Kids nowadays get bored at school. A teacher talking to dozens of kids and expecting them to transform those low pitched sound vibrations into interesting concepts in their heads, can you imagine? And learning math in particular is hard for many, including some of my cousins and sons and daughters of people I work with. So how can we make this process a bit less painful, while at the same time getting our hands into a cool HTML5 game framework?
HTML5 Mobile Game Development by Example – Educational Game
HTML5 Mobile Game Development by Example – Veggies vs Zombies

In this tutorial, we’ll be creating a simple mobile game to learn multiplication tables (or develop other math skills) in the form of a racing game. The main player will be a racing car (it really looks more like a dodgy G.I. Joe on a trolley, but you see where I’m going) that gains speed as you answer math questions correctly, and is to compete with other fake G.I. Joe dudes to reach the goal (represented by a 8 bit blonde).
Table of contents
The Requirements
We’ll be using the Quintus game development framework on this tutorial. This Open Source framework was created by Pascal Retig and is aimed for the creation of video games with JavaScript for mobile, desktop and beyond.
The requirements for this tutorial are the following:
- Familiarity with HTML, CSS, JavaScript and basic object oriented concepts.
- Clone or download Quintus from it’s Github page.
- Setup a local webserver. We need to run the code in this tutorial in a web server and not by just double clicking on the files. More on that later. WAMP for Windows, MAMP for Mac. On linux just type sudo apt-get install apache2.
- Have your favorite IDE ready (Netbeans, Eclipse, Sublime2, Notepad++, VIM, or any tool you use for coding).
- Crack your knuckles and start coding!
Create a new folder in your web server public folder (www folder in most cases), let’s call this new folder “racingmath”. In it, create the following sub-folders and empty files, and copy the JS files contained in Quintus/lib where shown:
racingmath/index.html
racingmath/data/
racingmath/lib/ —> copy the Quintus/lib JS files here
racingmath/images/
The Files
Download the source code and game assets in this link. Unless you wanna ruin the fun don’t look at the code just yet. Copy the content of /images and /data to their corresponding counterparts in your project though.
Image attribution:
Terrain tiles http://opengameart.org/content/minecraft-ish-platformer-tiles
Created by nkorth, thanks for the artwork!
license: CC-By 3.0
Tough guys tiles http://opengameart.org/content/skyriot-sprites
Created by freedomforge, thanks for the artwork!
license: CC-By-SA 3.0
Pixelated bunny chick http://opengameart.org/content/twelve-more-characters-3-free-characters-and-a-child-template
Created by Antifarea, submitted by CharlesGabriel. Thanks for the artwork!
license: CC-BY 3.0
The Framework
Quintus is a framework with a focus on simplicity and clear syntax. It grabs concepts from JQuery, Underscore JS and other HTML5 game frameworks. You don’t need to have experience using these libraries in order to get started with Quintus, although it would certainly be of help.
Some useful links for this framework:
- Quintus Github page. Before starting a new project make sure you are using the latest code. You can report bugs in this page. Also, like in other Open Source projects you can become an active contributor and add extra features.
- Quintus homepage. Take a look at the platformer example, the introductory guide and the annotated source code to get a feel of the basics.
- Google Plus Quintus community. If you have questions regarding the framework this is the place to ask. Also, as you become familiar with it you can respond other people’s questions as well.
The Basics
Before we get started with the actual game, I’d like to go through a few of the basic concepts when working with Quintus. These are covered in more depth in the intro guide at Quintus homepage.
1. Engine setup
You’ll always start your game by creating a new instance of the engine and including the modules that you want to use. There are some setup options as well that have to do with screen resolution. Running the following will initiate the engine and create a new canvas in your document. You can also specify your own canvas identifier:
var Q = Quintus()
             .include("Sprintes, Scenes, Input, 2D");
             .setup({width: 1000, height: 1000});
2. Classes
Quintus comes with it’s own implementation of John Resig’s simple JavaScript inheritance so that you can create classes and subclasses in the same way other OOP languages implement it.
//this will extend the class Q.SomeClass, creating a new class called Q.SomeSubClass
Q.SomeClass.extend('SomeSubClass', {
    greet: function() {console.log('Hello GameDevAcademy');}
}

//create an instance of Q.SomeSubClass
var subclass1 = new Q.SomeSubClass();
subclass1.greet() //"Hello GameDevAcademy" in your console
There are more core basic concepts in this framework but we’ll look into them as we need them in our game.
The Initialization
Enough talking! let’s get started with our educational game. Put the following content in index.html:
Inside the script tag let’s create our Quintus object and define which modules will be used in our math game:
var Q = Quintus()
            .include("Sprites, Scenes, Input, 2D, Touch, UI")
            .setup({
                width: 320,
                height: 480
            }).touch();
The modules that we’ll use in this game are:
- Sprites: provides all the functionality to work with sprites in the game canvas. We won’t have to deal with the canvas directly. Instead, we’ll work with the sprite objects in order to define their position, size and image files.
- Scenes: a scene here is basically a “layer” where you place sprites and read events and make stuff happen. When a scene goes live to the place that’s called “staging the scene”. You can have more than one scene staged at the same time, but they don’t interact directly with each other (for example having the scene game and an info scene showing the score and lives of the player
- Input: this module takes care of user input.
- Touch: this adds the support for touch screen devices. See how touch() was initiated after running .setup()
- 2D: this adds features that are common to 2D games such as support for tiles, gravity, collision detection and speed.
- UI: as the name suggests, this gives us a library of user interface elements such as buttons and input fields that get drawn on the canvas and we can use in our game
When you add a component in Quintus, that adds
The Assets
Instead of working with different image files for each character, terrain or item in our, Quintus allows us to create spritesheets that consist in an image file containing the sprites, and a json file with the coordinates and names of each sprite. Take a look at sprites.png and tiles.png in the folder /images, and the corresponding .json files in /data to see what I mean.
Creating these json files manually is ok for a small game. There is also an online tool you can use that makes the process easier. In addition, Quintus supports the tmx format from the Tiled map editor.
Let’s add the following code after our Q object definition to load these assets:
Q.load("sprites.png, sprites.json, level_collision.json, level_background.json, tiles.png", function() {
    Q.sheet("tiles","tiles.png", { tilew: 32, tileh: 32 });
    Q.compileSheets("sprites.png","sprites.json");

    //stage our scene here
});
By doing this our game will really start only after the assets have been loaded. This is a cool feature lacking in most game frameworks.
Regarding the actual json files:
- sprites.json:
keeps the info on the sprites present in sprites.png, including the main player, the enemies and the girl. See how the coordinates of each sprite are defined here.
- level_collision.json: the collision layer based off the tiles in tiles.png. Tiles count from zero on from left to right. The cells with zero won’t display any tile and won’t collide with anything. See how this is only including the ground and grass tiles.
- level_background.json: just a background based off the tiles in tiles.png. Tiles count from zero on from left to right. The cells with zero won’t display any tiles. See how this includes the sky and cloud tiles.
By using Q.sheet we are loading the asset tiles.png , which we can use later on for our collision layer and background.
Q.compileSheets what is does is read sprites.json and grab all the sheets present in sprites.png. They will be sheets just like “tiles” defined above in our game asset library.
Keep in mind that we haven’t really used any of this yet. The names I’ve used such as “level_collision” are arbitrary names and their behavior will be given by the objects we declare them in our scene.
The World
Our game will have to scenes that will be shown at the same time. A scene with the actual race and a scene with the math question and response area. Let’s begin with the race scene. Add the following after the Q object declaration:
Q.scene("level1",function(stage) {
    stage.collisionLayer(new Q.TileLayer({ dataAsset: 'level_collision.json', sheet: 'tiles', type: SPRITE_OTHER }));
    stage.insert(new Q.TileLayer({ dataAsset: 'level_background.json', sheet: 'tiles', type: SPRITE_NONE }));
});
This code will be executed once the scene “level1” is staged (brought to life basically). We define a collision layer which will load the grid from level_collision.json and will be represented by the tiles in the asset “tiles” (which we loaded into the memory previously). The “type” parameter has to do with collision detected and I’ll get into that in a bit.
We are also inserting another tile layer which will be a background as specified in the level_background.json. The tiles to be used as the same as before so we’ll also set the parameter “sheet” to our previously loaded asset. See how type here says “SPRITE_NONE”, which means the background won’t do collisions with other elements (we have to define this variable, we’ll do it shortly).
Regarding collision detection in Quintus (as provided by the 2D module), the way this works is as follows:
1. Say we have two sprites that include the 2D component. Each sprite has a “mask” and a “type”, which are numeric values.
2. If the type of one sprite “is included” in the mask of the other sprite, there is a collision.
3. When it comes to TileLayers like with the background or collision layer, they just have a type. Sprites such as the player or enemies will have a mask. That will define whether they collide or not.
4. Whether a type collides with a mask is defined by the result of the binary operator &. If you have no idea what I’m talking about I’ll give you a rule of thumb so that you can use this feature:
- Use only powers of 2 for the type and mask values: 2, 4, 8, 16, etc.
- If the type of one element equals the mask of the other, there is collision. If they are different (and powers of 2) there won’t ever be a collision.
- Use type = 0 for things that won’t collide, like the background.
Simple! right? OK define the following variables after the Q object definition:
//values for collision detection
var SPRITE_NONE = 0;
var SPRITE_RACER = 1;
var SPRITE_OTHER = 2;
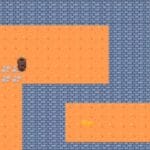
Righto, the world was promised and you are still not seeing any of it. Let’s fix that. Add the following code after the Q.compileSheets() statement in our asset loading section.
Q.stageScene("level1");
You should be seeing this now:

The Player
Let’s create a class for our player:
Q.Sprite.extend("Player",{
            init: function(p) {
              this._super(p, {
                  sheet: "player",
                  type: SPRITE_RACER,
                  collisionMask: SPRITE_OTHER
              });
              this.add('2d');
            },
        });
See how we are using the class inheritance model described previously. The init() method will call upon the parent’s method, which is the Q.Sprite object. We are passing it the sheet that we loaded from the json file, and the collision detection parameters: type and collisionMask. The player will only collide with objects that have a type SPRITE_OTHER or that have a mask of SPRITE_RACER.
After the init() method we give the player the component “2d”. Components are another core concept in Quintus, that allow to add some predefined functionality to an object. The 2d component will add gravity and collision detection. Since our player has a collision mask of SPRITE_OTHER and so does the floor, then the player won’t fall through it.
Now that we’ve defined the class we can create an instance in our scene initialization:
Q.scene("level1",function(stage) {
    stage.collisionLayer(new Q.TileLayer({ dataAsset: 'level_collision.json', sheet: 'tiles', type: SPRITE_OTHER }));
    stage.insert(new Q.TileLayer({ dataAsset: 'level_background.json', sheet: 'tiles', type: SPRITE_NONE }));

    //player
    var player = stage.insert(new Q.Player({x: 160, y: 112}));
    stage.add("viewport").follow(player);
});
This statement:
stage.add("viewport").follow(player);
Is part of the 2D module we’ve included in our game and will give us a “camera” that will follow the player wherever he goes in the level.
Would you like to give the player some speed? use the following if you want to see if move (remove it later):
var player = stage.insert(new Q.Player({x: 160, y: 112, vx: 30}));
The Rivals
The bad guys will work in a similar manner as the player. Create classes for them. See how they will operate an a similar way to the player, and how the rivals and the player will not collide with each other.
Q.MovingSprite.extend("Rival", {
            init: function(p) {
              this._super(p, {
                  type: SPRITE_RACER,
                  collisionMask: SPRITE_OTHER
              });
              this.add('2d');
            },
        });
We’ll create three rivals in our scene initiation and give them a random speed. Asset image sheets are grabbed from the json file we’ve been using:
//rivals
stage.insert(new Q.Rival({ x: 160, y: 112, sheet:'bluerival', vx: 40*Math.random()}));
stage.insert(new Q.Rival({ x: 160, y: 112, sheet:'purplerival', vx: 40*Math.random() }));
stage.insert(new Q.Rival({ x: 160, y: 112, sheet:'greenrival', vx: 40*Math.random() }));
The Girl
This is a race after all and there has to be a goal in it. After browsing for a while in Open Game Art I found an anime looking blonde and decided she’d be the goal for this pack of tired G.I. Joes on wheels.
If the player reaches her you win the game. If any of the rivals does so first you lose. Lets create the class:
Q.Sprite.extend("Girl", {
    init: function(p) {
      this._super(p, {
          sheet: 'girl',
          type: SPRITE_OTHER,
          collisionMask: SPRITE_OTHER
      });
      this.add('2d');

      this.on("hit.sprite",function(collision) {
          if(collision.obj.isA("Player")) {
            Q.stageScene("endGame",1, { label: "You Won!" });
            this.destroy();
          }
          else if(collision.obj.isA("Rival")) {
            Q.stageScene("endGame",1, { label: "Game Over" });
            this.destroy();
          }
      });
    }
});
See how we are checking the collision with “this.on”. This comes from an object called Evented. Using events in this manner is another core concept in Quintus. You can add and remove event listeners as follows:
srcObj.on("eventName",[ targetObj, ] [ callback ]);
srcObj.off("eventName",[ targetObj, ] [ callback ]);
It is possible to check if the object the girl collided with is a Player (or something else) using:
collision.obj.isA("Player")
See that upon collision we are staging a scene called “endGame”. This will be our game over scene and we have yet to define it. Let’s make it so that it’s just a dialog that shows the “label” parameter we are passing and allows you to play again. This will make use of some GUI elements from the UI module we loaded in our game:
Q.scene('endGame',function(stage) {
  var box = stage.insert(new Q.UI.Container({
    x: Q.width/2, y: Q.height/2, fill: "rgba(0,0,0,0.5)"
  }));

  var button = box.insert(new Q.UI.Button({ x: 0, y: 0, fill: "#CCCCCC",
                                           label: "Play Again" }))
  var label = box.insert(new Q.UI.Text({x:10, y: -10 - button.p.h,
                                        label: stage.options.label }));
  button.on("click",function() {
    window.location.reload();
  });
  box.fit(20);
});
The Math
Ok so far we have a bunch of dudes on wheels that leave you stranded once the race begins. The goal of the game was to learn how to multiply and we still haven’t got there. Time to catch up.
We’ll create a new scene (think of it as “layer”) that will show a question, an answer area and buttons with number so that you can type in the right answer. We’ll call this scene “calculations”. Let’s revisit our game initiation code:
Q.load("sprites.png, sprites.json, level_collision.json, level_background.json, tiles.png", function() {
  Q.sheet("tiles","tiles.png", { tilew: 32, tileh: 32 });
  Q.compileSheets("sprites.png","sprites.json");
  Q.stageScene("level1");
  Q.stageScene("calculations",1);
});
The “1” when we stage the calculations scene means this scene will go on top of level1, which has number 0 (default value). See how we used this in the endgame scene as well.
Our multiplication questions will have a min and max value, let’s define those as game level variables after the Q object definition using Q.state, which exists for the purpose of setting and getting game level values we wanna keep track off.
//configuration for math operations
Q.state.set({ operations_min: 0, operations_max: 10 });
Let’s create a class for the question area:
//question area
Q.UI.QuestionArea = Q.UI.Text.extend('UI.QuestionArea', {
    init: function() {
        this._super({
            color: "white",
            x: 0,
            y: 0
        });
    },
    generate: function() {
        this.p.num1 = Math.floor(Math.random() * Q.state.get('operations_max')) + Q.state.get('operations_min');
        this.p.num2 = Math.floor(Math.random() * Q.state.get('operations_max')) + Q.state.get('operations_min');
        this.p.label = this.p.num1+'x'+this.p.num2;
    },
    getAnswer: function() {
        return this.p.num1*this.p.num2;
    }
});
What we are doing is extend the Q.UI.Text class by adding some custom parameters and methods. generate() will create a new question based on the game level range. getAnswer() will just return the right answer to the current question.
We will now create the code for the “calculations” scene staging:
Q.scene("calculations",function(stage) {
//current question
var qContainer = stage.insert(new Q.UI.Container({
fill: "gray",
x: 221,
y: 325,
border: 2,
shadow: 3,
shadowColor: "rgba(0,0,0,0.5)",
w: 140,
h: 50
})
);
var question = stage.insert(new Q.UI.QuestionArea(),qContainer);
question.generate();
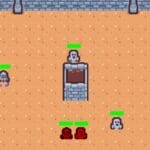
});
A new container is created an a question put in it. So far you should be seeing something like this:

The Race
All we have left now is to add the numbers to enter the answer and the area to show what’s being entered. Enter the following after
question.generate();
//are to show answer
var aContainer = stage.insert(new Q.UI.Container({
    fill: "#438700",
    x: 221,
    y: 385,
    border: 2,
    shadow: 3,
    shadowColor: "rgba(0,0,0,0.5)",
    w: 140,
    h: 50
    })
);

var answer = stage.insert(new Q.UI.Text({
        label: "",
        color: "white",
        x: 0,
        y: 0
      }),aContainer);
So far “answer” is empty, this is where we will add the numbers that the user types. Before getting into that I want to get the “submit” button out of way:
//submit answer
var aButton = stage.insert(new Q.UI.Button({
    fill: "white",
    label: "Enter",
    x: 221,
    y: 445,
    border: 2,
    shadow: 3,
    shadowColor: "rgba(0,0,0,0.5)",
    w: 140,
    h: 50
    },
    function() {
        var isCorrect = parseInt(answer.p.label) == question.getAnswer();
        question.generate();
        answer.p.label = '';
        var player = Q("Player",0).first();

        if(isCorrect) {
            player.p.vx += 10;
        }
        else {
            player.p.vx = Math.max(0, player.p.vx - 5);
        }
    })
);
So basically when we press this button, the value from the answer area will be read (blank for the time being!) and it will compare it to the right answer, which we get using the getAnswer() method defined previously.
Now for the numbers themselves.. we want to pass them the answer area on creation so that they can update it. Let’s create the class for them first which will have the functionality we’ve spoken about:
//answer button
Q.UI.AnswButton = Q.UI.Button.extend('UI.AnswButton', {
    init: function(p) {
        this._super(Q._defaults(p, {
            fill: "#FFFFFF",
            border: 2,
            shadow: 3,
            shadowColor: "rgba(0,0,0,0.5)",
            w: 40,
            h: 40
        }),
        function() {
            var currAnsw;
            if(this.p.answerLabel.p.label === '') {
                currAnsw = 0;
            }
            else {
                currAnsw = parseInt(this.p.answerLabel.p.label);
            }

            if(currAnsw < 1000000000) {
                this.p.answerLabel.p.label = ""+(currAnsw*10+parseInt(this.p.label));
            }

        }
        );
    }
});
And right after we created our “submit” button, add a loop to create a show all the number of the keypad:
//buttons
var i;
for(i=1;i<10;i++) {
    (function(i) {
        stage.insert(
            new Q.UI.AnswButton({
                label: i+'',
                y: 275+Math.ceil(i/3)*45,
                x: 30+parseInt((i+2)%3)*45,
                answerLabel: answer
                }
            )
        );
    })(i);
    stage.insert(new Q.UI.AnswButton({
                label: '0',
                y: 275+4*45,
                x: 30+45,
                answerLabel: answer
                }
            ));
}
Now the race is on!! Have a play and try to beat it! If it’s too easy for you adjust the parameters. Also you could modify this and extend it into a more complete game.

The Follow-up
You can download the source code of the game here.
Now what next? I’d recommend you have a play on your own with the code and get started with your own project as soon as you can!
Also you can check out my online course HTML5 Mobile Game Development for Beginners. A comprehensive guide to this topic using the LimeJS framework. We’ll cover the basics and get you up and running with several game demos, including farming games!