You can access the full course here: CREATE A 2D PLATFORMER WITH GODOT 4
Understanding how different game entities interact with each other is an integral part of developing engaging gaming experiences. In this tutorial, we’re going to delve into the topic of Godot collision detection and its applications in a simple 2D platformer game. We will walk you through the process of setting up an enemy character that moves back and forth on the screen and triggers a ‘game over’ event upon colliding with the player.
By the end of this tutorial, you will have a solid understanding of Godot collision detection, its importance in game development, and how to implement it in your own projects.
Table of contents
Course Files
Before we begin our Godot collision detection tutorial, make sure to download the project files to follow along with this tutorial:
Download Project Files HereCreating an enemy scene in a game is an important part of the development process. In this lesson, we will be setting up an enemy scene in a 2D game.
As you delve deeper into understanding Godot collision detection, a great resource to support your learning journey is the Godot 4 Game Development Mini-Degree. This comprehensive collection of courses not only provides a thorough grounding in collision detection, but also explores various aspects of game development like 2D/3D assets, player & enemy combat, item collection and much more. In addition to significantly speeding up your game creation process, it empowers you to build a portfolio of real Godot projects.

Creating the Enemy Scene
To start our Godot collision detection, we’ll first be creating an enemy to collide with.
The first step is to create a new node of type Area2D. This node will detect collisions and run an event in the code when another collider passes through it. You can rename this to Enemy.

We will then add a Sprite node as a child of the Area2D node. We will be using the character_0024.png sprite from our pack.

This will give the enemy a visual representation in the game. We can then rename the node to Sprite.

Next, we need to add a CollisionShape2D node to the enemy to give our Area2D a shape to check. This is the main powerhouse for our Godot collision detection.

Then set the Shape property to a new CircleShape2D.

Next, adjust its size to be slightly smaller than the Sprite.

This will allow the player to pass by the enemy without colliding with it but still set off a collision event.
Creating the Enemy Script
Next for our Godot collision detection setup, we’ll work on the enemy logic. With the Enemy node selected, create a new script.

This script will be named Enemy.gd and inherit from Area2D, as this is the Enemy node’s type.

This time we will keep the default functions, but we will add variables for the enemy’s move_speed, move_direction, start_position, and target_position.
extends Area2D

@export var move_speed : float = 30.0
@export var move_dir : Vector2

var start_positon : Vector2
var target_position : Vector2
- move_speed – The speed at which our enemy will move.
- move_direction – The maximum point our enemy will move to before moving back.
- start_position – The position the enemy starts in and will move back to.
- target_position – The position the enemy will move to and away from.
We have used the @export tag to make our variables visible to edit in the inspector.

With these variables, we can then set the start_pos and the target_pos in the _ready function.
func _ready():
    start_pos = global_position
    target_pos = start_pos + move_dir
We can now create the logic to move toward our target position. This will be done in the _process function, as it runs once every frame.
func _process(delta):
    global_position = global_position.move_toward(target_pos, move_speed * delta)
We will also need to check to see if we have reached our target position, and if we have, change the target position to the other way.
func _process(delta):
    ...

    if global_position == target_pos:
        if global_position == start_pos:
            target_pos = start_pos + move_dir
        else:
            target_pos = start_pos
This code will check to see if we have reached our target_pos, and then proceed to check if we are at the start_pos or not. If we are, we will change the target_pos to our move_dir value, if not, we want to move back to the start_pos.
We can now save this script (CTRL+S) and return to the 2D scene view.

Setting up our Enemy
To finish off our enemy for our Godot collision detection, let’s polish our setup in the engine.
We now need to set the Move Dir value we exported earlier, we will use the value (0, -50) to state move 50 pixels upward, you can of course change this value however you want.

If you now press Play, you will see the Enemy we created go up and down between its start position and target position.

You will notice, however, if you touch the enemy, it doesn’t yet call our game over function.
Godot Collision Detection
It’s finally time to handle our Godot collision detection itself. To do this, we will select the Player node and open the Node tab and select the Groups section.

We want to add our Player node to a group, this is like tagging our node and will let us know what type of node a collider is when one is detected by our Enemy. We will add a group to our Player named Player.

Next, with the Enemy node selected, choose the Signals section this time.

To add a signal to our Enemy, choose the body_entered signal and double-click it.

Then select our Enemy node in the list that appears and press Connect.

This will create an _on_body_entered function that will call when the signal is set off. The body parameter passed through the function is the object we have interacted with, so we want to check if this is the Player and call the game_over function if it is. We will do this with the following code at the bottom of the Enemy.gd script:
func _on_body_entered(body):
    if body.is_in_group("Player"):
        body.game_over()
Now if you save the script, and press Play you will see the player is reset when they touch the enemy, as intended.
Turning the Enemy into a Scene
Our Godot collision detection is ready, but our enemy is not really reusable here yet.
We need to save the Enemy node tree as a scene. This will allow us to drag in multiple instances of it into the game, and still be able to edit it globally. Do this by dragging the top Enemy node from the Scene tab to the FileSystem tab.

Then, save the scene as Enemy.tscn

You can now copy and paste the Enemy scene around the level and change the Move Dir and Move Speed to make differing enemies.

In the next lesson, we will be creating spikes, which will be another trap that the enemy must avoid.
Conclusion
Congratulations on completing this Godot collision detection tutorial! You have successfully created an enemy scene that moves between two points and triggers a game over event upon colliding with the player. Additionally, you’ve learned how to turn the enemy into a reusable scene that can be easily instantiated multiple times with different movement patterns and speeds.
Now that you have a basic enemy set up with Godot collision detection, you can further expand and improve your game by adding more complex enemy behaviors, new types of obstacles, and even power-ups for the player. With these newfound skills, you can continue to create more engaging and challenging games for your players to enjoy.
Are you keen on exploring more about Godot collision detection or building your own 2D or 3D games? Dive deeper with our Godot 4 Game Development Mini-Degree, a comprehensive collection of courses built to fast-track your mastery in Godot 4. From basic foundations to gameplay control flow and platformer mechanics, this Mini-Degree serves as an exceptional resource, enhancing your understanding about Godot’s full potential in game creation.
Did you come across any errors in this tutorial? Please let us know by completing this form and we’ll look into it! FINAL DAYS: Unlock coding courses in Unity, Godot, Unreal, Python and more.
Transcript
Welcome back everyone. In this Godot collision detection lesson, we are going to be setting up our enemy scene. Now the enemy scene is basically going to be similar to our player in the sense that it’s gonna be an object in our world and they are gonna be moving from one position to another. And if they get hit by the player, then that’s game over.
So to begin, what we are going to do is create a brand new node here, okay? And this is going to be off type area two D. Now an area 2D is basically a node which can detect collisions or detect when another collider has passed for itself. And then we can run the respective code, uh, for whatever we want to do.
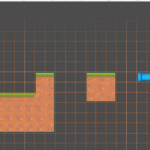
So we’ve got our area 2d, let’s rename this to be our enemy. Uh, we then need to give our enemy a visual so we can actually see where they are. So we’re gonna open up our Sprite folder characters and I am going to use this bat character right here so we can drag them in, make them a child of enemy, rename that node to be Sprite and said it’s transformed position to be zero on the X and zero on the Y. Now with our enemy here, we can move this over here just so it’s outta the way of our player.
And what we are then going to do is attach a collision shape because in order to have Godot collision detection, we need a collision shape. So we’re gonna go add child nerd collision shape 2d. This is going to be a circle shape, okay? And we can then change the size of that. So I’m just gonna make it a bit smaller than the Sprite so our player can pass by. Uh, just, and there we go. That’s all we need for our enemy node.
Now we need to create a script. So I’m gonna go over to the inspector. I’m going to create a brand new script called enemy gd. Make sure it inherits area 2D here. Click create. First of all, let’s go ahead and add in some variables.
So our first variable is going to be our move speed. And this is basically going to be how fast this uh, enemy is gonna be moving. It’s gonna be of type float, and it is going to be equal to, let’s just say 30 by default. Okay? So 30 pixels per second. We then want to have another variable for our move direction. And this is gonna be type vector two.
Now our move direction is gonna basically be in what direction and how far do we want this enemy to move before returning to its original position? Because if we go back into 2D mode here, I’ll show you what I mean. Basically with our enemy, it’s gonna have a starting position. So let’s just say it’s here and then we’re gonna have a move direction. Now let’s just say our move direction is up by about a hundred pixels.
Okay? It’s going to be up around here. So what’s gonna happen is at the start, it’s gonna move along that until it reaches its start position plus move direction and then return to start position. Then along that move direction again, then back to start position, okay?
And we can basically have that wherever we wish. Um, now these values are of course gonna be different for each instance of our enemy. You know. One enemy, we all might want to move faster than another. We might want to have a different move direction from one another. So in order to modify these values in the inspector, we need to export them. And to do that we just need to add in the export like so in front of each of these variables. And now if we save that and look in the inspector, you should see we have a move speed and a move direction property.
Now along with these variables, we also need a variable for our start position, which is gonna be off type vector two. Um, we’re not gonna be exporting this since we’re gonna be modifying it in code. Same thing for our target position. Okay?
So our start position is gonna basically be the starting position of the enemy and the target position is going to be where the enemy is gonna currently be moving towards. So down here in the ready function, which gets called right at the start of the game, we are gonna set our start position by going start pause equals global position.
And then we also want to set our target position. So target position to be equal to our start pause plus our move direction. Okay? Like, so now that we have this setup, what we can do is down here in the process function, we can move towards our target position every frame because the process function gets called on a frame by frame basis.
So to move towards our target position, we are going to go global position equals global position dot move toward. Now we want to move toward our target position at a rate. So we can go comma at a rate of our moose speed multiplied by delta.
Now the reason why we are multiplying by delta is because since this function gets called every single frame, that means that we are moving towards our target at move speed, okay? And if we didn’t have the delta here, that means we would be moving towards our target at 30 pixels, uh, per frame and multiplying that by delta basically converts that into 30 pixels per second. And since process can fluctuate, you know, from maybe 10 F Ps all the way up to a couple hundred F Ps, um, you know, it can be all over the place.
If you’re running on a slower machine, then the enemy would move slower. If you’re running on a faster machine, the enemy will move faster. Multiplying by delta just makes it consistent.
So we have that. Now what we need to do is we need to go ahead and basically check to see if we have reached our target position. So if global position is equal to our target position, then what we want to do is basically switch them around so we can then check if global position equals our start position. If so, then we want to set our target position to be equal to our start position plus move direction. Otherwise, what we want to do is we order set our target position to be equal to our start position. Okay?
Now we have a couple of statements here and it might be a bit confusing, but pretty much what we are doing here is making it so that once we have arrived at our target position, we’re gonna check to see if, first of all, is this our original start position? If so, then we want to move along our move direction. Otherwise, if we are at the end of our move direction, we want to move back to our start position. And what this means is that we are basically going to be moving back and forth between those two points.
So let’s save this, let’s go back into our scene here and we’ll just set up a nice simple uh, enemy movement. So we have our enemy here, move direction, I’m gonna set the Y to B. Uh, we’ll go negative 50. So that basically means our enemy is going to be moving up 50 pixels then back down to where it started. So let’s press play and see if it works. And as you can see, our enemy moves up 50 pixels and then back down to its start position, then back up 50 pixels, then back down to its start position, okay?
And that is just gonna be looping over and over. But as you can see, our enemy can hit us and it does nothing because we don’t have our Godot collision detection. So what we need to do is make it so that when the enemy collides with our player, it is going to call that game over function.
Now, to do this, we first of all want to select our player. We are going to go into where we have the node window here next to inspector select groups and we want to add our player toy new group. Now a group is basically like tagging the object and this just allows us to quickly identify, you know, what sort of node this is.
So I’m gonna add player right here, click add. And now our player node has the player group. So what we can do of this is if we go back into our script, select our enemy script, um, we need a way of detecting when a collision has happened, when the enemy has entered another body. Now, to do that, we can select our enemy node here, we can then go over to the node window once more, but select signals and in signals here we have a bunch of them.
And a signal is basically a function call for when a certain event happens. And we want to go over to where we have the body entered right here. So we wanna double click on that, select our enemy, click connect, and we should have a new function that gets added to our enemy script called on body entered. And it has a parameter here of type body. Now body is basically the object that we have, um, interacted with. And what we want to do is check to see if this body is the player.
So how do we do that? Well, we can check it’s group. So here I’m gonna go. If body.is in group of player, then what we wanna do is just go body.game over, okay?
Just like that. So on body entered gets called when, um, another object has entered our collision. Shape. Um, and that is the object of body here. And we are basically checking to see if that body is in the group player. And if so, then we are calling its game over function. So if we save this press play, we should see that if we run into the enemy here, wait for it to come down, there we go.
We can even jump into the enemy and it is just going to restart the level just as it does if we fall off the edge of the map. So now what you can do is go ahead and just start adding in all of these enemies throughout the level.
You can have some going up and down left and right at different speeds. Um, yeah, you can do pretty much whatever you want with that. But before you do that, make sure to drag your enemy down into the file system to save it as a scene, okay? Because now it is a scene, we can copy and paste this around. And any changes we make to the original scene here, those changes will be applied to every instance of the enemy. In the next lesson, we are gonna be working on setting up our spikes, which are gonna be another trap that the player has to avoid.
So thanks watching this Godot collision detection tutorial and I’ll see you all then.
Interested in continuing? Check out our all-access plan which includes 250+ courses, guided curriculums, new courses monthly, access to expert course mentors, and more! This includes our Godot 4 Game Development Mini-Degree which helps you learn Godot 4 from scratch all the way to industry-ready developer.