You can access the full course here: CREATE AI NPCS WITH GODOT 4 AND CHATGPT
Welcome to an in-depth Godot ChatGPT tutorial where we will delve into the exciting world of using Godot Engine to create a versatile chatbot featuring artificial intelligence (AI). We are going to build patterns that allow communication between Godot and the OpenAI API servers, allowing you to receive responses from AI, thus building an interactive dialogue.
These skills can form the basis of different applications – whether you just want to create some nifty Godot plugins or want to implement ChatGPT for NPC dialogue in your game proper. To join us in this intriguing journey, we hope you are well-acquainted with:
- GDscript — The native language of Godot
- Working with Godot’s user interface, such as adding nodes, scripting, and saving scenes
Also, if you want to learn these topics of Godot ChatGPT in detail, you can review our full course, Create AI NPCs with Godot 4 and ChatGPT which covers these concepts more in-depth.
Table of contents
Project Files
The project files associated with this Godot ChatGPT tutorial will be of great help while you’re walking through the tutorial. However, we strongly recommend setting up your own Godot project and following along as you practice creating your AI chatbot!
Download Project Files Here
API Request – Part 1
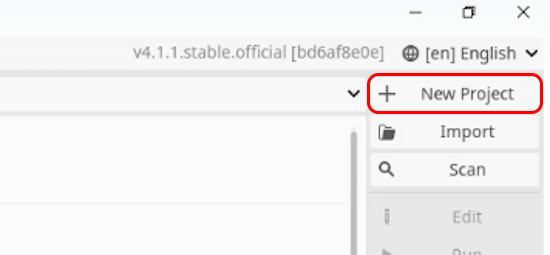
In this first part of our Godot ChatGPT tutorial, we will begin setting up our Godot project and start making the systems required to make HTTP Requests. To start this lesson, open the Project Manager window by running Godot. Here, we can press New Project.
This will open the Create New Project pop-up window. Here we can give the project a Name, such as ‘GodotNPCAI’, and a Project Path defining where Godot should store the project on your computer.
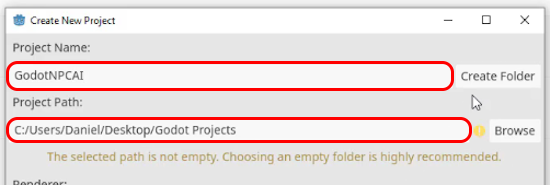
If the path you choose isn’t empty, Godot will display a warning on the screen, to fix this, select the Create Folder button to add a new folder to store the project in.

We can then select the Create & Edit button to generate the new Godot project.

Creating the Main Scene
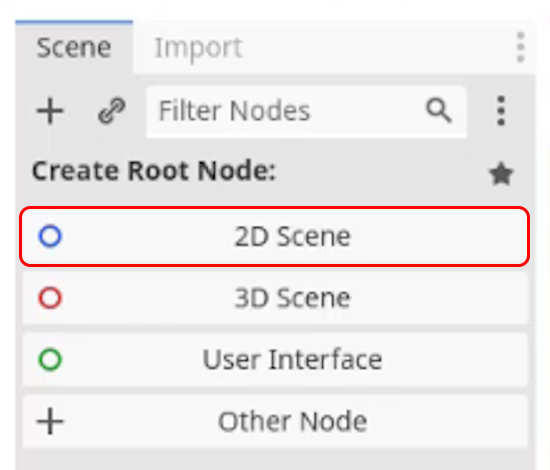
Once in the Godot ChatGPT project, we need to create the Main scene, in which our game will take place. This game will use 2D art, so for this project, we will select 2D Scene as the root node of our Scene. If you want to create a 3D game, the systems we will be creating will be very transferable. However, for this course, we will be focussing on 2D.
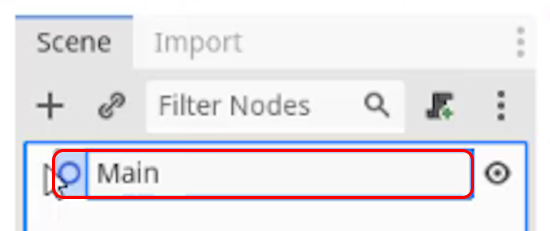
We can then rename the root node of this scene to ‘Main’ to make it easily identifiable.
Finally, we can save this scene (CTRL+S) as ‘main.tscn’.

We can set this as the main scene for Godot to use by pressing the play button in the top-right corner. This will bring up a pop-up window asking you to select a main scene, we can choose Select Current to select the Main scene that we have just created.

This will load the game window into our Main scene, which can them be closed.
Making API Requests
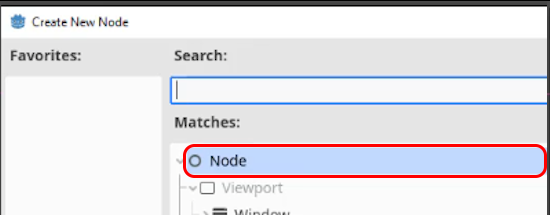
We are now ready to start making HTTP Requests to the OpenAI servers (i.e. the core part of Godot ChatGPT). The first step will be to create a node to handle our requests. As this node will not need to have a presence in the game world, we can make a basic Node type.
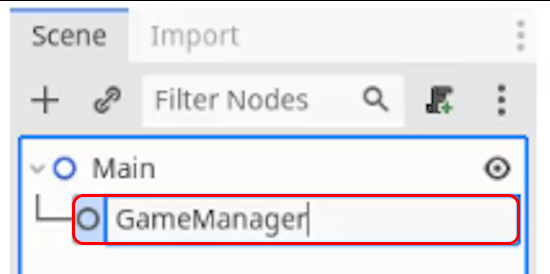
This can then be renamed to ‘GameManager’.
With this node selected, in the Inspector window, we can choose to create a New Script.
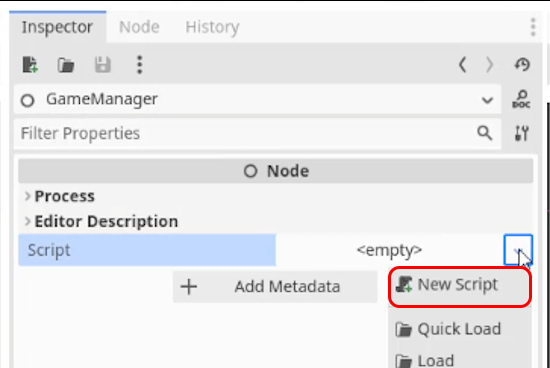
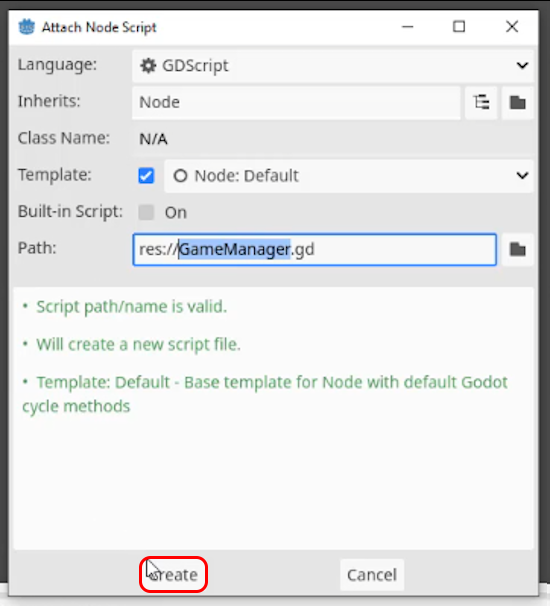
This can be called ‘GameManager.gd’ and then we can press Create.
We can begin by deleting the _process function, as this won’t be needed for this script, and then we can begin defining some variables. The first will be called ‘api_key’ and will store the Open AI secret key that we created in the previous lesson. This will be of type String and will have a default value of the secret key that you saved in the previous lesson.
var api_key : String = "sk-D3SBp..."
The next variable will store the URL used for accessing the OpenAI server. This is needed for directing the HTTP Requests to the correct destination (otherwise our Godot ChatGPT project won’t work at all). This variable will be called ‘url’, be of type String and have a default value of ‘https://api.openai.com/v1/chat/completions’.
var url : String = "https://api.openai.com/v1/chat/completions"
We will also use some variables to define the HTTP Request properties that will be needed. The first will be called ‘temperature’ and will be of type float. As mentioned in the Project Overview lesson, this variable will define how consistent or creative the AI is. We will set a default value of 0.5 to place the AI somewhere in the middle, although this can be tweaked later down the line as necessary.
var temperature : float = 0.5
The next variable will define the ‘max_tokens’ and will be an int with a default value of 1024. As mentioned previously, this is effectively the maximum input we will give to the AI, although we likely will not change this value.
var max_tokens : int = 1024
We will also need a variable called ‘headers’. When making HTTP Requests, we generally want to send over some additional background information to help the server understand the request. These are headers, which we will define as an array using square brackets. This array will contain the default values: “Content-type: application/json” and “Authorization: Bearer ” + api_key. These will make sure that the server knows that we will be using the JSON format to send data, and the API key to authorize the user for our Godot ChatGPT project.
var headers = ["Content-type: application/json", "Authorization: Bearer " + api_key]
We will also need a variable to define the ‘model’ of the AI. This will have a type of String and a default value of ‘gpt-3.5-turbo’ which is the GPT AI model that we will be using in this course.
var model : String = "gpt-3.5-turbo"
As mentioned in the Project Overview, we also need a variable called ‘messages’ to keep track of the messages we send to and from the AI server. We will give this a value of an empty array by default. Remember, if we don’t keep track of each message, we won’t be able to give the AI the context of the conversation that it may need.
var messages = []
Finally, we will make a variable called ‘request’ that is of type HTTPRequest. We will use this value to hold the Godot ChatGPT API requests that we are sending to the server.
var request : HTTPRequest
We can then create a new HTTPRequest node in the _ready function, and assign it to the request variable.
func _ready():
    request = HTTPRequest.new()
    add_child(request)
This will create a HTTPRequest node and add it to the scene tree as a child of the GameManager node. We then need to connect a function to this HTTPRequest, so that when the server sends data back, Godot can call this function. We will first create a new function called ‘_on_request_completed’. This function will need four parameters: result, response_code, headers, body.
func _on_request_completed(result, response_code, headers, body):
    pass
Here we temporarily place the pass keyword as we will add code to this function in the next lesson. We can now assign the request_completed signal of the request variable to the _on_request_completed function.
func _ready():
    ...
    request.connect("request_completed", _on_request_completed)
In the next part of our Godot ChatGPT tutorial, we will use this code to begin sending and receiving data to and from the server.
API Request – Part 2
In this next part of our Godot ChatGPT tutorial, we are going to finish implementing the GameManager script, allowing us to finally communicate between Godot and the OpenAI API Servers. Previously we set up every variable we will be needing, along with creating a HTTPRequest node that we saved in the request variable. We also implemented the code to call the _on_request_completed function when data is received from the AI server.
Sending Dialogue
Currently, we have nothing to send between our game and the OpenAI API. To fix this in our Godot ChatGPT project, we will first implement a new function that will be called when the player wants to say something to an NPC. This will be called ‘dialogue_request’ and have a parameter of player_dialogue.
func dialogue_request(player_dialogue):
Inside of this function, we will need to perform a number of steps. The first step is to add our new message from the player to the messages array. We can do this using the append function.
func dialogue_request(player_dialogue):
    messages.append({
        "role": "user",
        "content": player_dialogue
    })
Rather than adding our player_dialogue message straight into the messages array, instead, we add a new object that contains two values:
- role – Our first value is the role, which we define as user to tell the GPT AI model that this is a message from the player. Messages from the server will have a role of system.
- content – The second value in the object is the content, which we set as player_dialogue as it stores the actual message data.
The next step is to create the body of our HTTPRequest. This will contain each of the variables that we need to pass to the AI server to get the correct output. We will be doing this using a JSON format as defined in our headers variable. We will use the stringify function here, to turn the JSON object into a string that can be sent in the request.
func dialogue_request(player_dialogue):
    ...
    var body = JSON.new().stringify({

    })
We can then fill this JSON object with the relevant variables that we defined previously.
func dialogue_request(player_dialogue):
    ...
    var body = JSON.new().stringify({
        "messages": messages,
        "temperature": temperature,
        "max_tokens": max_tokens,
        "model": model
    })
This will make sure our body variable has all of the information we need to send to the AI server. The final step for the dialogue_request function is to send the request to the API.
func dialogue_request(player_dialogue):
    ...
    var send_request = request.request(url, headers, HTTPClient.METHOD_POST, body)
Here we pass through every required parameter to the request object, we also set the request’s method to post which means we are sending data to the API. This should all work, however, we will want to also check if there was an error sending the request. This can be done by checking whether the send_request variable is anything other than OK, which would mean an error has occurred.
func dialogue_request(player_dialogue):
    ...
    if send_request != OK:
        print("There was an error!")
Receiving Messages
Now that our player can send messages in our Godot ChatGPT project, we need to handle responses from the AI server. This will be done in the _on_request_completed function which we connected to the request object previously. We can begin by removing the pass keyword as it is no longer needed. We will parse the body parameter of the response into a JSON object.
func _on_request_completed(result, response_code, headers, body):
    var json = JSON.new()
    json.parse(body.get_string_from_utf8())
We can then convert this json object into a new variable called response containing the json’s data.
func _on_request_completed(result, response_code, headers, body):
    ...
    var response = json.get_data()
Finally, we can extract the message from this response. By default, OpenAI returns a list of messages called ‘choices’, we will select the first (0th) element from this list, and take the message content from this.
func _on_request_completed(result, response_code, headers, body):
    ...
    var message = response["choices"][0]["message"]["content"]
For now, we can just print this message to the Output window.
func _on_request_completed(result, response_code, headers, body):
    ...
    print(message)
Testing
We have now set everything up to communicate between Godot and the OpenAI servers. To test this, we can easily call the dialogue_request function from the _ready function. Here we can ask it anything, as if we were talking to ChatGPT.
func _ready():
    ...
    dialogue_request("Explain the Godot engine in 20 words.")
When you press play, after a couple of seconds you will now see the AI’s response to your message in the Output window.
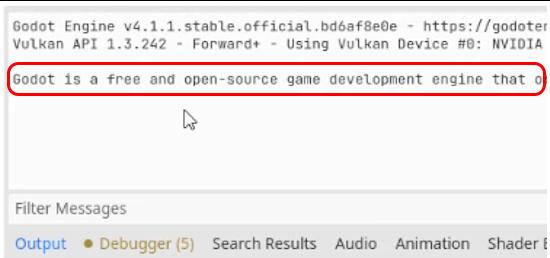
You can then try changing this to ask different questions and see the AI’s response in the Output window. In the next lesson, we will begin connecting this to a dialogue box for use in our game.
Godot ChatGPT Wrap-Up
Congratulations on making it to the end of this comprehensive Godot ChatGPT tutorial! Now you have successfully crafted a chatbot capable of having a dialogue with users powered by artificial intelligence. This intriguing feature can enrich your game development projects by integrating an interactive AI into it.
However, the journey does not end here. The Godot ChatGPT chatbot you have come up with provides a constructive bedrock for advanced explorations. You can enhance its functionality, improve its logic, or even introduce new features to it. The possibilities are boundless!
If you are keen on mastering more topics related to game development, Zenva offers a wide array of online courses to choose from, ranging from creating RPGs, FPS games, to VR and many more.
This tutorial has been a great step in your development journey, and we hope you discovered and learned a lot in the process. Keep the zeal of coding up, and be ready to create wonders in your upcoming game development adventures!
Did you come across any errors in this tutorial? Please let us know by completing this form and we’ll look into it! FINAL DAYS: Unlock coding courses in Unity, Godot, Unreal, Python and more.
Transcript – API Request – Part 1
Welcome back everyone. In this Godot ChatGPT lesson, we are going to begin setting up our Gado project. So here I am in our project manager and we are going to go ahead and create ourselves a brand new project. So I am going to go ahead and just call this one. Let’s just say our gado N P C ai. Okay? We can then choose a project path, click on the create new folder to create a new folder in that path, and then we can click create and edit to start up the editor and begin creating our project. So here we are inside of Gado.
The first thing we’re going to do is create our root scene here, and this is going to be of type two D because we are making a sort of top down pixel two D game where we can walk around and talk with NPCs. Although if you do want to make this three D, you can of course do that. The overall dialogue system is pretty interchangeable of two D and three D and any other sort of type of game you want to create. So I’m just going to click on two D scene here.
I am going to rename the node two D to be main because that’s what I generally like to do with these. We can then save this and we’re just going to save it as main tsc N k. So our scene is saved. We can click on the play button at the top right corner, click select current so it loads into this scene every time we click play, and we can then of course see our game right here. So we’ve got that all set up. Now what we can do is start making some requests, okay, because we want to start talking to our Godot ChatGPT ai.
Now to do this, we are going to go ahead and create ourselves a brand new script, but we first of all need a node to attach that to. So I’m going to go over to our scene view here, going to click on the plus and we are going to create a new node. Now, this node isn’t really going to have a presence in the world, so it can just be a base node right here, create that. I’m going to rename it to be game manager.
And then what we can do is then we can go over to the inspector here, go over to our script property, click on the little arrow, and we are going to create a brand new script for our game manager called as You Guess game manager. So we’ll create that here, and here we go.
So now inside of our code, what are we going to do? Well, first of all, we’re going to delete the process function since that is not going to be needed for this course, okay? We only really need the ready function that is already laid out in the base script here. And then what we’re going to do is we’re going to create a number of variables. Now we are going to have quite a few variables because we do need these to keep track of the different parameters we might want to tweak in our Godot ChatGPT project.
So first of all, we’re going to have a variable for our api key. So I’m just going to go API key. This is going to be of type string. So we’re going to define the type of string, and this is going to be equal to of course a string. Now this is going to be the a p I key that we just created before. So I’m going to paste that in right here. There we go.
Then what we’re going to need is we are going to need a U R L. Now the U R L is the actual website U R L link that we are going to be sending our A P R request to, because in Gadot we are going to use something known as a H T T P request. That’s basically where we can send something to a server to a website and then wait until we get a response back. Okay? So in order to do that, we need a U R L to send our things to. So we’re going to have uur L of type string. This is going to be equal to https slash slash api.
Then what we’re going to do is we’re going to have a variable for our temperature. This is going to be of type float, and we’re going to have this at around 0.5. Now, temperature basically just defines how consistent or sporadic you want your AI generations to be. So for our dialogue, if you’re noticing thats it’s either a bit cookie cutter or a bit too crazy, you can adjust this value back and forth from zero to one in order to fine, we’re just going to keep it at 0.5 for now. That’s about the middle ground.
We then need a variable for our max tokens, which is going to be an int, and this is going to be 1024. And a token is basically like a character or a word, and this is basically the maximum maam amount that we can use with the ai, but we’re probably not going to be exceeding this. So then what we’re going to do is when to create a variable for our headers.
Now, when you are making requests to an A P I, generally you want to send over some information that is more metadata, more information that’s in the background that it just needs to know, and we need two things. So we’re going to go equals, we’re going to create a new array here, and we’re going to have two things in our array. First of all, we’re going to have a string, and this one is going to be content dash type.
Then what we’re going to do is we are going to have a variable for our messages, which is going to be equal to an empty array, and a message is pretty much going to be either something that we send to the AI or something that the AI sends back. Now, the reason why we need to keep track of all of our messages is because when it comes to the open AI models, whenever we make a request, we need to send all of our chat history over to it because otherwise it won’t remember unless we ourselves are keeping track of it and send it all over.
So that is why generally the more and more messages you send to the Godot ChatGPT ai, the sort of slower it gets that is because each time you are sending a message, you are sending the entire chat history over, and that of course keeps growing the more messages you send. So we’ve got that.
Now what we need to do is we also need to go ahead and create another variable for our request, and this is going to be of type H T T P request. This is a node inside of gado, and this is basically the node that is going to manage all of the sending information to the A P I and receiving it and then telling us when we have received it. So we can then do something with that.
And down here inside of the ready function, which gets called right at the start of the game, we are going to create that request. So to do this, we’re going to go request equals http request. So we are connecting a signal to a function, okay? Very similar to if you go into the node panel here and connect these signals, it’s basically the same thing, but we’re doing it inside of a script.
So next up, then what we need to do is we need to connect this H T T P request so that when it has received information, we have a function call because right now it’s not really doing anything. So we’re going to go down here and create a new function called on request completed, and this is going to have four parameters, results, response code, headers, and body, and we’re just going to chuck in a pass right here just so it’s empty for now.
And then up here inside the ready function, what we’re going to do is we are going to go request connect. The signal that we want to connect is going to be request completed. So when we have received something from the A P I, this signal is going to be called and we want to connect it to the on request completed function. Okay? So there we go. So whenever we send something with our A P I and we get a response, this function down here is going to be called, and then we can read, okay, what do we get in response?
So in the next Godot ChatGPT lesson, we’re going to be continuing on with this and we’re going to actually begin sending and receiving information. So thanks for watching and I’ll see you all then in the next lesson.
Transcript – API Request – Part 2
Welcome back everyone. In this Godot ChatGPT lesson, we are going to continue on with our script right here and we are going to set it up so that we can finally send a request to the open AI servers and get a response back. So in the previous lesson, we set up all of our variables. We basically created our HTTP request node and set it up so that once we receive information from whatever request we are making, this function down here gets called.
So now what we’re going to do is we are going to create a function that we want to call whenever we want to basically send some dialogue over. So whenever we want to talk to the API, this is the function that we’re going to call and we are going to call it the function, dialogue request and we’re sending over a player dialogue parameter here. Inside of this function, we need to do a number of things alright?
First of all, we’re going to create ourselves a new message and add it to our messages array. Because remember, whenever we want to talk to the Godot ChatGPT AI, we need to send over all of our previous messages as well. And to do that, we’re going to first of all begin by adding a new message to that list, which is the current one. So for this, we’re going to go to messages append. We’re adding in a new element to the array here. We’re going to create two squiggly brackets like this, and we’re going to have two values inside of this object.
The first one is if we create a string, we’re going to say the role. And this colon is going to be equal to the user. Now let’s actually make it so it’s a bit easier to see this. There we go, the user. And then we’re going to have content, which is going to be our player dialogue.
So what we’re doing here is we are basically adding a new object to our messages array here. And that object contains two values. It contains a value called role, which is equal to the user and a value of content which is equal to whatever we are sending over here as a parameter. Now role, this is basically the user, so this is us saying something and when we get a response from the server, it will also send back a message and that message will have a role of the system and the content will be whatever the AI is saying back to us.
So we’re basically creating our little text box that we are sending over in a way. Then what we need to do is we need to create the body of our Godot ChatGPT request. This is basically what’s going to contain our messages, the temperature, the max tokens, the API model that we want to use. We’re basically compiling a lot of our variables here into a body that we are then going to send over through the request.
So here I’m going to create a variable called body, and this is going to be equal to JSON new. String offi. Okay? Add a squiggly bracket here and open that up.
Now what we’re doing with this line here is we are basically making it so that all of the objects and the values that we add inside of this body, they are going to get turned into a JSON format. Because when we are talking to the AI, we need to send over our values and our requests in a JSON format. And this is basically what’s going to do that automatically for us.
So in here we can go something such as messages, okay, sending over the messages, you can then go to a new line here. The next thing we need to send is our temperature. So temperature, make sure all of this is also spelled correctly because it is going to be needed in order for the AI to understand what we actually want from it. So temperature, we can then send over our max tokens, max tokens. And finally, we want to send over the model that we want it to use.
So model like so. and there we go. So we are creating our message, we are adding it to the messages array. We are then creating the body of our request, which is sending, which is basically compiling our messages, temperature, max tokens, and model.
Now what we need to do is actually send this request off. And to do that we’re going to create another variable here and we’re going to call this one, we’ll call it send request equals we’re going to access that request HTTP request node that we created up in the ready function request. And for this function, we need to give our Godot ChatGPT request a few things.
First of all, the URL. So we’ll send over the URL variable. We need to give it the headers. So we already have that headers variable, so we’ll send that over. We then need to send over the method. So what type of request is this? And as you can see, there are a large number of different types of requests we can make. Some of these might be getting, some of these might be deleting things, but for us, we want to be posting. And posting basically means we are sending something over. So method post, then what we want to do is send over the body and that is pretty much it.
So Godot is then going to automatically set this all up for us. It’s going to communicate with the Godot ChatGPT server. The server is then going to send our response back, and we need to make sure that this response is valid because if it’s an error, we probably want to know. So I’m going to go to a new line here, and we are just going to go if send request doesn’t equal. Okay? So basically if this is anything, but okay, then we want to know. So we’re just going to print and we’re just going to go, there was an error, okay? So if this is not working, we’re going to be sending an error.
Now what we can do is we can go down to our on request completed function. So if this request that we are sending here is successful and we receive information back, then that means this function is going to be called and inside of this function, we can actually then see what the AI has responded. So in here, what we’re going to do is we’re going to delete the pass, and what we’re going to do is we’re going to create a variable called json. This is going to be equal to JSON new. We will create a new object there, we’re then going to parse the information that we got from the server.
And remember this comes as a JSON format. So we need to convert that from JSON into something that we can easily access and work with. So, we’re going to then go to json parse, and what we want to parse is going to be our body. So that’s one of the parameters. Get string from UTF eight.
So basically what we’re doing here is we are just getting the string. The string, which is basically the compressed, compacted JSON format. We are then going to convert that into something that we can access. So then what we want to do, we can create a variable here called response equals json get data. Then what we can do finally is get the message that we got as a response.
So variable message equals is going to be our response. Now this Godot ChatGPT response is an array of objects in it. So the first one we want to do is response. We then want to get our choices out of all the different choices. We want to get the first one. So the first element in our choices array is going to be zero. Then we want to get the message and then in that message, we want to get the content, and that is going to get the message that the AI has sent to us.
And then what we can do is we can just print it out. So print message. So, okay, so we have this all set up. Now how do we actually go about testing it out? Well, pretty much we just need to call the dialogue request function. So inside of the ready function, what I’m going to do is after we’ve set up our HTTP request node, I’m just going to call the dialogue request and let’s just ask it something, okay. So we can just talk to it as if we are talking to an AI.
So I’m just going to go here, explain the Godot engine in 20 words, save that, and if we press play, we should see after a couple of seconds over here in the output, something get printed. So I’m going to press play.
And if we look down here inside of the output, you’ll see it says Godot is a free and open-source game development engine. And yeah, it basically explains that because it is responding to our request. So you can see that it doesn’t indeed work. We can change this around. We can say, for example, how do I get a node in GD script? Save that press play. Just as if you’re talking to chat g. It’s basically the exact same thing as instead though we are talking to it inside of our Godot game, which is really cool.
So as you can see down here in the output, it of course sends that information back. And there we go. So we’ve got the ability to start to communicating with the API connecting and talking to Jet GPT, but we don’t want to do just that. We want to basically connect this to a game so that we can talk through NPCs and have them respond in the way that an NPC would respond.
So how do we get from this to that? Well, in the next Godot ChatGPT lesson, we are going to look at setting that up. We’re going to create our dialogue box. We’re going to set up some NBCs. We’re going to set up N P C rules, dialogue rules, N B C, different personalities, descriptions of what they look like, where they are, and all this other contextual stuff that is going to create some fully fleshed NPCs that you can add to your games.
So thanks for watching and I’ll see you all then in the next Godot ChatGPT lesson.
Interested in continuing? Check out our all-access plan which includes 250+ courses, guided curriculums, new courses monthly, and more!
