You can access the full course here: DEVELOP A CASUAL COIN COLLECTOR GAME IN GAMEMAKER
Table of contents
Introduction
Discover the secrets to crafting a delightfully engaging GameMaker casual game that players will love and can’t stop playing!
In this guide, we will learn how to create and manage coins in a GameMaker casual game project, covering their implementation from basic setup to advanced effects. By the end of this series, you will have mastered coins as a gameplay element, complete with dynamic spawning, animations, and particle effects! You’ll also have a fantastic feeling mechanic that can be inserted into any kind of casual game – adding goals and progression!
This tutorial assumes you have a basic understanding of GameMaker, including familiarity with creating sprites, objects, and using the GameMaker interface. You can also explore our full course, Develop a Casual Coin Collector Game in GameMaker which covers these concepts in-depth.
Let’s get started!
Project Files
To help you follow along, we’ve included all the necessary assets used in this tutorial. Feel free to download and use them for your project: GameMaker Casual Game Assets

Coin – Part 1
In the first part of our GameMaker casual game tutorial, we’ll start off with making the coins themselves.
Creating the Coin Sprite and Object
First, we need to create the coin sprite and object. Follow these steps:
- In the sprites folder, right-click and select Create > Sprite. Name it spr_coin.
- Import the coin image into the sprite. Since the coin has only one frame, there’s no need for additional animations.
- Set the origin to Middle Center to make positioning easier.
- Next, create a new object in the objects folder. Right-click and select Create > Object. Name it obj_coin.
- Assign the spr_coin sprite to the obj_coin object.
Adding a Collision Event
The main functionality of the coin involves its collision with the player. Here’s how to set it up:
- In the obj_coin object, add a Collision event with the obj_player.
- In the collision event, we’ll update the player’s coin count and check if the level should be incremented.
Initializing Variables
Before we handle the collision, we need to initialize some variables in the obj_player object’s Create event:
level = 1;
level_coins_collected = 0;
total_coins_collected = 0;
Handling the Collision Event
Now, let’s handle the collision event in the obj_coin object. In this event, we want to increase both our coin variables. We’ll then check if the number of coins collected in the level matches our current level number. If so, we’ll increase the level and reset the coins counter for the level (but not the total for the whole game). Also, we’ll want to destroy the coin object.
obj_player.level_coins_collected += 1;
obj_player.total_coins_collected += 1;

// Should the level be increased?
if (obj_player.level == obj_player.level_coins_collected)
{
    obj_player.level += 1;
    obj_player.level_coins_collected = 0;
}

instance_destroy();
Creating the Coin Spawner Function
To spawn coins at the beginning of the game and after each level, we’ll create a function called spawn_coins in the obj_player object:
function spawn_coins()
{
    for (var _i = 0; _i < level; _i++)
    {
        var _coin_margin_x = 50;
        var _coin_margin_y = 150;

        var _coin_x = random_range(_coin_margin_x, room_width - _coin_margin_x);
        var _coin_y = random_range(_coin_margin_y, room_height - _coin_margin_y);

        instance_create_layer(_coin_x, _coin_y, layer, obj_coin);
    }
}
Explanation of the Coin Spawner Function
The spawn_coins function uses a for loop to spawn a number of coins equal to the current level. The coins are positioned randomly within the room, with margins to ensure they are visible and not overlapping with the user interface.
- _coin_margin_x and _coin_margin_y define the margins to keep the coins within the visible area.
- _coin_x and _coin_y are the random positions for the coins, calculated using the random_range function.
- instance_create_layer creates a new coin instance at the calculated position.
Coin – Part 2
In this next part of our GameMaker casual game tutorial, we will continue working on the `spawn_coins` function. We have already created the `coin_margin` and `coin_x` variables. Now, we will define the `coin_y` variable and instantiate the coin objects.
Defining the `coin_y` Variable
The `coin_y` variable will determine the vertical position of the coins. Similar to `coin_x`, we will set a minimum and maximum value for `coin_y` to ensure the coins are placed within the screen boundaries with some margins.
- The minimum value for `coin_y` will be `coin_margin_y`. This ensures that the coins are not placed at the very top of the screen.
- The maximum value for `coin_y` will be `room_height – coin_margin_y`. This ensures that the coins are not placed at the very bottom of the screen.
Here is how you can define `coin_y`:
var _coin_y = random_range(_coin_margin_y, room_height - _coin_margin_y);
Instantiating the Coin Objects
Now that we have both `coin_x` and `coin_y`, we can instantiate the coin objects using the `instance_create_layer` function. This function requires the x and y coordinates, the layer, and the object to be created.
Here is how you can instantiate the coin objects:
instance_create_layer(_coin_x, _coin_y, layer, obj_coin);
Adding the Spawn Call
If you haven’t done so already, make sure to call the spawn coin function during the collision event for the player so we can see it in action:
obj_player.level_coins_collected += 1;
obj_player.total_coins_collected += 1;

// Should the level be increased?
if (obj_player.level == obj_player.level_coins_collected)
{
  obj_player.level += 1;
  obj_player.level_coins_collected = 0;

  obj_player.spawn_coins();
}

instance_destroy();
Randomizing Coin Positions
You may have noticed that the coins appear in the same positions every time you play the game. This is because the random number generator uses the same seed every time. To fix this, we can use the `randomize` function to generate a new seed every time the game starts.
Add the `randomize` function to the `Create` event of the `obj_manager` object:
randomize();
Now, the coins will appear in different positions every time you play the game.
Complete `spawn_coins` Function
Here is the complete `spawn_coins` function with the changes we made in this part of our GameMaker casual game guide:
function spawn_coins()
{
    for (var _i = 0; _i < level; _i++)
    {
        var _coin_margin_x = 50;
        var _coin_margin_y = 150;

        var _coin_x = random_range(_coin_margin_x, room_width - _coin_margin_x);
        var _coin_y = random_range(_coin_margin_y, room_height - _coin_margin_y);

        instance_create_layer(_coin_x, _coin_y, layer, obj_coin);
    }
}
With these changes, the coins will now spawn at random positions within the screen boundaries, with some margins at the top and bottom. Additionally, the coins will appear in different positions every time you play the game.
Take your GameMaker skills to the next level with our GameMaker Academy learning pathway. Featuring hands-on projects, expert-designed courses, and 24/7 access, you’ll be industry-ready in no time.
Coin Particles
For the next part of our GameMaker casual game tutorial, we are going to be implementing the coin particles. To create them, we will go inside the `obj_player` and in the `Create` event, we will declare the different variables that particle systems need to work.
Setting Up Particle Systems
Particles need two things: first, a particle system that you create, and second, a particle type that you create. The particle type is what you actually modify. It’s like the particle asset that you create in which you modify the shape, size, etc.
particle_system = part_system_create();
particle_type = part_type_create();
Modifying the Particle Type
Let’s start by modifying the particle type. There are lots of things that we can modify. For example, we may want to modify the particle type shape. When you type this, you will see that there are dozens of methods that you can use to modify your particle type. In all of these kinds of methods, you first provide the particle type and then the different parameters that you want to modify.
Setting the Shape
For the shape, you would do `part_type_shape` and here you have tons of shapes that you can use. In this case, we will use a star because it does look quite interesting.
part_type_shape(particle_type, pt_shape_star);
Setting the Lifetime
After doing this, we will also set up the lifetime of the particle. We will provide the particle type and the lifetime. You can provide a minimum and maximum. We will make sure that all our particles live for the exact same time to make the effect constant.
part_type_life(particle_type, 50, 50);
Setting the Size
Next, we will modify the particle type size. You have more things that you can modify, not only the minimum and the maximum. The minimum will be something like 0.3 and the maximum 0.5. Then you also have the sizeInker and the sizeWiggle. The Inker allows us to determine how much the particle should increase or decrease in terms of size over time. Here, we want to keep our size always constant, so both of these parameters are just going to be zero as we don’t want to be modifying the size over time.
part_type_size(particle_type, 0.3, 0.5, 0, 0);
Setting the Speed
We will also want to modify the speed of the variable. For the minimum speed, we will provide two, and for the maximum three. For the speed incur and speed wiggle, once again zero because we want to keep it constant. We don’t want to be randomizing it or adding and subtracting over time.
part_type_speed(particle_type, 2, 3, 0, 0);
Setting the Direction
In terms of the direction of the particle, we want to provide a minimum direction of zero and a maximum direction of 180. This will create some kind of explosion effect emitted in some kinds of circle or line like this as if it were half of a circle. That would actually look quite good once we see it. Once again, we can provide the anchor and wiggle, so for both, we will just put zero as we want to keep it constant.
part_type_direction(particle_type, 0, 180, 0, 0);
Adding Gravity
We also want to add gravity to our particles so they fall down to the ground when they’re emitted. As in real life, if you drop an object, it is going to fall down. So here we want to do the same thing, but with particles.
Once they are emitted, we want them to fall, so we will provide a particle type and provide the gravity amount. We’ll set the gravity amount to be 0.35. Then, we have to provide the gravity direction. We want to make our gravity go down – and in GameMaker (as we have explained) 270 degrees is down. This means that the direction here should also be 270.
part_type_gravity(particle_type, 0.35, 270);
Setting the Alpha
We also want to modify the alpha of it. You will realize that you have three possible functions. In this case, `part_type_alpha2` will allow you to set a start alpha and an end alpha. So, it’s going to allow you to change the transparency of the particle over time. We want to start off our particle at an alpha of one, basically full transparency, and as time goes by, we want to decrease it until zero so that it can’t be seen.
part_type_alpha2(particle_type, 1, 0);
Setting the Color
Finally, we can also provide a color for it. In this case, we will use `part_type_color_mix` which takes two colors and will basically blend them. We will provide color one for example `c_red` and color two `c_blue` so we will always have colors going between the red and the blue.
part_type_color_mix(particle_type, c_red, c_blue);
Emitting the Particles
After creating all this, we will need to emit this particle when there is a coin collision. You will provide a particle system, the position, the particle type, and the number of particles to spawn. In this case, we want our particles to spawn at the current x and y, and we’ll spawn 10.
part_particles_create(particle_system, x, y, particle_type, 10);
Cleaning Up Particles
Finally, it’s essential to implement a cleanup event to effectively manage particle systems and prevent memory leaks. This involves using part_system_destroy and part_type_destroy, especially when the game is restarted. Even though this project is small and may not encounter immediate issues without these lines of code, adhering to this practice ensures better performance and resource management in larger projects with more complexity and particle usage.
part_system_destroy(particle_system);
part_type_destroy(particle_type);
That’s it for our particles!
Coin Animation
In this final part of our GameMaker casual game guide, we’re going to create a coin animation in GameMaker. Animations in GameMaker are called sequences. Let’s dive into the process step-by-step.
Creating a New Sequence
To start, we need to create a new sequence. Here’s how you can do it:
- Right-click in the GameMaker interface.
- Select Create.
- Choose Sequence.
- Name the sequence
seq_coin.
Setting Up the Sequence
Once you have created the sequence, you will see a new interface. This interface is easier to use than it may seem. Here’s what you need to do:
- In the track panel, select the coin sprite.
- You can now animate the coin using the GameMaker animation tools.
Defining the Animation Effect
Before we start animating, it’s important to have a clear idea of what effect we want to create. In this case, we want to:
- Scale in the coin.
- Change its transparency to fade it out.
Adding Parameter Tracks
To achieve the desired effect, we need to modify the properties of the sprite. Specifically, we need to modify the scale and the color (for transparency). Here’s how:
- Click on Add Parameter Track.
- Add the Scale track.
- Add the Color Multiply track.
Setting Keyframes
Keyframes are the different points that will be used to create the animation. Here’s how to set them:
- At the beginning of the animation (frame 0), create a new keyframe for both the scale and color multiply tracks.
- At the end of the animation (frame 60), set the final values:
- Change the alpha value to modify the transparency.
- Change the scale to 200 in both axes to make the coin bigger.
- Key these values to create the animation.
Adjusting the Animation Speed
If the animation is playing too slowly, you can adjust the frames per second (FPS). For example, you can set it to 175 FPS to make the animation play faster.
Implementing the Sequence in the Game
Now that the sequence is finished, we need to implement it in the game. Here’s how:
- Create a new assets layer and rename it
Sequences. - Place this layer behind the retry button layer so that the animated coin is not displayed on top of the retry button.
Playing the Sequence
We want to play this sequence when the coin is collected. Here’s the code to do that:
layer_sequence_create("Sequences", x, y, seq_coin);This code creates the sequence at the current x and y position of the coin. Here’s the full context of where this code should be placed:
obj_player.level_coins_collected += 1;
obj_player.total_coins_collected += 1;

// Should the level be increased?
if (obj_player.level == obj_player.level_coins_collected)
{
    obj_player.level += 1;
    obj_player.level_coins_collected = 0;

    // Reset health
    obj_player.current_health = obj_player.max_health;

    part_particles_create(obj_player.particle_system, x, y, obj_player.particle_type, 10);

    obj_player.spawn_coins();
}

layer_sequence_create("Sequences", x, y, seq_coin);

instance_destroy();
With this, you have successfully created and implemented a coin animation sequence in GameMaker. This adds a layer of visual effects to the game, making it more engaging for the player.
GameMaker Casual Game Wrap-Up
Congratulations on completing this GameMaker casual game tutorial! You now have a complete understanding of implementing coins in a GameMaker project. From creating the basic coin sprite to advanced features like random spawning, animations, and particle effects, you’ve built a versatile coin system for your game.
But don’t stop here! Consider enhancing your casual game further by adding sound effects, integrating coins with a scoring system, or designing a shop where players can spend their coins. The possibilities are endless – as our the ways in which you can use coins in games!
If you want to continue expanding your skills, check out other tutorials and resources on Zenva, such as the comprehensive GameMaker Academy learning pathway. This pathway has courses covering topics like RPGs, strategy games, and more – all geared to helping you expand your skills with hands-on projects!
We hope you’ve enjoyed this journey and wish you the best in your game development adventures!
Did you come across any errors in this tutorial? Please let us know by completing this form and we’ll look into it! FINAL DAYS: Unlock coding courses in Unity, Godot, Unreal, Python and more.
Transcript – Coin – Part 1
Hello there and welcome to a new lesson. In this one, we’ll start off with the coins. First, in the sprites folder, I will right-click, create a sprite, and name it SPR coin. Then, I will also create the corresponding OBJ coin.
Fortunately, the sprite does not have more animations. We can simply import the coin image, as it consists of only one frame, so no animation is required, unlike the player. I will set the origin to the middle center, which simplifies positioning.
Next, let’s load this sprite into the corresponding object. The main functionality of the coin will revolve around its collision with the player. When the player collides with the coin, certain actions need to occur. I’ll add a collision event with the player object. Before implementing further actions, I need to define some variables. First, the level variable will start at 1. Another variable, levelCoinsCollected, will start at 0 and track the coins collected in the current level.
For example, in level one, the count might start at 0 and increment as coins are collected. Once the level is completed, the counter resets to 0 for the next level. Additionally, there is a totalCoinsCollected variable, which accumulates the total number of coins collected across all levels and does not reset.
In the coin’s collision event, if the player collects a coin, the levelCoinsCollected and totalCoinsCollected variables will increment by 1. Next, I’ll check if the level is completed by comparing levelCoinsCollected with the current level number. If they match, it indicates the level is complete, so the level increments, and levelCoinsCollected resets to 0. The coin instance is then destroyed.
To test this functionality, we need coins in the game. For this, I’ll create a coin spawner function, which I’ll call at the game’s start and after a level is completed. The number of coins to spawn will equal the current level number. For instance, one coin for level one, two coins for level two, and so on.
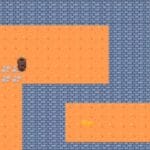
Using a for loop, I’ll iterate as many times as the level value to spawn coins. The coins’ positions will be randomized but confined within the game room, with margins to ensure they are visible to the player. Margins will also avoid overlapping with the user interface at the top. For x and y coordinates, I’ll use random ranges between the margins and the room boundaries, ensuring proper placement.
This system ensures coins are appropriately spawned and visible to the player. We’ll refine and expand upon this in the next lesson.
Transcript – Coin – Part 2
Hi there, and welcome to a new lesson. In this one, we are going to continue with the spawn coins function. We have already created the coins margin, the coin margin (sorry), and also the coin x. Now, we have to define the coin y. I will create it over here, and it’s going to be quite similar to coin x. The minimum value for it is going to be coin margin y. Instead of being zero, which would be at the top, it’s going to be coin margin y—maybe something like here.
The maximum value should be the room height, which will be at the bottom, minus the coin margin. This way, we leave some space between the actual bottom of the screen and the margin we are stipulating. The maximum is going to be the room height minus coin margin y.
Finally, after doing all this, I have to actually instantiate the coin. To do this, you write instance_create_layer. First, you provide the x, which is the coin x variable we’ve just created. For y, we use coin y. Then, for the layer, I will just use the layer for the current layer (in this case, the instance’s layer). That’s fine because the player is already there. Finally, the coin is going to be obj_coin.
Now, when we click play, we can go ahead and collect this coin. In level three, we get three coins; then we get four coins, and so on. As you can see, we never get coins super spaced out. Something you can do to try this out is to increase the condition. For example, if you want 100 coins, you can spawn 100 coins and observe the margins we have created. You would also be able to play around with the margins and adjust them as we want.
Remember, we are leaving a bigger space on the top because we have some text displaying there. For now, we just have to make sure that the condition is correct.
Something else you may have noticed is that when we play, the first coin, at least in my session, appears at the bottom right, and the other two are in different positions. If we play again in different game sessions, you will see that you get the exact same results even though they are being randomized. This happens because every coin is being associated with the same point each time. To avoid this, there is a super easy function called randomize.
The randomize function should be added to the create event, so as soon as the game starts (or at least the game room), it sets the seed to a random value. The seed determines the values generated for every random operation. By randomizing the seed in every single game session, you will always get different results. Now, when you play, you’ll notice different positions for the coins each time.
For instance, in one session, the first coin might appear at the bottom left. In another session, it might be slightly higher on the screen. In a third session, it might appear in a completely different position.
As you can see, the results are always changing. By the way, in one session, I got two coins because one of the coins was instantiated exactly at the center where my player collided with it. However, this is not something that will always happen.
With this, the lesson is finished.
Transcript – Coin Particles
Hello there, and welcome to a new lesson! In this one, we are going to be implementing coin particles. To create them, I will go inside the obj_player and, in the create event, declare the different variables that particle systems need to work. Over here, I will create them. Particles, in order to be created correctly, need two things: first, a particle system that you create exactly like this, and second, a particle type that you create like this.
The particle type is what you actually modify. It’s like the particle asset you create in which you modify the shape, size, etc. The first thing we have to do is to modify this particle type, and there are actually lots of things we have to do. For example, we may want to modify the particle type shape. When you type this, you will see that there are dozens of methods to modify your particle type.
In all of these methods, you first provide the particle type and then the parameters you want to modify. For the shape, you would use pt_shape. There are many shapes you can use, but in this case, I will use a star because it looks quite interesting.
After setting the shape, I will also set up the particle’s lifetime. You can provide a minimum and maximum lifetime. To ensure all particles live for the exact same time, I will set both the minimum and maximum values to the same amount. This keeps the effect constant so that every time the particles are emitted, their lifetime is uniform. If not, some particles might live longer, and others shorter, leading to inconsistent effects.
Next, I will modify the particle type size. For the size, you can adjust the minimum and maximum values, which I will set to 0.3 and 0.5, respectively. There are also parameters like sizeIncr and sizeWiggle, which determine how much the particle size changes over time. However, I want the size to remain constant, so both of these parameters will be set to zero.
I will also modify the particle speed. For the minimum speed, I will use 2, and for the maximum speed, 3. Similar to the size parameters, I will set speedIncr and speedWiggle to zero to maintain a constant speed. Then, for the direction, I will provide a minimum direction of 0 and a maximum direction of 180. This creates an explosion effect as if the particles were emitted in a semicircle. Again, I will keep the directionIncr and directionWiggle parameters at zero.
Additionally, I want to add gravity to my particles so that when emitted, they fall to the ground. To do this, I will set a gravity amount of 0.35 and a gravity direction of 270 degrees, which points downward in GameMaker.
I will also modify the particle’s alpha, which controls transparency. Using the alpha2 function, I can set a starting alpha of 1 (fully visible) and an ending alpha of 0 (completely transparent) to make the particle fade out over time. Finally, I can define the particle’s color. By using color_mix, I can blend two colors, such as red and blue, to create dynamic and interesting visuals.
After creating the particle with all these properties, we need to emit it during a coin collision. To do this, I will call part_particles_create, providing the particle system, the coin’s current X and Y coordinates, the particle type, and the number of particles (e.g., 10). Now, when we collect a coin, these amazing particles will appear, adding a lot of visual dynamism to the game.
Lastly, it is essential to clean up the particles. In the cleanup event, I will destroy both the particle system and particle type using part_system_destroy and part_type_destroy. This ensures good memory management and prevents memory leaks, especially in larger projects where many particles and systems might exist. While this project is small and wouldn’t face errors without these lines, it’s always a good practice to clean up resources.
With that, the particles are finished, and so is this lesson.
Transcript – Coin Animation
Hi there, and welcome to a new lesson! In this one, we’re going to create the coin animation. Animations in Game Maker are called sequences, so we have to create a new one. I will right-click, select “create,” and then choose “sequence.” I’ll name this one seq_coin. We’re introduced to a new interface, but it’s actually easier than it seems. In the track panel, I select the coin sprite, and here I can animate it easily using Game Maker’s animation tools.
When creating an animation, it’s essential to have a clear idea of what you want to achieve. In this case, I want an animation that scales in the coin while simultaneously changing its transparency, eventually fading it out. With this effect in mind, I need to modify the properties of the sprite, specifically its scale and transparency (color).
To begin, I click on “add parameter track” and add the scale track, then do the same for “color multiply.” At the beginning of the animation, on frame zero, I key the initial values by creating a new keyframe for both parameters. Keyframes act as base points for creating the animation.
The animation is set to last 60 frames at 60 FPS. At the 60th frame, I modify the transparency (alpha) and scale it to 200 in both axes to make the coin bigger. I key these new values and play the animation. Initially, I encounter some issues with keyframes not working correctly, so I delete and recreate them. After some adjustments, the first frame is set to 100 and the second frame to 200, ensuring the animation works as intended.
The animation plays slowly, so I increase the FPS to 175, making it much faster. With the sequence completed, it’s time to implement it in the game. I add a new layer, an assets layer, and rename it seq_coin. This layer is placed behind the retry button layer to ensure the animated coin doesn’t overlap the button.
The animation will play when the coin is collected. Before destroying the instance, I create the sequence using the layer_sequence_create function. This function requires the layer ID (the layer we just created), the x and y positions (current x and y of the coin), and the sequence (seq_coin).
Now, not only do we have the amazing particle effects, but also a visually appealing animation that plays whenever a coin is collected. Together, these effects enhance the visual quality of the game remarkably!
Interested in continuing? Check out our all-access plan which includes 300+ courses, guided learning pathways, new courses monthly, and more!