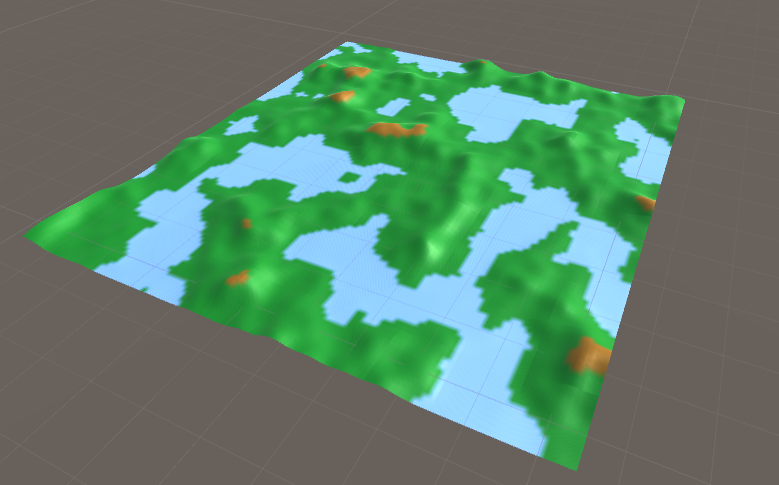
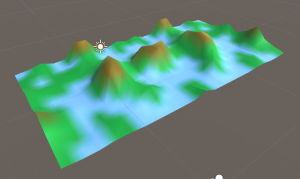
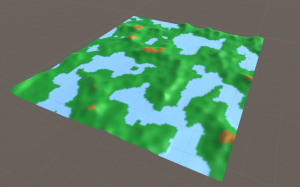
In this tutorial series, we are going to dive into Unity procedural generation for creating levels. For the first part of the tutorial, we are going to use pseudorandom noise to generate height maps and choose terrain types according to the height in each part of our level. In the next tutorials, we are going to assign biomes for each part of the level and in the end, we are going to generate a level map object that can still be manually edited according to the game needs.
This tutorial series takes inspiration from, and expands on techniques presented by Sebastian Lague, Holistic3D and this GDC talk on procedural generation in No Man’s Sky.
Rest of the series: part 2, part 3.
Looking for Unity procedural generation on 2D maps instead? Check out this article here instead!
Table of contents
Unity Procedural Generation Files & Requirements
In order to follow this tutorial, you are expected to be familiar with the following concepts:
- C# programming
- Basic Unity concepts, such as importing assets, creating prefabs and adding components
If you’ve never touched Unity before, Zenva’s Unity Game Development Mini-Degree is a comprehensive resource that can play a pivotal role. This Mini-Degree includes in-depth course material on how to optimize and procedurally generate terrain, among other essential game development aspects, proving to be a valuable tool in your Unity toolkit. By understanding Unity’s vast capabilities explored in this Mini-Degree, you can also create compelling games and applications, just like top game developers around the world.
You can download the tutorial source code files here.
Before starting to read the tutorial, create a new Unity project. If you’re new to Unity, we recommend checking out some beginner-friendly Unity courses first.
Generating noise
In order to construct levels with Unity procedural generation, we are going to use noise functions in our code. A noise function is basically a function that generates pseudorandom values based on some input arguments. By pseudorandom it means the values look random, despite being algorithmically generated. In practice, you can see this noise as a variable, which can be used as the height, temperature or moisture values of a level region. In our case, we are going to use it as the height of different coordinates of our level.
There are different noise functions, but we are going to use a specially popular one called Perlin Noise. You don’t need to fully understand Perlin Noise, since Unity provides an implemention it and makes it easy for our purposes of Unity procedural generation. What I’m going to explain in this tutorial is how you can use it in your code.
So, let’s start by creating a script we are going to generate a noise map. First, create a new script called NoiseMapGeneration. This script will have a function called GenerateNoiseMap, which will receive as parameters the map height, map width and a scale. Then, it will generate a matrix representing a noise map, with the noise in each coordinate of the level.
For each coordinate, we generate the noise vaue using the Mathf.PerlinNoise function. This function receives two parameters and generate a value between 0 and 1, representing the noise. Notice that we are going to use the x and z axes to access the level coordinates, while the y axis will be used to change the height of our level in a given coordinate. So, the parameters for the PerlinNoise function will be the x and z indices divided by the level scale. In practice, the level scale parameter acts as a zoom parameter in the level. In the end, it returns the noise map.
public class NoiseMapGeneration : MonoBehaviour {

	public float[,] GenerateNoiseMap(int mapDepth, int mapWidth, float scale) {
// with the mapDepth and mapWidth coordinates
float[,] noiseMap = new float[mapDepth, mapWidth];
for (int zIndex = 0; zIndex < mapDepth; zIndex ++) {
for (int xIndex = 0; xIndex < mapWidth; xIndex++) {
// calculate sample indices based on the coordinates and the scale
float sampleX = xIndex / scale;
float sampleZ = zIndex / scale;
// generate noise value using PerlinNoise
float noise = Mathf.PerlinNoise (sampleX, sampleZ);
noiseMap [zIndex, xIndex] = noise;
}
}
return noiseMap;
}
}Now we need some way to visualize this noise map. What we are going to do is creating a Plane GameObject to represent a tile in our level. Then, we can show the generated noise values by painting the tile vertices according to their corresponding noise values. Again, this noise can represent anything you want, such as height, temperature, moisture, etc. In our case, it will represent the height of that vertex.
This said, if you truly want to master Unity procedural generation, we encourage you to play around with different scenarios.
Creating level tile
Next for our Unity procedural generation, we’ll create a tile that takes on our noise.
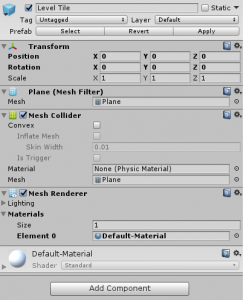
Let’s start by creating a new Plane (3D Object -> Plane) object called Level Tile. This will create the object below, already with a Mesh Renderer, which we are going to use to show the noise map.
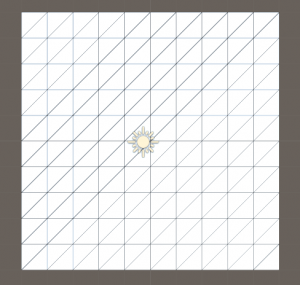
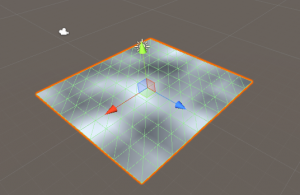
Before showing the noise map in the tile, it is important that you understand how a Plane mesh looks like. The figure below shows the a Plane created in Unity along with its Mesh. Notice that the mesh vertices are not only the four Plane vertices. Instead, the Mesh contains several intermediate vertices that are connected inside the Plane. Basically, what we are going to do is using each one of those vertices as a coordinate for our noise map later. This way, we can assign a color to each vertex (which will be a height later) according to each generated noise value.
This is something important to understand for procedural generation, as the density of your vertices can vastly affect how smooth your terrain transitions are.
Now, we create the following Script called TileGeneration. This script will be responsible for generating a noise map for the tile and then assigning a texture to it according to the noise map (a big portion of our Unity procedural generation). As this noise map will be used to assign heights to each vertex, from now on I’m going to call it a height map.
First of all, notice that the script has the following attributes:
- noiseMapGeneration: the script which will be used to generate the height map
- tileRenderer: the mesh renderer, used to show the height map
- meshFilter: the mesh filter component, used to access the mesh vertices
- meshCollider: the mesh collider component, used to handle collisions with the tile
- levelScale: the scale of the height map
Basically, in the Start method it will call the GenerateTile method, which will do all this stuff. The first thing it does is calculate the depth and width of the height map. Since we are using a square plane, the number of vertices should be a perfect square (in our case, the default Unity Plane has 121 vertices). So, if we take the square root of the number of vertices, we will get the map depth and width, which will be 11. Then, it calls the GenerateNoiseMap method with this depth and width, as well as the levelScale.
public class TileGeneration : MonoBehaviour {

	[SerializeField]
	NoiseMapGeneration noiseMapGeneration;

	[SerializeField]
	private MeshRenderer tileRenderer;

	[SerializeField]
	private MeshFilter meshFilter;

        [SerializeField]
        private MeshCollider meshCollider;

	[SerializeField]
	private float mapScale;

	void Start() {
		GenerateTile ();
	}

	void GenerateTile() {
                // calculate tile depth and width based on the mesh vertices
		Vector3[] meshVertices = this.meshFilter.mesh.vertices;
		int tileDepth = (int)Mathf.Sqrt (meshVertices.Length);
		int tileWidth = tileDepth;

                // calculate the offsets based on the tile position
		float[,] heightMap = this.noiseMapGeneration.GenerateNoiseMap (tileDepth, tileWidth, this.mapScale);

                // generate a heightMap using noise
		Texture2D tileTexture = BuildTexture (heightMap);
		this.tileRenderer.material.mainTexture = tileTexture;
	}

	private Texture2D BuildTexture(float[,] heightMap) {
		int tileDepth = noiseMap.GetLength (0);
		int tileWidth = noiseMap.GetLength (1);

		Color[] colorMap = new Color[tileDepth * tileWidth];
		for (int zIndex = 0; zIndex < tileDepth; zIndex++) {
			for (int xIndex = 0; xIndex < tileWidth; xIndex++) {
                                // transform the 2D map index is an Array index
				int colorIndex = zIndex * tileWidth+ xIndex;
				float height= heightMap[zIndex, xIndex];
                                // assign as color a shade of grey proportional to the height value
				colorMap [colorIndex] = Color.Lerp (Color.black, Color.white, height);
			}
		}

                //
create a new texture and set its pixel
 colors
		Texture2D tileTexture = new Texture2D (tileWidth, tileDepth);
		tileTexture.wrapMode = TextureWrapMode.Clamp;
		tileTexture.SetPixels (colorMap);
		tileTexture.Apply ();

		return tileTexture;
	}
}
After generating the height map, the script will call the BuildTexture method, which will create the Texture2D for this tile. Then, we assign this texture to the tile material.
The BuildTexture method will create a Color array, which will be used to create the Texture2D. Then, for each coordinate of the height map, it will choose a shade of grey based on the height value. We can do this by using the Color.Lerp function. This function receives as parameters two colors (in our case black and white) and a float value between 0 and 1 (in our case the noise value).
Then, it chooses a color between the two ones selected according to the float value. Basically, the lower the height, the darker will be the color. In the end, it creates a Texture2D using this Color array and returns it.
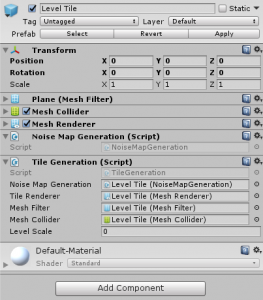
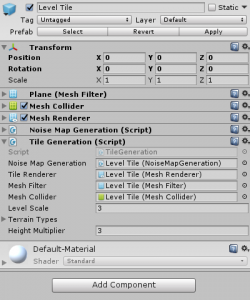
Now that the TileGeneration script is complete for our Unity procedural generation, we add both our scripts to the Level Tile object.
And then, we can try playing our game to visualize the height map. The image below shows a height map generated using a scale of 3. Hint: it is easier to visualize the tile if you switch back to the Scene view after starting the game. This way you can easily move the camera to see tile by different angles.
Assigning terrains types
Our next step is to assign terrain types (such as water, grass, rock, mountain) to different height values for our Unity procedural generation to be what we want it to be. Also, each terrain type will have a color associated with it, so that we can add colors to our Level Tile.
First, we need to create a TerrainType class in the TileGeneration Script. Each terrain type will have a name, height and color. Also, we need to add the [System.Serializable] tag before the class declaration. This will allow us to set the TerrainType attributes in the editor later. Finally, we are going to add another attribute to the TileGeneration Script, which will be an Array of TerrainTypes. Those will be the available terrain types for our level.
[System.Serializable]
public class TerrainType {
	public string name;
	public float height;
	public Color color;
}

public class TileGeneration : MonoBehaviour {

        [SerializeField]
	private TerrainType[] terrainTypes;

}
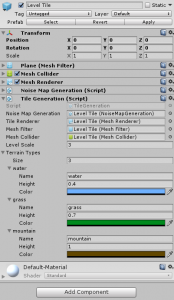
Then, we can set the terrain types for the Level Tile in the editor. Those are the terrain types I’m going to use. You can set them as you prefer, but it is important that the terrain types are in a ascending order of height values, as this will be necessary soon.
Now let’s change the TileGeneration script to use those terrain types to assign colors to the tile. Basically we are going to change the BuildTexture method to, instead of picking a shade of grey for the color, we are going to choose a terrain according to the noise value (using a ChooseTerrainType method). Then we assign the terrain type color to that level tile coordinate.
private Texture2D BuildTexture(float[,] heightMap) {
		int tileDepth = heightMap.GetLength (0);
		int tileWidth = heightMap.GetLength (1);

		Color[] colorMap = new Color[tileDepth * tileWidth];
		for (int zIndex = 0; zIndex < tileDepth; zIndex++) {
			for (int xIndex = 0; xIndex < tileWidth; xIndex++) {
				// transform the 2D map index is an Array index
				int colorIndex = zIndex * tileWidth + xIndex;
				float height = heightMap [zIndex, xIndex];
				// choose a terrain type according to the height value
				TerrainType terrainType = ChooseTerrainType (height);
				// assign the color according to the terrain type
				colorMap[colorIndex] = terrainType.color;
			}
		}

		// create a new texture and set its pixel colors
		Texture2D tileTexture = new Texture2D (tileWidth, tileDepth);
		tileTexture.wrapMode = TextureWrapMode.Clamp;
		tileTexture.SetPixels (colorMap);
		tileTexture.Apply ();

		return tileTexture;
	}
The ChooseTerrainType method will simply iterate through the terrainTypes array and return the first terrain type whose height is greater than the height value (that’s is why it is important that the terrain types are in ascending order of height).
TerrainType ChooseTerrainType(float height) {
		// for each terrain type, check if the height is lower than the one for the terrain type
		foreach (TerrainType terrainType in terrainTypes) {
			// return the first terrain type whose height is higher than the generated one
			if (height < terrainType.height) {
				return terrainType;
			}
		}
		return terrainTypes [terrainTypes.Length - 1];
	}
Now we can try playing the game again to see our tile with colors. You will notice that the tile looks a little blurred, but don’t worry about that now. It will look better once we have multiple tiles in our Unity procedural generation level.
Lost and need more Unity foundations first? The Unity Game Development Mini-Degree by Zenva equips you with comprehensive skills in Unity, including procedural generation to create dynamic environments, making it your one-stop solution to creating captivating cross-platform games.
Changing mesh heights
We have assigned terrain types to the tile coordinates. However, it is still a plane, even in the mountain regions. What we are going to do now is using the height map to assign different heights to the tile vertices – which is quite common for Unity procedural generation. We can do that by changing the y coordinate of the vertices.
In order to do so, we are going to create a new method in the TileGeneration Script called UpdateMeshVertices. This method will be responsible for changing the Plane Mesh vertices according to the height map, and it will be called in the end of the GenerateTile method. Basically, it will iterate through all the tile coordinates and change the corresponding vertex y coordinate to be the noise value multiplied by a heightMultiplier. By changing the heightMultiplier we can change how the level looks like.
In the end, it updates the vertices array in the Mesh and call the RecalculateBounds and RecalculateNormals methods. Those methods must be called every time you change vertices in the mesh. We also need to update the Mesh in the MeshCollider.
public class TileGeneration : MonoBehaviour {

	[SerializeField]
	private float heightMultiplier;

	private void UpdateMeshVertices(float[,] heightMap) {
		int tileDepth = heightMap.GetLength (0);
		int tileWidth = heightMap.GetLength (1);

		Vector3[] meshVertices = this.meshFilter.mesh.vertices;

		// iterate through all the heightMap coordinates, updating the vertex index
		int vertexIndex = 0;
		for (int zIndex = 0; zIndex < tileDepth; zIndex++) {
			for (int xIndex = 0; xIndex < tileWidth; xIndex++) {
				float height = heightMap [zIndex, xIndex];

				Vector3 vertex = meshVertices [vertexIndex];
				// change the vertex Y coordinate, proportional to the height value
				meshVertices[vertexIndex] = new Vector3(vertex.x, height * this.heightMultiplier, vertex.z);

				vertexIndex++;
			}
		}

		// update the vertices in the mesh and update its properties
		this.meshFilter.mesh.vertices = meshVertices;
		this.meshFilter.mesh.RecalculateBounds ();
		this.meshFilter.mesh.RecalculateNormals ();
		// update the mesh collider
		this.meshCollider.sharedMesh = this.meshFilter.mesh;
	}
}
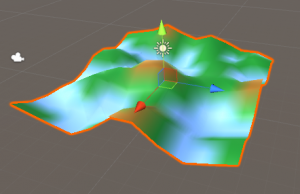
Then, we can assign a heightMultiplier to the Level Tile and try running the game. The figure below shows a tile using a heightMultiplier of 3. We can see the mountains on it, but there is still a problem. We are applying heights even for water regions, which makes them look weird, since they should be plane. That’s what we are going to fix now.
(Keep in mind, this is just how we want our Unity procedural generation to work – there’s no rule that says you can’t apply the height map to water regions).
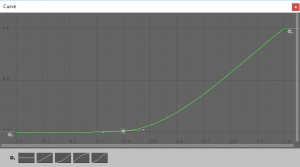
What we are going to do is create a custom function that receives input height values from our height map and returns corrected height values. This function should return a 0 value for all height values below 0.4, so that water regions are plane. We can do that by adding another attribute in the TileGeneration Script which is an AnimationCurve. Then, when assiging the y coordinate value of each vertex, we evaluate the height value in this function, before multiplying it by the heightMultiplier.
using System.Collections;
using System.Collections.Generic;
using UnityEngine;

public class TileGeneration : MonoBehaviour {

	[SerializeField]
	private float heightMultiplier;

	[SerializeField]
	private AnimationCurve heightCurve;

	private void UpdateMeshVertices(float[,] heightMap) {
		int tileDepth = heightMap.GetLength (0);
		int tileWidth = heightMap.GetLength (1);

		Vector3[] meshVertices = this.meshFilter.mesh.vertices;

		// iterate through all the heightMap coordinates, updating the vertex index
		int vertexIndex = 0;
		for (int zIndex = 0; zIndex < tileDepth; zIndex++) {
			for (int xIndex = 0; xIndex < tileWidth; xIndex++) {
				float height = heightMap [zIndex, xIndex];

				Vector3 vertex = meshVertices [vertexIndex];
				// change the vertex Y coordinate, proportional to the height value. The height value is evaluated by the heightCurve function, in order to correct it.
				meshVertices[vertexIndex] = new Vector3(vertex.x, this.heightCurve.Evaluate(height) * this.heightMultiplier, vertex.z);

				vertexIndex++;
			}
		}

		// update the vertices in the mesh and update its properties
		this.meshFilter.mesh.vertices = meshVertices;
		this.meshFilter.mesh.RecalculateBounds ();
		this.meshFilter.mesh.RecalculateNormals ();
		// update the mesh collider
		this.meshCollider.sharedMesh = this.meshFilter.mesh;
	}
}
Now let’s create this heightCurve. We can do this in the Editor, by selecting it in the Level Tile object. The curve should look similar to the one below. You can create a curve like this by selecting the third one in the menu, then adding a Key (right-click -> Add Key) in the 0.4 point and then dragging it to 0. You will also need to change the borders of the Key so that it is plane up to 0.4.
Finally, if you try playing the game it should show the level with plane water areas, which should look much better (again, for how we want our Unity procedural generation to work for water).
Building a level with multiple tiles
The last thing we are going to do in this Unity procedural generation tutorial is add multiple tiles to build a whole level. Each level tile will generate its own height values and the neighbor tiles should have continuous heights. So, the first thing we are going to do is make sure that Level Tiles will have the same height values in their borders.
We can do that by making sure that we are calling the PerlinNoise function with the same argument values for the border pixels. In order to do so, we are going to add offset parameters in the GenerateNoiseMap function. Those offsets are added to the x and z indices when calculating the x and z samples. Later, those offsets will correspond to the Level Tile position, so that the height is continuous along the tiles.
public class NoiseMapGeneration : MonoBehaviour {

	public float[,] GenerateNoiseMap(int mapDepth, int mapWidth, float scale, float offsetX, float offsetZ) {
                // create an empty noise map with the mapDepth and mapWidth coordinates
		float[,] noiseMap = new float[mapDepth, mapWidth];

		for (int zIndex = 0; zIndex < mapDepth; zIndex++) {
			for (int xIndex = 0; xIndex < mapWidth; xIndex++) {
                                // calculate sample indices based on the coordinates, the scale and the offset
				float sampleX = (xIndex + offsetX) / scale;
				float sampleZ = (zIndex + offsetZ) / scale;

                                // generate noise value using PerlinNoise
				float noise = Mathf.PerlinNoise (sampleX, sampleZ);

				noiseMap [zIndex, zIndex] = noise;
			}
		}

		return noiseMap;
	}
}
Then, we need to add those offset parameters when calling GenerateNoiseMap in the TileGeneration Script. The value of those parameters will be the opposite of the x and z coordinates of the Level Tile.
void GenerateTile() {
		// calculate tile depth and width based on the mesh vertices
		Vector3[] meshVertices = this.meshFilter.mesh.vertices;
		int tileDepth = (int)Mathf.Sqrt (meshVertices.Length);
		int tileWidth = tileDepth;

		// calculate the offsets based on the tile position
		float offsetX = -this.gameObject.transform.position.x;
		float offsetZ = -this.gameObject.transform.position.z;

		// generate a heightMap using noise
		float[,] heightMap = this.noiseMapGeneration.GenerateNoiseMap (tileDepth, tileWidth, this.mapScale, offsetX, offsetZ, waves);

		// build a Texture2D from the height map
		Texture2D tileTexture = BuildTexture (heightMap);
		this.tileRenderer.material.mainTexture = tileTexture;

		// update the tile mesh vertices according to the height map
		UpdateMeshVertices (heightMap);
	}
Before creating the whole Unity procedural generation level with several tiles, let’s create just two of them and put them side by side to check if the heights are continuous on the borders. For example, I created the two tiles below.
Then, when running the game, they should look like a single level with two tiles.
What we are going to do now is generalizing this to a level with any number of tiles. First, save the Level Tile object as a prefab, so that we can instantiate copies of it later. Then, let’s create a new Script called LevelGeneration. This script will be responsible for creating multiple Level Tiles. It will have the following attributes:
- mapWidthInTiles: number of tiles in the x axis
- mapDepthInTiles: number of tiles in the z axis
- tilePrefab: Level Tile prefab, used to instantiate the tiles
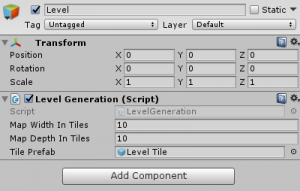
Then, the GenerateLevel method will create the Level Tiles by iterating through all the tile coordinates. For each tile, it calculates its position based on the tile coordinate and then instantiate a copy of it from the Level Tile prefab. In the end, this GenerateLevel method is called inside the Start method.
public class LevelGeneration : MonoBehaviour {

	[SerializeField]
	private int mapWidthInTiles, mapDepthInTiles;

	[SerializeField]
	private GameObject tilePrefab;

	void Start() {
		GenerateMap ();
	}

	void GenerateMap() {
		// get the tile dimensions from the tile Prefab
		Vector3 tileSize = tilePrefab.GetComponent<MeshRenderer> ().bounds.size;
		int tileWidth = (int)tileSize.x;
		int tileDepth = (int)tileSize.z;

		// for each Tile, instantiate a Tile in the correct position
		for (int xTileIndex = 0; xTileIndex < mapWidthInTiles; xTileIndex++) {
			for (int zTileIndex = 0; zTileIndex < mapDepthInTiles; zTileIndex++) {
				// calculate the tile position based on the X and Z indices
				Vector3 tilePosition = new Vector3(this.gameObject.transform.position.x + xTileIndex * tileWidth,
					this.gameObject.transform.position.y,
					this.gameObject.transform.position.z + zTileIndex * tileDepth);
				// instantiate a new Tile
				GameObject tile = Instantiate (tilePrefab, tilePosition, Quaternion.identity) as GameObject;
			}
		}
	}
}
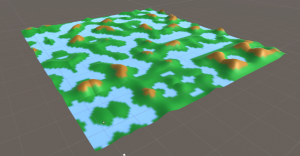
Now, remove the Level Tiles from your Unity procedural generation scene and add a single Level object, with some tiles in the x and z axis. The figure below shows an example of a Level with 10 tiles in each axis. You may also want to change the Level Scale and Height Multiplier for the Level Tiles to make the level look better. In the figure below I used a Level Scale of 10 and a Height Multiplier of 5. However, you can still see some repeating patterns in the level, as well as some weird-shaped regions.
So, our last step in this Unity procedural generation tutorial will be to polish a little bit the Noise Map generation to make the level look more natural.
Adding multiple waves
As you might notice with our current Unity procedural generation level is that the height changes don’t look natural.
What we are going to do in order to polish the noise map generation is add more noise waves. Basically, when you call Mathf.PerlinNoise, you’re sampling points from a noise wave. So, if we change this wave frequency and amplitude we change the noise result. Another way of changing the noise values is adding a random seed in the samples. By creating multiple waves with different frequencies and amplitudes, we can generate more interesting noise, which will lead to levels that look more natural. The different seed values, by their turn, allows us to remove the repetitions in the level.
So, first, let’s create a Wave class inside the NoiseMapGeneration Script. Like the TerainType, the Wave will be a Serializable class with a few attributes. The attributes we are going to use are the seed, frequency and amplitude of the wave, as discussed earlier.
[System.Serializable]
public class Wave {
	public float seed;
	public float frequency;
	public float amplitude;
}
Then, we change the GenerateNoiseMap method to receive an Array of Waves as a parameter. Then, instead of calling Math.PerlinNoise a single time, we call it once for each Wave, using the wave seed, frequency, and amplitude. Notice that the frequency is multiplied by the sample value, while the amplitude is multiplied by the noise result. In the end, we need to divide the noise by the sum of amplitudes, so that its result will remain between 0 and 1.
public float[,] GenerateNoiseMap(int mapDepth, int mapWidth, float scale, float offsetX, float offsetZ, Wave[] waves) {
		// create an empty noise map with the mapDepth and mapWidth coordinates
		float[,] noiseMap = new float[mapDepth, mapWidth];

		for (int zIndex = 0; zIndex < mapDepth; zIndex++) {
			for (int xIndex = 0; xIndex < mapWidth; xIndex++) {
				// calculate sample indices based on the coordinates, the scale and the offset
				float sampleX = (xIndex + offsetX) / scale;
				float sampleZ = (zIndex + offsetZ) / scale;

				float noise = 0f;
				float normalization = 0f;
				foreach (Wave wave in waves) {
					// generate noise value using PerlinNoise for a given Wave
					noise += wave.amplitude * Mathf.PerlinNoise (sampleX * wave.frequency + wave.seed, sampleZ * wave.frequency + wave.seed);
					normalization += wave.amplitude;
				}
				// normalize the noise value so that it is within 0 and 1
				noise /= normalization;

				noiseMap [zIndex, xIndex] = noise;
			}
		}

		return noiseMap;
	}
Now, we need to add an Array of Waves as a new attribute of the TileGeneration Script, so that we can send it to the GenerateNoiseMap method.
public class TileGeneration : MonoBehaviour {

	[SerializeField]
	private Wave[] waves;

	void GenerateTile() {
		// calculate tile depth and width based on the mesh vertices
		Vector3[] meshVertices = this.meshFilter.mesh.vertices;
		int tileDepth = (int)Mathf.Sqrt (meshVertices.Length);
		int tileWidth = tileDepth;

		// calculate the offsets based on the tile position
		float offsetX = -this.gameObject.transform.position.x;
		float offsetZ = -this.gameObject.transform.position.z;

		// generate a heightMap using noise
		float[,] heightMap = this.noiseMapGeneration.GenerateNoiseMap (tileDepth, tileWidth, this.mapScale, offsetX, offsetZ, waves);

		// build a Texture2D from the height map
		Texture2D tileTexture = BuildTexture (heightMap);
		this.tileRenderer.material.mainTexture = tileTexture;

		// update the tile mesh vertices according to the height map
		UpdateMeshVertices (heightMap);
	}
}
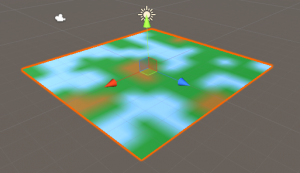
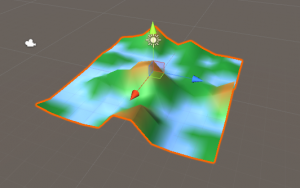
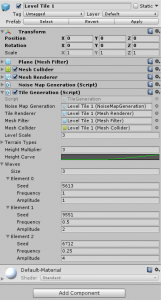
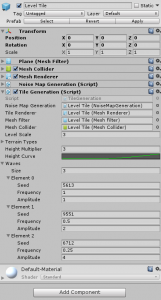
Finally, we add some Wave values in the Level Tile prefab and then we can play the game again to see the new level. The figure below shows the values I’m using in this tutorial to generate the level in the righthand figure. Notice that I changed the Level Scale and Height Multiplier again, to make the level look better. You may have to try different values until you find the one that looks better to you and for what you want your Unity procedural generation to look like.
And this concludes this Unity procedural generation tutorial! In the next one, we are going to generate temperatures and moisture values for our level, so that we can select biomes for different level areas.
As you delve deeper into the world of Unity procedural generation, though, taking Zenva’s Unity Game Development Mini-Degree can provide you with a highly comprehensive learning platform. This Mini-Degree teaches you the nuances of Unity, from creating your own 2D and 3D games to mastering game mechanics and crafting procedural maps. It’s an excellent resource for anyone looking to enrich their Unity skills and explore the limitless opportunities in the booming game industry.
Did you come across any errors in this tutorial? Please let us know by completing this form and we’ll look into it!

FINAL DAYS: Unlock coding courses in Unity, Godot, Unreal, Python and more.
