Are you looking to learn coding, only with information that is actually suitable for someone who has never programmed (including kids)?
In this tutorial, we’ll be taking an introductory look at Python by learning turtle graphics. Turtle, allows us to use commands in order to draw to the screen. It’s a great way of learning programming since, at its core, it’s all about commands and order of execution. It also provides instant, visual results, so you don’t have to guess what your code is doing.
If you’re ready for this Python turtle tutorial, let’s dive in.
Table of contents
Project Files
While this Python turtle project doesn’t require any assets, you can download the finished project files below. We recommend finishing the tutorial first, but you can cross-check our code against yours at any time to verify your answers: Download the completed files here
We also want to recommend you check out our Python Mini-Degree to learn more about Python (not just Turtle coding).
Did you come across any errors in this tutorial? Please let us know by completing this form and we’ll look into it! FINAL DAYS: Unlock coding courses in Unity, Godot, Unreal, Python and more.
Python Development Environment
About Code Editors & Python
When it comes to writing Python code (whether using Python Turtle or not), we need an IDE (integrated development environment), also known as a code editor. This is a text editor which can format, compile, and run our code. While most IDE’s are downloadable programs, some of them, such as Replit, are hosted in the cloud and can only be used using a web browser.
Common features of an IDE include:
- Syntax highlighting (coloring different parts of the code to make it more readable)
- Auto-complete
- File management
- Ability to compile and run code
- Support for different programming languages

In addition, in order to run or execute Python code, you will need access to a Python runtime. That being, a program that can take your Python code (which is just text), translate it into executable commands, and have your machine run it.
Python can be downloaded for all operating systems (Windows, Mac, Linux) on the official Python website.

Setting up Replit
For this Python Turtle coding tutorial, I recommend you use Replit as your IDE. Replit, is a cloud-based online code editor which requires no downloading or installation.
To begin, let’s go to the replit.com and click on the Log in button.

The easiest and quickest way would be to log in with your Google account or Facebook, so go ahead and do that.

Once logged in, you’ll be taken to the dashboard. Here is where you can create and manage your projects. Let’s start by clicking on the blue Create button at the top left.

A window will pop up.
- Set the Template to Python.
- Give your repl a name.
- Click the Create Repl button.

Once created, we can begin to Turtle coding! But first, let’s have a look at our IDE. There are three different windows, each serving a specific purpose as we work with Python Turtle.
- First, we have the Files window. Here, we can create and manage the files we need for our project. Right now we have main.py – which is all we need for this tutorial.
- In the middle, we have our actual Python script in the center, which is where we’ll be entering all of the code.
- On the right, we have the Console. This is where we can see log messages, errors, etc.

What is a Turtle?
In this tutorial, we’re going to be learning Turtle coding graphics in Python. The “turtle” is basically an entity that we can move around the screen. It starts at one point and we can command it to move up 20 pixels for example. The turtle will move up 20 pixels, drawing a line as it does. We can provide a range of different commands which can result in different shapes and colors.
Here’s an example of what we can make the turtle do with a little bit of code.

The turtle only does what it is told to do. So when we create a turtle script, we need to provide all of the commands in order. Let’s say we want to create a cube with a size of 50×50 pixels, here are the commands that we’d need to enter in:
- Move forwards 50 pixels.
- Turn right 90 degrees.
- Move forwards 50 pixels.
- Turn right 90 degrees.
- Move forwards 50 pixels.
- Turn right 90 degrees.
- Move forwards 50 pixels.
In your head, picture a turtle moving across a flat plane, forwards 50 pixels, then turning 90 degrees to the right and repeating. This will form a cube and is the basis of not just programming the turtle, but computer programming as a whole.
This is also the basis of what an algorithm is – a set of instructions that return to us a result. Using turtle, the instructions are the commands we enter in and the result is the rendered drawing.
Let’s Begin Coding
First thing’s first, let’s go over to our main.py file in the center of our Repl project and add in the following line of code:
from turtle import *
This will tell the program that we want to use the Python turtle library, giving us the tools to draw.
So how do we draw? Well, basically we need to provide a list of commands. Let’s start with the forward command. This will move the turtle in its forward direction (right by default).
from turtle import *

forward(50)
If you are using Replit, there should be a green Run button at the top of the page. Press that to run the program. The console should now shift over and a window will appear, showing your turtle in action! If you’re using another IDE, press the respective compile or run button.

Let’s now turn the turtle with the right command, 90 degrees. Then move forward 50 pixels again.
from turtle import *

forward(50)
right(90)
forward(50)
This is what the output result should look like when you click Run.

For this example, let’s try and draw a cube. Here’s a diagram showing what we’ll need in order to accomplish that.
- Move forwards 50 pixels.
- Rotate right 90 degrees.
- Repeat three more times until we return to our start position.

Now to finish off our cube, let’s turn right and move forwards twice more.
from turtle import *

forward(50)
right(90)

forward(50)
right(90)
forward(50)
right(90)
forward(50)

So we’ve got a cube, but how do we change the color? For that, we can call the color command, and instead of giving it a number, we can give it a color as a string.
In programming, a string is text contained in quotation marks.
It’s important to note, that the color command needs to be the first command executed. The program reads the code from top to bottom, so changing the color at the end won’t do anything since we’ve already drawn the cube.
Note: To be clear, this isn’t specific to Turtle coding commands – all programming languages generally work from top to bottom in order of execution.
from turtle import *

color("red")

forward(50)
right(90)

forward(50)
right(90)

forward(50)
right(90)

forward(50)
Now we have a red cube!

How about circles? Well to draw a circle, we can give the circle command. We can then give it a radius and it will draw a circle to its left.
circle(50)
Here’s what it should look like:

Turtle Commands
Let’s now look at a few other Python turtle coding commands.
- As well as the forward command, we also have backward which moves the turtle backwards.
- Same goes for the right command, and we also have left which turns the turtle towards the left.
Right now we just have wireframe shapes with no filling. To fill in the shape, we can use the begin_fill and end_fill commands.
When you call the begin_fill command, everything after that will be filled in with the color up until you call end_fill. Here’s how we can fill in a red circle:
from turtle import *

color("red")

begin_fill()
circle(100)
end_fill()
We can even stack shapes on top of each other, changing the color before doing so.
from turtle import *

# set the color to red
color("red")
# draw and fill a 100px circle
begin_fill()
circle(100)
end_fill()

# set the color to blue
color("blue")

# draw and fill a 50px circle
begin_fill()
circle(50)
end_fill()
You may have noticed the lines of code beginning with #. These are known as comments and are only there for us to easily see what different parts of the code are doing. When the program is compiled and run by the computer, the comments are removed. They are only there for us humans to view and document our own code (very useful for when you come back to it after a long time).
So if you’re ever creating a large block of code, you can leave a comment for yourself or anyone else who views your code.
Also, if you’re wanting to learn more Python turtle commands, check out the official documentation here.
Let’s Make a Project
For the rest of our Turtle coding tutorial, let’s create ourselves a project. This is going to be a visualization of our solar system. So to follow along, you can clear the file of all code, or create a new one.
Project Planning
Before we jump in and begin to code, let’s plan out our project. This will help us with defining what exactly we want and give us an idea on what type of turtle commands we’ll be needing.
First, let’s define our project.
- We’re going to be creating a solar system using Python Turtle.
- It will have a black background and different colored planets.
- We will develop it using the tools we have learned so far.
- This will be an example of how we can use Python to create digital art.
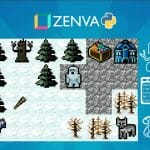
Next, the designing phase. This is where we basically create the project, without writing any code. We need to know what we’re going to do, how large the planets will be, the distance between them and their color. Below is a diagram of what we’re going to create.
It shows the planets, along with their respective pixel radius’ (right column) and distance (left column).

So we’ve got our diagram – we know the planet sizes, colors, and distances. But before we start to code, let’s create a flowchart. This will help us understand the flow of code. How do we go from drawing one planet to another?

Finally, a good step in the design phase is to write out your project in pseudo-code. This is writing out the lines of code without any specific programming language in mind. Basically, writing it out in English. Pseudocode is good because you don’t need to know the syntax or libraries of any specific language in order to write it. There’s also no universal format for it. As long as your pseudo-code can convey the commands and processes of your program, then it should be good.
So for us, we have four circles we need to draw, each with a different color and radius. We’ve already listed out the numbers and colors, so let’s get to writing the pseudo-code!
Set the background color to BLACK

Set color to ORANGE
Draw circle (60px radius)

Turn right (90 degrees)
Move forwards (70 pixels)
Turn left (90 degrees)

Set color to GRAY
Draw circle (20px radius)

Turn right (90 degrees)
Move forwards (100 pixels)
Turn left (90 degrees)

Set color to RED
Draw circle (40px radius)

Turn right (90 degrees)
Move forwards (100 pixels)
Turn left (90 degrees)

Set color to GREEN
Draw circle (30px radius)

Turn right (90 degrees)
Move forwards (100 pixels)
Turn left (90 degrees)
I’m sure that reading the pseudo code, you can already start to see how we could translate some of that to Python Turtle. Moving forwards would be the turtle.forward() command and setting the color would be the turtle.color() command.
Creating the Project
First, let’s import Python turtle and set the background color to black. This is how we do that with Turtle coding:
from turtle import *

# paint screen black
bgcolor("black")
We access the turtle, then the screen, then the background color.
First up, let’s draw the sun. How are we going to do this? Let’s list out commands we’re going to need in order to get the result we’re looking for before. This is a good step to do before coding, since it will allow you to plan ahead and have a better understanding of what needs to be done.
- Set the turtle’s color to orange.
- Call the begin_fill command, since we want the shape to be solid.
- Create the circle.
- End the fill (end_fill) so that the shape can be finalized and filled in with orange.
Now let’s translate that into Python Turtle code:
# draw sun
color("orange")
begin_fill()
circle(60)
end_fill()
Before we start to draw the planets, we need to move the turtle down as we do want some gap between the shapes. At the moment the turtle’s forward direction is right. So let’s list out the commands needed to move.
- Turn right 90 degrees.
- Move forwards 70 pixels.
Let’s code that now.
# turn and move down
right(90)
forward(70)

But hold on! There’s a problem here. We are able to see the path of the turtle so there are going to be these annoying lines all over the place. How can we fix that? Well with Python turtle, we can think of it like a pen moving across a piece of paper. If you want to draw one thing, then another without drawing a line between them… you can simply lift your pen up – and that’s exactly what we can do with Turtle coding.
The penup command will make it so the turtle is no longer drawing, and pendown will return the drawing functionality.
So let’s update that code we just entered in.
# turn and move down
right(90)
penup()
forward(70)

Much better! Now to draw the first planet. Since Python turtle creates circles towards its left-hand side, we need to rotate the turtle left.
left(90)
Then to begin drawing again, we need to put our pen down.
pendown()
And then we can draw the planet:
- Set the color to whatever you wish.
- Begin fill.
- Draw the circle of your desired radius.
- End fill.
color("gray")
begin_fill()
circle(20)
end_fill()
From here, the process is pretty much the same.
- Turn right 90 degrees.
- Pen up.
- Move forwards.
- Turn left 90 degrees.
- Pen down.
- Draw the planet.
Challenge!
Task
As a bit of a Turtle coding challenge, I want you to create 2 more planets with these properties:
- A red planet with a radius of 40 pixels.
- A green planet with a radius of 30 pixels.
Here’s what it should look like:

Look away now, and then come back here to find the answer.
Solution
Alright, so I hope you had a go at that Turtle challenge. Here’s the code required for the red planet.
# move to next planet position
right(90)
penup()
forward(100)

# draw planet
left(90)
pendown()
color("red")
begin_fill()
circle(40)
end_fill()
And finally for the green planet.
# move to next planet position
right(90)
penup()
forward(100)

left(90)
pendown()
color("green")
begin_fill()
circle(30)
end_fill()
Bonus: About Animation Speed
You may notice that the time it takes to draw all of the planets can be a while. This isn’t a limitation of the software though or Turtle coding. In fact, we can choose to speed up, slow down or skip entirely the animation.
So let’s go right to the top of our script, just below where we import turtle. The speed command allows us to specify the speed, between 0 and 10.
- 10 is the fastest.
- 1 is the slowest.
- 0 is instant.
speed(0)
So if we set the speed to 0, you’ll notice that it’s almost instantly drawn when we press run.
Conclusion
So there we have it, an introductory look at the Python programming language using turtle.
Turtle is a fantastic way to start learning to program. It teaches many great fundamentals of programming such as order of execution and giving commands. It also allows us to instantly see the results of our code visually. However, it avoids many other programming concepts that might otherwise trip beginners up. Instead, you can focus on algorithms and learn, regardless of syntax or data, how computers use instructions to perform operations.
If you want to learn the full extent of turtle, then check out the Turtle graphics documentation here.
If you want to learn more Python programming, you can also check out the Python Mini-Degree offered by Zenva, which covers the full extent of using Python to create real-world programs for games, apps, data science, machine learning, and more.
Thank you very much for following along, and good luck with your future Python turtle projects!