Welcome to our tutorial on creating a Godot RTS, where you’ll get started with the most base fundamental: units!
Have you ever wanted to create your own virtual Globe of War? Are you fascinated by the movements and actions of units in similar strategy games and would love to create your very own units?
If yes, then this tutorial is perfect for you. We will dive into the creation of basic Godot RTS units, a popular open-source gaming engine, scripting their actions, and their overall movements in a predefined navigational region. But before we start, being familiar with Godot engine and having a little experience with programming will be handy in grasping the concepts better.
Table of contents
Godot RTS Project Files
While the tutorial will guide you on creating and structuring your own project, it would be beneficial to download the project files we’ll be using in this tutorial. This will ensure you are following along accurately and will serve as a reference point if you are unsure of any steps.
Download Project Files Here

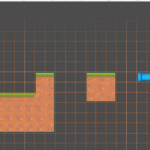
Godot RTS Unit Scene
In this tutorial, we will delve into setting up a basic Godot RTS unit, which serves as a node or scene that is capable of moving around a predefined navigation region and launching attacks on enemy units. For the player interface, we will also include functionality for selecting Godot RTS units and enabling their movement with a right mouse click.
Constructing the Unit Scene
Our Godot RTS unit will be comprised of a variety of objects, referred to as nodes in this context. Start by creating a new node of type character body 2D and rename it to “unit.

Next, the Godot RTS unit needs a Sprite. Navigate to the Sprites directory and select an appropriate Sprite. Drag and drop the Sprite into the scene and make it a child of the “unit” object in the scene hierarchy.

Set the position of the sprite to (0, 0) to ensure that it is centered on the main object and rename it to “Sprite”.

Adding a Collider
To add a collider for our Godot RTS unit, simply add a child node to the unit and choose “CollisionShape2D”.

After which you can adjust the shape to a rectangle that fits within the bounds of our Sprite. Once the collider has been added, the Godot RTS unit can be repositioned in the scene as desired.

Enabling Unit Movement
In order for our Godot RTS unit to navigate around the scene, a NavigationAgent2D node must be added. This node, once given a destination in our script, will compute a navigational path and proceed to move the unit along that path. Consequently, this equips our Godot RTS unit with obstacle avoidance AI.

At this point, additional nodes could be added to the Godot RTS unit based on specific requirements for the project – such as a visual indicator for player selection – but for simplicity, this tutorial will not delve into that. The Godot RTS unit scene can be saved in the file system as “unit.tscn”.
Adding a Script to the Unit
For added functionality, assign a script to the main Godot RTS unit node.

This new script should be called “unit” and inherit from CharacterBody2D. This will allow us to further script our unit’s actions and behaviors.

In the following sections of this series, we will delve further into the basics of the Godot RTS unit scripting, including how to enable unit selection and movement. Stay tuned for more!
Unit Script – Part 1
In this tutorial, we will be setting up Godot RTS unit scripts for a game using Godot, a popular open-source gaming engine. To begin with, make sure you have already created a Godot RTS unit scene and added the respective nodes. We will now create a script and attach it to your project to get started.
Setting Up the Script
To start with, the inherited character body 2D code is not required for our Godot RTS unit as we don’t want it triggered by the keyboard press. Hence, all lines of code can be deleted except for the first line ‘extends character body 2D’.
Creating Variables
Let’s first create some variables that will define the stats and properties for our Godot RTS unit. We will be declaring a few variables, some of which will be modifiable in the inspector. These include:
- Health: This defines the health of the unit, set to a default value of 100.
- Damage: This indicates how much damage the unit inflicts each time it attacks. This variable can be set to 20 by default.
- Move Speed: This informs how rapidly the unit moves (in pixels per second), it can be set to 50 by default.
- Attack Range: This specifies the distance from the target at which a unit starts attacking.
- Attack Rate: This determines the waiting time between attacks. By default, it can be set to 0.5, representing half a second.
- Is Player: Boolean variable to indicate if it’s a player unit or not.
You just need to add ‘export’ in front of those variables you want to be modifiable in the inspector.
@export var health : int = 100
@export var damage : int = 20
@export var move_speed : float = 50.0
@export var attack_range : float = 50.0
@export var attack_rate : float = 0.5
@export var is_player: bool = true
Apart from these variables, we also need to create a few more not meant for the inspector modifications. These will be read and set inside the script and are:
- Last Attack Time: To keep a record of the time of the last dealt attack.
- Target: This will store the target which the unit will chase and attack.
- Agent Node: To keep track of our agent node for navigation purposes.
- Sprite: To keep track for later visual feedback purposes when the unit is hit.
var last_attack_time : float
var target : CharacterBody2D
var agent : NavigationAgent2D
var sprite : Sprite2D
Setting Up Functions
The next step is to create some functions for our Godot RTS unit. The first one we would create is the ready function, which is built into Godot by default. This function gets called when the scene is first created.
func _ready():
    agent = $NavigationAgent2D
    sprite = $Sprite2D
The next function will be the take_damage function which will apply a damage_to_take property to our health variable.
func take_damage (damage_to_take):
    health -= damage_to_take
In this function, we can also check if the health has reached zero, and if so, call the queue_free function, which will delete the Unit instance.
func take_damage(damage_to_take):
    ...
    if health <= 0:
        queue_free()
To complement the take_damage function, we also want a function that can handle attacks. This will be called _try_attack_target and will be called every frame when we are in range of our target unit.
func _try_attack_target():
    var cur_time = Time.get_unix_time_from_system()
    if cur_time - last_attack_time > attack_rate:
The code we have added above is quite large, so we can break it down into sections.
- We first created a function called _try_attack_target.
- We then get the unix_time using the get_unix_time_from_system function and save this to a new variable called cur_time. The unix_time is a universal time value that constantly goes up.
- We can then compare the cur_time variable against our last_attack_time variable to see if more time than our attack_rate has passed.
If more time than the attack_rate has passed, we can call the take_damage function on our target, along with updating the last_attack_time variable to the current time.
func _try_attack_target():
    ...
    if cur_time - last_attack_time > attack_range:
        target.take_damage(damage)
        last_attack_time = cur_time
Currently, our target variable is always empty. To fix this, we will implement a new function called set_target that changes the target variable to a property called new_target.
func set_target(new_target):
    target = new_target
Additionally, our Units need a way to move between points. This can be placed in its own function called move_to_location which will have a property of location. The first thing this function will do is set the target variable to null.
func move_to_location(location):
    target = null
We can then update the target_position property of our agent variable to calculate a path using the NavigationAgent2D. This won’t move our Unit instance, but it will calculate the path to get from the current position to the destination.
func move_to_location(location):
    ...
    agent.target_position = location
In this tutorial, we have discussed how to create and implement these functions. In the next section, we will continue setting up this script, enabling us to check the target every frame and move along the given AI path.
In conclusion, the Godot RTS unit script would set your game’s units stats and properties, define their movement and attack functions, and let you manipulate their actions. Through this tutorial, you can take your game development skills to the next level.
Unit Script – Part 2
In this tutorial, we will continue building on our unit script in Godot. Our goal is to create a function that checks the distance between our Godot RTS unit and its target and determines whether it needs to stop and start attacking or keep pursuing its target. We will also work on a function that allows our Godot RTS unit to move.
Creating the ‘targetcheck’ function
First, we’ll create a function named ‘targetcheck’. This function will handle checking the distance from our Godot RTS unit to its target and make decisions based on that distance.
  func target_check():
    if target != null:
          var dis = global_position.distance_to(target.global_position)
          if dis <= attack_range:
              agent.target_position = global_position
              _try_attack_target()
          else:
              agent.target_position = target.global_position
This function first checks if the target is to null. If it is, then it calculates the distance between our unit and its target using the ‘distance_to’ method. Then we check if this distance is less than or equal to our unit’s attack range. If it is, then we set our agent’s target position to our current position, effectively making our Godot RTS unit stop moving, and then we attempt to attack the target. If our unit is not within attack range, then we set our agent’s target position to the target’s position, which makes our unit pursue its target.
Creating the ‘process’ function
The ‘process’ function is called every frame and is the function where we will call the ‘targetcheck’ function.
  func process(delta):
    target_check()
Moving the Unit
Right now, even though we have set our Godot RTS unit’s target position, the unit doesn’t move. This is because while we’ve told our unit where we want it to go, we haven’t yet instructed it to actually move. We can achieve this in the ‘physics_process’ function:
  func _physics_process(delta):
    if agent.is_navigation_finished():
       return
    var direction = global_position.direction_to(agent.get_next_path_position())
    velocity = direction * move_speed
    move_and_slide()
This function first checks if our Godot RTS unit has reached its destination. If it has, then the function returns and doesn’t execute the remaining code. If our unit hasn’t reached its destination, then we calculate the direction to the next node in the path and assign it to the ‘direction’ variable. We then set our unit’s velocity in the direction of the next node multiplied by the unit’s movement speed. Finally, we call the ‘move_and_slide’ function, which applies the velocity and moves the unit.
That completes the unit script. In later lessons, we’re going to add the functionality to be able to select units and command them to move to specific locations, and we’ll add enemy units that our units can attack.
Conclusion
We have accomplished a lot in this tutorial. Our Godot RTS unit now has the ability to navigate through a game scenario, make strategic decisions based on distances from targets, and carry out movement. We also developed a detailed script to control our unit’s actions and behavior, all whilst learning the basics of programming and game design.
Stay tuned for future tutorials where we will be enhancing the functionality and features of our unit even further by adding selection capabilities, creating enemy units for interaction, and programming unit motions. Keep exploring and experimenting with how you can take this foundational knowledge to create even more complex units and dynamic game environments.
We hope you found this tutorial enlightening and look forward to seeing how you incorporate these techniques into your future projects at Zenva Academy!
Want to learn more? Try our complete REAL-TIME STRATEGY GAME WITH GODOT 4 course.
Did you come across any errors in this tutorial? Please let us know by completing this form and we’ll look into it!

FINAL DAYS: Unlock coding courses in Unity, Godot, Unreal, Python and more.