Whenever a human learns a new subject, whether it be a musical instrument or a new language, there’s always a theme of “trial and error.” Attempting to get the correct finger placement on the violin or correct pronunciation of a foreign word oftentimes involves getting it wrong several times over.
This is a well-known way people learn, and it’s the analog we draw when it comes to machine learning. A machine learning agent “learns” in a way very similar to how we as humans learn. But, human learning differs drastically from machine learning, because a human can be shown how to perform a task while a machine cannot.
Or can they? Can we demonstrate a task to a computer? Could we train an agent by demonstrating the task? The exciting answer to this question is yes!
In this tutorial, we’re going to “supercharge” our AI by learning how to train a Unity machine learning agent through demonstration. We will also be looking at how to tweak some special parameters (called “hyperparameters”) that will make the training process much faster and more accurate. And to me, having an agent learn by demonstration is a much more intuitive way of interacting with machine learning. Not only will this save on development time for you, but help you make even more complicated agents!
Let’s get started and learn how to train ML-agents in Unity!
Did you come across any errors in this tutorial? Please let us know by completing this form and we’ll look into it!

FINAL DAYS: Unlock coding courses in Unity, Godot, Unreal, Python and more.
Table of contents
Project Files and Overview
The starter files we’re going to be needing can be downloaded here: Starter Files. This contains a basic scene with some cubes, a boundary, and a special script that will be used as the “goal” for our agent. The plan is to have an agent spawn randomly in a scene, locate the box, and push it onto the green part of the environment.

This project comes from the Unity ML-Agents example package which you can find on the Unity Github (https://github.com/Unity-Technologies/ml-agents). If you have a look at the starter files, there are a couple of components here that are not the focus of the tutorial and so they will not be explained fully. Mainly how the agent and target script are coded. Fortunately, there is nothing new in the starter files so if you want to know how to make it from scratch, check out the other ML-Agents tutorials on the Game Dev Academy (An Introduction to Unity’s ML-Agents and How to Make AIs Target Objects with Unity ML Agents). Once you’ve got the project files downloaded and imported, we can get started!
Configuring the Agent
Taking Observations
If you have a look at the Behaviour Parameters component on the Agent, you’ll notice that the “Observation Space Size” is set to zero.

How then are we to take any observations at all? The answer is we use a special, almost magical component called the “Ray Perception Sensor 3D” component.


This sends out a series of raycasts and automatically adds them to the observation stack. What’s more, the parameters on the component are very intuitive and the gizmos in the editor only add to the ease of use. Therefore, we can use this component as the way in which our agent “sees” the world. Because of this, we’re going to need two of these with the following configuration:

In essence, what we’re doing is giving the agent two lines of sight. One is high above the agent to be used likely for making sure it is upright and still in the environment, the other is lower and is used for detecting the box and the goal. One of the strengths of the Ray Perception Sensor component is that it observes basically everything about its detectable target. Whether it be velocity, speed, even color, the component can observe it all.
Now, because of this, it can take a while for the neural net to figure out what bits of information is useful. So what we gain in the convenience we also lose in training speed. This isn’t much of a cost, however, since coding each raycast manually would be quite a chore. Because we’re using Raycasts, we need to make sure the agent itself isn’t detected by switch the layer to “Ignore Raycast.”

And we need to make sure the “Max Steps” value on the “PushAgent” script is not zero.

This basically just sets the duration of an episode. If this were zero, it would be an unlimited length. And so, with our agent now seeing our beautiful world and possessing the proper number of maximum steps, let’s jump into the scripts that came in the starter file to see what’s going on under the hood.
An Overview of the Agent Script
As I mentioned earlier, we’re not going to be going over every single line of this script but we do need to know the basics of what’s going on.
using System.Collections;
using UnityEngine;
using Unity.MLAgents;

public class PushAgent : Agent
{
    /// <summary>
    /// The ground. The bounds are used to spawn the elements.
    /// </summary>
    public GameObject ground;

    public GameObject area;

    [HideInInspector]
    public Bounds areaBounds;

    private VisualSettings visualSettings;

    public GameObject goal;

    public GameObject block;

    [HideInInspector]
    public GoalDetection goalDetect;

    public bool useVectorObs;

    Rigidbody blockRigid;
    Rigidbody agentRigid;
    Material groundMaterial;

    Renderer groundRenderer;

    EnvironmentParameters defaultParameters;

    void Awake()
    {
        visualSettings = FindObjectOfType<VisualSettings>();
    }

    public override void Initialize()
    {
        goalDetect = block.GetComponent<GoalDetection>();
        goalDetect.agent = this;

        agentRigid = GetComponent<Rigidbody>();
        blockRigid = block.GetComponent<Rigidbody>();
        areaBounds = ground.GetComponent<Collider>().bounds;
        groundRenderer = ground.GetComponent<Renderer>();
        groundMaterial = groundRenderer.material;

        defaultParameters = Academy.Instance.EnvironmentParameters;

        SetResetParameters();
    }

    public Vector3 GetRandomSpawnPos()
    {
        var foundNewSpawnLocation = false;
        var randomSpawnPos = Vector3.zero;
        while (foundNewSpawnLocation == false)
        {
            var randomPosX = Random.Range(-areaBounds.extents.x * visualSettings.spawnAreaMarginMultiplier,
                areaBounds.extents.x * visualSettings.spawnAreaMarginMultiplier);

            var randomPosZ = Random.Range(-areaBounds.extents.z * visualSettings.spawnAreaMarginMultiplier,
                areaBounds.extents.z * visualSettings.spawnAreaMarginMultiplier);
            randomSpawnPos = ground.transform.position + new Vector3(randomPosX, 1f, randomPosZ);
            if (Physics.CheckBox(randomSpawnPos, new Vector3(2.5f, 0.01f, 2.5f)) == false)
            {
                foundNewSpawnLocation = true;
            }
        }
        return randomSpawnPos;
    }

    public void ScoredAGoal()
    {
        AddReward(5f);

        EndEpisode();

        StartCoroutine(GoalScoredSwapGroundMaterial(visualSettings.goalScoredMaterial, 0.5f));
    }

    IEnumerator GoalScoredSwapGroundMaterial(Material mat, float time)
    {
        groundRenderer.material = mat;
        yield return new WaitForSeconds(time); // Wait for 2 sec
        groundRenderer.material = groundMaterial;
    }

    public void MoveAgent(float[] act)
    {
        var dirToGo = Vector3.zero;
        var rotateDir = Vector3.zero;

        var action = Mathf.FloorToInt(act[0]);

        switch (action)
        {
            case 1:
                dirToGo = transform.forward * 1f;
                break;
            case 2:
                dirToGo = transform.forward * -1f;
                break;
            case 3:
                rotateDir = transform.up * 1f;
                break;
            case 4:
                rotateDir = transform.up * -1f;
                break;
            case 5:
                dirToGo = transform.right * -0.75f;
                break;
            case 6:
                dirToGo = transform.right * 0.75f;
                break;
        }
        transform.Rotate(rotateDir, Time.fixedDeltaTime * 200f);
        agentRigid.AddForce(dirToGo * visualSettings.agentRunSpeed,
            ForceMode.VelocityChange);
    }

    public override void OnActionReceived(float[] vectorAction)
    {
        MoveAgent(vectorAction);

        AddReward(-1f / MaxStep);
    }

    public override void Heuristic(float[] actionsOut)
    {
        actionsOut[0] = 0;
        if (Input.GetKey(KeyCode.D))
        {
            actionsOut[0] = 3;
        }
        else if (Input.GetKey(KeyCode.W))
        {
            actionsOut[0] = 1;
        }
        else if (Input.GetKey(KeyCode.A))
        {
            actionsOut[0] = 4;
        }
        else if (Input.GetKey(KeyCode.S))
        {
            actionsOut[0] = 2;
        }
    }

    void ResetBlock()
    {
        block.transform.position = GetRandomSpawnPos();

        blockRigid.velocity = Vector3.zero;

        blockRigid.angularVelocity = Vector3.zero;
    }

    public override void OnEpisodeBegin()
    {
        var rotation = Random.Range(0, 4);
        var rotationAngle = rotation * 90f;
        area.transform.Rotate(new Vector3(0f, rotationAngle, 0f));

        ResetBlock();
        transform.position = GetRandomSpawnPos();
        agentRigid.velocity = Vector3.zero;
        agentRigid.angularVelocity = Vector3.zero;

        SetResetParameters();
    }

    public void SetGroundMaterialFriction()
    {
        var groundCollider = ground.GetComponent<Collider>();

        groundCollider.material.dynamicFriction = defaultParameters.GetWithDefault("dynamic_friction", 1);
        groundCollider.material.staticFriction = defaultParameters.GetWithDefault("static_friction", 0);
    }

    public void SetBlockProperties()
    {
        var scale = defaultParameters.GetWithDefault("block_scale", 2);
        blockRigid.transform.localScale = new Vector3(scale, 0.75f, scale);
        blockRigid.drag = defaultParameters.GetWithDefault("block_drag", 0.5f);
    }

    void SetResetParameters()
    {
        SetGroundMaterialFriction();
        SetBlockProperties();
    }
}
A very dense script but the reason it’s so complicated is not because it has a lot of conceptually unique things going on but because it’s dealing with the most basic actions of moving the player and resetting the scene when an episode ends. In fact, the methods “SetResetParameters,” “SetBlockParamters,” “SetGroundMaterialFriction,” “GetRandomSpawnPos,” “OnEpisodeBegin,” “ResetBlock,” and “Initialize”are all dealing with resetting everything.
The parts you should pay attention to (after you’ve basically understood what the resetting methods do) are where we’re assigning rewards and performing actions. Notice, at line 79 we’re adding a reward of 5 in the “ScoredAGoal” method which is called externally. And we’re subtracting a reward in the “OnActionRecieved” method at the 130th line. This system gives a very large reward for scoring a goal but also encourages the agent to do it quickly by punishing it slightly whenever it uses an action.
Notice also when we’re telling the agent to move in the “OnActionRecieved” and the “MoveAgent” methods. Because we’re using a discrete action space (to learn about what this is, visit the introduction tutorial https://gamedevacademy.org/unity-ml-agents-tutorial/), we’re using a switch-case at line 100 to determine which direction to go. It seems like a very busy script but all we’re really doing is assigning rewards, performing actions, and resetting the environment as we have always done. And so with this basic understanding of the script which powers our agent, lets get to the meat of this tutorial and train it.
Training the Agent
The First Attempt – No Demonstration
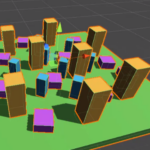
I mentioned in the introduction that we’re going to be using a demonstration to train the agent. But what happens if we just have it train without a demonstration? Let’s go ahead and have a go at this. Duplicate the environment several times

open up a command line and run this command
mlagents-learn --run-id=AIPushAgent
Hit play in the Unity Editor and it’ll start training.

Training stops at 50,000 steps and has amassed a mean reward of 1.819 which is not a lot.

We could bump up the number of steps to make it train longer in the hopes that it will eventually work, or we could train it after we’ve demonstrated how to complete the task. There’s no real way to find out how long it could take to train this agent (the Unity example had 15,000,000 steps!) so we’re better off just doing a demonstration. With that, let’s go ahead and disable all but one of the environments in preparation for the demonstration.

The Second Attempt – With Demonstration
Unity ML-Agents has two methods of doing imitation learning, GAIL and BC. BC stands for “Behavioural Cloning” and it basically is an agent that exactly copies whatever was demonstrated. This is useful for only the most basic of AI agents. We’re obviously not going to be using BC since our agent and block spawn in random places. This makes it impossible for an agent to properly execute a task because each scenario is new.
Therefore, we are going to be using GAIL which stands for “Generative Adversarial Imitation Learning.” Using this method, two neural networks are effectively used. One is the actual policy that the agent will operate on and the other is a special network called the “discriminator.” The discriminator determines what actions or observations are original (as in, if the agent came up with that decision itself) or if the action or observation came from the demonstration. If it came from the agent itself, it assigns a reward. This way, two optimizations are working in parallel to give us a faster and better agent. To record a demonstration, add a “Demonstration Recorder” component to the agent.


As usual, Unity has made recording demonstrations super intuitive. We’ve got two string fields that specify the path and name of the demonstration. And a boolean that we can check to begin demonstrating. Call your demonstration “PushBlockDemo” and let’s create a new folder called “Demonstrations” to save this demonstration in.

Now click the “Record” boolean and play through a couple of episodes to get a good demonstration. Use the WASD keys to move the agent around and push the block into the green


Remember how the agent assigns rewards. If you get a goal it’s +5 rewards, using actions subtracts a reward by a small amount. So try and get the block into the goal without using too many actions. Once you’re satisfied with your demonstration, exit play mode, uncheck “Record” (super important, always remember this!), and simply refresh the Demonstrations folder to see your demo.


If you select the demonstration and have a look at the inspector, it’ll tell you how many episodes you played through and how many rewards you amassed.

For this project, I’ve found that a mean reward of over 4.5 is fine but it’s best to try and get as high as possible. And so, with our brand new demonstration ready to be thrown into the neural network, let’s go ahead and tell ML-Agents to use GAIL to train the agent. Open up the “configuration.yaml” file located in the “results” folder.

behaviors:
  PushAgent:
    trainer_type: ppo
    hyperparameters:
      batch_size: 1024
      buffer_size: 10240
      learning_rate: 0.0003
      beta: 0.005
      epsilon: 0.2
      lambd: 0.95
      num_epoch: 3
      learning_rate_schedule: linear
    network_settings:
      normalize: false
      hidden_units: 128
      num_layers: 2
      vis_encode_type: simple
      memory: null
    reward_signals:
      extrinsic:
        gamma: 0.99
        strength: 1.0
    init_path: null
    keep_checkpoints: 5
    checkpoint_interval: 500000
    max_steps: 500000
    time_horizon: 64
    summary_freq: 50000
    threaded: true
    self_play: null
    behavioral_cloning: null
env_settings:
  env_path: null
  env_args: null
  base_port: 5005
  num_envs: 1
  seed: -1
engine_settings:
  width: 84
  height: 84
  quality_level: 5
  time_scale: 20
  target_frame_rate: -1
  capture_frame_rate: 60
  no_graphics: false
parameter_randomization: null
curriculum: null
checkpoint_settings:
  run_id: AIPushAgent
  initialize_from: null
  load_model: false
  resume: false
  force: true
  train_model: false
  inference: false
debug: false
To integrate GAIL into the training process, we need to add these lines under “reward signals”:
    reward_signals:
      gail:
        gamma: 0.99
        strength: 1.0
        demo_path: D:\PushBlockAI\Assets\Demonstrations\PushBlockDemo.demo
With the “demo_path” pointing to where your demonstration is stored. Now, since we’re here in the config file, are there any other settings we can tweak to make the agent train better? Let’s have a look at the “hyperparameters.” This config file houses what are called “hyperparameters” which are a special set of parameters that affects the neural network at the most granular level. For example, the “hidden_units” value at line 15 is the number of neurons that are going to be used in the neural network.
The “num_layers” on line 16 are how many layers of neurons we’re going to be using. Obviously, larger values for both of these will result in longer training time but you might need the extra neurons if you’re training a complex agent. Let’s go ahead and more than double the number of neurons to give us a bit more precision.
hidden_units: 256
Having a quick look at the other values, “gamma” on line 21 determines whether the agent should look for immediate rewards or pursue a policy that will gain more rewards in the long run. A lower value results in the former while a higher value (as it is at 0.99) will look for something which gains rewards long-term. “Batch_size” and “Buffer_size”, on lines 5 and 6 respectively, determine how many experiences the agent should use before it updates the policy and continues in gradient descent. We’re going to set this to 128 and 2048 respectively to give us fewer experiences during gradient descent but more when it comes to updating the policy. These must be multiples of each other or else the math doesn’t work out.
There are many more values in this config document but the final one we’re going to be investigating is the “beta” value on line 8. This influences the number of random actions the agent will take. A higher value makes it more random. Let’s set this to 0.005 since the task doesn’t necessarily require much deviation if the agent has found a path that maximizes rewards. Before we save this out, let’s increase the “max_steps” value, on line 27, from 500,000 to 8,000,000 just to give us a bit more space to let the agent train. Also, I had to delete line 51 because of a bug at the time of writing. Save the config file as “PushBlockAIConfig.yaml” to a convenient location (I just chose my Documents folder) and then resume training by punching in this command:
mlagents-learn Documents\PushBlockAIConfig.yaml --run-id=PushBlockAI --force
Make sure to enable all the environments and then hit play.

To get a more detailed view of the training process, open up a new command window and punch in this command:
tensorboard --logdir=results --port=6006
Now, we can go to a web browser and go to “http://localhost:6006/”. This will open up a graph like this:

This will give us information about things like mean rewards, episode length, GAIL rewards, etc. It’s a good sign if the rewards have reached 4 to 4.5.

We can import the neural network and assign it to our agent.


We can hit play and watch the agent automatically push the block into the green area.

Conclusion
And that’s it! Congratulations on finishing your machine learning agent!
Through this tutorial, we learned a novel method of training our machine learning agents – through the power of demonstration. Just like how one would show a human, we managed to teach our AI to push a block to a goal purely by performing the act ourselves.
In fact, being able to have so much control over agent training is one of the strengths of Unity ML-Agents. Plus, imitation learning is a much more intuitive way of training an AI. It makes so much more sense to show the agent what to do, rather than hope it figures out what to do. By completing this tutorial, though, you can see just how advanced an AI made with machine learning can be, and we’re sure you can find a multitude of applications for it in your own games!
Either way, you’ve got another tool under your belt to…
Keep making great games!