In this tutorial, we will delve into the world of Unit Testing in Unity. We will learn the concept of a unit, why Unit Testing is essential, and how to create and execute Unit Tests in Unity. By the end of this tutorial, you will have a clear understanding of Unit Testing and its practical applications in the game development process, which will ultimately result in more robust and stable code.
Before we begin, make sure you have a basic understanding of C# programming and the Unity Editor, such as importing assets, creating prefab, and adding components.
Table of contents
Project Files
We have prepared a full copy of the code files used in this tutorial for you to download. By following along line by line, you will develop a profound understanding of Unit Testing in Unity.
Download Project Files Here
Unit Testing Introduction
Welcome to Zenva’s Testing and Debugging in Unity course. Throughout this course, we’re going to look at how we can test our Unity games in various ways. In this lesson, we’re going to introduce the concept of Unit Testing and go over why we would use it.
What is a Unit?
To understand Unit Testing, we need to understand what a unit is. A unit can be defined as a small, testable chunk of code that is separated from any dependencies in the surrounding logic. The easiest way to to think about and use a unit is to consider a single method. A single method has a clear intent with a single purpose, thus making it the best candidate for creating a unit. With such a method, we could then test for and see if we get the expected result that we have defined in some other way.
Let’s look at an example of how we can take a simple method and create a unit. In the code below, we have a sample method that adds in item to an inventory list.
public void AddItem(Item item)
{
    Items.Add(item);
}
For the unit to test it, we create a new method with an attribute of Test.
[Test]
public void AddItem_True_ItemAddedToInventory()
{
    //Assign or Arrange
    Inventory inventory = new Inventory (5);

    //Act
    inventory.AddItem(new Item());

    //Assert
    Assert.Greater(inventory.Items.Count,0);
}
This method above uses a common naming convention for Unit Testing that includes the intent of what we’re trying to do, the expected result of the test, and the conditional for the test to be true. In our case, our intent is to add an item, we expect the result to be true, and it’s true if the item was added to the inventory.
(Note: There are several common naming conventions when it comes to Unit Testing. You can use one your prefer, but the importance is to have consistency in your project).
Within this method, we also have three different sections.
- Assign, more commonly referred to as Arrange, deals with assigning initial values to the properties involved. Here, we assigned the Inventory to be a size of 5.
- Act deals with acting upon the object in our intended way. In this case, we added an item to the inventory.
- Assert deals with what we declare to be our expected result. In our example, we’re saying our count for the inventory will be greater than 0.
Our last section is the most vital, as the whole point of testing is to verify whether our logic is doing what we expect it to do. Thus, we need to assert that something will happen. In our example above, our assertion would be correct if we returned true, meaning our test passes and our AddItem method works. This works regardless of the method. For example, if we had a method that added 2 and 2, our assertion would be it returns 4. Either way, this is key for testing, since a test can only pass or fail depending on what we think will happen.
Why Unit Testing?
At this point, we can understand what a unit looks like and how it works a little, but why would we use Unit Testing when it’s a lot of extra code? In the best case, writing Unit Tests lengthens the longevity of our source code.
For example, imagine if you had thousands of lines of code in your project, which can be common for large games or even business software. If you want to add, change, or remove something, there’s a good chance something will be relying on an element you changed. Without proper testing elements, you would have to manually go through every system to verify things still work as expected.
With Unit Testing, however, we can have pre-made bits of code that will do this for us. Essentially, all we’d need to do is run tests we already created again and verify that our code works despite our changes. This quickly allows us to know whether the changes we made are fine or if we broke something. Usually in the latter’s case, we can figure out from the test where the logic failed. If we use the example we showed, our test for AddItem would ensure to us that AddItem always works. This allows us to change items or our inventory slots with confidence, since if we break something we’ll know right away.
Ultimately, this makes it easier and cheaper to find bugs before production and/or release. This way you aren’t stuck making rush job patches to fix games, only to find out your patch created more bugs. Even after release, this can be a boon to verifying patches work before they’re released to the public.
Another Example
Before we close out this introduction, let’s look at another example. In the code chunks below, we have a method that checks if we have an empty inventory slot by comparing the inventory size to the item list. If the Inventory size is greater than the list, there is an empty slot.
public bool CheckForEmptySlot()
{
    /*
     * This method doesn't care about anything other than
     * the inventory size vs. the Items list count.
    */
    return Size > Items.Count;
}
With our Unit Test, we assert our test to be true in regards to finding empty slots when we run our method above. Using a numberofItems, we add these items to our inventory, and assert after doing so we’ll still have an empty slot. You will notice at the top that we can also create test cases. This allows us to pass in various parameters as well to verify our tests work under different conditions.
[Test]
[TestCase(0)]
[TestCase(1)]
[TestCase(3)]
public void CheckForSlot_True_EmptySlotAvailable(int numberOfItems) {

    //Assign
    Inventory inventory = new Inventory(5);

    //Act
    for(int i = 0; i < numberOfItems; i++)
    {
        inventory.AddItem(new Item());
    }

    //Assert
    Assert.True(inventory.CheckForEmptySlot());
}
We can also perform more complicated checks. For example, if we tweak the code above, we can assign the value we expect and then check if that expected value is equal to the value of slots we expect there to be left.
//Assign
Inventory inventory = new Inventory(5);
int expected = inventory.Size - numberOfItems;

//Act
for(int i = 0; i < numberOfItems; i++)
{
    inventory.AddItem(new Item());
}

//Assert
Assert.AreEqual(expected, inventory.Size - inventory.Items.Count);
Testing in Unity and What to Expect
In the next lesson, we will begin writing our Test Units in Unity to practice. Fortunately, Unity has some convenient testing tools that not only let us use the framework we’ve been showing in our examples, but also include a Test Runner that makes testing super easy.
At the end of our Unit Testing section for this course, we will also delve into Test Driven Development (TDD). This is a style of development where one writes the tests first and designs their game around making the logic for the tests to pass. There are pros and cons to the style, but we’ll go more in depth in the subsequent lesson on it.
For now, though, we will turn to Unity and get started writing our own tests and using Unity to make developing easier.
Creating a Unit Test
The instructions in the video for this particular lesson have been updated, please see the lesson notes below for the corrected code.
In this lesson, we’re going to create our very own Unit Test.
Code to Test
Before we can write a Unit Test, we need to write some code that we want to use the test on. Similar to the previous lesson, we will write an inventory system that takes in gold. If you’d like to work along, make sure to create a New Project in Unity (our Unity version for this lesson is 2017.2.0f3). Once the project is created, we can create a new C# Script called Inventory.
Opening the script in Visual Studio, we will begin by removing the MonoBehaviour inheritance and the default methods. After which, we will set up an auto-implementing property for Gold and two methods that take in an amount to either deposit or withdraw gold. For the latter, however, we want to make sure that we have enough gold to withdraw in the first place.
using System.Collections;
using System.Collections.Generic;
using UnityEngine;

public class Inventory {
    public int Gold { get; set; }

    public void DepositGold(int amount)
    {
        Gold += amount;
    }

    public void DebitGold(int amount)
    {
        if (Gold >= amount)
            Gold -= amount;
    }

}
First Unit Test
Now that we have a little code we can test, let’s write our first Unit Test.
The following instructions have been updated, and differs from the video: in the Unity 2020 LTS version, with the latest package version of the Test Runner, the way in which test scripts are created has changed.
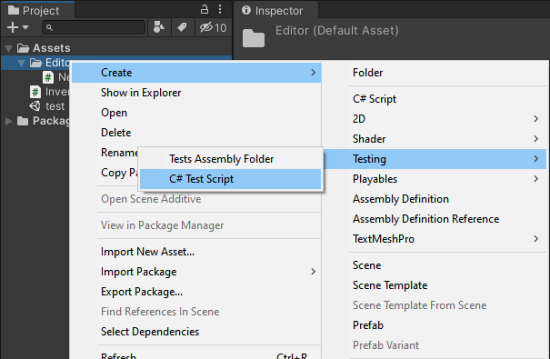
For Unity 2020 LTS, first, right-click on the Assets folder and select Create > Folder and name the folder “Editor.” Then right-click on the new Editor folder and select Create > Testing > C# Test Script.
This will create a NewTestScript file – you can rename this to “NewEditModeTest” to conform with the following instructions.
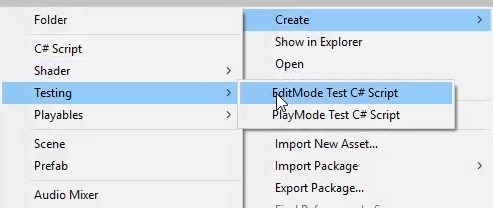
For older versions of Unity, to create a test file, we need to right-click on the Assets folder in Unity, select the Testing submenu, and choose EditMode Test C# Script.
This will create both an Editor folder and NewEditModeTest file. If we open up the file in Visual Studio, you’ll be presented with some default material. For our purposes, we will remove everything in the class so we can start fresh. In our first test, we’re going to do a simple math test. We know that if we deposit gold to our gold amount, we should get that amount plus our original gold amount. Thus, we can create a test to verify that our gold is equal to what we expect at the end.
To start our code off, we need to use the Test attribute, which comes from the NUnit.Framework namespace. After which, we will create a public void method so we can access the test from anywhere and not be expected to return anything. For our test name, you may recall our convention is to use the following:
- The first text names the method or describes what it does.
- The second text is the pass condition. In our case, it passes if our amount equal test is true.
- The third text is what describes what will make the condition pass.
public class NewEditModeTest {
    [Test]
    public void DepositGold_True_DepositedGold()
    {

    }
}
Within this method, we then need to define everything we need since we’re not meant to have any dependencies for our test. Like established in the previous lesson, we need three sections: the assign/arrange section for initialization, the act section which acts upon our initializations, and the assert section where we declare our expected result.
For our initialization, we need to create a new Inventory and also declare the expected amount of gold that we intend to deposit. Following this, in act we use our DepositGold method to deposit that same amount. Finally, in Assert, we can declare our expected value and the actual value in the inventory’s Gold Are Equal since this is what should happen math-wise.
public class NewEditModeTest {
    [Test]
    public void DepositGold_True_DepositedGold()
    {
        // Assign
        Inventory inventory = new Inventory();
        int expected = 10;

        // Act
        inventory.DepositGold(10);

        // Assert
        Assert.AreEqual(expected, inventory.Gold);
    }
}
Using the Test
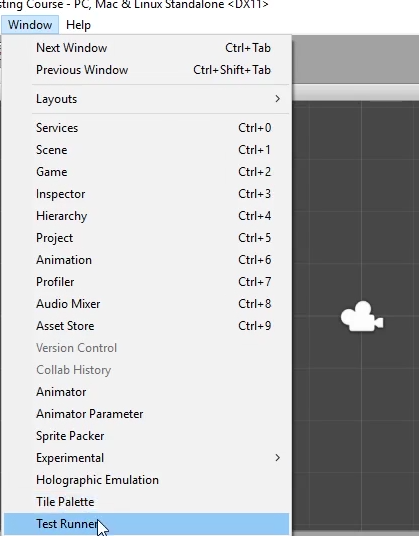
Let’s see how we can actually access this test now. Back in Unity, we need to select the Window menu and open up the Test Runner.
Note for Unity 2020 LTS and beyond the Test Runner is located at Window > General > Test Runner.
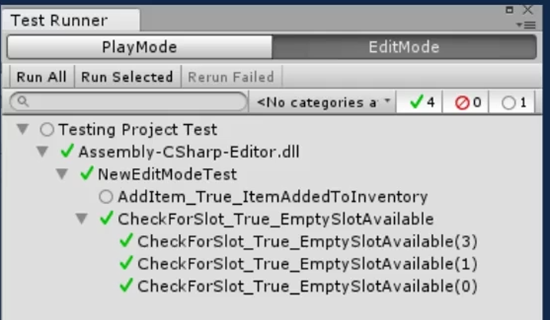
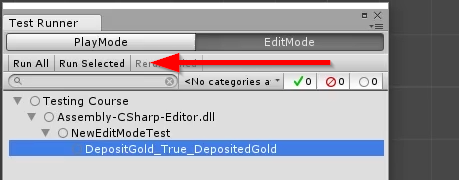
Once the Test Runner is open, you should see a hierarchy consisting of the project name, the dll file name, the test file name, and finally the name of the test. As you might guess from the image below, to run a test you can either select Run All, which will run all the tests, or select a test and use Run Selected to run just that test. There is also the Rerun Failed option which you can run during bug fixing to simply run any tests that have previously failed.
When you run a test, those that pass will receive a green checkmark. It will also go up in the hierarchy. This means that for a test to pass all test cases must pass. For the test file itself to pass, all tests in the file must pass. For the DLL file to pass, all test files must pass. In this way, locating a test that fails can be fairly simple. There is also a search bar too, however, that makes searching for a specific test very easy.
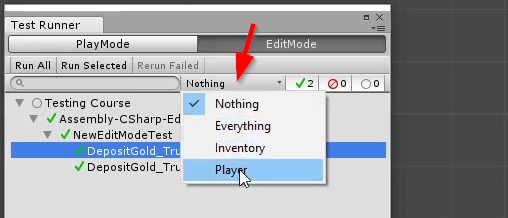
One last thing to note is the testing categories which allows us to further organize our tests. To add a test to a category, one simply must declare it as an attribute under the test attribute.
public class NewEditModeTest {
    [Test]
    [Category("Inventory")]
    public void DepositGold_True_DepositedGold()
    {
        // Assign
        Inventory inventory = new Inventory();
        int expected = 10;

        // Act
        inventory.DepositGold(10);

        // Assert
        Assert.AreEqual(expected, inventory.Gold);
    }
}
Afterward, in Unity, you can use the category filter to only display certain tests.
In the next lesson, we will go over more Unit Test examples. If you need more information about the Test Runner or writing a test, you can view Unity’s documentation on the subject: https://docs.unity3d.com/Manual/testing-editortestsrunner.html
Conclusion
By now, you should have a clearer understanding of the importance of Unit Testing in Unity and how to create and execute Unit Tests in the Unity environment. Unit Testing allows you to identify bugs and potential issues earlier in the development process, saving you time, effort, and money in the long run. With the foundation laid in this tutorial, you can now use the essential Unit Testing skills gained to improve the reliability and maintainability of your game projects.
Don’t forget to explore more tutorials and resources on game development topics like RPGs, FPS games, and much more! Keep learning and growing, and have fun with your game projects.
Want to learn more? Try our complete TESTING AND DEBUGGING IN UNITY course.
Did you come across any errors in this tutorial? Please let us know by completing this form and we’ll look into it!

FINAL DAYS: Unlock coding courses in Unity, Godot, Unreal, Python and more.
