Table of contents
Introduction
We often hear in the news about this thing called “machine learning” and how computers are “learning” to perform certain tasks. From the examples we see, it almost seems like magic when a computer creates perfect landscapes from thin air or makes a painting talk. But what is often overlooked, and what we want to cover in this tutorial, is that machine learning can be used in video game creation as well.
In other words, we can use machine learning to make better and more interesting video games by training our AIs to perform certain tasks automatically with machine learning algorithms.
This tutorial will show you how we can use Unity ML agents to make an AI target and find a game object. More specifically, we’ll be looking at how to customize the training process to create an AI with a very specific proficiency in this task. Through this, you will get to see just how much potential machine learning has when it comes to making AI for video games.
So, without further ado, let’s get started and learn how to code powerful AIs with the power of Unity and machine learning combined!
Did you come across any errors in this tutorial? Please let us know by completing this form and we’ll look into it!

FINAL DAYS: Unlock coding courses in Unity, Godot, Unreal, Python and more.
Project Overview and Source Code
This project is based on an example from the Unity ML-Agents demo package. You can download this package on GitHub (https://github.com/Unity-Technologies/ml-agents) or you can simply download this completed project by clicking here (Source Code). The basic description of our project is that we are going to have a cube bouncing around on a plane looking for the “target” cube.

(pre-visualization)
This is a great project to customize the level of proficiency on an AI. Do we want this AI to be adequate, competent, or a complete beast at this objective? We’ll be determining this as we go through our project. Another important thing to note is that this tutorial isn’t intended to cover machine learning in general, nor is it meant to be an introduction to ML-Agents. For a deeper explanation of ML-Agents and what the components do, have a look at the other ML-Agents tutorial on the Game Dev Academy (https://gamedevacademy.org/unity-ml-agents-tutorial/) . With this overview, let’s start formulating a plan for rewarding the agent
Rewards and Penalties
Some obvious penalties we could give this agent are for falling off the plane or for going too far off the edge. What may not be as obvious is what other penalties we can give the agent. For example, we could penalize the agent if it takes too long to reach the target or if it uses too many jumps to get there. If you were to develop this project from scratch, you might start off with a totally different approach to assigning penalties. You might go through several different plans for assigning penalties before finding one that works. Fortunately, you’re following along with a tutorial that already knows what the best penalty and rewards plan are. Therefore, in terms of penalties, our agent will be given three. One for falling off the plane, one for taking too long to reach the target, and a smaller penalty for using an action. This will encourage the agent to search for the most efficient way to reach the target.
Now let’s talk about rewards. The most obvious reward the agent will get is when it reaches the target cube. And believe it or not, this is actually the only way we are going to be rewarding the agent. This stiff system of many penalties, fewer rewards will be what makes the agent good at this objective. Because getting rewards is so narrow, the agent will be forced to find the most efficient way to reach the target. It will also give it a chance to be an absolute beast at the objective. Just be prepared for some decently long training times.
Observations
What sorts of things does the agent need to know in order to make decisions? What we can do here is to let the agent skip a step and simply give it the position of the target. We could try and give the agent some sort of “seeing” mechanism where it searches around and finds the target that way, or we can simply give it the position at the start. This is the best way to do observations with a project that doesn’t need to get too terribly complicated. Even with this “short cut”, we’ll still find that it does take a decent amount of time to train.
So we’re going to give the agent the position of the target, what else does the agent need to know? Well, since it isn’t automatically added, we will give the agent its own position as an observation. This way, what will hopefully happen is that the neural network will recognize the connection between close proximity to the target position and high rewards. Observations for this project are fairly simple and straight forward.
Actions
So we’ve got our observations that we’re going to send off to the neural network and it’s going to evaluate the observations and send back some actions (a massive oversimplification of machine learning but it serves our purposes). What do we want the agent to do with those actions? Further, how many should we demand from the neural network? Again, if you were making this project from scratch, you might have to go through several iterations of a plan before coming to the right one. I’ve already got the plan that will work best with this project so let’s just start there. We need three float actions from the neural network. This will be for the x, y, and z rotation of our agent. If the agent is jumping around, it might be tempting to have the neural network control the strength of the jump as well. As a general rule, you want to have the neural network control as few things as possible especially things that involve physics interactions. Therefore, the best approach is to have the neural network control the rotation of the object while we use a fixed jump strength to bounce around.
Setting up the Project
Installing ML-Agents
Go to Window -> Package Manager and download the ML-Agents package.


If you can’t see it, make sure you are viewing “preview packages.” Next, you’re going to need Python 3.6x 64-bit installed. Then you can run the following console command to install ML Agents
pip3 install mlagents
For more detail on installing ML-Agents, check out the introductory tutorial on the Game Dev Academy (https://gamedevacademy.org/unity-ml-agents-tutorial/).
Setting up the scene
Nothing is complicated about our scene. We need a plane and two cubes but these objects should be children of an empty game object called “Environment”. As a general rule, it’s best to have your agents be children of some other object. That way, it’s easier to duplicate the parent object and the neural network is dealing with the same general transform across all agents.

Create a new folder called “Materials” and create some new materials to make everything easier to see.


Let’s do some re-naming. The non-colored cube will be the “Agent” and the green cube will be the “Target.”

The target will need a Rigidbody set to “Kinematic” and its collider will need to be “Trigger.”

Now the agent will need a Rigidbody as well but this one will not be Kinematic neither will the collider be “Trigger”.

While we’re here, let’s go ahead and give the agent and the target some scripts. Create a new “Scripts” folder and make two C# scripts called “BouncerAgent” and “BouncerTarget.”


Assign these to their respective game objects.

The Agent is going to need one more component. Click “Add Component” and find the “Behavior Parameters” script. Add this to the Agent.

This will communicate with the Academy (the Academy is the component that sends observations to the neural network and gets back actions) during the training process to generate a neural policy. And with that, everything is now set up in the scene and we can begin scripting!
Scripting
The Agent Script
First things first, we must be inheriting from “Agent” instead of “Monobehavior” which requires we be using “Unity.MLAgents”.
using System.Collections;
using System.Collections.Generic;
using UnityEngine;
using Unity.MLAgents; //new line

public class BouncerAgent : Agent //new line
{
    // Start is called before the first frame update
    void Start()
    {

    }

    // Update is called once per frame
    void Update()
    {

    }
}
Next, let’s go ahead and add in the five methods contained in the Agent abstract. They are “Initialize”, “CollectObservations,” “OnActionReceived,” “Heuristic,” and “OnEpisodeBegin.” Implementing “CollectObservations” requires that we are using “Unity.MLAgents.Sensors”.
using System.Collections;
using System.Collections.Generic;
using UnityEngine;
using Unity.MLAgents;
using Unity.MLAgents.Sensors; //new line

public class BouncerAgent : Agent
{
    public override void Initialize()
    {
        base.Initialize();
    }

    public override void CollectObservations(VectorSensor sensor)
    {
        base.CollectObservations(sensor);
    }

    public override void OnActionReceived(float[] vectorAction)
    {
        base.OnActionReceived(vectorAction);
    }

    public override void Heuristic(float[] actionsOut)
    {
        base.Heuristic(actionsOut);
    }

    public override void OnEpisodeBegin()
    {
        base.OnEpisodeBegin();
    }
}
There now, to complete the skeleton of our script, add in the “Update” and “Fixedupdate” methods.
using System.Collections;
using System.Collections.Generic;
using UnityEngine;
using Unity.MLAgents;
using Unity.MLAgents.Sensors;

public class BouncerAgent : Agent
{

    public override void Initialize()
    {
        base.Initialize();
    }

    public override void CollectObservations(VectorSensor sensor)
    {
        base.CollectObservations(sensor);
    }

    public override void OnActionReceived(float[] vectorAction)
    {
        base.OnActionReceived(vectorAction);
    }

    public override void Heuristic(float[] actionsOut)
    {
        base.Heuristic(actionsOut);
    }

    private void FixedUpdate()
    {
        //new method
    }

    private void Update()
    {
        //new method
    }

    public override void OnEpisodeBegin()
    {
        base.OnEpisodeBegin();
    }
}
So now that we’ve got the majority of the methods we’re going to be using, let’s add in some variables. What sorts of variables do we need? We obviously need the position of the target and we’re going to need the position of the player. But let’s think for a minute, if we’re trying to have this agent bounce around to reach the target in the quickest way possible, we not only need variables for jumping (such as the rigid body of the player and the jump strength), but we also need a way to keep track of how many times the agent has jumped. These are the variables we’re going to be needing:
using System.Collections;
using System.Collections.Generic;
using UnityEngine;
using Unity.MLAgents;
using Unity.MLAgents.Sensors;

public class BouncerAgent : Agent
{
    public GameObject target;
    public GameObject agentObject;
    public float strength = 350f;

    Rigidbody agentRigidbody;
    Vector3 orientation;
    float jumpCoolDown;
    int totalJumps = 20;
    int jumpsLeft = 20;

    EnvironmentParameters defaultParams;
We’ve got the position of the target and the agent. These we will assign in the inspector along with the strength of the jump. The agent rigid body we will assign using a GetComponent and the “orientation” vector is what we will use to rotate the agent. “jumpCoolDown” is so the agent doesn’t keep jumping like crazy. “totalJumps” and “jumpsLeft” are to keep track of how many times the agent has jumped. What we can do is if “jumpsLeft” is equal to 0, we can end the episode and assign a punishment. And finally, the “EnvironmentParameters” just allows us to reset everything to its default value when an episode ends.
Now that we’ve got all the variables we need, we can start filling in all those methods we created. The obvious place to start is the Initialize method. Here, we can assign the rigidbody variable, zero out the orientation vector, and assign the “defaultParameters.
public override void Initialize()
    {
        agentRigidbody = gameObject.GetComponent<Rigidbody>();
        orientation = Vector3.zero;
        defaultParams = Academy.Instance.EnvironmentParameters;
    }
This is just so that everything starts with a fresh slate. Moving on, we need to populate the “CollectObservations” method. This is super simple since the only observations we’re taking in are the position of the agent and the target.
public override void CollectObservations(VectorSensor sensor)
    {
        sensor.AddObservation(target.transform.position);
        sensor.AddObservation(agentObject.transform.position);
    }
Super simple and straight forward. Note that we are taking in a total of 6 floats here since each position vector has 3 floats.
Now we need to specify what the agent is going to do when we get back some actions from the Academy. The code for this method (and, in a sense, for this entire script) may not seem very intuitive. That’s simply because, as I mentioned before, this method of scripting is the result of a lot of trial and error and so it can naturally seem different than how you’d probably approach this. Given this unintuitive nature, here’s the code that goes into “OnActionRecieved” and hopefully I can explain it all in a way that makes sense:
public override void OnActionReceived(float[] vectorAction)
    {
        for (var i = 0; i < vectorAction.Length; i++)
        {
            vectorAction[i] = Mathf.Clamp(vectorAction[i], -1f, 1f);
        }
        float x = vectorAction[0];
        float y = ScaleAction(vectorAction[1], 0, 1);
        float z = vectorAction[2];
        agentRigidbody.AddForce(new Vector3(x, y + 1, z) * strength);

        AddReward(-0.05f * (
            vectorAction[0] * vectorAction[0] +
            vectorAction[1] * vectorAction[1] +
            vectorAction[2] * vectorAction[2]) / 3f);

        orientation = new Vector3(x, y, z);
    }
First off, we need to clamp all the actions we get back so we don’t get any super strange values. Then, we assign those actions to some local variables. These variables are then going to determine the direction of the bounce and the orientation of the agent. Finally, we’re adding a small punishment (-0.05) whenever the agent uses up an action. It’s worth noting that “AddReward” is different in a big way from “SetReward.” By using “AddReward” we’re telling it to add (or subtract) a value from the total accumulated rewards. If we use “SetReward” that sets all accumulated rewards to whatever value you specify. They both sound similar but are very different when it comes to assigning rewards.
The “Heuristic” method is really simple as we just map the actions to the keystrokes.
public override void Heuristic(float[] actionsOut)
    {
        actionsOut[0] = Input.GetAxis("Horizontal");
        actionsOut[1] = Input.GetKey(KeyCode.Space) ? 1.0f : 0.0f;
        actionsOut[2] = Input.GetAxis("Vertical");
    }
Moving on, we need to populate “FixedUpdate.” This is where we’ll do a simple raycast that determines when the agent is touching the ground. We’ll use this to end episodes and keep track of how many jumps the agent has left. The completed method looks like this:
void FixedUpdate()
    {
        if (Physics.Raycast(transform.position, new Vector3(0f, -1f, 0f), 0.51f) && jumpCoolDown <= 0f)
        {

            //Forces a decision, zeros out velocity, and decrements 'jumpsLeft'

            RequestDecision();
            jumpsLeft -= 1;
            jumpCoolDown = 0.1f;
            agentRigidbody.velocity = default(Vector3);
        }

        jumpCoolDown -= Time.fixedDeltaTime;

        if (gameObject.transform.position.y < -1)
        {

            //When the agent falls off the plane

            AddReward(-1);
            EndEpisode();
            return;
        }

        if (gameObject.transform.localPosition.x < -17 || gameObject.transform.localPosition.x > 17
            || gameObject.transform.localPosition.z < -17 || gameObject.transform.localPosition.z > 17)
        {

            //When the agent goes beyond the plane

            AddReward(-1);
            EndEpisode();
            return;
        }
        if (jumpsLeft == 0)
        {
            EndEpisode();
        }
    }
Note that this is the only place where we actually end episodes. Also, note that the logic statement we used to determine if the agent had gone off the plane uses values (i.e 17 and -17) that we can get from the scene.

In the “Update” method, we just need to make sure the rotation of the agent matches the orientation vector. We can use “Vector3.Lerp” to rotate the agent.
    private void Update()
    {
        if (orientation.magnitude > float.Epsilon)
        {
            agentObject.transform.rotation = Quaternion.Lerp(agentObject.transform.rotation,
                Quaternion.LookRotation(orientation),
                Time.deltaTime * 10f);
        }
    }
Notice that we do a check to make sure the magnitude is greater than a really small value. “float.Epsilon” is the smallest value a floating-point number can have. This is important because if we simply used zero, it would always be true.
We just have one more method to implement and that is the “OnEpisodeBegin” method. What do we want to do when an episode begins? The obvious choice would be to have the agent and the target respawn at a random point. We’re going to be revisiting this method once we’ve finished the “BouncerTarget” script. For now, this is what it should look like:
    public override void OnEpisodeBegin()
    {
        gameObject.transform.localPosition = new Vector3(
            (1 - 2 * Random.value) * 5, 2, (1 - 2 * Random.value) * 5);
        agentRigidbody.velocity = Vector3.zero;
    }
And before we leave the “BouncerAgent” script, let’s add one more method that will be another level of resetting.
public void ResetParamters()
    {
        var targetScale = defaultParams.GetWithDefault("target_scale", 1.0f);
        target.transform.localScale = new Vector3(targetScale, targetScale, targetScale);
    }
And we can call this in the “OnEpisodeBegin” and “Initialize” methods.
using System.Collections;
using System.Collections.Generic;
using UnityEngine;
using Unity.MLAgents;
using Unity.MLAgents.Sensors;

public class BouncerAgent : Agent
{
    public GameObject target;
    public GameObject agentObject;
    public float strength = 350f;

    Rigidbody agentRigidbody;
    Vector3 orientation;
    float jumpCoolDown;
    int totalJumps = 20;
    int jumpsLeft = 20;

    EnvironmentParameters defaultParams;

    public override void Initialize()
    {
        agentRigidbody = gameObject.GetComponent<Rigidbody>();
        orientation = Vector3.zero;
        defaultParams = Academy.Instance.EnvironmentParameters;\

        ResetParamters(); //new line
    }

    public override void CollectObservations(VectorSensor sensor)
    {
        sensor.AddObservation(target.transform.position);
        sensor.AddObservation(agentObject.transform.position);
    }

    public override void OnActionReceived(float[] vectorAction)
    {
        for (var i = 0; i < vectorAction.Length; i++)
        {
            vectorAction[i] = Mathf.Clamp(vectorAction[i], -1f, 1f);
        }
        float x = vectorAction[0];
        float y = ScaleAction(vectorAction[1], 0, 1);
        float z = vectorAction[2];
        agentRigidbody.AddForce(new Vector3(x, y + 1, z) * strength);

        AddReward(-0.05f * (
            vectorAction[0] * vectorAction[0] +
            vectorAction[1] * vectorAction[1] +
            vectorAction[2] * vectorAction[2]) / 3f);

        orientation = new Vector3(x, y, z);
    }

    public override void Heuristic(float[] actionsOut)
    {
        actionsOut[0] = Input.GetAxis("Horizontal");
        actionsOut[1] = Input.GetKey(KeyCode.Space) ? 1.0f : 0.0f;
        actionsOut[2] = Input.GetAxis("Vertical");
    }

    void FixedUpdate()
    {
        if (Physics.Raycast(transform.position, new Vector3(0f, -1f, 0f), 0.51f) && jumpCoolDown <= 0f)
        {
            RequestDecision();
            jumpsLeft -= 1;
            jumpCoolDown = 0.1f;
            agentRigidbody.velocity = default(Vector3);
        }

        jumpCoolDown -= Time.fixedDeltaTime;

        if (gameObject.transform.position.y < -1)
        {
            AddReward(-1);
            EndEpisode();
            return;
        }

        if (gameObject.transform.localPosition.x < -17 || gameObject.transform.localPosition.x > 17
            || gameObject.transform.localPosition.z < -17 || gameObject.transform.localPosition.z > 17)
        {
            AddReward(-1);
            EndEpisode();
            return;
        }
        if (jumpsLeft == 0)
        {
            EndEpisode();
        }
    }

    private void Update()
    {
        if (orientation.magnitude > float.Epsilon)
        {
            agentObject.transform.rotation = Quaternion.Lerp(agentObject.transform.rotation,
                Quaternion.LookRotation(orientation),
                Time.deltaTime * 10f);
        }
    }

    public override void OnEpisodeBegin()
    {
        gameObject.transform.localPosition = new Vector3(
            (1 - 2 * Random.value) * 5, 2, (1 - 2 * Random.value) * 5);
        agentRigidbody.velocity = Vector3.zero;

        ResetParamters(); //new line
    }

    public void ResetParamters()
    {
        var targetScale = defaultParams.GetWithDefault("target_scale", 1.0f);
        target.transform.localScale = new Vector3(targetScale, targetScale, targetScale);
    }
}
The Target Script
The target script isn’t nearly as involved as the agent script. We just need to check if the agent has collided with the target and respawn at a random position.
using UnityEngine;
using Unity.MLAgents;

public class BouncerTarget : MonoBehaviour
{
    void FixedUpdate()
    {
        gameObject.transform.Rotate(new Vector3(1, 0, 0), 0.5f);
    }

    void OnTriggerEnter(Collider collision)
    {
        var agent = collision.gameObject.GetComponent<Agent>();
        if (agent != null)
        {
            agent.AddReward(1f);
            Respawn();
        }
    }

    public void Respawn()
    {
        gameObject.transform.localPosition =
            new Vector3(
                (1 - 2 * Random.value) * 5f,
                2f + Random.value * 5f,
                (1 - 2 * Random.value) * 5f);
    }
}
Notice that we have a “Respawn” method. We can call this on the “OnEpisodeBegin” method back in the “BouncerAgent” script
    public override void OnEpisodeBegin()
    {
        gameObject.transform.localPosition = new Vector3(
            (1 - 2 * Random.value) * 5, 2, (1 - 2 * Random.value) * 5);
        agentRigidbody.velocity = Vector3.zero;
        var environment = gameObject.transform.parent.gameObject;
        var targets =
            environment.GetComponentsInChildren<BouncerTarget>();
        foreach (var t in targets)
        {
            t.Respawn();
        }
        jumpsLeft = totalJumps;

        ResetParamters();
    }
It looks a little busy but all this is saying is to call the “Respawn” method whenever an episode begins on whatever targets are in the scene.
Training the AI
Now we need to set everything up in the inspector. The “BouncerAgent” needs itself and the target while the “Behaviour Paramters” component needs to have a observation space set to 6 and an action space set to “Continous” and 3. Also, go ahead give our behavior a unique name.

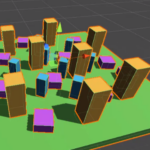
Now, go ahead and duplicate the environment several times.

Then open up a command line and run the following command:
mlagents-learn --run-id=AIBouncer
The agents will then start training. It may take a while so just make yourself a pot of coffee and sit tight.

After a couple of hours, it should reach the maximum number of steps and the training will cease. However, if you notice they console log, you’ll see that the total number of rewards is a negative number.

This is usually not a good sign. It means that even after all that time, the agent still wouldn’t behave properly. You can check this out by dragging in the neural network saved in “C:\Users\*your Username*\results\AIBouncer.”


So how do we fix this? Well, since we did see the rewards increasing over time, the best strategy is to increase the training time. We can do this by grabbing the config file we found in the results folder and modifying it a bit. Open it up in notepad and let’s have a look.

This config file is where all the training settings live. We can configure quite a lot and there’s too much here to cover just in this tutorial but the main thing we want to focus on is the “Max_Steps.”

Right now, it’s set to 500,000 which, in this case, is much too little. The agent doesn’t accumulate enough rewards in that number of steps. So what should we set it too? This is where we can determine the level of proficiency this AI can have. If we set it to 4,000,000, the AI will train for much longer and become very proficient at the task. If we set it to a value a little bit lower, like 900,000, it will have a level of proficiency slightly better than you or I would. For safety sake, I decided to set mine to 4,000,000 and decided I would stop it if I felt it had trained enough.

Also, at the time of writing, there was a slight bug in version 1.0.3 of ML-Agents that requires you to delete this line

in order for the changes to be read. So delete that line and then save your config file. I chose to save it in my Documents folder as “bouncerAIconfig” since we’re going to be referencing it in our new training command. Make sure to include “.yaml” when you save the file. With our config file sufficiently modified, we can run a new command in the command line.
mlagents-learn Documents\bouncerAIconfig.yaml --run-id=AIBouncer --resume
Of course, you would put the path to your config file if you didn’t save it to your documents. Now, you should notice that ML-Agents recognized our changes to the config file and has resumed training!

This will take a bit longer so go ahead and make another pot of coffee.

I let my agent train overnight and I think the results were worth it! Drag the neural network from the results folder and assign it to your agent.

Conclusion
With all our training done, we officially have our AI targetting objects – once again all thanks to Unity’s ML Agents! So congratulations for following along and learning how to code an interesting AI for your game projects.
While we’ve chosen to demonstrate with simple primitives, the skills learned here can be applied to a number of different games projects. Though we can’t say the coding principles will apply in all cases, we can say that through persistence and sticktoitiveness, you will be creating a number of different machine learning networks in no time to suit your own project. What we hope we’ve taught you here, more than anything else, is how to modify the AI training process and how that in turn affects your ML agent. Where you take these skills, though, is up to you!
We hope you’ve found this useful and relevant, and as always…
Keep making great games!