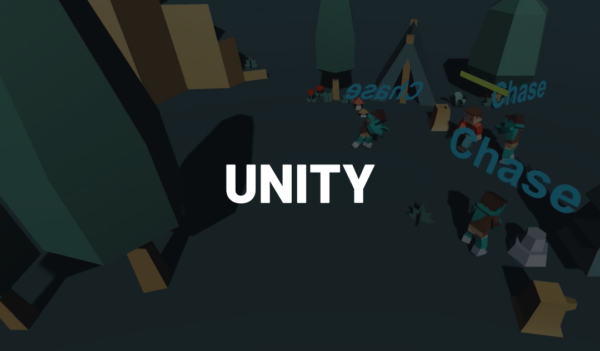
In this tutorial, we are going to learn all about AI and how to create a state machine in Unity. You will explore how to utilize a State Machine to create a dynamic AI that can perform different actions depending on its state. This tutorial will guide you through setting up your State class, preparing Unity and building various states for a wandering zombie. It will also touch on using stacks, populating states and creating your own player controller.
To get the most out of this course, you should have some familiarity with:
- Unity Editor, such as importing assets, creating prefabs, and adding components
- Unity’s animation system
- Basics of AI and State Machines in game development
Table of contents
State Machine in Unity – Project Files
We have provided full project files for this course, which include all scripts used and assets implemented. Feel free to download and explore them further to reinforce your learning.
Download Project Files Here
State
Throughout this course, we will learn how to use a State Machine in Unity and create a dynamic AI that is able to perform different actions depending on the state. In this lesson, we’re going to set up our State class so we can define what a state is.
Setup and State Machine Theory
To begin, make sure to download the Course Files, as this will include the project we’ll be working with. Once downloaded, you can open it up in Unity with the latest version (for us, that was 2018.1.1f1). We will also be using the Windows Build Target. After opening it, you should see a nice sample scene already created that we’ll be working in and where we’ll be building a state machine in Unity.
If you have errors when opening the Course Files on Unity, this might be an issue with the path of your project being too long (Windows has a limitation on the number of characters in the file path). Try moving the project files closer to the root in your system and opening the project again.

The first thing we’ll be doing is creating a new Folder in our Assets called Scripts by right clicking.

Within this Scripts folder, we can then create a new C# Script called State.

Before we jump into writing this script, let’s talk about how our State Machine in Unity is going to work. Our State Machine in Unity is going to jump between various methods. These methods will happen every single frame, so we likewise want our states themselves to execute every frame. When the states change, we also want to allow the ability for a transition to occur that allows us to perform certain operations, like changing the animation. This means we’re going to require both OnEnter and OnExit methods that can run before and after the actual state execution respectively. For our State class specifically, it will consist of the methods we call every frame to run the state code.
State Script
All this said, let’s open up our State script in Visual Studio so we can start building our state machine in Unity. Once there, we can start off by adding the System namespace since we’ll be using it a lot. Further, we can remove the default methods since we don’t require either Start or Update. Last but not least, we can remove MonoBehaviour inheritance since we won’t be putting it on a component.
using System.Collections;
using System.Collections.Generic;
using UnityEngine;
using System;

public class State {

}
To create a state, we will be using a constructor in our State class. However, we need to be able to pass in variables that are assigned to a method. This being the case, we need to use delegates which act as function pointers. While there are several ways to write delegates, we can simply use the Action type from System which serves as a shorthand way to have the delegate created. This let’s us focus on method assignment. Since we need to have methods for entering a state, executing a state, and exiting a state, we will create variables for all three of these.
public Action ActiveAction, OnEnterAction, OnExitAction;
Under this, we can then make our State constructor which takes in methods for all three of these types. Using the methods passed in, we can then assign them to our variables as seen below. Ultimately, this constructor is what allows us to create the state itself and operate our state machine in Unity.
public State(Action active, Action onEnter, Action onExit)
{
    ActiveAction = active;
    OnEnterAction = onEnter;
    OnExitAction = onExit;
}
Last but not least, we want to create methods that allow each state to be individually executed. Using these methods, we can use Invoke to call each individual Action, which will in turn run whatever method it is attached to via the constructor. For safety, we want to wrap our Invoke calls in an if statement that verifies the Action is assigned a method in the first place.
public void Execute()
{
    if (ActiveAction != null)
        ActiveAction.Invoke();
}

public void OnEnter()
{
    if (OnEnterAction != null)
        OnEnterAction.Invoke();
}

public void OnExit()
{
    if (OnExitAction != null)
        OnExitAction.Invoke();
}
With these methods, we now have the ability to easily execute everything a state can do. Further, by writing our state as such, we can create a variety of different states, whether that involves a zombie chasing the player or a door knowing how to open.
In the next lesson, we will create our State Machine in Unity and learn more about how our State class will work.
State Machine
In this lesson, we’re going to write our State Machine in Unity, which will handle which state is active and how to transition to and from states.
Setup and Stacks
To begin, back in Unity we’re going to create a new C# Script called StateMachine. Once open in Visual Studio, you can remove the default methods since we won’t be using them.
With our State Machine in Unity, we’ll be making what’s called stack finite state machines. This allows us to create a Stack of states that controls which state is active. To make a state active, all we need to do is put the state on the top of the Stack. When we remove the state from the top, however, the Stack is able to remember which state was the last active one. While this approach is simple, it can allow for a lot of dynamic things when it comes to our AI.
Knowing this, let’s set up our Stack variable. Fortunately, this is a built in type, so we only need to define what type the Stack will be (which in this case is State). We will be turning this into a property as well with get and set. Under our variable, we also need to implement an Awake method that will take our States Stack and initialize it as an empty Stack.
public Stack<State> States { get; set; }

private void Awake()
{
    States = new Stack<State>();
}
Get the Current State
The next thing we want is a way to get the current State, which is determined by what’s on top of the Stack we just created. To do this, we will create a method that returns a State type object. Within this return, we will write a ternary that checks if the Stack’s count is greater than 0. If it is, we can use the Peek function to look at the State on top of the Stack. Else, we will return null since there are no States in the Stack. Keep in mind that null is a valid value in a Stack.
private State GetCurrentState()
{
    return States.Count > 0 ? States.Peek() : null;
}(Note: Stacks do function similarly to Lists, so we can use things like Count on them as we would lists. You can read more about this in Unity’s documentation, which we highly suggest for mastering creating a state machine in Unity).
Now that we have a way to get the current State, we can use that to execute that State every single frame. Since we’ll be updating every frame, we can call our method within an Update method. After checking to make sure the State isn’t null, we can call our GetCurrentState method again and Invoke the ActiveAction on it.
private void Update()
{
    if (GetCurrentState() != null)
    {
        GetCurrentState().ActiveAction.Invoke();
    }
}
Switching States
The next thing we have to write is the ability to switch states – as that is really a core part of having a state machine in Unity. To do this, we’re going to use push and pop. The push method is what will take the State and put it on the top of the Stack. Meanwhile, pop will remove the state from the top of the Stack and allow the State in the second position to return to the top of the Stack.
We will write our Push method first. The first thing this method needs to do is check what the current state is. If it’s not null, we need to run our OnExit method on it. This way the State that is being pushed down in the Stack is properly cleaned up and exited before moving to the new State. Since this comes first in the method, it will work fine since the Stack is not yet pushed.
public void PushState()
{
    if (GetCurrentState() != null)
        GetCurrentState().OnExit();
}
Now we can push our new State. Since we’re creating the State essentially, we need to take in the Active Action, the On Enter action, and the On Exit action as parameters. Then, using these parameters, we can use our State constructor to create the state and save it in the variable. Finally, after doing that, we can Push the new state into the States Stack and run our OnEnter method on this new Current State.
public void PushState(System.Action active, System.Action onEnter, System.Action onExit)
{
    if (GetCurrentState() != null)
        GetCurrentState().OnExit();

    State state = new State(active, onEnter, onExit);
    States.Push(state);
    GetCurrentState().OnEnter();

}
After this, we can then create our Pop State method which will remove the State from the top of the Stack. Like before, we first want to find what the current State is and use OnExit to transition out of it. After this, we want to delete the current State’s Active Action to prevent issues. We can do this simply by setting it to null. Finally, we can then use Pop to remove the State that’s on top of the Stack and use the OnEnter method to transition to our new Current State.
public void PopState()
{
    if (GetCurrentState() != null) {
        GetCurrentState().OnExit();
        GetCurrentState().ActiveAction = null;
        States.Pop();
        GetCurrentState().OnEnter();
    }
}
This is it for our State Machine in Unity itself, so next is applying it to actual objects within our file.
Enemy Brain – Part 1
In this lesson, we’re going to get started with implementing our enemies for our state machine in Unity.
Enemy Object Setup
Before we can do any script writing, we first need to set up our enemy object in the Scene. Like before, we’re going to create a new empty object in the Hierarchy called Zombie. After that, we can go into the Character Models/Model folder and drag the advancedCharacter model into the Zombie object to make it a child. After adding it, we want to make sure to add the Zombie Controller from the Model’s folder onto the advancedCharacter’s Animator component. We also want to set the Y position to 0.5 so the advancedCharacter model doesn’t sink into the ground.

We can see that the Zombie Controller already has animations and states ready to go, so we can manipulate them in our script.
(Fun fact: the Animator is in itself a state machine in Unity – so if you’ve been using it, you already have a good grasp of state machines).

With our model in the Scene, we can now drag our Materials onto him. This time we’ll be using skin_orc, but you can use any Material that you find in Character Models/Material/Advanced. Make sure to drag it onto every part of the advancedCharacter model.

Navigation Mesh
Within our scene, our Zombies will be using a navigation mesh to path-find around the area. This way, we can directly tell the Zombie where he can and can’t walk. Thus, we’re going to set that up next. To begin, we’re first going to select the Zombie parent object and add a Nav Mesh Agent component. We will edit the settings later on, but for now this ensures that the Zombie can use the Nav Mesh.

Now we can create our Nav Mesh. First, we need to select the Ground object from our Hierarchy. In the Inspector, we can then access the Static dropdown and set the Ground to be Navigation Static.

We also want to do this for larger obstacles like our trees. Within the Nature Pack folder, you can also find more objects if you wish to populate your scene with even more obstacles. The look is up to you, but make sure any large objects that can’t be walked through have the Navigation as Static property so that our state machine in Unity functions properly.

(Note: You do want to say Yes for changing the children objects as well for these).
Next, from the Window menu, we want to open up the Navigation window.
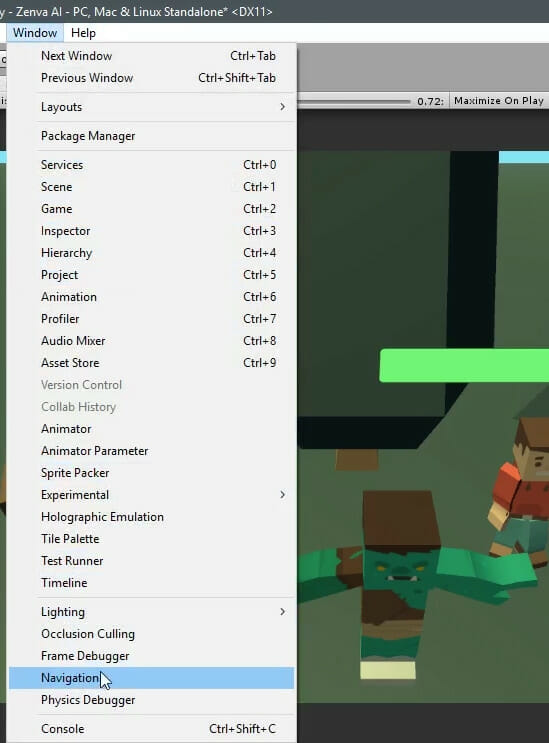
From there, we can check the Bake tab, which offers you several settings. You can play around with the settings if you wish, but we’re going to leave ours as default. Once satisfied, you can hit Bake. However, make sure you have the Ground selected first.

Once you hit Bake, this will set up the NavMesh with objects automatically cut out. The blue areas that you can see will represent where the Zombie is allowed to walk.

Now that our navigation works, there’s something else we want to add for our state machine in Unity: indicators that our state machine in Unity is actually working.
State HUD
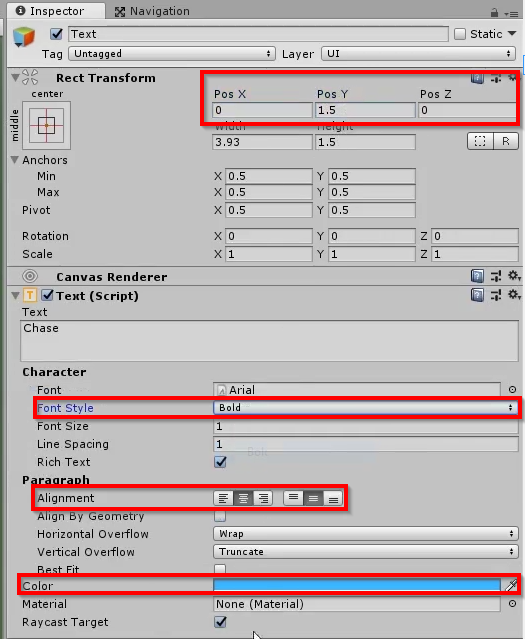
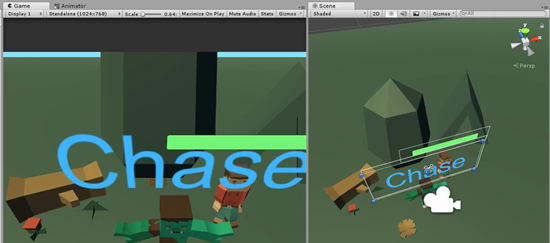
Last but not least, we want to set up a HUD for the Zombie that will tell us what State the Zombie is in. To make things simple, we can take the Canvas we created on the Player, duplicate that, and then drag the new Canvas onto the Zombie’s Spine1 Object. After doing this, we can delete the slider for the Zombie and replace it with a UI Text object.
This text will say Chase and be resized to fit within the bounds of the Canvas. We also want to change the alignment to be center on both axes, the color to blue, and the Font Style to Bold. If you want to position yours like ours, we used 0 for the X, 1.5 for the Y, and 0 for the Z. Last but not least, we need to select the Canvas and change the Dynamic Pixels Per Unit to be 100 so the text resizes nicely.
And that’ll do it for the visual components for showing our state machine in Unity in action.

Zombie Reference Setup
Our object is setup, so let’s start working on our script. In Unity, we can start off by creating a new C# Script called Zombie. Before we move to Visual Studio, we want to add both the Zombie script and a State Machine component to the Zombie parent object – as we’ll be needing these for our stat machine in Unity to function.
After this, we can open the script in Visual Studio. To begin, we want to get references to our State Machine Component, Animator Component, Text UI, Player, and the NavMesh Agent Component. While the Text UI we will assign in the Inspector, the others we can assign in the Start method by using Get component on them, with exception for the Player. With the Player, however, we can simply use FindObjectOfType to find the Player, since we know only one Player will exist in our scene at a time.
private StateMachine brain;
private Animator animator;
[SerializeField]
private UnityEngine.UI.Text stateNote;
private UnityEngine.AI.NavMeshAgent agent;
private Player player;

void Start () {
    player = FindObjectOfType<Player>();
    agent = GetComponent<UnityEngine.AI.NavMeshAgent>();
    animator = transform.GetChild(0).GetComponent<Animator>();
    brain = GetComponent<StateMachine>();
}
Besides these references, we also want to know when a player is near or in an attack range so the Zombie can Chase or attack. To get these, we can set up simple booleans that will be true or false depending on a Vector calculation of the Player’s position compared to the Zombie’s. However, in Start we want to initialize them as false explicitly for safety.
private StateMachine brain;
private Animator animator;
[SerializeField]
private UnityEngine.UI.Text stateNote;
private UnityEngine.AI.NavMeshAgent agent;
private Player player;
private bool playerIsNear;
private bool withinAttackRange;

// Use this for initialization
void Start () {
    player = FindObjectOfType<Player>();
    agent = GetComponent<UnityEngine.AI.NavMeshAgent>();
    animator = transform.GetChild(0).GetComponent<Animator>();
    brain = GetComponent<StateMachine>();
    playerIsNear = false;
    withinAttackRange = false;
}
Now that we have these variables, we can use the Update method to perform our calculations and set the booleans to true or false based on the calculations. Fortunately, the Vector3 class has a method called Distance that can take two points and find the distance between them. Thus, for each of our booleans, we just need to compare the Zombie’s position to the Player’s position. If the distance is less than a certain amount, the boolean will be true. Otherwise, it will be false. We will use 5 for playerIsNear and 1 for withinAttackRange, but you can adjust them as you see fit for your own state machine in Unity.
void Update () {
    playerIsNear = Vector3.Distance(transform.position, player.transform.position) < 5;
    withinAttackRange = Vector3.Distance(transform.position, player.transform.position) < 1;
}
Idle and Wander State Creation
The next thing we’re going to write is the initial State that our Zombie will be in, which will be the Idle State. Like we talked about when creating our States, we can also create similar methods for onEnter and onExit so that we can properly transition to and from the State. For testing purposes, all we’ll add to this State for now is a change to our UI text.
void OnIdleEnter()
{

}
void Idle()
{
    stateNote.text = "Idle";
}
void OnIdleExit()
{

}
Since this will be the State we’ll be Starting in, we can use our Start method to Push the Idle State to our State Machine in Unity on the object. As you might recall from our script, this requires us to pass in all three of the methods we just created.
brain.PushState(Idle, OnIdleEnter, OnIdleExit);
We will be writing more to this later, but for now we’re also going to create skeletons for a new State called Wander. For our Wander State, we already know that we want to play our Chase animation. So in both the OnEnter and OnExit methods, we want to set the Bool for the Chase parameter in the animator to be true and false respectively. Like before, we’ll also change the UI text for testing purposes.
void OnWanderEnter()
{
    animator.SetBool("Chase", true);
}
void Wander()
{
    stateNote.text = "Wander";
}
void OnWanderExit()
{
    animator.SetBool("Chase", false);
}
OnWander Calculations
The way our Wander and Idle States will work for this state machine in Unity is that after a certain amount of time, the Zombie will pick a random direction and head off into it until it hits its destination. Thus, we need to set all this up.
Within OnWanderEnter, we will start by getting a random direction. We will calculate this by adding the Zombie’s transform position to a random offset. Using Random.insideUnitSphere, we can get a random 1 unit point from a sphere using the Zombie as a central point. We will also multiply it so that the offset has a min value that makes the direction change significant.
void OnWanderEnter()
{
    animator.SetBool("Chase", true);
    Vector3 wanderDirection = (Random.insideUnitSphere * 1.2f) + transform.position;
}
Though we have a direction for the Zombie to go, we obviously need it to be within the bounds of the NavMesh. Using the SamplePoint method for NavMesh, we can return what’s called a NavMesh hit point. This works similarly to a Physics Raycast where a target will seek out a point and return information about what it hit. Before we do any calculations though, we need to make sure to add the UnityEngine.AI namespace to the script at the top.
using UnityEngine.AI;
Back in the OnWanderEnter method, we can set up a variable to store the out information for the NavMesh Sample Position. After that, we just need to use Sample Position, which will find the closest point on the NavMesh to the one we calculated for our wanderDirection. Besides the source and the out for the parameters, we also need to specify the maximum distance and the area mask. With the last one, you can specify specific areas a person can walk in. In our case though, the Zombie can walk anywhere so we’ll use AllAreas (of course, this is up to your for how your state machine in Unity will ultimately function).
void OnWanderEnter()
{
    stateNote.text = "Wander";
    animator.SetBool("Chase", true);
    Vector3 wanderDirection = (Random.insideUnitSphere * 4f) + transform.position;
    NavMeshHit navMeshHit;
    NavMesh.SamplePosition(wanderDirection, out navMeshHit, 3f, NavMesh.AllAreas);
}
Since this Sample Position returns the navMeshHit variable with a new value, we can examine that and use its position to create a final Vector 3 destination. Following that, we can then set the destination for our NavMesh agent to that Vector 3 variable.
void OnWanderEnter()
{
    stateNote.text = "Wander";
    animator.SetBool("Chase", true);
    Vector3 wanderDirection = (Random.insideUnitSphere * 4f) + transform.position;
    NavMeshHit navMeshHit;
    NavMesh.SamplePosition(wanderDirection, out navMeshHit, 3f, NavMesh.AllAreas);
    Vector3 destination = navMeshHit.position;
    agent.SetDestination(destination);
}
Idle to Wander Switch
So we can test our State Machine in Unity out, we need a way to switch from Idle to Wander. We will do this with a Timer that randomly calculates a value and decides how long it takes before the Zombie changes its mind. To store our time, we’ll first create a new variable called changeMind at the top of the class.
private float changeMind;
Next, in the Idle method, we can first set up the “timer” part of our changeMind variable by subtracting from the value every frame Idle is called. Using Time.deltaTime, we make sure this is based on real world time and not each individual frame. Following this, we can then use an if statement to check if the changeMind variable is 0. If it is, we will use the brain to Push our Wander State. We will also reset our changeMind variable using Random.Range with 4 seconds being the minimum and 10 seconds being the highest.
void Idle()
{
    stateNote.text = "Idle";
    changeMind -= Time.deltaTime;
    if (changeMind <= 0)
    {
        brain.PushState(Wander, OnWanderEnter, OnWanderExit);
        changeMind = Random.Range(4, 10);
    }
}
Last, in OnIdleEnter, we want to make sure to reset our path for the NavMesh Agent to make sure we don’t have a path that conflicts with our State changes.
void OnIdleEnter()
{
    agent.ResetPath();
}
Before we end the lesson, we need to head back into Unity very quickly. For the Zombie, we need to make sure to drag over the Canvas Text object to our serialized field. After doing such, you are free to check out our progress so far by play testing.

In the next and final lesson, we will finish our Zombie by adding in the rest of our States and logic.
Enemy Brain – Part 2
In this final lesson, we’re going to complete our Zombie by adding in the rest of the logic it needs – completing our state machine in Unity.
Wander to Idle
Within the Zombie script, the next thing we have to do is create a way for the Zombie to transition from our Wander State to our Idle State. To do this, we’re going to check how much distance the Zombie has on its path using the NavMesh agent. If the remaining distance is less than or equal to .25f, we’re going to reset the path and then push our Idle State. We will put this on our main Wander method.
void Wander()
{
    stateNote.text = "Wander";
    if (agent.remainingDistance <= .25f)
    {
        agent.ResetPath();
        brain.PushState(Idle, OnIdleEnter, OnIdleExit);
    }
}
Our Zombie isn’t wandering very far, though, so in OnWanderEnter, we’re going to multiply our Random.insideUnitSphere calculation by 4 instead of our previous number.
Vector3 wanderDirection = (Random.insideUnitSphere * 4f) + transform.position;
Back in Unity, we also need to look to our Zombie’s Nav Mesh Agent Component. To make the movement smoother and more Zombie like, we’re going to change the Speed to 0.4 and the Angular Speed to 350.

You’re free to test the Zombie at this point and see him wander around. Before we move on, we’re going to move our stateNote changes to the onEnter parts of our States, so make sure to do that as seen below (so we can see how our state machine in Unity is operating).
void OnIdleEnter()
{
    stateNote.text = "Idle";
    agent.ResetPath();
}
void OnWanderEnter()
{
stateNote.text = "Wander";
animator.SetBool("Chase", true);
Vector3 wanderDirection = (Random.insideUnitSphere * 4f) + transform.position;
NavMeshHit navMeshHit;
NavMesh.SamplePosition(wanderDirection, out navMeshHit, 3f, NavMesh.AllAreas);
Vector3 destination = navMeshHit.position;
agent.SetDestination(destination);
}Chase State
The next thing we’re going to write is our Chase State, which we’ll put between our Idle and Wander States in the Zombie Script. Like we did with Wander, this will start off by changing the animation Bool for Chase in the OnEnter and OnExit methods. We’ll also, of course, change the stateNote Text as well.
void OnChaseEnter()
{
    animator.SetBool("Chase", true);
    stateNote.text = "Chase";
}
void Chase()
{

}
void OnChaseExit()
{
    animator.SetBool("Chase", false);
}
For the Chase State, we want to begin by setting the Nav Mesh Agent’s destination to be the player’s position. Of course, we also need a way to get out of the Chase State. To do this, we can use the Distance method from the Vector3 class again to see how far apart the Zombie and Player are. In this case, if the distance is greater than 5.5f, we’ll pop our chase State and Push our Idle State.
void Chase()
{
    agent.SetDestination(player.transform.position);
    if (Vector3.Distance(transform.position, player.transform.position) > 5.5f)
    {
        brain.PopState();
        brain.PushState(Idle, OnIdleEnter, OnIdleExit);
    }
}
We have our Chase State, but no way to transition into it within our state machine in Unity. Thus, we need to adjust our Idle and Wander States. Within Idle, we’re going to check if playerIsNear is true, since this variable always knows how close the player is. If the playerIsNear, we’ll push the Chase state. However, we also want to change our other if statement to an else if, since we don’t want to consider pushing the Wander State if we can Chase instead.
void Idle()
{

    changeMind -= Time.deltaTime;
    if (playerIsNear)
    {
        brain.PushState(Chase, OnChaseEnter, OnChaseExit);
    }
    else if (changeMind <= 0)
    {
        brain.PushState(Wander, OnWanderEnter, OnWanderExit);
        changeMind = Random.Range(4, 10);
    }
}
Next, in Wander, we want to add the same if statement so the Zombie can move to Chase when the playerIsNear.
void Wander()
{

    if (agent.remainingDistance <= .25f)
    {
        agent.ResetPath();
        brain.PushState(Idle, OnIdleEnter, OnIdleExit);
    }
    if (playerIsNear)
    {
        brain.PushState(Chase, OnChaseEnter, OnChaseExit);
    }
}
Attack State
Last but not least, we’re going to write our Attack State. This State will only be accessible from the Chase State. At the bottom of the script, we’ll first set up on skeletons. Like with Idle, we need to make sure to reset the path to prevent conflicts and change the UI Text in OnEnter. We won’t be using the OnExit for Attack, so we won’t add it for our particular state machine in Unity.
void OnEnterAttack()
{
    agent.ResetPath();
    stateNote.text = "Attack";
}
void Attack()
{

}
With Attack, the first thing we want to do is check for withinAttackRange becoming false. When that happens, we simply want to Pop our State.
void Attack()
{
    if (!withinAttackRange)
    {
        brain.PopState();
    }
}
However, we don’t want the Zombie to be able to constantly attack the player. Thus, we next want to set up a timer. At the top with our other variables, we’ll add a new variable for this attackTimer.
private float attackTimer;
Then, with the Attack State, we can write something similar to Idle where we subtract time from the Timer every time the State is called. If the timer is 0, though, we will Trigger the Attack animation, use our Player’s Hurt method to hurt the player, and reset the timer.
void Attack()
{
    attackTimer -= Time.deltaTime;
    if (!withinAttackRange)
    {
        brain.PopState();
    }
    else if (attackTimer <= 0)
    {
        animator.SetTrigger("Attack");
        player.Hurt(2, 1);
        attackTimer = 2f;
    }
}(Note: Set Trigger means the animation will play once and then return to the animation it was doing before).
As mentioned, this State will only be accessible from the Chase State. Thus, within that State, we just need to check if our withinAttackRange variable is true. If it is, we push the Attack State. Since we don’t have an OnExit State for this one, we need to be sure to pass in null for it.
void Chase()
{
    agent.SetDestination(player.transform.position);
    if (Vector3.Distance(transform.position, player.transform.position) > 5.5f)
    {
        brain.PopState();
        brain.PushState(Idle, OnIdleEnter, OnIdleExit);
    }
    if (withinAttackRange)
    {
        brain.PushState(Attack, OnEnterAttack, null);
    }
}
Final Test
At this point, our game and state machine in Unity should be solid, so we can test it out. First off, in Unity, you may want to duplicate the Zombie objects in the Hierarchy so that you can have multiple Zombies in your game.
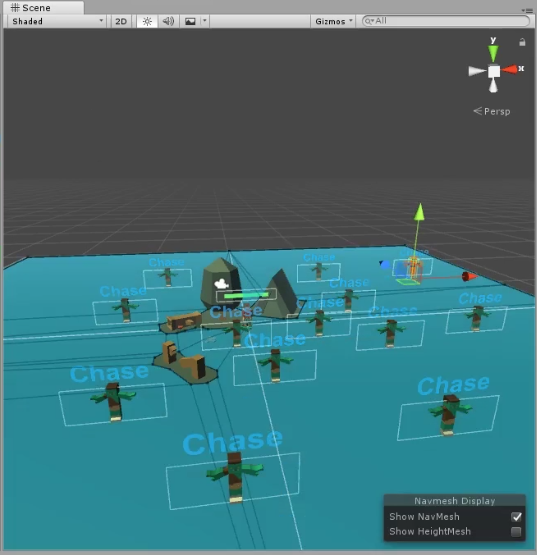
After which though, you’re free to run the game and watch the enemies chase, wander, and stand around idly!
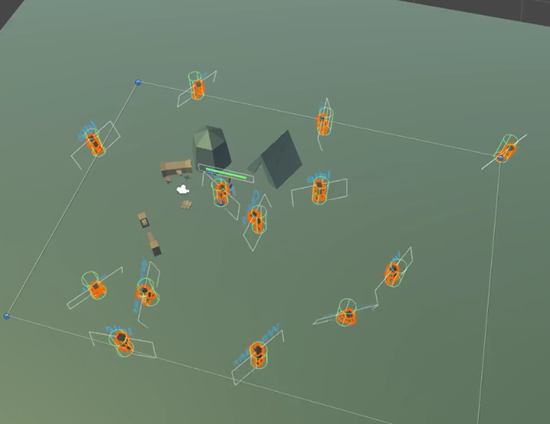
Congratulations! This is just a small sample of what a state machine in Unity can do, as they can be used for menus, chests, and more beyond AI. We encourage you to explore the topic further, but hope you now have a greater understanding of how to use them to create dynamic enemies.
Conclusion
You have made it to the end of this tutorial on creating a state machine in Unity! Congratulations on successfully setting up your State class, building various states for a wandering zombie, using stacks, populating states, and creating your own player controller. Through this course, you have gained the knowledge and skill of utilizing State Machines to create a dynamic AI that can perform different actions depending on its state in Unity.
Even though you have achieved a lot in this course, don’t stop here. You can explore this topic further and broaden your understanding of AI and State Machines. You can also look forward to our other complex and interesting game development tutorials. So, never stop learning, and always strive to make your unique mark in the world of game development.
We hope you found this course insightful and helpful, and wish you the best in your future game development endeavors!
Want to learn more? Try our complete DISCOVER AI AND STATE MACHINES IN UNITY course.
Did you come across any errors in this tutorial? Please let us know by completing this form and we’ll look into it!

FINAL DAYS: Unlock coding courses in Unity, Godot, Unreal, Python and more.
