In this tutorial, we will explore the process of splitting a terrain in Unity. This technique allows us to create more efficient games by only rendering terrain chunks that are within a certain distance of the player. By the end of this tutorial, you will learn how to split a terrain, offset its textures, and set up a script to successfully manage chunk visibility depending on the player’s position.
Before starting this tutorial, it’s expected that you should have a basic understanding of Unity and knowledge of C# programming.
Table of contents
Project Files
While you will set up your own Unity project, we have included a full copy of the code files and accompanying assets used in this tutorial for your convenience.
Download Project Files Here

Splitting our Terrain
Splitting the Terrain
To split the terrain, let’s open up the split terrain window (Dvornik > Terrain > Split Terrain).

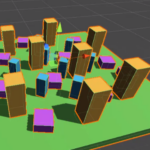
Select the terrain, then click on the Split terrain button. This will split the terrain into 4 separate chunks. You’ll notice that the terrain’s texture has been shifted and didn’t carry over with the split. This is because all the tiles are still using the same texture and need to be offset. The bottom left tile is correct, but with the others, we need to offset them.

Let’s now split each of the 4 terrain chunks, so we have 16 in total. Disable the original terrain objects. Delete the original terrain layer.

Select the bottom left chunk and add a new terrain layer like we done in the last lesson.
- Set the Size to 1024, 1024
For the Offset, we don’t need to change that since we’re working with the first tile.

Select the Terrain 0 1 chunk and do the same thing as above.
- Set the Offset to 0, 256

Now we need to do this for all the other chunks. Creating a new terrain layer with a size of 1024 and an offset depending on the tile position. An easy way to do this would be to look at the name of the chunk. Terrain 2 3 for example, would have an offset of 512, 768. Multiply the first number by 256 for the x offset and the second number for the y offset.

In the next lesson, we’ll be setting up the script to toggle the chunks depending on the player distance.
Enabling and Disabling the Chunks
ChunkHider Script
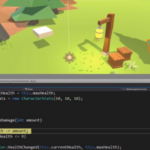
Create a new C# script called ChunkHider and attach it to our player object. Opening up the script, we can begin with our variables.
private Terrain[] chunks;

public float visibleDistance;
public int chunkSize;
public float checkRate;
In the Start function, we’re going to start by finding all of our chunks and adding them to the chunks array. Then, we’ll call start calling the CheckChunks function (making it next) every checkRate seconds. This is done using the InvokeRepeating method.
void Start ()
{
    // get all of the chunks
    chunks = FindObjectsOfType<Terrain>();

    // check the chunks every 'checkRate' seconds
    InvokeRepeating("CheckChunks", 0.0f, checkRate);
}
CheckChunks is a function which we’ll use to check the distance of each chunk from the player. If it’s past the visibleDistance, then it will be disabled, otherwise enabled.
void CheckChunks ()
{
    Vector3 playerPos = transform.position;
    playerPos.y = 0;

    // loop through each chunk
    foreach(Terrain chunk in chunks)
    {
        // get the center pos of the chunk
        Vector3 chunkCenterPos = chunk.transform.position + new Vector3(chunkSize / 2, 0, chunkSize / 2);

        // check the distance
        if(Vector3.Distance(playerPos, chunkCenterPos) > visibleDistance)
            chunk.gameObject.SetActive(false);
        else
            chunk.gameObject.SetActive(true);
    }
}
Back in the editor, let’s set the chunk hider properties.
- Visible Distance: 500
- Chunk Size: 256
- Check Rate: 0.5
In the next lesson, we’ll be setting up a system to hide objects that are in certain terrain chunks.
Conclusion
Congratulations! You have successfully learned how to split a terrain in Unity, offset its textures, and manage chunk visibility based on the player’s distance. With this knowledge, you can now create more efficient games and better optimize their performance.
Feel free to expand on this tutorial by experimenting with different terrain sizes, visible distances, and check rates. Additionally, you can enhance your knowledge by exploring other Unity topics such as creating RPGs, FPS games, and more.
We hope this tutorial has been a valuable learning experience for you, and we wish you the best of luck with your future game projects!
Want to learn more? Try our complete CREATE AND MANAGE HUGE WORLDS course.
Did you come across any errors in this tutorial? Please let us know by completing this form and we’ll look into it!

FINAL DAYS: Unlock coding courses in Unity, Godot, Unreal, Python and more.