In this tutorial, you will learn how to optimize your games in Unity by utilizing various tools and techniques. From understanding how the Profiler works to setting up Baked Lighting, we’ll dive into the different aspects of optimization that are crucial for developing performant games on mobile platforms. Additionally, we will discuss multiple ways to optimize User Interfaces within Unity, ultimately resulting in more efficient and faster-running games. To follow along with this tutorial, a basic understanding of C# programming and the Unity Editor is required.
Table of contents
Project Files
While you’ll need to set up your own Unity project, we have included a full copy of the code files used in this tutorial, as well as sprite assets used. You can download the project files below:
Download Project Files Here

Profiler
When developing games on mobile platforms, it’s important to have performance in mind. And in Unity, we can keep track of things like memory and CPU usage using the Profiler.
Let’s go to Windows > Analysis > Profiler (Or press Ctrl + 7):


When we play our game, we can see that the graphs are being updated to display what has happened, frame by frame.

You can click anywhere on the timeline to see how long it took for that frame to compute for each of the modules.

If we click on Memory, we can see how much memory has been used, by which of the applications, out of how much total memory available.

The list goes on with other various modules such as Audio, Video, Physics, and Network Messages.
Let’s click on CPU usage, click on Timeline at the bottom panel, and select Hierarchy.


This shows how long it took for each of the various different functions to run. For example, the Camera.Render function took 7.1% of the total time for that frame.

For best-practice information on how to profile your application, refer to the official Unity optimization tutorial: https://learn.unity.com/course/performance-and-optimisation
Light Baking
In this lesson, we’re going to go over the concept of actually baking your lighting inside of Unity. When it comes to performance impact, lighting is one of the major factors that contribute.
Types of Lighting
In Unity, there are three different types of lighting: Baked, Real-time, and Mixed.
| Light Modes | Description |
| Baked | Unity pre-calculates the illumination from baked lights before runtime and does not include them in any runtime lighting calculations. |
| Realtime | Unity calculates and updates the lighting of Realtime Lights every frame at runtime. Unity does not precompute any calculations. |
| Mixed | Unity performs some calculations for Mixed Lights in advance and some calculations at runtime. |
When baking lights, Unity will create a special type of texture called lightmap, which is basically like a blanket that is put over everything in the scene with all the lighting data and information already pre-applied. This can greatly reduce the rendering cost of shadows, as real-time lighting updates shadows and lighting every frame.
Setting up Baked Lighting
To start setting up baked lighting, we need to define which objects we want to include in the baking process. Let’s select all gameObjects that will remain static for the rest of the game:


We can then check these to be ‘Static‘; in other words, once this game is playing, we cannot move these objects around.

Once that’s done, we can select the light source (i.e. Directional Light):

… and change the Mode from ‘Realtime’ to ‘Baked’.

We can then click on the Auto-Generate Lighting button on the bottom left corner of the screen.

This is going to open up the Lighting window. And in here is where we can set up our baked lighting:

First of all, make sure that you have the lighting settings set up; if it doesn’t exist yet, you can create one by clicking on New Lighting Settings.

Then you can scroll down to set up the Lightmapping Settings, where we can select which processor to bake light with.
If you have a good graphics card, we recommend selecting Progressive GPU as this is going to greatly decrease the time it takes to bake the lighting.

When we are generating lightmaps, we need to take samples around the scene to determine how the light is going to behave, by looking at the samples’ light intensity, shadows, etc.
Increasing these values will make it take longer to render, but will result in a finer detail of lighting.

For more information about Lightmapping, refer to the official documentation: https://docs.unity3d.com/Manual/Lightmapping.html
Light Generation
Once you’ve finished configuring the lighting settings, you can click on Generate Lighting:

And you’ll now see a progress bar down at the bottom right going through each of the various different processes in order to bake the lighting.

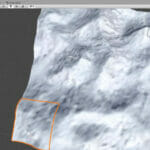
In exchange for greater performance, you may encounter some glitches, such as this banding artifact. Feel free to finetune your lightmap settings and re-generate lighting until you’re satisfied with the result.

UI Optimizations
In this lesson, we’re going to go over a few different ways you can optimize your user interfaces inside of Unity.
Removing Raycaster
Having multiple UIs on your screen at a time can slow down your performance. And one of the most performance impacting factors is Raycaster.
When a Graphic Raycaster is present and enabled inside of a Canvas, it will be used by the Event System to see if you are clicking on any of the UI elements. In other words, it will translate your input (touch or mouse click) into UI Events.

For optimized performance, you should minimize the number of Graphic Raycasters by removing them from non-interactive UI Canvases. You can remove the raycaster by Right-click > Remove Component.

Splitting Canvases
It’s recommended that you have multiple canvases with a single UI object rather than having a single canvas with multiple UI as child objects. This is because each time a canvas is active, it is going through every single child object checking to see if it needs to be rendered on screen, if it is active and enabled, etc.

So instead of having various elements in one canvas, you should split them up into different canvases.

Disabling Raycast Target
Inside of an image or a button, there is an Image component. You’ll see that inside the Image component is a Raycast Target checkbox. This will determine whether or not the image is going to be detecting Raycasts.

Having the Raycast Target enabled allows the image/button to be detecting touch or mouse clicks. This may also be enabled inside of a non-interactable object (e.g. Text).

For every element that doesn’t need to be interacted with the finger or the mouse click, you can basically disable Raycast Target.
Conclusion
Congratulations on successfully completing this tutorial! By now, you should have a good understanding of how to optimize your games in Unity using various tools like the Profiler, baked lighting, and optimizing user interfaces. Incorporating these techniques into your projects will help ensure better performance and smoother gameplay on mobile platforms. Remember to keep practicing and experimenting with these techniques to continue improving your Unity skills.
If you’re interested in additional intermediate Unity content, you can try checking out this free YouTube tutorial. It covers not only additional game optimization techniques, but various code improvements as well to keep your game efficient!
Good luck on your game development journey, and we look forward to seeing your fantastic creations!
Want to learn more? Try our complete PUBLISHING AND OPTIMIZING MOBILE GAMES course.
Did you come across any errors in this tutorial? Please let us know by completing this form and we’ll look into it!

FINAL DAYS: Unlock coding courses in Unity, Godot, Unreal, Python and more.