Want more GAMEMAKER content? Explore GameMaker Academy where you can find a comprehensive, project-based learning pathway on it!
Are you ready to dive into the world of game development? In this GameMaker free course, we’ll guide you through the foundational steps of using GameMaker, from installation to creating and managing assets like sprites and audio. By the end, you’ll have everything set up to start building your very own game.
In addition, you can also review our full course, Intro to Game Development with GameMaker, which covers the fundamentals of working with GameMaker in-depth.
Table of contents
Project Files
To enhance your learning experience, we’ve provided all the essential project files, including sprites and audio samples, so you can follow along seamlessly with this GameMaker free course.
Download the project files here: GameMaker free course assets

Installation
In this section of our GameMaker free course, we will guide you through the installation process of the GameMaker engine. This will be the first step in setting up your game development environment. Whether you’re a Windows or Mac user, the process is straightforward and simple.
Step 1: Download the GameMaker engine
Firstly, navigate to the GameMaker download page by typing the following URL into your browser: gamemaker.io/en/download. Depending on your operating system (Windows or Mac), click on the appropriate download button.
Step 2: Install the GameMaker engine
Once the download is complete, locate the downloaded EXE file in your downloads folder. Double-click on the file to start the installation process. A prompt will appear asking you if you want to make changes to your computer, simply click ‘Yes’ to proceed.
A setup wizard will then guide you through the installation process. You will be asked to accept the terms of the agreement, which you can do by clicking ‘Agree’.
You will also have the option to install OperaGX, but this is not necessary for the GameMaker engine to function. The rest of the default settings should be fine, so you can click ‘Next’ to continue.
Step 3: Choose your installation location
The setup wizard will then ask you to choose the location where you want to install the GameMaker engine. The default location is usually sufficient, but you can change this if you wish. Once you’ve made your choice, click ‘Next’ to proceed.
The GameMaker engine will then begin to download and install. Once this process is complete, click ‘Next’ and then ‘Finish’ to close the setup wizard.
Step 4: Open the GameMaker engine
After the installation is complete, the GameMaker engine should automatically open. You will then be asked to install any platforms you’d like to upload your games to. Ensure you have Windows or Mac VM installed for the platform you’re currently using so you can play your own games.
- HTML5 is a good option as it allows you to upload your games to the web, making it easy to share them with others.
- Android is also an option if you want to put your games on a phone.
With the GameMaker engine now installed, you are ready to start creating your first game project.
Creating Your Project
In this next section of our GameMaker free course, we’ll be diving in to the actual project setup for our GameMaker project.
Opening GameMaker
When you first open GameMaker, you will see a screen displaying a list of your previous projects and when they were last edited. If you’re opening GameMaker for the first time, you might also see a setup wizard. Don’t worry about the setup wizard for now, as this guide will serve as your personal wizard.
Creating a New Project
To start a new project, navigate to the ‘Get Started’ section and click ‘New’. This will present you with several options:
- Live wallpaper: This allows you to create an animated wallpaper for use with Wallpaper Engine on Steam.
- Game strip: This feature is related to OperaGX, but we will not be using it in this GameMaker free course.
- Game: This is the option we will be using.
Choosing a Game Template
After selecting ‘Game’, you will see a list of game templates. These templates can be useful for experimenting and learning how the GameMaker engine works. However, for this GameMaker free course, we will be starting with a ‘Blank Game Project’.
Naming Your Project
Once you’ve selected your project template, it’s time to name your project. For this GameMaker free course, we will name our project ‘Intro to GameMaker’. Make sure to save your project in a location you can easily remember, in case it doesn’t appear in your recent projects later. After naming your project, click ‘Let’s Go’.
Navigating the GameMaker Editor
You are now inside the GameMaker editor. Though it may seem intimidating at first, don’t worry – this guide will walk you through the process.
GameMaker Editor Overview – Part 1
Now that our GameMaker free course project is set up, let’s dive into the GameMaker Editor. We’ll first take a look at the assets browser.
Understanding Assets
In game creation, an asset refers to any element that makes up a game. This includes characters, images, code, levels, and more. Essentially, every single component of your game is an asset. In the Asset Browser, you will find different folders representing various types of assets. You can also create your own folders, known as groups, for better organization.
Types of Assets
There are numerous types of assets you can use in your GameMaker game. In this introductory course, we will focus on a few key ones:
- Objects: These are everything that exists in your game. While you might think of images as objects, in GameMaker, an object is an image linked up to its behavior.
- Sprites: These are the images in your game. They make up the 2D characters, enemies, objects, weapons, bullets, projectiles, and more.
- Sounds: These are the sound effects and music for your game.
- Scripts: This is where all the code for your game goes.
- Rooms: These constitute the levels of your game. You’re given a starting level, which is indicated by a little home icon. As you create more rooms, the game knows which one to start you at and which ones you’ll go to throughout the game.
Understanding these assets and their roles is fundamental to successful game creation in GameMaker. In the next lesson, we’ll delve deeper into how these assets are used and how they interact with each other in a game. Stay tuned!
GameMaker Editor Overview – Part 2
In the previous sections of our GameMaker free course, we explored the Assets section of the GameMaker Editor. In this part, we will provide a brief overview of the rest of the Editor, which will be essential for the remainder of this GameMaker free course.
The Workspace
The workspace, which is a large blank area in front of our screen, is a unique feature in GameMaker. It serves as an area where we can organize and edit our assets. For instance, if we create a sprite, it will appear in the workspace. We can edit various aspects of our sprite, including animations, collision data, and size. If we create another sprite, it opens in a sub-window in our workspace.
We can navigate around our workspace using the scroll wheel on our mouse or the middle click button. We can also move around any of these windows, just like any window on a computer. We can even move our workspace outside of the GameMaker window. In the workspace, we can open and edit all our sprites, sound files, and objects. Essentially, all our assets in the game exist in this 2D space, which we can organize any way we want. We can also zoom in and out to visualize our game at a glance.
The Inspector
When we click on any of these assets on the left side of our screen, all of these options will also appear to us in the inspector. The inspector is a convenient way to edit our assets on the fly while we might be in another window such as the room window. When we click on one of our rooms, it opens its own window separate from the workspace. Here, we can edit everything about our room, including placing and moving objects.
The Output Tab
At the bottom, there’s an output tab, which will be important later. If our code is throwing errors or acting unexpectedly, we’ll see the output here. We can also put lines in our code that’ll print stuff out to the output. This won’t be visible to the player but might be useful for us during development.
Top of the Screen Options
At the top of the screen, there are several options. Some of the most important ones include saving our project, building our project, opening different windows, accessing tools, and accessing the marketplace for assets. We can also save and load different layouts. There’s also a help section, which includes a button to open up the GameMaker manual. This will be useful when we want to code something new or learn how part of the engine works.
The Toolbar
The toolbar allows us to save and open new projects. There’s also a button that allows us to run our game. At this stage, our game is a blank screen because we haven’t really built a game yet. We can close the game or stop it with a button.
This concludes our brief overview of the GameMaker Editor. If you’re struggling to follow along, take a second to re-read sections until you feel comfortable with the editor. You might also consider checking out our GameMaker Academy learning pathway for a more in-depth, hands-on explanation of the material featured here.
Importing Sprites
In this next section of our GameMaker free course, we will be learning how to import sprites into our GameMaker projects. Sprites are a fundamental part of game design, representing the visual elements in your game, such as characters, objects, and backgrounds. By the end of this GameMaker free course, you will be able to create and import sprites, set their origins, and even create animations from sprite sheets.
Creating a Sprite
To create a sprite, follow these steps:
- Right-click on your sprites folder.
- Hover over ‘Create’ and click on ‘Sprite’.
- Name your asset. For sprites, it is recommended to start with ‘SPR’, followed by an underscore and the name of your sprite. For example, ‘SPR_Player’.
Importing a Sprite
After creating a sprite, you can import an image file to represent it. To do this:
- Double click on your sprite asset to focus on it in the workspace.
- Click on ‘Import’ and navigate to the image file you wish to use. In this case, we are using a ‘player.png’ file included in the asset pack for this course.
- A message will appear warning that importing a sprite is not an undoable action. Click ‘Yes’ to continue.
After importing, you can see the size of your sprite in pixels and set its origin. The origin determines the point on the sprite that represents its position in space. This is particularly important for things like rotation and collision detection. To set the origin to the middle center of the sprite, click on the dropdown that says ‘top left’ and select ‘middle center’.
Creating Animations from Sprite Sheets
GameMaker also allows you to create animations from sprite sheets. A sprite sheet is an image file containing multiple frames of an animation. To create an animation:
- Click on ‘Import’ and select your sprite sheet. In this case, we are using an ‘arrow.png’ file that contains four frames of a rotating arrow.
- Click ‘Edit Image’ and then click on ‘Image’ on the toolbar at the top of the screen.
- Click on ‘Convert to Frames’. A dialog will appear allowing you to determine how to split your image into different frames.
- Enter the number of frames in your animation and the number of frames per row in your sprite sheet. In this case, we have a 2 by 2 grid, so we enter 4 frames and 2 frames per row.
- Click ‘Convert’ to create your animation.
After creating your animation, you can adjust its speed by editing the frames per second in the sprite settings. For example, a four-frame animation at 60 frames per second will appear very fast. Reducing the frames per second to 15 will result in a slower, more natural-looking rotation.
Conclusion
By following these steps, you can create, import, and animate sprites in GameMaker. This will allow you to bring your game to life with dynamic visuals and animations. Remember to always set the origin of your sprites and adjust the frames per second of your animations to achieve the best results.
Creating and Editing Sprites
In this next part of our GameMaker free course, we will learn how to create custom sprites for our GameMaker projects. GameMaker offers the unique ability to create your own sprites within the engine itself, eliminating the need for a separate program. This guide will cover the process of creating a new sprite, editing its size, and utilizing the sprite editor panel.
Creating a New Sprite
To create a new sprite, follow the steps below:
- Create a new sprite.
- Name the sprite. For this GameMaker free course, we will use “SPR_custom_player”.
- The default size of sprite assets is 64 by 64. However, you can alter this size according to your needs. For this GameMaker free course, we will use a size of 32 by 32.
- If you do not want your sprite to be square, uncheck the “maintain aspect ratio” box. This allows you to create a sprite that is wider or longer.
- Click “edit image” to access the sprite editor panel.
Using the Sprite Editor Panel
The sprite editor panel in GameMaker is a robust image editor that offers a range of tools. These include:
- A standard brush to draw any shape.
- A color picker with a history of previously used colors.
- An eraser tool.
- A tool to replace one color with another.
- A fill tool to fill any space with a color.
- Tools to draw straight lines, rectangles, squares, circles, and polygons.
You can also adjust the size of your brushes and erasers, view a grid for precision, and move your selection around using the rectangular select tool.
Creating Animated Sprites
To create an animated sprite, you need to generate new frames. You can do this by clicking the plus symbol in the sprite editor panel. If you want to use the current frame as a basis for the next one, press control D to duplicate it. You can also copy a part of your frame and paste it using the rectangular select tool.
By following these steps, you can create unique and custom sprites for your GameMaker projects. This adds a level of personalization and creativity to your game development process.
Importing Audio
For our next part in this GameMaker free course, we will walk you through the process of importing audio into your GameMaker project. This is a crucial step in the game development process, as sound effects and background music can significantly enhance the gaming experience. The process is straightforward and can be easily followed by beginners.
Step 1: Create a Sound
The first step is to create a sound in your project. To do this, right-click on the “Sounds” folder in your asset browser and select “Create Sound”. This will create a new sound asset in your project which you can then rename. It is recommended to name your assets using the type of the asset in the name. For example, if you are importing background music, you can name it “SFX_BG_Music”.
Step 2: Import Your Audio
Once you have created your sound asset, you can import your audio file. Click on the three dots (…) next to the “Audio” field to open a file browser. Navigate to your audio file, select it and click “Open”.
Step 3: Compress Your Audio (Optional)
If you have a lot of audio files or if your files are long, you might want to consider compressing them. This will reduce the size of your audio files, which can help to improve the performance of your game.
Step 4: Set the Output to Stereo
In the “Options” section, set the output from “Mono” to “Stereo”. This will ensure that your audio plays back in stereo, which can provide a more immersive gaming experience.
Step 5: Adjust the Audio Level
It is always a good idea to double-check the audio level of your sound assets. This is because sound effects and background music can often be much louder than expected, which can be jarring for players. To adjust the audio level, use the volume slider in the “Audio” section. You can preview the audio by clicking on the “Play” button.
Now, you have successfully imported an audio file into your GameMaker project. Remember, the right sound effects and background music can significantly enhance the gaming experience. So, choose your audio files wisely and always keep the audio level in check.
Creating Your First Object
Now that we understand assets, we will be creating our first objects in our GameMaker free course. Objects are a crucial part of game development in GameMaker as they are the entities that the player will interact within the game.
Creating an Object
To create an object in GameMaker, follow these steps:
- Right-click on the ‘Objects’ folder.
- Hover over ‘Create’ and then click on ‘Object’.
- Name your object. It is common practice to use ‘obj’ as a prefix. For instance, if we are creating a player object, we can name it ‘objPlayer’.
After creating the object, you need to select a sprite for it. A sprite is a graphic that will be displayed for that object. You can select a sprite from the ‘Sprites’ folder. For example, we can select the ‘player’ sprite for our ‘objPlayer’.
Setting the Collision Mask
Next, you need to set the collision mask for the object. The collision mask is the area of the sprite that is considered when calculating collisions between objects. GameMaker usually defaults the collision mask to a box around the outermost pixels of a sprite. However, it’s always a good idea to double-check this before moving on.
Other Object Properties
There are also some other properties that you can set for your object:
- Visible: Determines whether or not the object is visible when it is first instantiated.
- Solid: If set to true, whenever a sprite attempts to move into the object, it will automatically stop. However, the game will not process the collision as actually occurring. Hence, it is generally recommended to keep this off.
- Uses Physics: This relates to the physics system of the engine, which we won’t be covering in this GameMaker free course.
- Persistent: If checked, the object will remain when you swap between rooms and levels. This is useful when you want to maintain certain aspects of the game, like the player’s inventory or health bar, across different levels.
Once you have set all these properties for your object, you can proceed to create objects for your other sprites. However, note that you don’t need to create an object for your background as backgrounds are handled differently in GameMaker.
That’s it for this section. We have now created our first objects in GameMaker.
Placing Objects
Next for our GameMaker free course, we will learn how to place objects in our game level.
Setting the Level Size
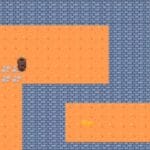
Begin by double-clicking on the room, which will present you with a blank black screen. The first thing we want to do is change the width and height of our level. Navigate to the left side of the screen and set the width to 750 and the height to 384. This size is suitable for working with 32 by 32 assets and for creating a small, simple scene.
Setting the Background
Next, let’s set the background. You can select any of your sprites for this. For this GameMaker free course, we will choose the dirt or sand texture. Initially, it will appear only in the corner, but don’t worry, we can adjust this. We can set a default color for our background. If you want to create multiple levels with the same background, changing the color slightly can give the illusion of a new environment. However, for this GameMaker free course, we will keep the default white color.
You can expand the background to the rest of the screen using the following options:
- Stretch: This will stretch the texture to the size of the room.
- Horizontal tiling: This will tile the texture across the screen if you made a very tall sprite.
- Vertical tiling: This will tile the texture vertically.
- Both: This will duplicate the texture across the screen.
For this GameMaker free course, we will choose the ‘Both’ option. You can also set a speed for your background, which might be useful for creating a scrolling background for certain types of games.
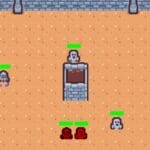
Placing Objects
Now that our background is set, let’s place one of our objects. Ensure that you are on the instances layer, then drag your object in. If you want to create multiple instances of an object, you can hold the Alt key on your keyboard and click and drag. If you make a mistake, you can use the Shift key to select multiple objects and then press Delete.
Finally, add a player and an arrow to your scene. Launch the game to see your newly created level. Congratulations, you have created your first level!
GameMaker Free Course Wrap-Up
And with that, you’ve completed this GameMaker free course! Now, your toolkit is packed with knowledge on installing GameMaker, organizing assets, and using the editor efficiently. From here, feel free to experiment by creating new objects, adding animations, or even incorporating more complex audio and visual effects.
For further learning, explore our additional resources and tutorials to help you bring your game ideas to life. We can’t wait to see what you’ll create with GameMaker – happy developing!
Get industry-ready with the GameMaker Academy! Perfectly suited to any skill level, you’ll get the tools you need to succeed while building a slew of projects!
Did you come across any errors in this tutorial? Please let us know by completing this form and we’ll look into it!

FINAL DAYS: Unlock coding courses in Unity, Godot, Unreal, Python and more.