You can access the full course here: BUILD A COMPLETE ARCADE GAME IN GAMEMAKER
Table of contents
Introduction
Welcome to this GameMaker 2D tutorial where we’ll walk through the steps of creating and animating a dynamic background for a game. By the end of this tutorial, you’ll know how to set up a background sprite, apply scrolling, and use physics to create engaging visual effects that will add a sense of motion to your game.
We’ll also dive into setting up a player character with jump mechanics and how to create boundaries using walls to keep your player within the game’s visible area. These concepts will give you a strong foundation in GameMaker’s powerful game development tools, even if you’re just starting out! You can also dive into the full Build a Complete Arcade Game in GameMaker to explore more GameMaker 2D mechanics.
GameMaker 2D – Project Files
To facilitate easy learning, we’re providing you with a downloadable set of assets used in the tutorial: Download Project Files
To follow along with this tutorial, you should be familiar with the following concepts:
- Basic GameMaker Studio usage, including creating and applying sprites
- Working with layers and properties within GameMaker Studio

Background
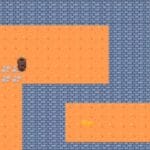
In this tutorial, we will be covering how to create and animate a background for a room game using GameMaker. GameMaker is a powerful tool that provides an easy way to set up backgrounds for your game, even allowing for animations that can make your game more interactive and interesting. In this case, we will be using a sprite as our background and moving it horizontally to give the player a sense of movement.
Setting up the Background Sprite
Firstly, we need to set up our sprite. GameMaker allows us to use any image as a sprite, which will then be used as the background. Follow these steps to set up your sprite:
- Go to the sprite folder.
- Right-click and select ‘Create’.
- Select ‘Sprite’ and name it ‘SPR background’.
- Click on ‘Import’ and navigate to your assets folder to load in the background image.
Now you have set up your sprite and it’s ready to be used as a background in this GameMaker 2D project.
Applying the Background Sprite
Once the sprite is set up, we need to apply it to our game room. To do this, head back to your game room and navigate to the background layer. Here, you can select the sprite that you just created for this GameMaker 2D project.
Adjusting the Background Properties
By default, the background might not look perfect. It might not cover the entire screen, or it might appear static. GameMaker provides a host of properties that you can adjust to fix these issues:
- Stretch: This setting allows the background to fill the entire screen. Simply enable this and your background will stretch to cover all available space.
- Scroll Speed: GameMaker allows you to set a scroll speed for the background. This can be used to create a sense of movement. For our example, we want the background to scroll horizontally to the left, so we set the x-axis speed to -5.
- Horizontal Tiling: If you have enabled scrolling, you might notice that the background repeats after a while. To fix this, you can enable horizontal tiling, which will infinitely repeat the background in the x-axis.
With these settings adjusted, your background is now set up and ready to go for our GameMaker 2D project. It will scroll horizontally, giving a sense of movement, and will infinitely repeat so that it never runs out. This can greatly enhance the visual appeal of your game and provide a more immersive experience for your players.
Player
In this lesson, we will start creating our player in our GameMaker 2D project. Our player will have many functions, events, variables, and so forth. Right now, we will focus on creating the jump functionality for our player.
Creating a New Object
- First, we create a sprite and then an object containing that sprite.
- Inside the object, we add all the events and lines of code that we need to make that object behave as we want.
Let’s create a new sprite and call it SPRPlayer. We’ll import our player assets into it. Then, we’ll create the object player (OBJPlayer) and load the sprite into it.
Adding Events
Now, we can add the corresponding events to make our player jump. We want our player to jump when we release the left button of our mouse, regardless of where the cursor is on the screen. We’re going to use the “global left released” event for this part of our GameMaker 2D project.
Creating a Jump Force Variable
To create the jump, we need a variable to store our jump force. We’ll create a variable called “jump force” with a value of 1000.
Applying the Jump
We want to apply an impulse upwards whenever the “global left released” event happens. To do this, we can use the “physics_apply_impulse” function provided by GameMaker. This function requires the X and Y positions where the impulse will take place (our current X and Y positions), and the impulses to be applied on the X and Y axes. As we want to apply a jump, we only need to modify the Y-axis. Therefore, we provide a zero for the X impulse and our “jump force” for the Y impulse.
// Apply an upward impulse when the left mouse button is released
physics_apply_impulse(x, y, 0, -jump_force);
Enabling Physics
Since we’re using a physics function in this GameMaker 2D project, we need to enable physics in our object and also in our room. To enable physics in the object, we can simply check the “Uses physics” checkbox in the object’s properties. To enable physics in the room, we need to check the “Enable physics” checkbox in the room’s properties.
Fixing Rotation
Our player may rotate all the time due to the physics impulse. To fix this, we set the “phy_fixed_rotation” variable to true in the object’s Create event. This will prevent the player from being affected by rotational forces.
And that’s it! We now have a player object that can jump. In the next lessons, we will continue to build upon this player object and add more functionality to it.
Walls
In this lesson, we will learn how to add walls in a game to prevent the player from exiting the screen in our GameMaker 2D project. This feature is crucial in game design as it ensures the player remains within the boundaries of the game environment. We will achieve this by creating a new sprite, assigning it to an object, and using physics to allow the object to interact with the player.
Creating a New Sprite
Firstly, we will create a new sprite. We will name this sprite SPR wall. The color of the sprite doesn’t matter as we will not render it. However, for visibility in the editor, we will give it a white color. We will use the fill tool to fill in the square. This gives us our sprite wall.
Creating an Object for the Sprite
Next for our GameMaker 2D project, we need to create an object that will store this sprite. We will name this object obj wall. We then assign the sprite wall to the obj wall. We don’t need to add any event or code to this object.
The reason we create an object for the sprite is to allow it to interact with the player. We want the object to stop the player from moving out of the screen. This behavior needs to be inside an object because sprites are just images that don’t interact with the environment or collide with the player. Objects, on the other hand, can collide with others.
Adding the Walls in the Game
Now we need to add these walls in our game. We can do this by dragging and dropping the obj wall into the instances layer of our room game. We will make the walls a bit bigger and move them to the outside of the screen.
Using Physics
One important thing to remember is that if we want to detect collisions between objects, both objects must either use physics or not. In this case, our player uses physics, so we need to make sure that the wall also uses physics.
However, when we enable physics for the wall, gravity is applied to it, causing it to fall down. We can prevent this by setting the density of the wall to zero in its physics settings. A density of zero means that the object has no weight, and therefore, gravity won’t be applied to it.
density = 0
Hiding the Walls
If we want to hide the walls in the GameMaker 2D editor, we can decrease their alpha (transparency) to zero. This way, the object is not visible but still exists in the game. We can still modify or move it by double-clicking on it in the instances layer.
With these steps, we have successfully added walls in our game that prevent the player from exiting the screen. The walls interact with the player through physics, stopping the player’s movement when a collision is detected.
GameMaker 2D Wrap-Up
And there you have it! You’ve now successfully built a game environment with a scrolling background, a jumping player character, and boundary walls to keep the action contained. By applying these techniques, you can make your game world feel more immersive and responsive.
Feel free to experiment by adding more features, such as enemy characters, scoring systems, or even parallax scrolling to create a sense of depth. The knowledge gained here can be a valuable asset as you continue your game development journey in GameMaker 2D.
We hope you enjoyed this tutorial and are excited to keep building awesome games! For more lessons, tips, and projects, check out our other tutorials and courses on Zenva Academy. Happy coding!
Did you come across any errors in this tutorial? Please let us know by completing this form and we’ll look into it! FINAL DAYS: Unlock coding courses in Unity, Godot, Unreal, Python and more.
Transcript – Background
Hello there and welcome to a new lesson. In this one we will create the background for our room game.
So basically here GameMaker does provide a quite handy way of creating this background because it already creates a background layer that, as we have been discussing in the menu room, well basically here you can set any color. However, in this case, what we want to set instead of a color is a sprite. We want to show the background sprite that we saw in the assets lesson. And not only do we want to show it, but also to move it to the left so that we give the player the feeling of movement. This is going to make much more sense once we actually set up this background.
So as you can see, it requires us to provide a sprite as we want to have as a background. So in here, let’s go here to the sprite folder, right-click, create, and then here sprite. I’m going to be calling it SPR background. And right here I’m going to click import, and basically here I will go to my assets folder and I will load in the background. Okay, so here I have it.
Now, after doing this, I’m going to come back to my game room. And inside of the background layer, I will select here the sprite that I have just created. And here actually we have some properties that we can modify. Because right now if we play, and we go to this room, once we click here the play button, it looks a little bit weird.
Okay, so how to fix this? First of all, as you can see the background is not covering all the screen. So in order to avoid that we have to enable stretch. Okay, so it will basically stretch to fill all the background space, quite easy. Now, when we play again, we can check that we do have a much better result. But as I told you, I want to be scrolling my background like this, as if we were moving.
And here, what is pretty good about GameMaker is the fact that here it provides a speed value that you can modify. So as I explained, we want to move to the left. Okay, I want to scroll in this direction, so I want to move horizontally to the left and that will be my x-axis. And for example, the speed that I will provide is something like minus five. Okay, now when I play again, you can see that indeed it is scrolling, but well then this happens. Okay?
Basically our background is not being repeated. So basically, to enable horizontal tiling, we set our background to be infinitely repeated in the horizontal axis. And as you can see, it is impossible to realize that we are actually only using one background that is moving and tiling horizontally.
So as you can see, the effect is quite cool and actually gives the feeling of movement. That is what we are looking for. And basically with this, we do have our background set correctly.
Transcript – Player
Hello there and welcome to a new lesson. In this one, we will start creating our player. Our player will basically have tons of functions, events, variables, et cetera. So it’s actually an object that we are going to be modifying in a variety of lessons, okay? Right now, we are going to focus on creating the jump.
As I’ve already explained, the process of creating a new object that appears on the screen and has some code is quite similar in all cases. You first create a sprite, then an object containing that sprite, and finally, inside the object, you add all the events and lines of code needed to make it do what you want. So, let’s create a brand-new sprite called SPRPlayer, and I will import my player assets. Here we have it.
With the sprite player ready, I’m going to create the object player. I’ll create an object, OBJ player. Then inside this object player, let’s load in the sprite; you can even drag and drop it right here if you want—it’ll work the same way. Now, we can add the corresponding events to make our player jump.
Basically, I want the player to jump when I release the left button on my mouse. As I explained in a previous lesson, there are different events that seem similar but are actually very different. Given that I’ve already explained these events, I’ll make my player jump when the global left mouse button is released—meaning I don’t want to jump only when the left mouse button is released over the player, but in any space in the game room.
If I used the left released event, it would only trigger if the left mouse button was released while hovering over the player, which I don’t want. That’s why I’ll use global left released. I’ll mark this with “jump” in the description, as we’ll code the jump here.
To implement the jump, we need a variable to store our jump force. Under variable definitions, I’ll add a variable called jump force, with a value of 1000, and the type will be an integer. Here, you can see explanations of each value type if needed. Now, with this variable, we’ll apply an impulse upwards whenever the event occurs.
GameMaker provides a handy function called physics_apply_impulse, which will require us to provide some arguments. The X and Y positions indicate where the impulse will occur; this will be my current X and Y position. Then, we specify an impulse in the x-axis and y-axis. Since jumps usually modify only the y-axis, we’ll set the x-axis impulse to zero. For the y-axis, I’ll set it to negative jump force because GameMaker’s Y-axis decreases as you go up, so a negative value is needed to go upwards.
After adding the player sprite to the room, let’s look at the Y value. As I move it up, it decreases. This confirms we need a negative value to go up. Now, since we’re using a physics function, we must enable physics in our object by checking the appropriate box. This allows us to use physics functions and variables related to physical behaviors.
When we play, however, we’ll see no physics effects yet and an error saying the instance lacks an associated physics representation. This is because physics aren’t enabled in the room by default, which we need to do since we’re applying a physics-related function. Let’s go to the room settings, and under room physics, we’ll enable physics. Now, when we play, we’ll see physics applied, but there are some issues.
Firstly, the gravity is too weak, so the player takes a long time to fall, and the jump force seems overly strong. If we click two or three times, the player will disappear. So, let’s adjust the gravity to a value like 65, which should work much better. Trying again, we see that gravity and forces now function properly. You can experiment with different values for gravity and jump force, but our player is still rotating.
To fix the rotation, go into the object player and, in the create event, enable fixedRotation. This prevents the instance from being affected by rotational forces. The impulse is still applying rotation, so this step ensures our player isn’t affected by unintended rotations from the physics impulse.
Now, as you can see, we have our player movement finished, and it works quite well.
Transcript – Walls
Hello there and welcome to a new lesson. In this one, we will actually add some walls to the player. Currently, the player works quite well, but as you can see, we can exit the screen on the top and bottom, which we want to avoid. If not, the player would be able to leave the screen, and we don’t want that.
So, let’s go ahead and add some walls that will prevent us from leaving the screen. To start, let’s create a brand new sprite that I’m going to call “SPR wall.” Make sure it follows the same pattern you used in the previous sprites and objects. Here, I won’t actually render this wall, so the sprite color doesn’t really matter, but to see it in the editor, I’ll give it a white color and fill in the square.
Now we have this sprite wall, and as before, we need an object to store this sprite. So, let’s create it and call it “obj wall.” Then, let’s drag and drop the corresponding sprite. In this case, we won’t add any events or code to it. You may be wondering why we’re creating an object for this. This is because we want the object to interact with the player, to stop the player from moving off the screen. Sprites are just images and don’t interact with the environment, so we need an object that can collide with others.
In our game room, we’ll need to create these walls. Make sure you’re inside the instances layer, and then we can drag and drop them in. First, let’s make them a little bigger so they fit well, and I’ll position them outside the screen. I’ll do the same for each wall, placing them as needed.
Now, when we play the game, you’ll see the walls aren’t working as expected; they aren’t colliding with the player. Why? Our player uses physics, but our wall object doesn’t. To detect collisions, both objects need to either use physics or not. Since our player uses physics for jumping, we need to make sure the wall uses physics too. We don’t need to apply gravity or other forces to the wall, as we won’t add any code to it, but we still need to enable “uses physics” so it can collide with the player.
When we run the game now, the walls will fall down. Since we enabled physics, gravity is applied to the walls, just like with the player. To disable gravity for the wall, you might think of disabling physics or decreasing gravity for the entire room, but that would affect the player too. To disable gravity for just the wall, go into the wall object’s physics settings and set its density to zero. With density set to zero, gravity won’t apply because it’s like the wall has no weight, and physics can’t act on it.
Now, with this setup, the wall should work just fine. Another thing to clarify: if you want to hide the walls in the editor (since they may not look nice as visible blocks), you can double-click on them, adjust the color, and decrease the alpha to zero, making them transparent. Once done, you won’t see them, but they’ll still be there. If you need to move them, you can find them in the instances list, double-click to open their menu, and adjust as needed.
The advantage here is that we can position them anywhere, and they’ll remain transparent. This allows you to adjust player movement boundaries by placing walls closer inside the screen if desired. This technique will come in handy later when we create the health bar and restrict player movement even more.
Right now, I’ll position my walls a little off the screen. The results will be the same, but now they’re completely transparent, allowing you to place them wherever you want. I’ll see you in our following lesson.
Interested in continuing? Check out our all-access plan which includes 300+ courses, guided learning pathways, new courses monthly, and more!