There are plenty of sites where you can find free images for your games, but sometimes it can be difficult to find exactly what you’re looking for. What if you could create your own Phaser game images from scratch, even if you have no artistic abilities? In fact, wouldn’t it be great if you could create game sprites and texture atlases based on objects, people, and animals from your own life? That is exactly what we will be covering in this tutorial!
Table of contents
Learn Phaser by building 15 games
If you want to master Phaser and learn how to publish Phaser games as native games for iOS and Android feel free to check Zenva‘s online course The Complete Mobile Game Development Course – Build 15 Games.
Tutorial asset files
You can download the tutorial source code files here. All the project files are located in the main folder. The asset folder contains additional intermediate files that were used during the process of creating the game sprites.
Tutorial goals
This tutorial will explain how to create cartoon versions from real photos for use within any game, with a focus on Phaser.
1. Learn how to cut out a portion of a photo and clean it up in preparation for creating a cartoon version for use in a game.
2. Learn how to create a cartoonized version of a photo.
3. Learn what a texture atlas is and how to create one using TexturePacker.
4. Learn how to load a texture atlas into Phaser and use it to create animations.
Tutorial requirements
- Basic knowledge of JavaScript may be helpful for the Phaser portion of the tutorial.
- Download and install the free GIMP photo editing software.
- Download and install the free Inkscape vector image software. If you use Mac OS X, you will need to download and install XQuartz first.
- Download Phaser from it’s Github repo. You can either clone the repo or download the ZIP file.
- Download and install TexturePacker. This is the only software we will be using that is not free, but you can use it to test your texture atlases and animations for free.
Find an image
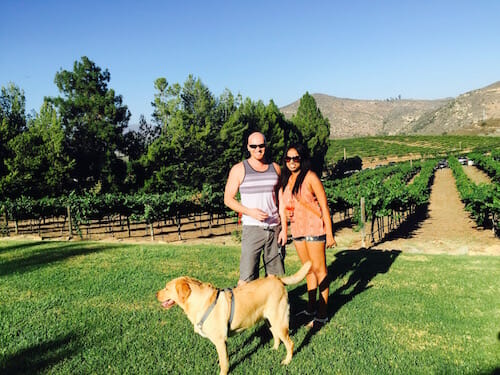
Since we are focusing on creating images for this tutorial, we will begin with an image. For my last tutorial, I wanted to create some dog animations. I couldn’t find free dog photos that I needed, and I have absolutely no artistic drawing capabilities, so my brother provided me with a few photos. I will focus on just one of the photos, because it was the most difficult one to clean up, and covers just about all the processing you may come across.
As you can see, the dog (Max) in this photo is not only skewed, but one of his feet is completely out of the frame, and he’s wearing a harness! Don’t worry, we can fix all of these problems, and it’s not as difficult as you may think.
Cut out the image with GIMP
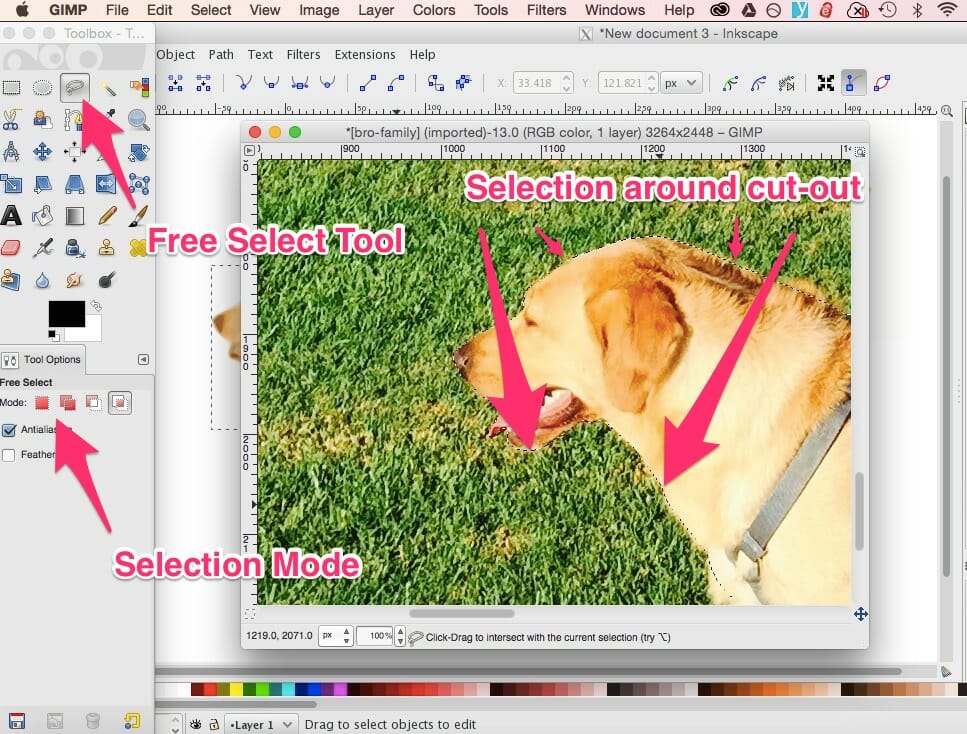
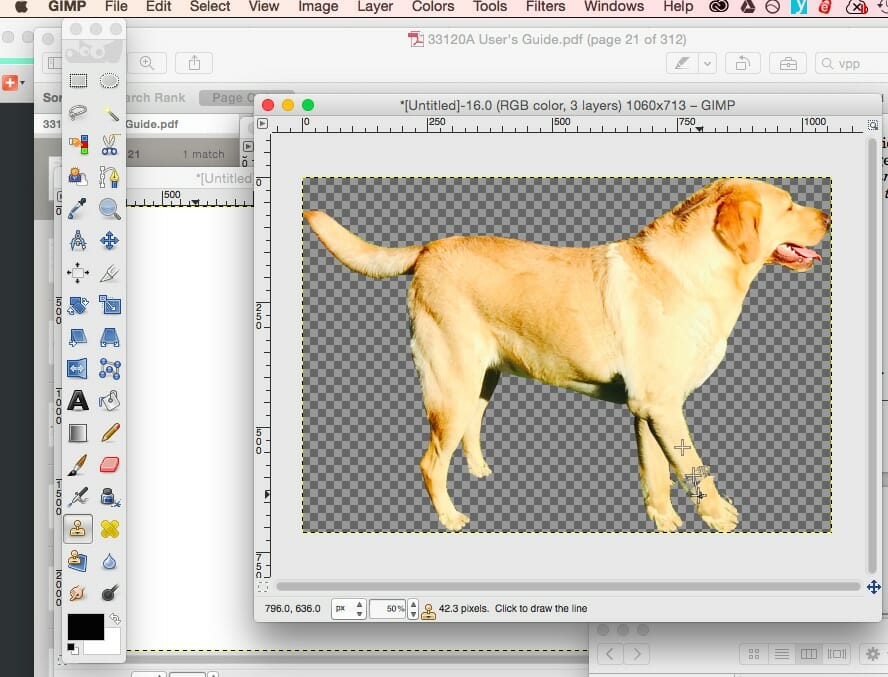
First of all, we need to cut Max out of the photo. If we open the photo in GIMP, we can use the Free Select Tool from the toolbox to select our shape. Simply start anywhere along the edge of the shape you wish to pull out and continue clicking along the entire perimeter. Finish the shape by clicking on the starting point.
If this does not create a selection area around the object (moving dotted lines), check the “Mode” under the “Free Select” section of the Tool Options (which you can find under Windows -> Dockable Dialogs, if it’s not already open). You will want to select a mode that either replaces the current selection or adds to it.
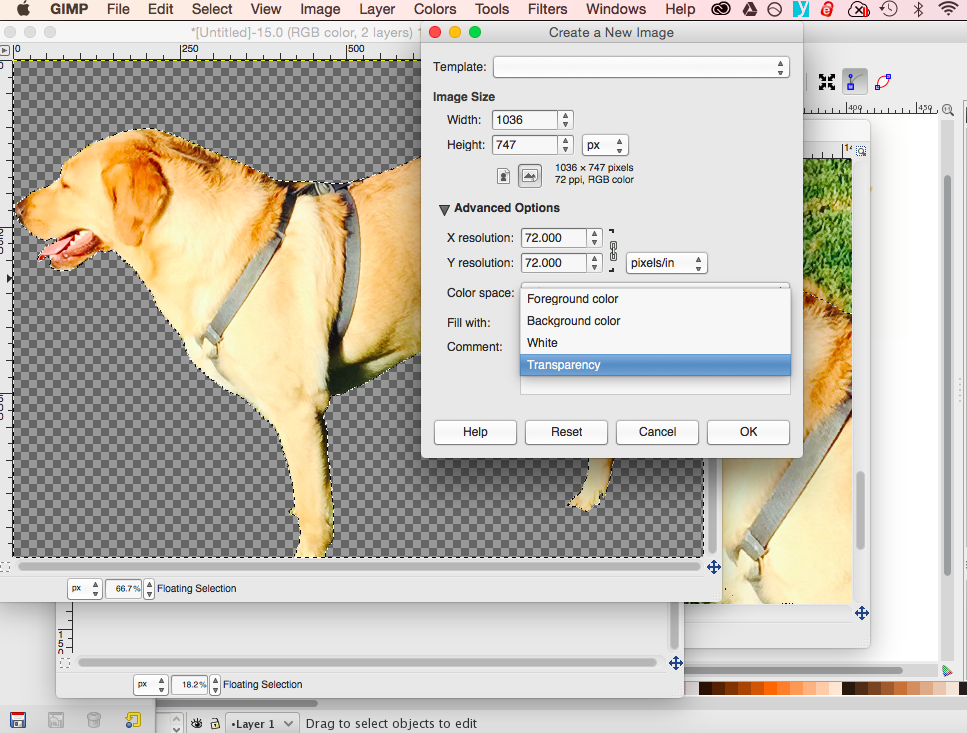
Once the object is selected, copy it (Edit -> Copy). Create a new GIMP file (File -> New). In the Create a New Image dialog box, choose Advanced Options -> Fill with -> Transparency, then press OK. The size of the new file doesn’t matter, as long as it’s larger than the object you are pasting (you can fix it with Image -> Canvas Size). Paste your selection into the new file. This is where it can get difficult, but you don’t really need to do more than necessary. Since we will be turning the photo into a small cartoon, it doesn’t have to be perfect.
Edit the image in GIMP
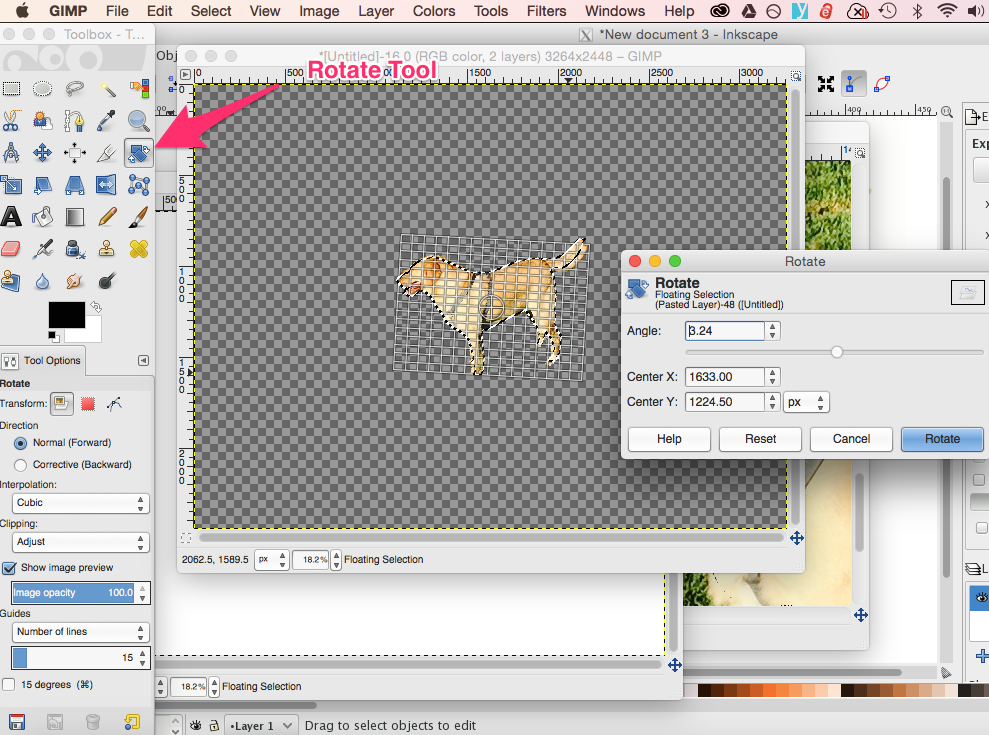
The most glaring problem with the photo is that it is skewed. All we need to do to fix this is choose the Rotate Tool from the toolbox and begin rotating the image on the screen. A dialog box will appear, and you can just move it aside so you can see what you’re doing. Once the two front feet appear to be flat on the ground (taking into account the foot that is outside the frame, which we’ll fix later), we’re finished rotating.
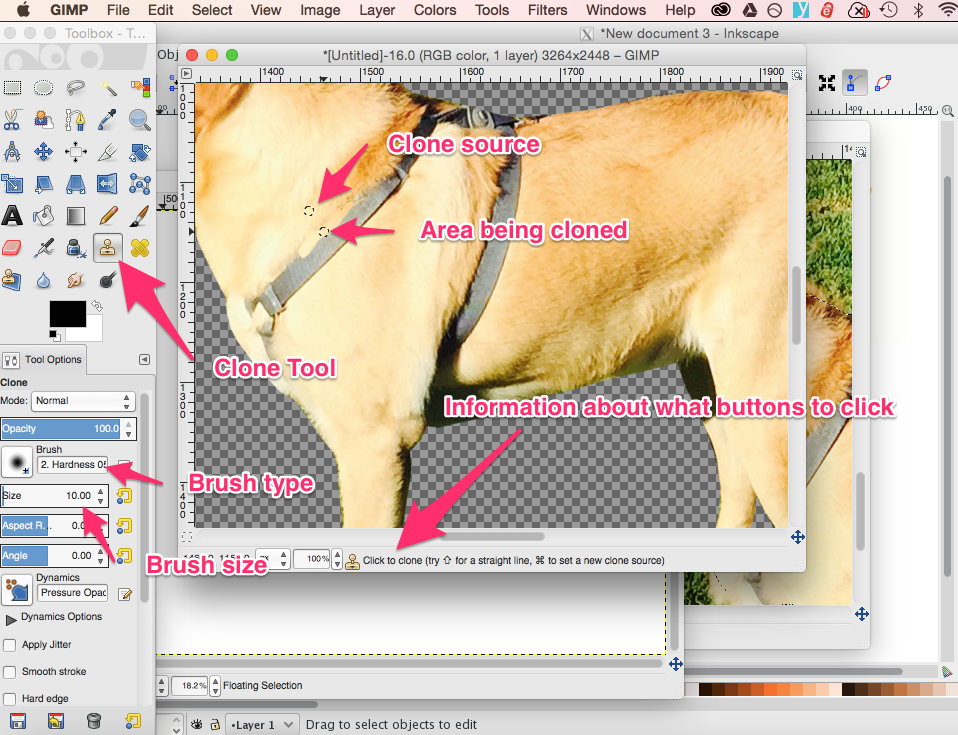
The next problem is the harness. This is relatively easy to fix by using the Clone Tool from the toolbox. Once the tool is selected, and the cursor is over the image, you will see a message telling you what key you need to press (it’s different for every operating system) in order to set a source. Just hold down that key and click on some of the fur next to the harness.
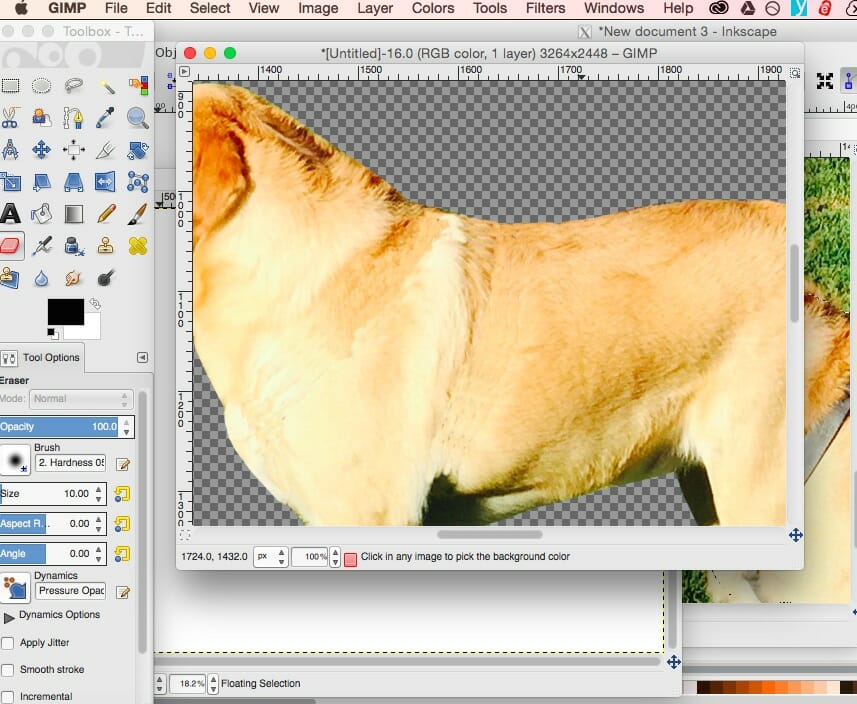
Once the source is set, begin coloring over the harness. You will want to keep the portion you are coloring in line with the source so you don’t get too many artifacts. Select a new source whenever you move to a section that needs a different color. You want to try to match the part you’re coloring to the fur that is closest to it so it will look as seamless as possible.
Amazingly, we can use the same Clone Tool trick for filling in blanks. For example, you can also use the Clone Tool to fill in the missing foot that was out of the frame!
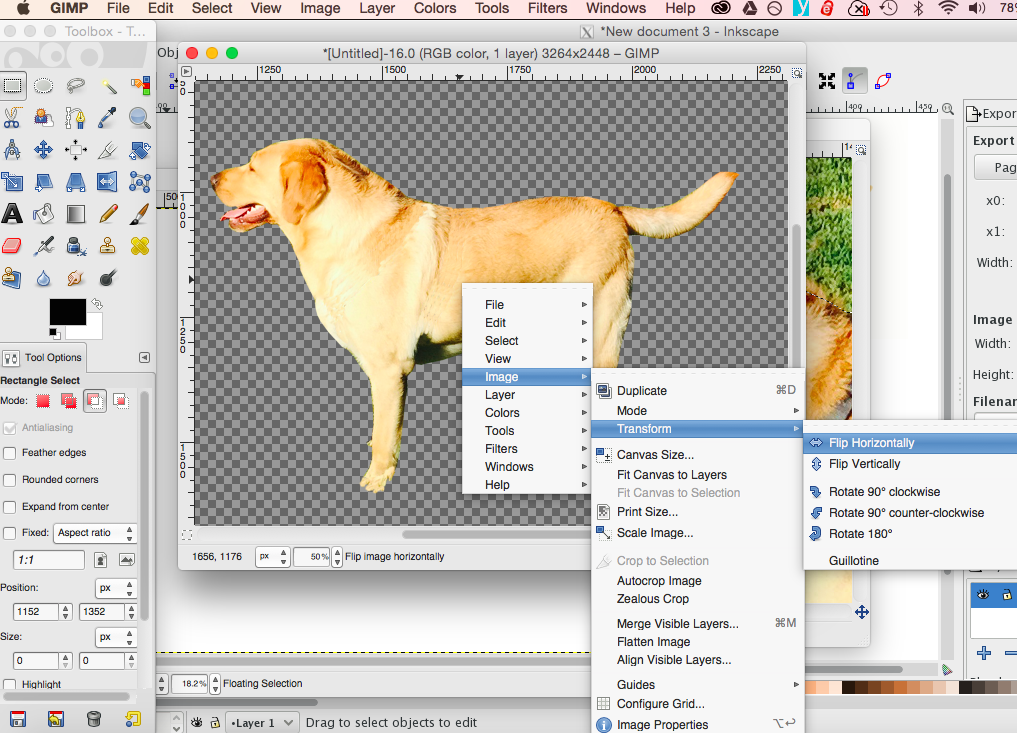
We also want to flip the image so Max is facing in the other direction. That’s easy, as you can see below:
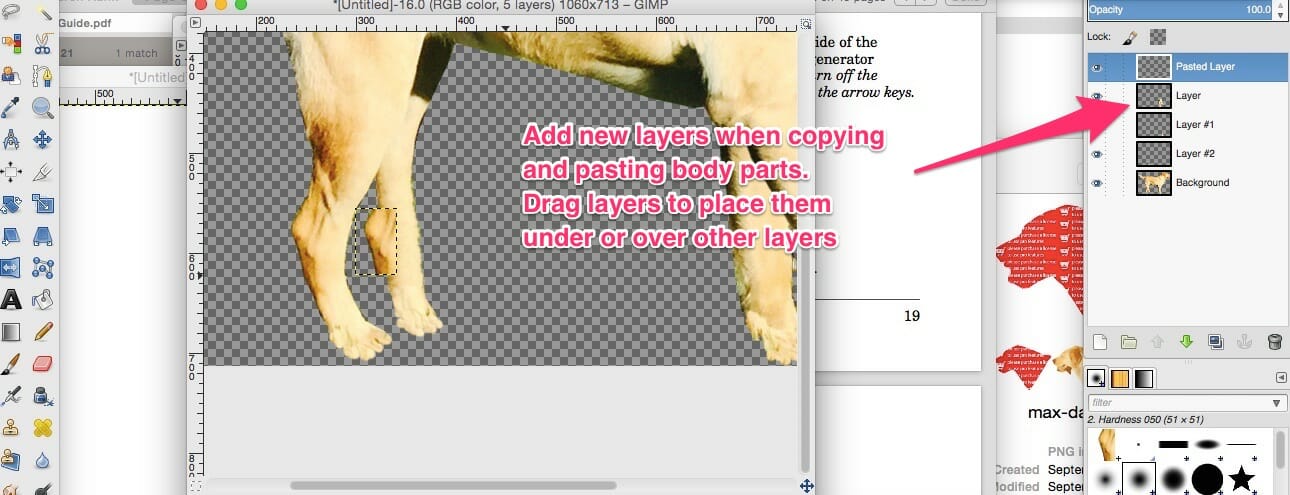
See how the back foot seems way too far up for the perspective we are attempting to achieve? All I did for that was cut the back foot off using the Rectangle Select Tool, created a new layer in the Layers window (Windows -> Dockable Dialogs if it’s not already there), then pasted the foot. Then I moved the foot down until I had the perspective I wanted, clicked back on the main layer, and used the clone tool to fill in the gap. I also copied a few details from the other leg, although that’s not entirely necessary. I also moved the layers around until I had them in an order that was easier to work with.
Create a new animation frame
Once we are happy with the first image, we will have to decide how we want to animate it. I created a very simple animation with just two frames. I decided that it would be easiest to use the photo resulting from the edits already made as the “step” frame, then remove the back legs to create a frame where Max appears to be standing straight.
In order to do this, I made a copy of Max’s front leg, pasted it in a new layer, rotated it lengthened it, and used the clone tool to fill in any problem areas (similar to what we did with the back foot. I also used the Eraser Tool to erase part of the foot so it wouldn’t look like he had two of the same feet.
At this point, we select Image -> Autocrop Image, to make it the exact size of the edited dog. Then, we save the file. Select File -> Export, choose GIF as the file type, and save it. Now select File -> Save As to create a copy of the file. This will be our other animation frame.
Now we can simply delete all the layers in the Layers window, except our main layer. We also want to use the Eraser Tool to remove that back leg. Save the new file. Again, choose File -> Export to export our new GIF. We now have our other frame!
Convert photos to cartoons with Inkscape
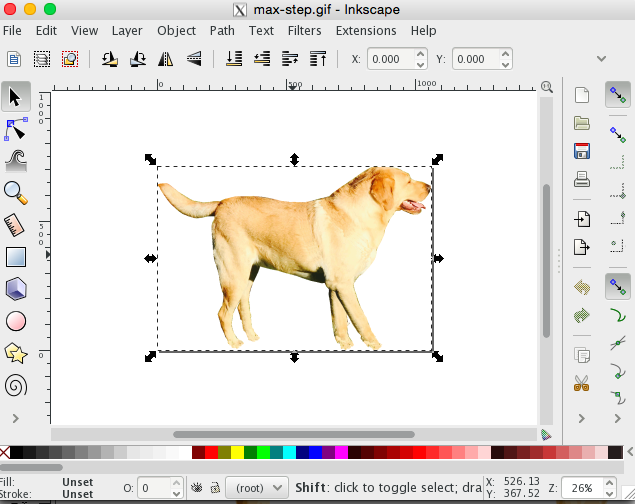
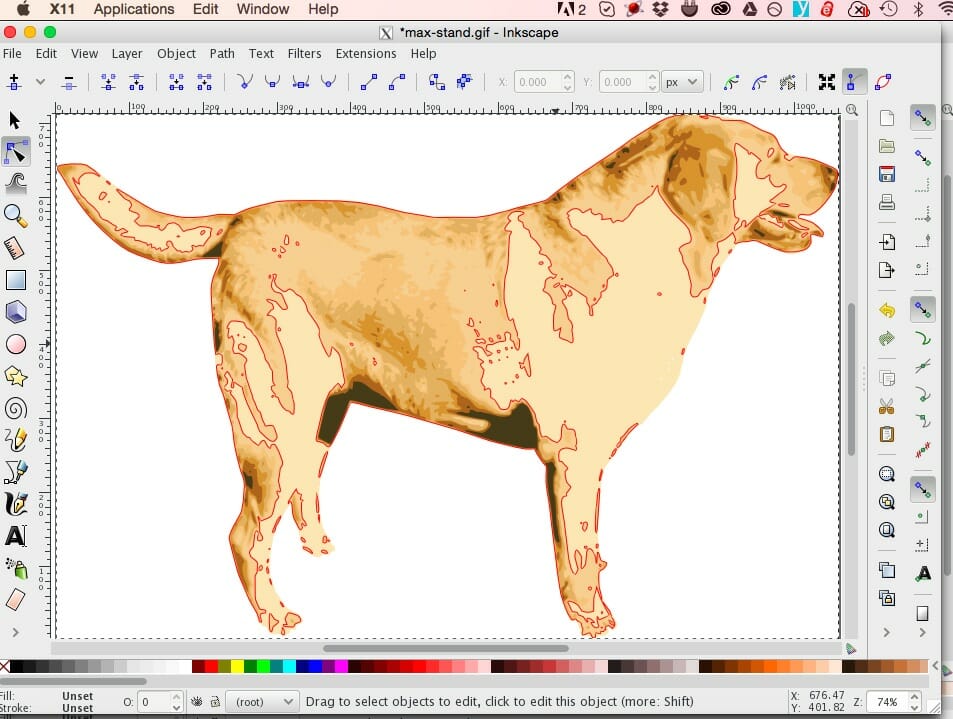
Open one of the GIF files in Inkscape. It’s OK to keep the default settings. Click the image on the page to select it, so that it has a bounding box around it like this:
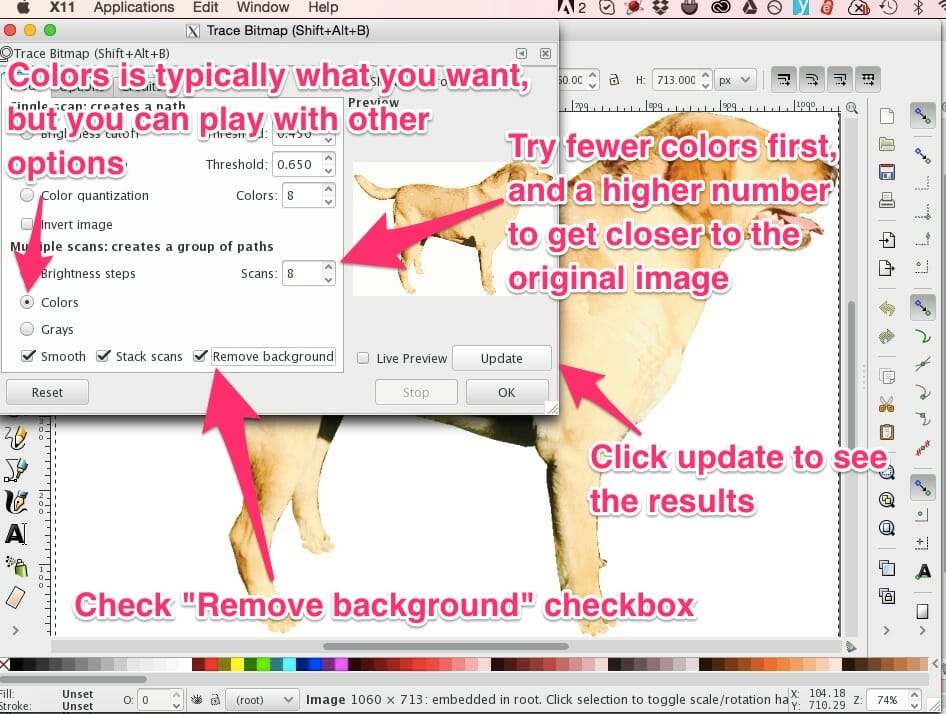
Now select Path -> Trace Bitmap. Select “Colors,” then check the “Remove Background” checkbox. The higher the number in the “Scans” dropdown, the more colors it will use, and the closer the vector will be to the original photo. Try different options and click “Update” to preview them until you are happy with the outcome, then press OK. You now have a vector cartoon version of your photo!
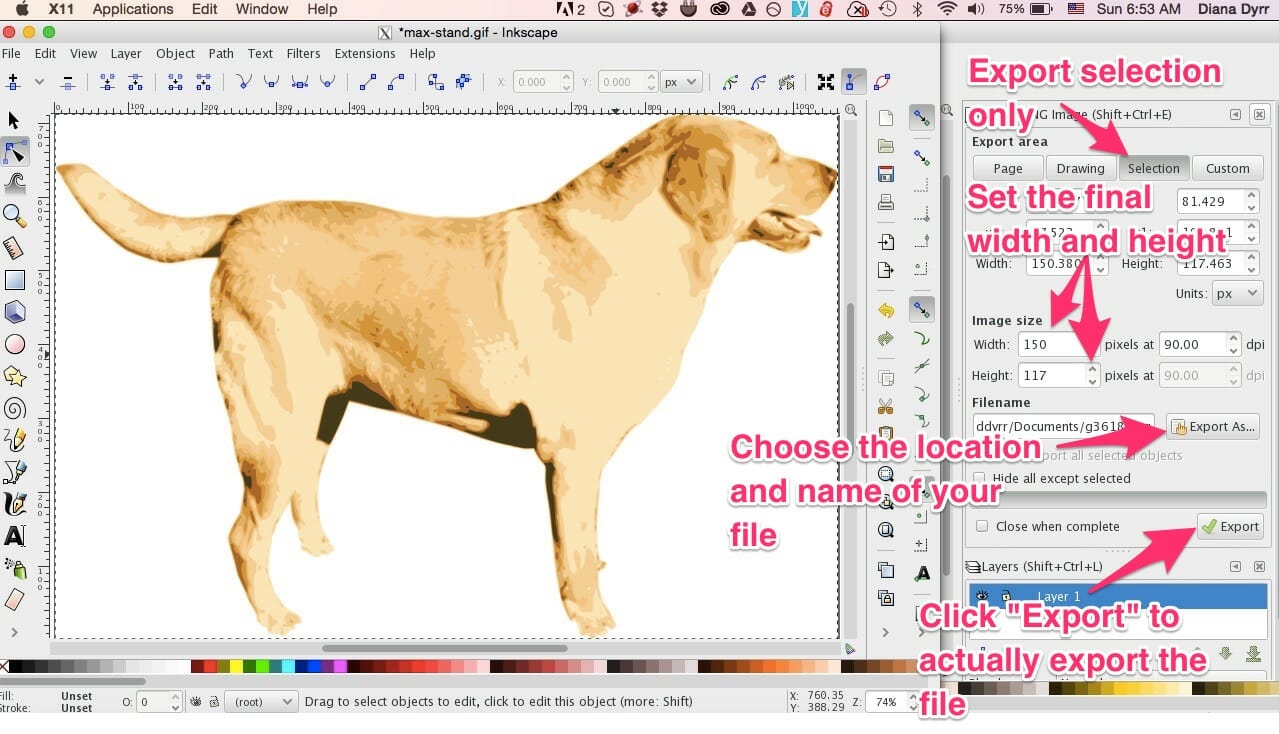
To export the new vector into the format needed for the game, click on the image you wish to select (so it has the bounding box around it), then go to File -> Export PNG Image. You will be presented with a large box on the right. Click the “Selection” tab at the top of the box, then set the final width and height you would like for the image in your game (you will probably want a fairly small image unless this will serve as a background image). Click “Export As” to choose the location, then click “Save.” Note that this does not save the image! Farther down in the box is a button that says “Export.” Clicking this button will complete the final export of the image.
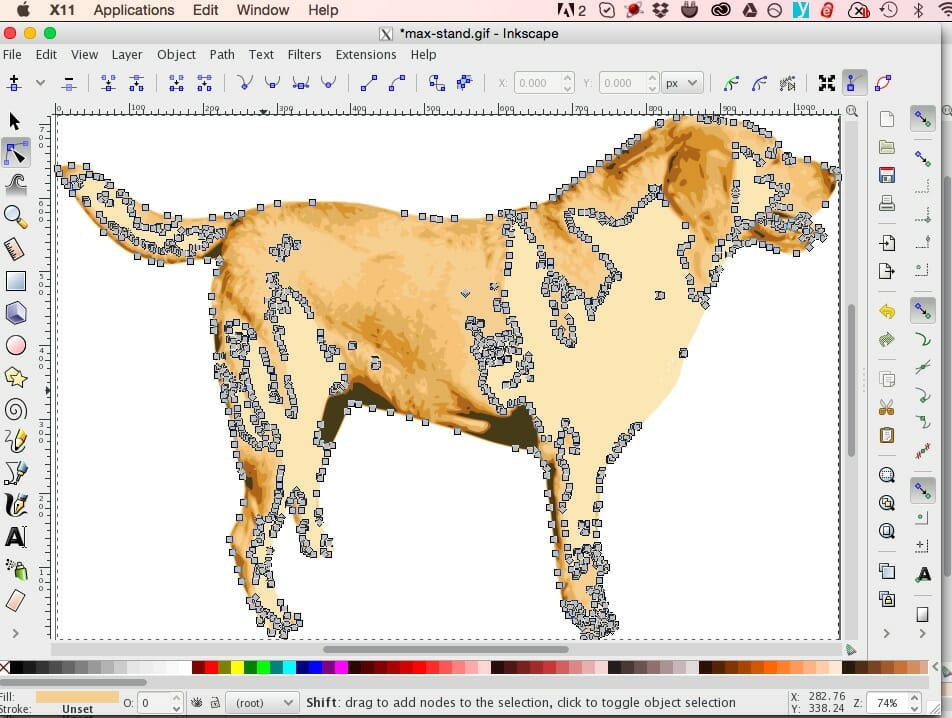
You can now do the same with the other GIF photo you exported from GIMP. Another option is to create other frame or frames with Inkscape. This depends on what you want to do with your animation. Once you have converted your photo to a vector, click the “Edit paths by nodes” tool. When you move the cursor over the image, you’ll see all sorts of lines:
If you click on the image, you’ll wind up with many points that can be moved around. Depending on the complexity of your image and what sorts of changes you wish to make in each frame, moving these points around may be the easier route to creating additional animation frames.
Create a texture atlas with TexturePacker
A texture atlas is a large “spritesheet” consisting of all the sprites (or images) that will be used in a game. The spritesheet is accompanied by a data file that details the exact location and size of every sprite, along with keys (labels) that can be used to reference each sprite.
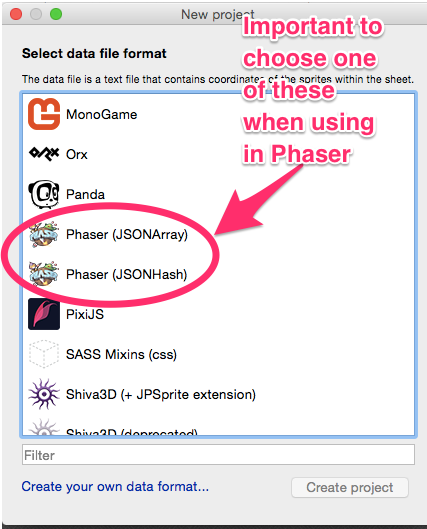
TexturePacker makes it extremely easy to add all of your game images and animation frames into a single spritesheet file, as long as you follow a couple of important rules. The first important step is to choose a Phaser-specific option. In this case, we chose “Phaser (JSONHash)” as the data file format when creating a new TexturePacker project. Once you click “Create project,” everything is simple.
You can either drag individual files or folders, or use the “Add sprites” or “Add smart folder” buttons to choose the images you will use in your game. This allows you to organize all of your images. If you have multiple characters that are animated with many frames, for example, you could create folders for each character that contain animation images for that character, then drag the entire parent folder into TexturePacker. The animation frames can contain a naming convention that will make adding the frames to the game more intuitive (TexturePacker automatically uses the file name as the key you will use to reference the frame in the game).
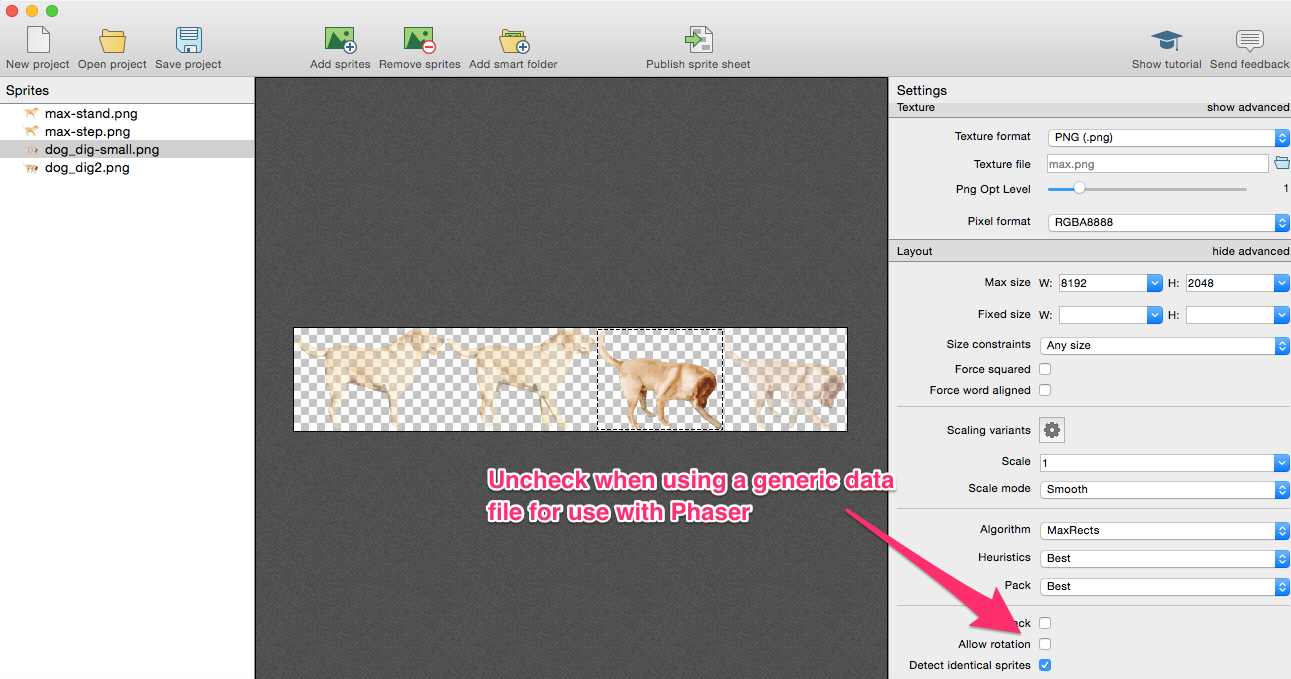
The second important rule when creating your file is one that you will probably never encounter unless you try to use the same image file in multiple game frameworks. If you were to choose the generic “JSON (Hash)” for the data file type rather than the Phaser-specific option, TexturePacker would create smaller spritesheets by rotating some of the images on the sheet. The problem is that Phaser is not compatible with rotation. In order to fix the problem, you would click the “show advanced” link on the “Layout” section of the Settings box on the right. Unchecking “Allow rotation” will fix the problem.
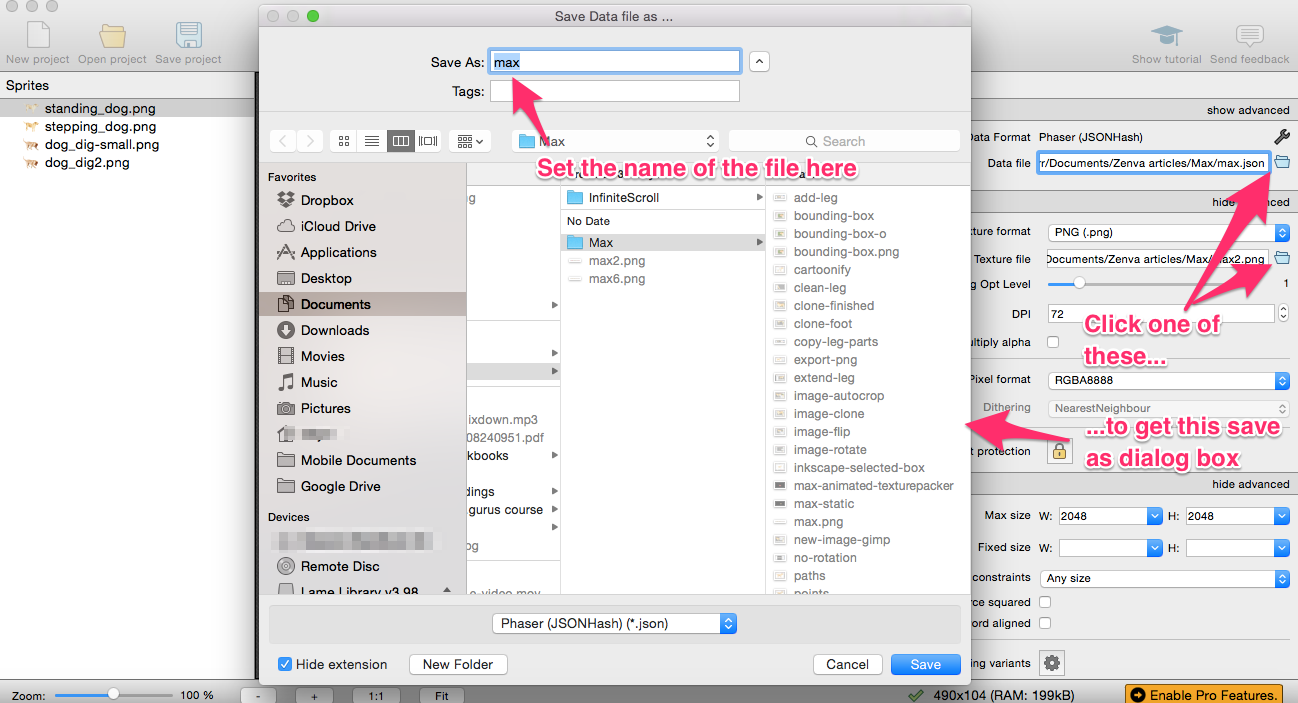
All that is left is to set the location and name for your “Data file” and “Texture file” in the Settings box on the right. Clicking the file selector button (the little folder picture) next to each box will allow you to search for the location of your project and set the name you would like in the “Save As” box. In most cases, you will not need to touch any other settings. Once you’re finished, just click the “Publish sprite sheet” button and you’re done!
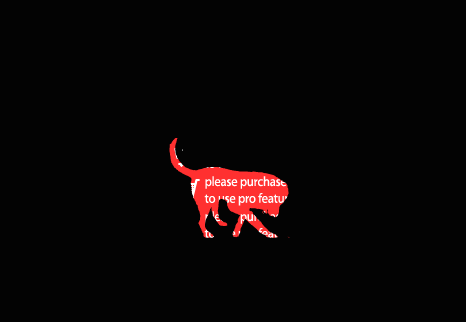
If you’re using the free version of TexturePacker, some of your sprites will be filled in with a solid red color with white text stating, “please purchase a license to use pro features.” It’s OK for now, because the sprites retain their shape, which means that you can still use the texture atlas to test your project, as I’ve shown below:
Load the sprites into Phaser
The Phaser project begins in a new folder containing an index HTML file, the Phaser javascript file, and the spritesheet and JSON data files you created in TexturePacker. Phaser can be copied from the “build” directory of the downloaded Phaser zip or cloned repository.
We are creating an extremely simple Phaser project for the purpose of testing our texture atlas, so our file structure is going to be minimal. Normally, we would create a game with states and organize multiple files in additional folders. To learn more about states and the best way to create a full game, please see this Phaser tutorial. For now, the following code goes into the index.html file.
<!DOCTYPE html>
<html>
    <head>
        <meta charset="utf-8" />
        <title>Learn <a class="wpil_keyword_link" href="https://gamedevacademy.org/how-to-learn-coding-for-beginners/" target="_blank" rel="noopener" title="Game Development" data-wpil-keyword-link="linked">Game Development</a> at ZENVA.com</title>
        <script src="phaser.min.js"></script>
    </head>
    <body>
      <!-- include the main game file -->
	    <script src="max-animation.js"></script>
    </body>
</html>
Our game is actually initiated within the max-animation.js file, and the Phaser framework is included with the phaser.min.js file. For the purposes of testing out our images, we will just be doing a very simple test within a single javascript file rather than using a set of state files.
Test the animations
Here’s the most basic javascript file needed for testing our animations in Phaser:
window.onload = function() {

  var max;

  var game = new Phaser.Game(800, 400, Phaser.CANVAS, '', { preload: preload, create: create, update: update });

  function preload () {
    //load the json from TexturePacker
    game.load.atlasJSONHash('max', 'max.png', 'max.json');
  };

  function create () {
    //Load the initial sprite
    max = game.add.sprite(0, 180, 'max', 'max-step1');

    //create the animation for walking using the frame names we want from max.json
    max.animations.add('walk', [
        'max-step1',
        'max-step2'
    ], 10, true, false);

    //same for the digging animation
    max.animations.add('dig', [
        'max-dig1',
        'max-dig2'
    ], 10, true, false);

    //start up the walk animation
    max.animations.play('walk');
  }

  function update() {
    //once Max walks a bit, have him stop and dig
    if(max.x >= 400){
      max.x = 400;
      max.animations.play('dig');
    }
    else {
      //otherwise, have him move to the right
      max.x += 3;
    }
  }
};
The “max” variable is our main character in the game. The next statement creates our game canvas. To learn more about the game creation statement and the Phaser.CANVAS option, please see my previous tutorial.
Next comes three functions that are predefined in Phaser, and will need to be extended in order to make the test work. The preload function is where all images, sounds, and other assets should be loaded so they are available before the game actually begins.
In our case, we have just a single image with a data file, which must be loaded according to the type of data file we created in TexturePacker. We must use the atlasJSONHash spritesheet loading function, since that was the option we selected in TexturePacker. The first argument is the key that will be used to reference the texture atlas and create sprites.
The create function is where we create all of the game sprites and other things that will be used throughout the game. We begin by creating our initial character sprite. The first two arguments are the x and y location for placing the sprite, which begins at (0, 0) in the upper left corner of the canvas. The next argument is the key referencing the texture atlas we loaded in the preload function. The last argument references one of the frames listed in the JSON texture atlas file. In most cases, this will be the name of the image file loaded into TexturePacker, but you can also change the names manually in the JSON file.
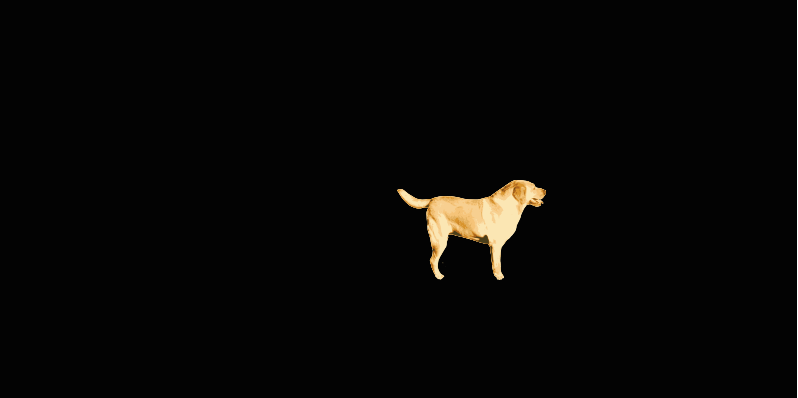
The purpose of a texture atlas is to load one small image file that contains all the sprites you need for your game. Otherwise, you would have to load multiple files, which can slow the loading time. That means you can include all the images you need for the game using TexturePacker, including the background image and other static images. For example, if you were to comment out everything after the following statement in the “create” method, you would be left with just the first static image:
max = game.add.sprite(0, 180, 'max', 'max-step1');
The next two statements will create the animations that may be played at any time throughout the game. If we had used a simple spritesheet rather that a texture atlas, we would have loaded many separate spritesheets for each animation, added each sprite separately, then created an animation for each one. My previous Phaser tutorial discusses this method.
max.animations.add('walk', [
        'max-step1',
        'max-step2'
    ], 10, true, false);

max.animations.add('dig', [
        'max-dig1',
        'max-dig2'
    ], 10, true, false);
In this case, we need to reference each frame within the texture atlas data file, as we did for the single sprite. The first argument is the key you will use to initiate the animation, and the next argument is an array referencing each frame from the data file. The next argument is the speed in frames per second (fps). For more information on fps, please see this other Phaser tutorial. The next argument is true if we want the animation to loop, and having “false” in the last argument means that the listed frames are strings (“true” would mean we listed the frames as numbers, where each number corresponds to the order it appears in a spritesheet).
Lastly, we begin one of the animations by using the play function, and passing in the key we created that references the walking animation. If we were to stop right here, our character would merely appear on the screen and animate, but stay in the same position. That looks a little weird, so we use the “update” function to make our animation do something interesting.
max.animations.play('walk');The update method is automatically called “many times per second.” Therefore, this is the place where main game play happens, because we do all of our testing here to see when things change. We can do all sorts of fun things with game physics, but since we are only testing our texture atlas, we are instead going to continually add to the “x” location of our main character so he appears to be walking across the screen.
max.x += 3;
In order to test the other animation I’ve added to the texture atlas, I change max.x to a constant variable when he’s partway across the screen, then switch the animation by simply playing the “dig” animation. Rather than make things more complex by adding timers and continuing the animation, the page must be reloaded if you want to see it again. My previous tutorial explains how to add timers to allow an animation to run for a short time, then continue on.
if(max.x >= 400){
   max.x = 400;
   max.animations.play('dig');
}
And there we have it! You have tested your texture atlas, and it is now ready to use in a full game!
Additional Resources
There are other types of game images that can be added to your games, and many ways to add various images in Phaser. For a complete discussion of tiling to create game levels, please see this Tiled tutorial. There is also this Phaser tutorial that discusses a different way to tile game levels. You can also check out this tutorial, which discusses an interesting way to add sprites and animation. Finally, my previous Phaser tutorial discusses ways to create random sprite animations for an infinitely scrolling game.
Leave a comment!
How did you like this tutorial? Do you have any questions? Do you need additional help? What else would you like me to write about? Please let me know by leaving a comment.

