In my last tutorial, we built a platformer game using Phaser and Tiled. In the following two tutorials we will add content to this game, making it more complete. In this tutorial, the following content will be added:
- Bigger levels, and two of them, so we can use the multilevel feature we implemented in the last tutorial.
- Smarter enemies, that don’t fall from platforms.
- A new enemy, which follows the player when you get close to it.
Player score, which will be increased when the player kill enemies or collect coins. - A checkpoint, so if the player dies after reach it, it will be respawn at the checkpoint position.
For this tutorial, it is necessary that you finished the last tutorial, since we will continue from the code we already wrote.
Table of contents
Learn Phaser by building 15 games
If you want to master Phaser and learn how to publish Phaser games as native games for iOS and Android feel free to check Zenva‘s online course The Complete Mobile Game Development Course – Build 15 Games.
Source code files
You can download the tutorial source code files here.
Game States
In this tutorial, we will use the same states from the last one:
- Boot State: loads a json file with the level information and starts the Loading State.
- Loading Sate: loads all the game assets, and starts the Level State.
- Tiled State: creates the map and all game objects.
The code for Boot and Loading states are exactly the same as before, so I will omit them. On the other hand, the Tiled State code had some changes. Some of those changes are necessary because of the new content added to the game and will be explained throughout the tutorial. However, there is one change that was made to make the code simpler, and I will explain it now.
In the previous tutorial, we had a “create_object” method that used a switch case to instantiate the correct prefab. To avoid having to add another case condition for each prefab we create, we will change it to use an object that maps each prefab type to its constructor, as shown below:
var <a class="wpil_keyword_link" href="https://gamedevacademy.org/best-platformer-tutorials/" target="_blank" rel="noopener" title="Platformer" data-wpil-keyword-link="linked">Platformer</a> = Platformer || {};

Platformer.TiledState = function () {
    "use strict";
    Phaser.State.call(this);

    this.prefab_classes = {
        "player": Platformer.Player.prototype.constructor,
        "ground_enemy": Platformer.GroundEnemy.prototype.constructor,
        "flying_enemy": Platformer.FlyingEnemy.prototype.constructor,
        "running_enemy": Platformer.RunningEnemy.prototype.constructor,
        "goal": Platformer.Goal.prototype.constructor,
        "checkpoint": Platformer.Checkpoint.prototype.constructor,
        "coin": Platformer.Coin.prototype.constructor,
        "score": Platformer.Score.prototype.constructor
    };
};

Platformer.TiledState.prototype = Object.create(<a class="wpil_keyword_link" href="https://gamedevacademy.org/what-is-phaser/" target="_blank" rel="noopener" title="Phaser" data-wpil-keyword-link="linked">Phaser</a>.State.prototype);
Platformer.TiledState.prototype.constructor = Platformer.TiledState;

Platformer.TiledState.prototype.init = function (level_data) {
    "use strict";
    var tileset_index;
    this.level_data = level_data;

    this.scale.scaleMode = Phaser.ScaleManager.SHOW_ALL;
    this.scale.pageAlignHorizontally = true;
    this.scale.pageAlignVertically = true;

    // start physics system
    this.game.physics.startSystem(Phaser.Physics.ARCADE);
    this.game.physics.arcade.gravity.y = 1000;

    // create map and set tileset
    this.map = this.game.add.tilemap(level_data.map.key);
    tileset_index = 0;
    this.map.tilesets.forEach(function (tileset) {
        this.map.addTilesetImage(tileset.name, level_data.map.tilesets[tileset_index]);
        tileset_index += 1;
    }, this);
};

Platformer.TiledState.prototype.create = function () {
    "use strict";
    var group_name, object_layer, collision_tiles;

    // create map layers
    this.layers = {};
    this.map.layers.forEach(function (layer) {
        this.layers[layer.name] = this.map.createLayer(layer.name);
        if (layer.properties.collision) { // collision layer
            collision_tiles = [];
            layer.data.forEach(function (data_row) { // find tiles used in the layer
                data_row.forEach(function (tile) {
                    // check if it's a valid tile index and isn't already in the list
                    if (tile.index > 0 && collision_tiles.indexOf(tile.index) === -1) {
                        collision_tiles.push(tile.index);
                    }
                }, this);
            }, this);
            this.map.setCollision(collision_tiles, true, layer.name);
        }
    }, this);
    // resize the world to be the size of the current layer
    this.layers[this.map.layer.name].resizeWorld();

    // create groups
    this.groups = {};
    this.level_data.groups.forEach(function (group_name) {
        this.groups[group_name] = this.game.add.group();
    }, this);

    this.prefabs = {};

    for (object_layer in this.map.objects) {
        if (this.map.objects.hasOwnProperty(object_layer)) {
            // create layer objects
            this.map.objects[object_layer].forEach(this.create_object, this);
        }
    }

    this.game.camera.follow(this.prefabs.player);
};

Platformer.TiledState.prototype.create_object = function (object) {
    "use strict";
    var position, prefab;
    // tiled coordinates starts in the bottom left corner
    position = {"x": object.x + (this.map.tileHeight / 2), "y": object.y - (this.map.tileHeight / 2)};
    // create object according to its type
    if (this.prefab_classes.hasOwnProperty(object.type)) {
        prefab = new this.prefab_classes[object.type](this, position, object.properties);
    }
    this.prefabs[object.name] = prefab;
};

Platformer.TiledState.prototype.restart_level = function () {
    "use strict";
    // restart the game only if the checkpoint was not reached
    if (this.prefabs.checkpoint.checkpoint_reached) {
        this.prefabs.player.x = this.prefabs.checkpoint.x;
        this.prefabs.player.y = this.prefabs.checkpoint.y;
    } else {
        this.game.state.restart(true, false, this.level_data);
    }
};
Notice that, in the TiledState constructor we create an object with all prefab types and their corresponding constructors. So, in the “create_object” method we can call the correct constructor using the type property from the map object. This is only possible because all prefabs use the same constructor. So, if you created your prefabs with different constructors you can change them to have the same constructor, or keep using the switch case strategy, as in the previous tutorial. Remember that all code I show here is based on my preference, and you should write it the way you think it’s best.
New levels
Those are the two levels I created for this tutorial. Feel free to create your owns, trying to add different tiles and enemies. In those new maps, there are already the new prefabs I will explain later in the tutorial, there is, however, something I would like to show first.


In the first level, I added a bridge between two platforms, as you can see in the image. This bridge sprite is smaller than the tile, and I wanted its collision box to be smaller too. So, I had to add a new tileset using the same tileset image but different tile sizes. The tile size used was 35 pixels width and 11 pixels height with 1 pixel margin and spacing (as shown below). It is also possible to insert the bridge as an object, not a tile, but I found this way easier.

Also, notice that I divided the background layer in two: sky and background. This was done to add some background decoration, like the signs at the beginning and end of the level.
Smarter enemy
We will change our enemy so it will switch direction if arrives the edge of platform. The idea is to check if the next ground position is occupied by a tile and, if not so, switch the enemy direction. To find this next ground position we have to calculate its x and y coordinates. The y coordinate is just the enemy bottom y plus 1, since that’s the y coordinate immediately below the enemy. The x coordinate depends on the enemy direction. So, it will be the enemy x coordinate plus tile width, if the enemy is moving right, or minus tile width if the enemy is moving left.
To check if a position is occupied by a tile, we will use the tilemap method “getTileWordlXY”, which returns the tile object of a layer in a given position (for more information, check Phaser documentation: http://phaser.io/docs/2.4.3/Phaser.Tilemap.html). If the method returns a tile, we know the enemy is not in the platform edge yet, so it can keep moving. If it returns null, the enemy must switch direction to avoid falling. In this code, the method “switch_direction” is the code we already had in the Enemy prefab, I just moved it to a function (you can check it in the source code).
var Platformer = Platformer || {};

Platformer.GroundEnemy = function (game_state, position, properties) {
    "use strict";
    Platformer.Enemy.call(this, game_state, position, properties);
};

Platformer.GroundEnemy.prototype = Object.create(Platformer.Enemy.prototype);
Platformer.GroundEnemy.prototype.constructor = Platformer.GroundEnemy;

Platformer.GroundEnemy.prototype.update = function () {
    "use strict";
    Platformer.Enemy.prototype.update.call(this);

    if (this.body.blocked.down && !this.has_tile_to_walk()) {
        this.switch_direction();
    }
};

Platformer.GroundEnemy.prototype.has_tile_to_walk = function () {
    "use strict";
    var direction, position_to_check, map, next_tile;
    direction = (this.body.velocity.x < 0) ? -1 : 1;
    // check if the next position has a tile
    position_to_check = new Phaser.Point(this.x + (direction * this.game_state.map.tileWidth), this.bottom + 1);
    map = this.game_state.map;
    // getTileWorldXY returns the tile in a given position
    next_tile = map.getTileWorldXY(position_to_check.x, position_to_check.y, map.tileWidth, map.tileHeight, "collision");
    return next_tile !== null;
};
New enemy
Also, we will add an enemy with the following behavior:
- If the player is outside a detection range, it will act like a regular enemy.
- If the player is inside a detection range, it will increase its velocity and go in the player direction.
To do that, we will create a new prefab that extends the GroundEnemy prefab. Besides all the regular enemy properties, it will have a detection distance and a running speed. In the update method, we check if the player is inside the detection range. If so, the enemy change its velocity to the running speed and follows the player. Otherwise, it just calls the GroundEnemy update method.
To check if the player is inside the detection range, we calculate the distance between the player and enemy x positions. If the absolute value of this distance is less than the detection distance and both the player and enemy bottom y positions are the same (meaning they’re standing in the same ground), the enemy detects the player.
var Platformer = Platformer || {};

Platformer.RunningEnemy = function (game_state, position, properties) {
    "use strict";
    Platformer.GroundEnemy.call(this, game_state, position, properties);

    this.detection_distance = +properties.detection_distance;
    this.running_speed = +properties.running_speed;
};

Platformer.RunningEnemy.prototype = Object.create(Platformer.GroundEnemy.prototype);
Platformer.RunningEnemy.prototype.constructor = Platformer.RunningEnemy;

Platformer.RunningEnemy.prototype.update = function () {
    "use strict";
    var direction;
    this.game_state.game.physics.arcade.collide(this, this.game_state.layers.collision);

    if (this.detect_player()) {
        // player is inside detection range, run towards it
        direction = (this.game_state.prefabs.player.x < this.x) ? -1 : 1;
        this.body.velocity.x = direction * this.running_speed;
        this.scale.setTo(-direction, 1);
        this.previous_x = this.x;
    } else {
        // player is outside detection range, act like a regular enemy
        direction = (this.body.velocity.x < 0) ? -1 : 1;
        this.body.velocity.x = direction * this.walking_speed;
        this.scale.setTo(-direction, 1);
        Platformer.GroundEnemy.prototype.update.call(this);
    }
};

Platformer.RunningEnemy.prototype.detect_player = function () {
    "use strict";
    var distance_to_player;
    distance_to_player = Math.abs(this.x - this.game_state.prefabs.player.x);
    // the player must be in the same ground y position, and inside the detection range
    return (this.bottom === this.game_state.prefabs.player.bottom) && (distance_to_player <= this.detection_distance);
};
Player score
The player score will increase every time it kills an enemy or collect a coin. For this, we have to add a score property to the Enemy prefab and create a Coin prefab, as follows.
var Platformer = Platformer || {};

Platformer.Coin = function (game_state, position, properties) {
    "use strict";
    Platformer.Prefab.call(this, game_state, position, properties);

    this.score = +properties.score;

    this.game_state.game.physics.arcade.enable(this);
    this.body.immovable = true;
    this.body.allowGravity = false;

    this.anchor.setTo(0.5);
};

Platformer.Coin.prototype = Object.create(Platformer.Prefab.prototype);
Platformer.Coin.prototype.constructor = Platformer.Coin;

Platformer.Coin.prototype.update = function () {
    "use strict";
    this.game_state.game.physics.arcade.collide(this, this.game_state.layers.collision);
    this.game_state.game.physics.arcade.overlap(this, this.game_state.groups.players, this.collect_coin, null, this);
};

Platformer.Coin.prototype.collect_coin = function (coin, player) {
    "use strict";
    // kill coin and increase score
    this.kill();
    player.score += this.score;
};
For the enemy killing, we just have to increase the player score in the “hit_enemy” method, while for collecting coins we check for overlaps between the player and the coins, and increase the player score according to the coin score. To keep track of the player score, we will add a score property in the Player as well.
var Platformer = Platformer || {};

Platformer.Player = function (game_state, position, properties) {
    "use strict";
    Platformer.Prefab.call(this, game_state, position, properties);

    this.walking_speed = +properties.walking_speed;
    this.jumping_speed = +properties.jumping_speed;
    this.bouncing = +properties.bouncing;
    this.score = 0;

    this.game_state.game.physics.arcade.enable(this);
    this.body.collideWorldBounds = true;

    this.animations.add("walking", [0, 1, 2, 1], 6, true);

    this.frame = 3;

    this.anchor.setTo(0.5);

    this.cursors = this.game_state.game.input.keyboard.createCursorKeys();
};

Platformer.Player.prototype = Object.create(Platformer.Prefab.prototype);
Platformer.Player.prototype.constructor = Platformer.Player;

Platformer.Player.prototype.update = function () {
    "use strict";
    this.game_state.game.physics.arcade.collide(this, this.game_state.layers.collision);
    this.game_state.game.physics.arcade.overlap(this, this.game_state.groups.enemies, this.hit_enemy, null, this);

    if (this.cursors.right.isDown && this.body.velocity.x >= 0) {
        // move right
        this.body.velocity.x = this.walking_speed;
        this.animations.play("walking");
        this.scale.setTo(-1, 1);
    } else if (this.cursors.left.isDown && this.body.velocity.x <= 0) {
        // move left
        this.body.velocity.x = -this.walking_speed;
        this.animations.play("walking");
        this.scale.setTo(1, 1);
    } else {
        // stop
        this.body.velocity.x = 0;
        this.animations.stop();
        this.frame = 3;
    }

    // jump only if touching a tile
    if (this.cursors.up.isDown && this.body.blocked.down) {
        this.body.velocity.y = -this.jumping_speed;
    }

    // dies if touches the end of the screen
    if (this.bottom >= this.game_state.game.world.height) {
        this.game_state.restart_level();
    }
};

Platformer.Player.prototype.hit_enemy = function (player, enemy) {
    "use strict";
    // if the player is above the enemy, the enemy is killed, otherwise the player dies
    if (enemy.body.touching.up) {
        this.score += enemy.score;
        enemy.kill();
        player.y -= this.bouncing;
    } else {
        this.game_state.restart_level();
    }
};
To show the score in the screen, we create a Score prefab, that extends Phaser.Text instead of Phaser.Sprite. Notice that Phaser.Text extends Phaser.Sprite too, so our prefab still is a Phaser sprite. This Score prefab must be fixed to the camera, so it won’t move with the player and in the update method it will change its text to be equivalent to the player current score.
var Platformer = Platformer || {};
Platformer.Score = function (game_state, position, properties) {
"use strict";
Phaser.Text.call(this, game_state.game, position.x, position.y, properties.text);
this.game_state = game_state;
this.game_state.groups[properties.group].add(this);
this.fixedToCamera = true;
};
Platformer.Score.prototype = Object.create(Phaser.Text.prototype);
Platformer.Score.prototype.constructor = Platformer.Score;
Platformer.Score.prototype.update = function () {
"use strict";
// update text to player current score
this.text = "Score: " + this.game_state.prefabs.player.score;
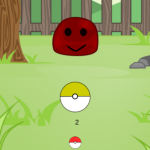
};Here is an example of the score in our game. Try it yourself!

Checkpoint
Our checkpoint will be simple, if the player dies after touching the checkpoint, it will be respawned in the checkpoint position instead of its initial position. For this, we will add a checkpoint prefab that checks for overlap with the player, and if that happens, set a checkpoint variable to true. So, in the “restart_level” method from TiledState (presented above) we now check if the checkpoint was reached. If so, we just respawn the player to the checkpoint position, instead of restarting the level.
var Platformer = Platformer || {};

Platformer.Checkpoint = function (game_state, position, properties) {
    "use strict";
    Platformer.Prefab.call(this, game_state, position, properties);

    this.checkpoint_reached = false;

    this.game_state.game.physics.arcade.enable(this);

    this.anchor.setTo(0.5);
};

Platformer.Checkpoint.prototype = Object.create(Platformer.Prefab.prototype);
Platformer.Checkpoint.prototype.constructor = Platformer.Checkpoint;

Platformer.Checkpoint.prototype.update = function () {
    "use strict";
    this.game_state.game.physics.arcade.collide(this, this.game_state.layers.collision);
    this.game_state.game.physics.arcade.overlap(this, this.game_state.groups.players, this.reach_checkpoint, null, this);
};

Platformer.Checkpoint.prototype.reach_checkpoint = function () {
    "use strict";
    // checkpoint was reached
    this.checkpoint_reached = true;
};
Here is an example of the checkpoint in our game. Try it yourself!

Finishing the game
Now that we have all the game code, we just have to add the prefab properties in our Tiled map, as we did in the last tutorial, and work game is working!
Show me the levels you created, and tell me your opinion about this tutorial. In the next tutorial, we will add lives to our player, some items and a boss level, so tell me if you have any suggestion, too!