In the previous tutorial we finished adding the gameplay content to our game. Now, in this last part of the Pokemon GO tutorial series, we are going to add Google and Facebook authentication, to allow saving the game data on an online database. We are going to use Firebase as the framework for authentication and online storage. The following topics will be covered in this tutorial:
- Creating a Firebase app
- Adding Google authentication
- Creating an app as Facebook developer
- Adding Facebook authentication
- Adding online storage
To read this tutorial, it is important that you are familiar with the following concepts:
- Javascript and object-oriented concepts.
- Basic Phaser concepts, such as: states, sprites, groups and arcade physics
- Creating maps using Tiled
Table of contents
Become a Game Developer by building 15 games
If you want to master Phaser and learn how to publish Phaser games as native games for iOS and Android feel free to check Zenva‘s online course The Complete Mobile Game Development Course – Build 15 Games.
Source code files
You can download the tutorial source code files here.
Creating Firebase app
Firebase is a Google framework that provides different functionalities for web and mobile apps, such as authentication, realtime database, analytics and cloud messaging. We are going to use it only for authentication and for the realtime database, but you can check their documentation for examples of other features.
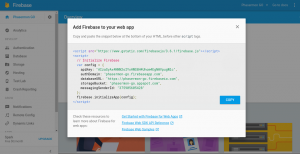
The first thing we have to do is creating a Firebase account and a new Firebase app. In the image below I created a Firebase app called Phasermon GO. Then, by clicking on “Add Firebase to your web app” the console will show how to add Firebase to your app code.
For this tutorial, we are going to add the script tag in the index.html file, while the “config” variable and initialization will be added to main.js. For now, you can try running your game and checking if there is no Firebase error.
var Pokemon = Pokemon || {};

var config = {
    apiKey: "AIzaSyAx4NNN2oIYxHWS8H4Uhom4EgN0VpugWlc",
    authDomain: "phasermon-go.firebaseapp.com",
    databaseURL: "https://phasermon-go.firebaseio.com",
    storageBucket: "phasermon-go.appspot.com",
    messagingSenderId: "375905605428"
};
firebase.initializeApp(config);

var game = new Phaser.Game(320, 640, Phaser.CANVAS);

game.caught_pokemon = this.game.caught_pokemon || [];
game.number_of_pokeballs = this.game.number_of_pokeballs || {pokeball: 0, greatball: 1, ultraball: 2};

game.state.add("BootState", new Pokemon.BootState());
game.state.add("LoadingState", new Pokemon.LoadingState());
game.state.add("TitleState", new Pokemon.TitleState());
game.state.add("WorldState", new Pokemon.WorldState());
game.state.add("CatchState", new Pokemon.CatchState());
game.state.start("BootState", true, false, "assets/levels/title_screen.json", "TitleState");
Disclaimer: for some reason Firebase is not working for Google Chrome in my computer. So, if you experience issues with it, trying running it on Firefox to see if it is a browser related issue.
Adding Google authentication
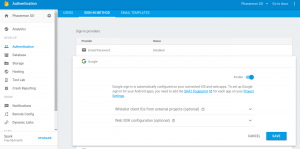
Now, we are going to add Google authentication to our game. First, we must enable it in the Firebase console, by going to the Authentication section in the menu, and then the Sign-in Method tab. Then, we enable Google authentication. We also need to add “127.0.0.1” as an OAuth redirect domain in order to test our game.
 Now we are going to change our TitleState to allow authentication. For now we are going to simply change the input event to start the login procedure. Later, when we add Facebook authentication, we will create buttons for the different login types.
var Pokemon = Pokemon || {};

Pokemon.TitleState = function () {
    "use strict";
    Pokemon.JSONLevelState.call(this);

    this.prefab_classes = {
        "text": Pokemon.TextPrefab.prototype.constructor,
        "login_button": Pokemon.LoginButton.prototype.constructor
    };
};

Pokemon.TitleState.prototype = Object.create(Pokemon.JSONLevelState.prototype);
Pokemon.TitleState.prototype.constructor = Pokemon.TitleState;

Pokemon.TitleState.prototype.create = function () {
    "use strict";
    var pokemon_data;
    Pokemon.JSONLevelState.prototype.create.call(this);

    this.game.input.onDown.add(this.login, this);
};

Pokemon.TitleState.prototype.login = function (provider) {
    "use strict";
    var provider, user;
    if (!firebase.auth().currentUser) {
        provider = new firebase.auth.GoogleAuthProvider();
        //provider.addScope('https://www.googleapis.com/auth/plus.login');
        provider.addScope("https://www.googleapis.com/auth/userinfo.email");

        firebase.auth().signInWithPopup(provider).then(this.start_game.bind(this)).catch(Pokemon.handle_error);
    } else {
        firebase.database().ref("/users/" + firebase.auth().currentUser.uid).once("value").then(this.start_game.bind(this));
    }
};

Pokemon.TitleState.prototype.start_game = function () {
    "use strict";
    this.game.state.start("BootState", true, false, "assets/levels/world_level.json", "WorldState");
};
The “login” method will start by checking if there is a current user authenticated with Firebase. If so, it will simply start the game. If not, it will create a new GoogleAuthProvider to perform the authentication. The next step is to add a scope, which will define the amount of data from the user account our app will have access. In this tutorial our app will only have access to the user email address (using the scope https://www.googleapis.com/auth/userinfo.email). Finally, we call the “signInWithPopup” method, which will open a popup window for the user to authenticate with its Google account. The “then” and “catch” methods add callbacks to when the operation concludes succesfully and when it fails, respectively.
When the user authenticates succesfully, the “start_game” method is called, which will simply start the game as before. On the other hand, if the authentication fails, we need to handle the error. In this tutorial we are only going to add a function in Utils.js to print the error message. In a real app, you can try identifying the error cause and dealing with it, when appropriate.
Pokemon.handle_error = function (error) {
    "use strict";
    console.log(error);
};
By now, you can already test Google authentication by trying to login with your Google account.
Adding Facebook authentication
Before storing the game content in the online database, we are going to add Facebook authentication as well. The first thing we have to do is creating a Facebook app in Facebook for developers. You will need a Facebook account, and you might have to add a phone number or credit card number in order to verify your account.
 The next step is enabling Facebook authentication on Firebase. This is similar to how we did with Google authentication, but we need to add our App ID and App secret.
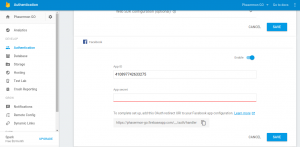 The last step is enabling your Facebook app to be authenticated by Firebase. To do that, first we need to copy the OAuth redirect URI shown in the authentication page (https://phasermon-go.firebaseapp.com/__/auth/handler). Then, back in the Facebook for developers console, we need to add a Facebook Login product (by clicking on Add Product). In the Facebook Login settings page we need to add the Firebase OAuth redirect URI as a valid one.
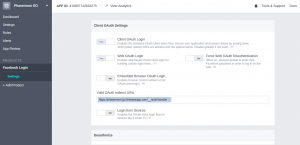 Now that we have enabled Facebook authentication, we need to change our code to allow the player to choose to authenticate with Google or Facebook.
In order to do that, we are going to create a LoginButton Prefab. The only difference between the code to login with Google or Facebook is the authentication provider and the scope string. So, LoginButton will have as properties both the provider and the scope. In order to select the provider object correctly, it will have an object to map each login type to the provider Object. In the end of the constructor we add an input event to call the “login” method.
var Pokemon = Pokemon || {};

Pokemon.LoginButton = function (game_state, name, position, properties) {
    "use strict";
    Pokemon.Prefab.call(this, game_state, name, position, properties);

    this.auth_providers = {
        google: firebase.auth.GoogleAuthProvider.prototype.constructor,
        facebook: firebase.auth.FacebookAuthProvider.prototype.constructor
    };

    this.auth_provider = properties.auth_provider;
    this.provider_scope = properties.provider_scope;

    this.inputEnabled = true;
    this.events.onInputDown.add(this.login, this);
};

Pokemon.LoginButton.prototype = Object.create(Pokemon.Prefab.prototype);
Pokemon.LoginButton.prototype.constructor = Pokemon.LoginButton;

Pokemon.LoginButton.prototype.login = function () {
    "use strict";
    var provider, user;
    if (!firebase.auth().currentUser) {
        provider = new this.auth_providers[this.auth_provider]();
        provider.addScope(this.provider_scope);

        firebase.auth().signInWithPopup(provider).then(this.game_state.start_game.bind(this.game_state)).catch(Pokemon.handle_error);
    } else {
        firebase.database().ref("/users/" + firebase.auth().currentUser.uid).once("value").then(this.game_state.start_game.bind(this.game_state));
    }
};
The “login” method is almost the same as the previous one from game state, but now we are going to use the provider and scope from the Prefab properties. If the player authenticates successfully, it calls the “start_game” method from game state as before.
Now, in game state we need to remove the “login” method and leave only the “start_game” method. We also are going to remove the input event from the game, since now the authentication will be done through the login buttons.
var Pokemon = Pokemon || {};

Pokemon.TitleState = function () {
    "use strict";
    Pokemon.JSONLevelState.call(this);

    this.prefab_classes = {
        "text": Pokemon.TextPrefab.prototype.constructor,
        "login_button": Pokemon.LoginButton.prototype.constructor
    };
};

Pokemon.TitleState.prototype = Object.create(Pokemon.JSONLevelState.prototype);
Pokemon.TitleState.prototype.constructor = Pokemon.TitleState;

Pokemon.TitleState.prototype.start_game = function () {
    "use strict";
    this.game.state.start("BootState", true, false, "assets/levels/world_level.json", "WorldState");
};
Also, remember to add the login button objects in the JSON level file of TitleState, and the LoginButton prefab in the “prefab_classes” object of TitleState.
{
    "assets": {
        "google_login_button_image": {"type": "image", "source": "assets/images/google_login_button.png"},
        "facebook_login_button_image": {"type": "image", "source": "assets/images/facebook_login_button.png"}
    },
    "groups": [
        "hud"
    ],
    "prefabs": {
        "title": {
            "type": "text",
            "position": {"x": 0.5, "y": 0.5},
            "properties": {
                "anchor": {"x": 0.5, "y": 0.5},
                "group": "hud",
                "text": "Phasermon GO",
                "style": {"font": "32px Arial", "fill": "#FFF"}
            }
        },
        "login_with_google_button": {
            "type": "login_button",
            "position": {"x": 0.5, "y": 0.7},
            "properties": {
                "anchor": {"x": 0.5, "y": 0.5},
                "group": "hud",
                "texture": "google_login_button_image",
                "auth_provider": "google",
                "provider_scope": "https://www.googleapis.com/auth/plus.login"
            }
        },
        "login_with_facebook_button": {
            "type": "login_button",
            "position": {"x": 0.5, "y": 0.9},
            "properties": {
                "anchor": {"x": 0.5, "y": 0.5},
                "group": "hud",
                "texture": "facebook_login_button_image",
                "auth_provider": "facebook",
                "provider_scope": "user_birthday"
            }
        }
    }
}
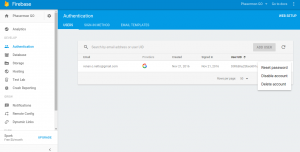
By now you can try running your game and try authenticating with both Google and Facebook. However, if you use your Google email for Facebook, you can’t authenticate with both at the same time. In this case, you will need to go to the authentication settings in Firebase and remove the Google user in order to authenticate with Facebook.
Saving game data online
Until now we are saving in the game the number of pokeballs of the player and caught pokemon. However, when the game restarts we lose this information and need to reset it to a default value. So now we are going to save it using Firebase online storage features. Firebase saves data as JSON objects, so it is very easy to use and integrate it in our code.
In order to do that we are going to add code to TitleState and change LoginButton callback method. Now, when the player succesfully authenticates, our code is going to call an “on_login” method from TitleState. This method will retrieve the current player data before starting the game.
Pokemon.LoginButton.prototype.login = function () {
    "use strict";
    var provider, user;
    if (!firebase.auth().currentUser) {
        provider = new this.auth_providers[this.auth_provider]();
        provider.addScope(this.provider_scope);

        firebase.auth().signInWithPopup(provider).then(this.game_state.on_login.bind(this.game_state)).catch(Pokemon.handle_error);
    } else {
        firebase.database().ref("/users/" + firebase.auth().currentUser.uid).once("value").then(this.game_state.start_game.bind(this.game_state));
    }
};
We can navigate through Firebase data using the “ref” method and the “slash” symbol to access object properties. Our app will have a root object called “users”. This object will have a property (called child in Firebase) for each player. This child will have the data for that specific player. So, in the “on_login” method we navigate to the current user object and retrieve its data. Firebase asynchronously manipulates data, so we need to add a callback to an event. In this case we are going to use the “once” event with the “value” parameter, which calls the callback method only the first time this data changes in the database (you can learn more on Firebase documentation). We are going to use it to retrieve the initial data for this player in the database.
Pokemon.TitleState.prototype.on_login = function (result) {
    "use strict";
    firebase.database().ref("/users/" + result.user.uid).once("value").then(this.start_game.bind(this));
};
The callback for the database operation is “start_game”. We are also going to change this method to save the player data before starting the game. The “val” method retrieves the data as a JSON object. There are two possibilities for this data: if it is the first time this player authenticates, the data will be null, and we need to initialize it with the default values. Otherwise, we simply save the data from the database. In the end, we start the game as before.
Pokemon.TitleState.prototype.start_game = function (snapshot) {
    "use strict";
    var user_data;
    user_data = snapshot.val();
    if (!user_data) {
        this.game.caught_pokemon = [];
        this.number_of_pokeballs = {pokeball: 0, greatball: 1, ultraball: 2};
    } else {
        this.game.caught_pokemon = user_data.caught_pokemon || [];
        this.game.number_of_pokeballs = user_data.number_of_pokeballs || {pokeball: 0, greatball: 1, ultraball: 2};
    }
    this.game.state.start("BootState", true, false, "assets/levels/world_level.json", "WorldState");
};
The last thing we have to do is update Firebase every time this data changes. This is done in the Pokeball and Pokemon prefabs.
In the “throw” method of the Pokeball prefab we need to update the “number_of_pokeballs” object in the database every time a pokeball is used. We do that by navigating to this object and calling the “set” method, which replaces the object in the database with a new one.
Pokemon.Pokeball.prototype.throw = function () {
    "use strict";
    var distance_to_initial_position;

    // stop draggin the pokeball
    this.dragging = false;

    // throw the pokeball if the distance to the initial position is above the threshold
    distance_to_initial_position = new Phaser.Point(this.x - this.initial_position.x, this.y - this.initial_position.y);
    if (distance_to_initial_position.getMagnitude() > this.THROW_THRESHOLD) {
        this.game_state.game.number_of_pokeballs[this.type] -= 1;
        // update database
        firebase.database().ref("/users/" + firebase.auth().currentUser.uid + "/number_of_pokeballs").set(this.game_state.game.number_of_pokeballs);
        this.number_of_pokeballs_text.text = this.game_state.game.number_of_pokeballs[this.type];
        distance_to_initial_position.normalize();
        // initialize the pokeball physical body
        this.init_body();
        this.body.velocity.x = -distance_to_initial_position.x * this.pokeball_speed;
        this.body.velocity.y = -distance_to_initial_position.y * this.pokeball_speed;
    } else {
        this.reset(this.initial_position.x, this.initial_position.y);
    }
};
Similarly, in the “catch” method of Pokemon prefab we update the “caught_pokemon” object every time a new Pokemon is caught.
Pokemon.Pokemon.prototype.catch = function () {
    "use strict";
    var catch_message;
    // kill the Pokemon and show the catch message box
    this.kill();

    if (!this.already_caught()) {
        this.game_state.game.caught_pokemon.push({species: this.species, texture: this.texture_key});
        // update database
        firebase.database().ref("/users/" + firebase.auth().currentUser.uid + "/caught_pokemon").set(this.game_state.game.caught_pokemon);
    }

    catch_message = new Pokemon.MessageBox(this.game_state, "catch_message", {x: this.game_state.game.world.centerX, y: this.game_state.game.world.centerY}, this.MESSAGE_PROPERTIES);
    catch_message.message_text.text = "Gotcha!";
};
Finally, we need to remove the default data initialization from main.js.
Now you can try playing the game with the database feature. Try catching some Pokemon and throwing some pokeballs to see if the data is updated when the game restarts.
And this concludes this tutorial series. I hope you liked it, and leave in the comment section suggestions for the next ones!

