Scrolling games can be fun, but what if you want to create a game that is not restricted to the confines of a small game world? What if you want to base your game levels on points rather than on reaching the “other side” of the “world?” What you need in that case is a game where the player can move through infinite bounds.
For this simple game, I decided to create something that would not only show how to scroll seamlessly through an infinite world, but also be relatable. So, what is something many people can relate to? Pets!
People love their pets. I know I do. Pet health, cat and dog videos and memes, Facebook-like sites specifically for pets, and games involving cute animals have all become very popular as people become more invested in seeing their pets as family members.
The following tutorial will show you the basics of how to create an HTML5 game from scratch using the Phaser library. This game is cross-platform, which means that it will work on any OS, even on mobile devices.
Feel free to use the provided source code as a starter for your own mobile projects. The assets may be used along with the game, but you can also create cartoons of your own pets using a free site such as Cartoonize My Pet.
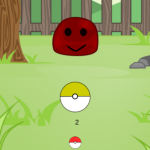
The pet used in this game is a cartoonified version of my brother’s dog, Max. Max must avoid giant fleas, while digging up bones and balls he has hidden throughout the neighborhood. Let’s get started!
Did you come across any errors in this tutorial? Please let us know by completing this form and we’ll look into it!

FINAL DAYS: Unlock coding courses in Unity, Godot, Unreal, Python and more.
Table of contents
Source code files
You can download the tutorial source code files here.
Tutorial goals
This tutorial will give you a solid foundation for creating many types of scrolling 2D mobile HTML5 games with Phaser.
1. Learn the basics of Phaser by creating a game with infinite scroll capabilities.
2. Learn how to automatically generate and destroy random game items every time the game world wraps, so the game remains fresh no matter how far the player goes.
3. Learn to create layers of tiled and single sprites automatically within the infinite world.
4. Learn to capture swipes from either a mouse or mobile screen.
Tutorial requirements
- Basic to intermediate knowledge of JavaScript. If you need to refresh your skills.
- A code editor or IDE. Some options include Sublime Text, Netbeans, or lightweight alternatives like Geany. You can also check out the Intel XDK.
- Download Phaser from it’s Github repo. You can either clone the repo or download the ZIP file.
- You need to run the code and the Phaser examples using a local or remote web server. Some popular options are Apache (WAMP if in Windows, MAMP if in Mac). Some lightweight alternatives are Mongoose web server and Python’s HTTP server.
- Have the Phaser documentation and the examples page at hand. Also don’t forget that you can always find answers by looking at the source code of Phaser.
New project
The project all begins in a new folder containing an index HTML file, along with the Phaser file. Phaser can be downloaded from the “build” directory of the downloaded Phaser zip or cloned repository.
The non-minified phaser.js file (rather than phaser.min.js) will allow you to debug your code by exploring the source code to give you a better understanding of what is happening. The following code goes into the index.html file, and includes all of the Javascript files we will be describing throughout the tutorial.
<!DOCTYPE html>
<html>

	<head>
		<meta charset="utf-8" />
		<title>Learn <a class="wpil_keyword_link" href="https://gamedevacademy.org/how-to-learn-coding-for-beginners/" target="_blank" rel="noopener" title="Game Development" data-wpil-keyword-link="linked">Game Development</a> at ZENVA.com</title>
		<meta name="viewport" content="width=device-width, initial-scale=1.0">
		<meta name="mobile-web-app-capable" content="yes">
		<meta name="apple-mobile-web-app-capable" content="yes">
		<script type="text/javascript" src="js/phaser.min.js"></script>
		<script type="text/javascript" src="js/Boot.js"></script>
		<script type="text/javascript" src="js/Preload.js"></script>
		<script type="text/javascript" src="js/Game.js"></script>

		<style>
		  body {
		    padding: 0px;
		    margin: 0px;
		  }
		  </style>
	</head>

	<body>
		<!-- include the main game file -->
		<script src="js/main.js"></script>
	</body>
</html>
The viewport metatag prevents the user from accidentally zooming as they play. The mobile-web-app-capable and apple- mobile-web-app-capable tags allow shortcuts to be created on a mobile phone (you can also learn how to create an icon in iOS and Android Chrome).
main.js is where our game is actually initiated. We will load our files according to states. Check out this other Phaser tutorial for a full discussion of states.
Initiating the game
Our main.js file contains the following code:
var InfiniteScroller = InfiniteScroller || {};

InfiniteScroller.game = new Phaser.Game(746, 420, Phaser.CANVAS, '');

InfiniteScroller.game.state.add('Boot', InfiniteScroller.Boot);
InfiniteScroller.game.state.add('Preload', InfiniteScroller.Preload);
InfiniteScroller.game.state.add('Game', InfiniteScroller.Game);

InfiniteScroller.game.state.start('Boot');
First of all, we begin with:
var InfiniteScroller = InfiniteScroller || {};This will create an empty object if InfiniteScroller is not already defined. InfiniteScroller is a namespace pattern that will help avoid collisions with other libraries you may want to add later.
Next, we have the statement:
InfiniteScroller.game = new Phaser.Game(746, 420, Phaser.CANVAS, '');
The initial screen resolution (746 x 420 in this case) will be used throughout the game using a variable, but will be automatically scaled for us using a statement we will discuss in the next file. In this case, we are rendering the game using Phaser.CANVAS, which will allow us to use debugging features. Normally, we would use Phaser.AUTO to let Phaser decide what to use, depending on what’s available.
The remaining lines add each of the game states to the game. Then, we start the game with:
InfiniteScroller.game.state.start('Boot');Boot state
The Boot state is where we load the minimum amount of information to make something happen. People are impatient, and will not wait more than just a couple of seconds for your game to load. For this reason, we need to have a boot state that will allow us to show them something while they wait. That something should be a simple preloading bar, and perhaps a very small, fast-loading logo. Here’s what Boot.js looks like:
var InfiniteScroller = InfiniteScroller || {};

InfiniteScroller.Boot = function(){};

//setting game configuration and loading the assets for the loading screen
InfiniteScroller.Boot.prototype = {
  preload: function() {
    //assets we'll use in the loading screen
    this.load.image('preloadbar', 'assets/images/preloader-bar.png');
  },
  create: function() {
    //the game will have a sky blue background
    this.game.stage.backgroundColor = '#5555ff';

    //scaling options
    this.scale.scaleMode = Phaser.ScaleManager.SHOW_ALL;

    //have the game centered horizontally
    this.scale.pageAlignHorizontally = true;
    this.scale.pageAlignVertically = true;

    //physics system
    this.game.physics.startSystem(Phaser.Physics.ARCADE);

    this.state.start('Preload');
  }
};
States have reserved methods that serve specific purposes, two of which are used in the Boot state: preload and create.
First, we create the InfiniteScroller.Boot object which was passed in main.js when adding the state to the game.
In the preload method, we load the progress bar sprite with the following statement:
this.load.image('preloadbar', 'assets/images/preloader-bar.png');The first variable passed to the method is “preloadbar,” which is the key for this asset. The key will allow us to access the image anywhere we want throughout the game.
In the create method, we start by setting the background color, which is the color we will use throughout this game. If you want to add a Main Menu state (described in this tutorial), you may want to have a different color on Boot, then change it during actual game play.
We then define the screen scaling. Phaser provides three ways to scale: EXACT_FIT (which stretches the game to the screen), SHOW_ALL (which scales the game while keeping the aspect ratio) and NO_SCALE (which is rarely used). SHOW_ALL is the most common option, and what we will use in this game. Anything else would probably throw off all of our calculations (especially for an infinitely scrolling game such as this one).
We will want to center the game horizontally and vertically for the best results:
this.scale.pageAlignHorizontally = true;
this.scale.pageAlignVertically = true;
Since we are keeping the aspect ratio, there may be bars on the top and bottom or both sides, since we centered the game. The bars will appear if the player’s screen does not match the aspect ratio. Since this particular game is larger horizontally than vertically, the bars will appear on the top and bottom when the screen size is different from the aspect ratio.
We then launch the physics system in the game using this statement:
this.game.physics.startSystem(Phaser.Physics.ARCADE);
The last step of the Boot state is to start up the next state with:
this.state.start('Preload');Preload state
The Preload state is where the rest of the game assets are loaded. We only have audio and image files, but some games make use of other types of files. A popular file type for Phaser is a tilemap. Tilemaps are great for games that have predetermined levels laid out in a specific manner, but we want to stay away from them in this case, because it would be impossible to do infinite scrolling with tilemaps unless you were to repeat the same tilemaps over and over, which wouldn’t be random at all!
The preloading of assets ensures that all the resources needed to play the game will be available once the game starts. This is why we have a preload bar and Boot state, so the player has something to look at while the game loads. If we were to skip this step, some of the images and sounds required for proper game play would be missing until they finished loading.
var InfiniteScroller = InfiniteScroller || {};

//loading the game assets
InfiniteScroller.Preload = function(){};

InfiniteScroller.Preload.prototype = {
  preload: function() {
    //show loading screen
    this.preloadBar = this.add.sprite(this.game.world.centerX, this.game.world.centerY, 'preloadbar');
    this.preloadBar.anchor.setTo(0.5);
    this.preloadBar.scale.setTo(3);

    this.load.setPreloadSprite(this.preloadBar);

    //load game assets
    this.load.spritesheet('dog', 'assets/images/dog_walk.png', 122, 92, 2);
    this.load.spritesheet('playerScratch', 'assets/images/dog_scratch.png', 116, 100, 2);
    this.load.spritesheet('playerDig', 'assets/images/dog_dig.png', 129, 100, 2);
    this.load.image('ground', 'assets/images/ground.png');
    this.load.image('grass', 'assets/images/grass.png');
    this.load.audio('whine', ['assets/audio/whine.ogg', 'assets/audio/whine.mp3']);
    this.load.audio('bark', ['assets/audio/bark.ogg', 'assets/audio/bark.mp3']);

    //from https://gamedevacademy.org/html5-phaser-tutorial-spacehipster-a-space-exploration-game/
    this.load.image('mound', 'assets/images/rock.png');

    //Adapted from https://openclipart.org/detail/6570/flea:
    this.load.image('flea', 'assets/images/flea.png');

    //https://openclipart.org/detail/188266/bone:
    this.load.image('bone', 'assets/images/toys/bone.png');

    //https://openclipart.org/detail/139615/tennis-ball:
    this.load.image('ball', 'assets/images/toys/tennisball.png');
  },
  create: function() {
    this.state.start('Game');
  }
};
Once again, as in the Boot state, we use the “preload” and “create” methods. We begin by adding the “preloadBar” sprite that we loaded in the Boot state, using that “preloadbar” key we mentioned earlier.
We will be creating a lot of sprites in this game, so you will want to read more about the Sprite class in the Phaser documentation. The next statement centers the anchor point of the image, so it can be scaled from the center (especially necessary since the sprite object is centered on the screen). We then scale it up to 3 times its size, since we are starting with a tiny bar:
this.preloadBar.scale.setTo(3);
The next statement is a beautiful function provided by Phaser, which will automatically animate our sprite. The default is a horizontal sprite, but you can also pass a second argument of 1 to make it vertical. This function will crop the sprite down, then increase its length until the sprite is no longer cropped, and the game is fully loaded.:
this.load.setPreloadSprite(this.preloadBar);
After this, we load all the assets we will need in the game. The first three images are called “spritesheets.” A spritesheet is like any other image, except that it contains multiple images. In this case, each image within each spritesheet is the same size, and only slightly different. This will allow us to create Phaser animations more easily. For example:
this.load.spritesheet('playerDig', 'assets/images/dog_dig.png', 129, 100, 2);In the above statement, the first argument is the key for the image, which will allow us to access it from anywhere in the game. The second argument is the location of the image. The next two arguments represent the width and height of a single frame within the image. This means that the first frame of the “dog” spritesheet is 129 pixels wide by 100 pixels high, even though the dog_walk.png image is 129 x 200. The last argument is the number of frames in our animation, which is 2. So, each frame is 129 x 100, giving us that total image size of 129 x 200:
![]()
Lastly, we start up the Game state
Game State
Here’s the most basic skeleton for Game.js that will allow us to run the game without console errors:
var InfiniteScroller = InfiniteScroller || {};

InfiniteScroller.Game = function(){};

InfiniteScroller.Game.prototype = {
  preload: function() {
      this.game.time.advancedTiming = true;
    },
  create: function() {

    //create player and walk animation
    this.player = this.game.add.sprite(this.game.width/2, this.game.height-90, 'dog');
    this.player.animations.add('walk');

  },

  update: function() {

  },
  render: function()
    {
        //this.game.debug.text(this.game.time.<a class="wpil_keyword_link" href="https://gamedevacademy.org/best-fps-tutorials/" target="_blank" rel="noopener" title="fps" data-wpil-keyword-link="linked">fps</a> || '--', 20, 70, "#00ff00", "40px Courier");
    }
};
Again, we have the “preload” and “create” methods, but now we’ve added the “update” and “render” methods. The update method is called on every game tick, which is “many times per second.” This is where we need to add anything that must be constantly tested, such as collision detection.
For the purposes of our skeleton code, we create the player sprite using the image that we called “dog” in Preload. This will display the dog, but it won’t be doing much for now, because the dog doesn’t have any physics properties yet.
Another thing we’ve added is some debugging information having to do with timing. This is a really handy thing to display as you work on your game, and you can display it on the screen by uncommenting the statement in the render method. For a longer discussion of the frames per second (fps) information, see this other Phaser tutorial.
Loading the sprite layers
The first lines of the “create” method are as follows:
//set up background and ground layer
    this.game.world.setBounds(0, 0, 3500, this.game.height);
    this.grass = this.add.tileSprite(0,this.game.height-100,this.game.world.width,70,'grass');
    this.ground = this.add.tileSprite(0,this.game.height-70,this.game.world.width,70,'ground');

    //create player and walk animation
    this.player = this.game.add.sprite(this.game.width/2, this.game.height-90, 'dog');
    this.player.animations.add('walk');

    //create the fleas
    this.generateFleas();
    //and the toy mounds
    this.generateMounds();

    //put everything in the correct order (the grass will be camoflauge),
    //but the toy mounds have to be above that to be seen, but behind the
    //ground so they barely stick up
    this.game.world.bringToTop(this.grass);
    this.game.world.bringToTop(this.mounds);
    this.game.world.bringToTop(this.ground);
The first line sets up the world bounds. Although we are going to be scrolling infinitely to the side, we want to have an area big enough to load randomly generated content before wrapping around, destroying everything and creating new random content. We don’t care about the height, however, so we set it to the initial height of the game (which will be scaled automatically to the player’s screen by Phaser).
The next couple of lines set up the ground and grass. Both images are 70 x 70, and we want the ground to appear at the bottom of the screen. Phaser’s x and y coordinates begin at 0, 0 in the upper left corner of the screen. Therefore, we set the y coordinate for the ground to the height of the game, minus the height of the ground image (remember, Phaser will take care of all the scaling for us).
![]()
![]()
The width is the width of the game “world,” which we set to 3500 in the “setBounds” statement. The function “tileSprite” will tile the image across the entire width of the game world. We set the same width for the grass, but we place it 30 pixels above the ground.
We then create the player as we did before, and call methods that will create our randomly generated content (which we will go over in the next section). In the last three lines, we use “bringToTop” in order to put the grass above the player, the mounds above the grass, and the ground layer above that. This will give us the illusion that the dog is walking through the grass, and the grass is growing out of the ground.
Now let’s look at all of our randomly generated nemeses and toy mounds!
Adding random content
We have two functions for creating random content:
generateMounds: function() {
    this.mounds = this.game.add.group();

    //enable physics in them
    this.mounds.enableBody = true;

    //phaser's random number generator
    var numMounds = this.game.rnd.integerInRange(0, 5)
    var mound;

    for (var i = 0; i < numMounds; i++) {
      //add sprite within an area excluding the beginning and ending
      //  of the game world so items won't suddenly appear or disappear when wrapping
      var x = this.game.rnd.integerInRange(this.game.width, this.game.world.width - this.game.width);
      mound = this.mounds.create(x, this.game.height-75, 'mound');
      mound.body.velocity.x = 0;
    }

  },
  generateFleas: function() {
    this.fleas = this.game.add.group();

    //enable physics in them
    this.fleas.enableBody = true;

    //phaser's random number generator
    var numFleas = this.game.rnd.integerInRange(1, 5)
    var flea;

    for (var i = 0; i < numFleas; i++) {
      //add sprite within an area excluding the beginning and ending
      //  of the game world so items won't suddenly appear or disappear when wrapping
      var x = this.game.rnd.integerInRange(this.game.width, this.game.world.width - this.game.width);
      flea = this.fleas.create(x, this.game.height-115, 'flea');

      //physics properties
      flea.body.velocity.x = this.game.rnd.integerInRange(-20, 0);

      flea.body.immovable = true;
      flea.body.collideWorldBounds = false;
    }
  },
You can always create more randomness, such as brick walls. These obstacles can stop, damage, or kill the player. Since our player is a dog in this case, and nobody likes to see a poor innocent dog get… er… damaged… we are simply creating some annoyances… and toys!
Each function is similar. Fleas and toy mounds each go into a group, and we create a random number of them, within the specified range. Every item has a “body” that we can manipulate. Then we loop through and create each item, where the y coordinate is set so that each flea appears just above the grass (but somewhat hidden), and each mound appears slightly above the ground.
Since our world is infinitely wrapping around, we set the x value to be within the width of the game world, but also out of sight of the beginning and ending sections seen within the player’s screen. That way, we won’t have mounds and fleas suddenly disappearing or appearing each time the world wraps around.
In addition, the mounds have no physics applied to them (we will put them to use later), but the fleas are immovable (that means the player can’t run through them). We also don’t want the fleas colliding with the world bounds, since the world bounds are infinite.
Next, we get our player moving!
Player physics
The player is just standing there doing nothing, so now it’s time to add some physics:
//enable physics on the player and ground
    this.game.physics.arcade.enable(this.player);
    this.game.physics.arcade.enable(this.ground);

    //player gravity
    this.player.body.gravity.y = 1000;

    //so player can walk on ground
    this.ground.body.immovable = true;
    this.ground.body.allowGravity = false;

    //properties when the player is digging, scratching and standing, so we can use in update()
    var playerDigImg = this.game.cache.getImage('playerDig');
    this.player.animations.add('dig');
    this.player.digDimensions = {width: playerDigImg.width, height: playerDigImg.height};

    var playerScratchImg = this.game.cache.getImage('playerScratch');
    this.player.animations.add('scratch');
    this.player.scratchDimensions = {width: playerScratchImg.width, height: playerScratchImg.height};

    this.player.standDimensions = {width: this.player.width, height: this.player.height};
    this.player.anchor.setTo(0.5, 1);

    //the camera will follow the player in the world
    this.game.camera.follow(this.player);

    //play the walking animation
    this.player.animations.play('walk', 3, true);

    //move player with cursor keys
    this.cursors = this.game.input.keyboard.createCursorKeys();

    //...or by swiping
    this.swipe = this.game.input.activePointer;
In the next two lines, we enable arcade physics on the player and ground. We then set gravity on the player, but make the ground immovable. We don’t want the player to be able to move the ground, and we also don’t want the ground to fall out from under the player.
After that, we set up the digging and scratching animations for our player, and set variables that will allow us to switch out the size of the player when playing these other animations. Right after setting the player’s “standing up” dimensions, we set the anchor to the bottom center of the player sprite to make the various changes to the physics of the player easier (since sitting and standing and jumping happens from the bottom, with the legs).
The next line tells the camera to follow the player through the game world, and then we play the walking animation that we added earlier.
The last two lines above capture keyboard and pointer input, which will allow us to manipulate the player sprite using the keyboard, mouse, or mobile device screen.
But the player still falls through the ground! We fix that with collision detection.
Collision detection
Two game elements collide when they share the same space on the screen. Phaser gives us collide and overlap detection. When two items collide, they stop against each other. When they overlap, however, nothing happens. We want the game to constantly test for collisions and overlaps, so we add these lines to the update method:
this.game.physics.arcade.collide(this.player, this.ground, this.playerHit, null, this);
    this.game.physics.arcade.collide(this.player, this.fleas, this.playerBit, null, this);
    this.game.physics.arcade.overlap(this.player, this.mounds, this.collect, this.checkDig, this);
The player will collide with both the ground and the fleas, but will only overlap with the toy mounds. These collisions and overlaps are tested “multiple times per second,” because they’re in the update method.
Our playerHit method is empty, but I’ve kept it there for additional future functionality, such as being blocked by a wall. It doesn’t matter that there’s nothing in the function though. The fact that we are testing for collision means that the player will land on the ground without falling through.
Now it’s time to set some variables so we can start to make things interesting!
Setting variables to be used throughout the game
We are going to need to add some variables that will be used within the update function and elsewhere throughout the game, so let’s finish out the “create” function:
//sounds
    this.barkSound = this.game.add.audio('bark');
    this.whineSound = this.game.add.audio('whine');

    //set some variables we need throughout the game
    this.scratches = 0;
    this.wraps = 0;
    this.points = 0;
    this.wrapping = true;
    this.stopped = false;
    this.maxScratches = 5;

    //create an array of possible toys that can be gathered from toy mounds
    var bone = this.game.add.sprite(0, this.game.height-130, 'bone');
    var ball = this.game.add.sprite(0, this.game.height-130, 'ball');
    bone.visible = false;
    ball.visible = false;
    this.toys = [bone, ball];
    this.currentToy = bone;

    //stats
    var style1 = { font: "20px Arial", fill: "#ff0"};
    var t1 = this.game.add.text(10, 20, "Points:", style1);
    var t2 = this.game.add.text(this.game.width-300, 20, "Remaining Flea Scratches:", style1);
    t1.fixedToCamera = true;
    t2.fixedToCamera = true;

    var style2 = { font: "26px Arial", fill: "#00ff00"};
    this.pointsText = this.game.add.text(80, 18, "", style2);
    this.fleasText = this.game.add.text(this.game.width-50, 18, "", style2);
    this.refreshStats();
    this.pointsText.fixedToCamera = true;
    this.fleasText.fixedToCamera = true;
First, we add the scratching and barking sounds that will be used when the dog is bitten by a flea or digs up a mound, respectively. Then, we have a few basic variables that we will use to keep track of our statistics.
After that, we create an array of toys for the dog to dig up. So far, we just have a bone and a ball, but you can always add more. We will choose a toy randomly each time the player digs up a mound.
The rest of the lines have to do with displaying the statistics at the top of the screen. We set a style for the descriptive text, display it in a specific location on the screen, and make the text “fixedToCamera” so it won’t move off the screen. We do the same for the variable text, but add the text into variables that can be updated as the game is played.
Setting the velocity
We want the player to start moving along the screen, but only if he has not stopped for scratching or digging, and only if he is still alive (or in our case, has not run home). The following statement will get the player moving:
this.player.body.velocity.x = 300;
OK, but we also need the player to keep moving rather than running into the end of the “world,” and we also need to test whether the player is jumping. So, here is the rest of the “update” function:
if(this.player.alive && !this.stopped) {

      this.player.body.velocity.x = 300;

      //We do a little math to determine whether the game world has wrapped around.
      //If so, we want to destroy everything and regenerate, so the game will remain random
      if(!this.wrapping && this.player.x < this.game.width) {
        //Not used yet, but may be useful to know how many times we've wrapped
        this.wraps++;

        //We only want to destroy and regenerate once per wrap, so we test with wrapping var
        this.wrapping = true;
        this.fleas.destroy();
        this.generateFleas();
        this.mounds.destroy();
        this.generateMounds();

        //put everything back in the proper order
        this.game.world.bringToTop(this.grass);
        this.game.world.bringToTop(this.mounds);
        this.game.world.bringToTop(this.ground);
      }
      else if(this.player.x >= this.game.width) {
        this.wrapping = false;
      }

      //take the appropriate action for swiping up or pressing up arrow on keyboard
      //we don't wait until the swipe is finished (this.swipe.isUp),
      //  because of latency problems (it takes too long to jump before hitting a flea)
      if (this.swipe.isDown && (this.swipe.positionDown.y > this.swipe.position.y)) {
        this.playerJump();
      }
      else if (this.cursors.up.isDown) {
        this.playerJump();
      }

      //The game world is infinite in the x-direction, so we wrap around.
      //We subtract padding so the player will remain in the middle of the screen when
        //wrapping, rather than going to the end of the screen first.
      this.game.world.wrap(this.player, -(this.game.width/2), false, true, false);
    }
First, we test that the player is not “dead” or stopped before doing anything else (besides collision detection). If the player is OK, we get him moving with some velocity.
Since Phaser doesn’t tell us when the player has wrapped around in the game world, we have to do a little basic math. We just need to test whether the player has reached a low x coordinate, within the size of the game width. If so, this means the player has wrapped around. We initially set the wrapping variable to true in the “create” method, so that the start of the game won’t count as a wrap.
If the player has just wrapped, we destroy all the mounds and fleas and recreate them. We also have to put everything back in the proper order. By setting the “wrapping” variable to true, we only do this one time on each wrap. Once the player leaves that beginning section of the screen, we can set “wrapping” to false and start all over again.
After that, we test for an arrow up key or swipe up. All we need for a quick swipe up test is:
if (this.swipe.isDown && (this.swipe.positionDown.y > this.swipe.position.y)) {If we wait until the user finishes the swipe, there is too much latency. We want a quick test for a quick movement, and we just want to make sure that the current position of the swipe is less (in other words, has a higher y coordinate in the game world) than the position at which they started their swipe. If so, we call the playerJump method (described below).
Lastly, we call the following function:
this.game.world.wrap(this.player, -(this.game.width/2), false, true, false);
This will tell Phaser to wrap the player around in the game world. The second argument is padding. If we subtract the game width as padding, the player will stay in the middle of the screen rather than moving to the end of the world, then starting back at the very beginning. This makes the world seamlessly infinite.
Jumping
Our playerJump method is very simple:
playerJump: function() {
    //when the ground is a sprite, we need to test for "touching" instead of "blocked"
    if(this.player.body.touching.down) {
      this.player.body.velocity.y -= 700;
    }
  },
First, we need to test that the player is touching the ground. If so, we give him a negative velocity in the y-direction so he can jump up.
Digging
Remember this overlap detection line from the top of the update method?
this.game.physics.arcade.overlap(this.player, this.mounds, this.collect, this.checkDig, this);
The checkDig method in the fourth argument is called first. If that method returns true, then the collect method from the third argument is called. Here’s the checkDig method:
checkDig: function() {
    if (this.cursors.down.isDown || (this.swipe.isDown && (this.swipe.position.y > this.swipe.positionDown.y))) {
      return true;
    }
    else {
      return false;
    }
  },
All we are doing here is checking that either the down arrow key is being pressed or the user is swiping down while overlapped with a mound. If so, we return true, which will cause the collect method to be called:
collect: function(player, mound) {
    //this is called continuously while player is on mound, but we only want to do it once
    if (!this.stopped) {
      //change image and update the body size for the physics engine
      this.player.loadTexture('playerDig');
      this.player.animations.play('dig', 10, true);
      this.player.body.setSize(this.player.digDimensions.width, this.player.digDimensions.height);

      //we can't remove the toy mound until digging is finished, so we have to set a variable for
      //the function called from the timer (below)
      this.currentMound = mound;

      //we stop a couple of seconds for the dig animation to play
      this.stopped = true;
      this.player.body.velocity.x = 0;
      this.game.time.events.add(Phaser.Timer.SECOND * 2, this.playerDig, this);
    }
  },
Since the method is called continuously while the player is overlapping a mound, we need to check whether our “stopped” variable is set to false. If so, we add the digging sprite and start the animation. We also set the stopped variable to true, set the currentMound (so we can remove it later), and set the velocity to 0 while the digging animation plays.
After a couple of seconds of digging, we call the “playerDig” function:
playerDig: function() {
    //play audio
    this.barkSound.play();

    //grab the location before we destroy the toy mound so we can place the toy
    var x = this.currentMound.x;

    //remove toy the mound sprite now that the toy is collected
    this.currentMound.destroy();

    //refresh our points stats
    this.points += 5;
    this.refreshStats();

    //randomly pull a toy from the array
    this.currentToy = this.toys[ Math.floor( Math.random() * this.toys.length ) ];

    //make the toy visible where the mound used to be
    this.currentToy.visible = true;
    this.currentToy.x = x;

    //and make it disappear again after one second
    this.game.time.events.add(Phaser.Timer.SECOND, this.currentToyInvisible, this);

    //We switch back to the standing version of the player
    this.player.loadTexture('dog');
    this.player.animations.play('walk', 3, true);
    this.player.body.setSize(this.player.standDimensions.width, this.player.standDimensions.height);
    this.stopped = false;
  },
Now that the player dug up a toy, we play the bark sound. We grab the x coordinate of the mound before destroying it so that we can place the toy in its place. Next, we update our stats by calling the “refreshStats” function:
refreshStats: function() {
    this.pointsText.text = this.points;
    this.fleasText.text = this.maxScratches - this.scratches;
  },
We then use a little javascript to randomly select a toy from our toy array: Math.floor( Math.random() * this.toys.length ).
Once we have our toy, we make it visible and place it where the mound used to be. After 1 second, we call the currentToyInvisible function:
currentToyInvisible: function() {
    this.currentToy.visible = false;
  },
Yep, we simply make the toy invisible again. Now we can load our normal walking animation back in and continue on with our game by setting stopped back to false.
Game over
Remember why we need to jump? Because of giant fleas! In the update method, we were detecting collision with fleas:
this.game.physics.arcade.collide(this.player, this.fleas, this.playerBit, null, this);
When the player hits a flea, the “playerBit” method is called, which looks like this:
playerBit: function(player, flea) {
    //remove the flea that bit our player so it is no longer in the way
    flea.destroy();

    //update our stats
    this.scratches++;
    this.refreshStats();

    //change sprite image
    this.player.loadTexture('playerScratch');
    this.player.animations.play('scratch', 10, true);

    //play audio
    this.whineSound.play();

    //wait a couple of seconds for the scratch animation to play before continuing
    this.stopped = true;
    this.player.body.velocity.x = 0;
    this.game.time.events.add(Phaser.Timer.SECOND * 2, this.playerScratch, this);
  },
The first thing we do is destroy the flea sprite so that the player won’t continue colliding with it. We update the stats right away, which we’ll cover further down. We then play the scratch animation, and play the sound of the dog whining.
In order to stop and play the animation, we have to set our “stopped” variable to true, set the velocity of the player to 0, and add a timer that will wait for 2 seconds before calling the “playerScratch” method (which could probably be called playerScratched, since the scratch will have happened already).
Here is the playerScratch method:
playerScratch: function() {
    this.stopped = false;

    if (this.scratches >= 5) {
      //set to dead (even though our player isn't actually dead in this game, just running home)
      //doesn't affect rendering
      this.player.alive = false;

      //destroy everything before player runs away so there's nothing in the way
      this.fleas.destroy();
      this.mounds.destroy();

      //We switch back to the standing version of the player
      this.player.loadTexture('dog');
      this.player.animations.play('walk', 10, true); //frame rate is faster for running
      this.player.body.setSize(this.player.standDimensions.width, this.player.standDimensions.height);

      //...then run home
      this.player.anchor.setTo(.5, 1);
      this.player.scale.x = -1;
      this.player.body.velocity.x = -1000;

      //we want the player to run off the screen in this case
      this.game.camera.unfollow();

      //go to gameover after a few miliseconds
      this.game.time.events.add(1500, this.gameOver, this);
    } else {
      //change image and update the body size for the physics engine
      this.player.loadTexture('dog');
      this.player.animations.play('walk', 3, true);
      this.player.body.setSize(this.player.standDimensions.width, this.player.standDimensions.height);
    }
  },
Here we set the “stopped” variable to false so we can continue with the game… unless we’ve reached the maxScratches! If we’ve reached maxScratches, we set the player to “dead” (even though he’s not exactly dead in this case), then we destroy all the mounds and fleas so they won’t be in the way.
We then start up the normal walking animation again, except this time, we add these statements:
this.player.scale.x = -1;
this.player.body.velocity.x = -1000;
this.game.camera.unfollow();
Setting player.scale.x to -1 causes the player sprite to flip in the opposite direction so it will appear as though he’s running away. We then set is velocity to a large negative value and stop the camera from following him so he’ll run off the screen. We then wait a few milliseconds before ending the game with the gameOver function:
gameOver: function() {
    this.game.state.start('Game');
  },
At this point we’ll start over from the beginning!
Of course, if the player hasn’t reached the maxScratches, we simply load the normal animation so the player can continue walking along.

Sound
For a great discussion on creating sound files, please visit this tutorial. You can use this information to create sound files of your own dog barking or whining!