You can access the full course here: CREATE A BOT WITH PYTHON AND CHATGPT
Table of contents
Introduction
In this tutorial, we are going to create the simplest possible bot using the ChatGPT API. We will see how to pass the API key, define the prompt, make an API call, and print the response. By the end of this tutorial, you will be able to create a basic chatbot that can answer questions based on the input provided.
Project Files
While you’ll need to set up your own Python project and include the necessary dependencies, we have included a full copy of the code files used in this tutorial for reference.
Download Project Files Here
OpenAI Library
In this lesson, we’ll create the simplest possible bot using the ChatGPT API. Let’s open our code editor and get started!
Create a new file called “app.py” and import the OpenAI library:
import openai
Passing the API Key
First, we need to set the API key so that OpenAI can process our requests. To do this, we need to head over to the OpenAI website (https://platform.openai.com/account/api-keys) and create a new key. Copy your new key and paste it into the code, replacing the YOUR_KEY_HERE string below:
import openai

# pass the api key
openai.api_key = 'YOUR_KEY_HERE'

# define prompt

# make an api call

#print the response
Remember to never share your secret key or post any files containing it to Github or other websites.
Defining the Prompt
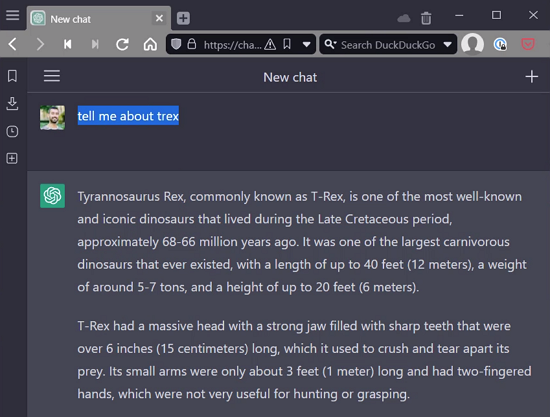
The next step is to define the prompt that we will pass to the chatbot. When we send messages to the API, we are sending a list of different messages which can come from the user or from the assistant. Consider that we asked OpenAI about dinosaurs:
Here, our question is the first message, followed by a response from the assistant. If we ask another question, we’d be sending the API the whole conversation and not only the topic in question. In this case, the T-rex question, the assistant’s response to it, and our second question (resulting in a list of 3 messages). That said, we can create a dictionary with a role (user or assistant) and the content of the message as follows:
# define prompt
message = {'role': 'user', 'content': 'why is my website down?'}
messages = []
messages.append(message)
Making an API Call
Now, we have what’s needed to make an API call. We pass in the model (‘gpt-3.5-turbo’) and the messages list:
# make an api call
response = openai.ChatCompletion.create(model='gpt-3.5-turbo', messages=messages)
Printing the Response
The last step is to print the response:
# print the response
print(response)
Run your code by pressing the ‘Run’ button or via terminal/command line:
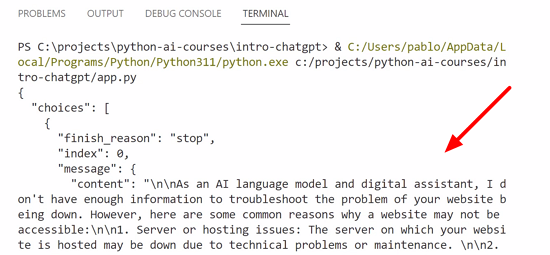
The response we’ve received is an object that has a ‘choices‘ key with a list of possible answers to our question. We have only one response here, of index 0 and of role ‘assistant‘. Further down, we also have a timestamp with information on our request.
To print out the content of our response directly, type:
# print the response
print(response.choices[0].message.content)
Now we see the actual response:
Conclusion
And that wraps up our tutorial on creating a simple bot using the ChatGPT API. We have demonstrated how to pass an API key, define a prompt, request a response from the API, and display the response in a user-friendly manner. This simple chatbot has potential for many applications, from answering basic user questions to creating a more advanced conversational interface.
You can now consider expanding your knowledge on chatbots and natural language processing, or even integrate this simple bot into a larger project. Whatever your next steps may be, you’re now equipped with the skills to create an interactive, text-based chatbot using OpenAI’s powerful GPT-3 technology.
We hope you’ve learned a lot through this tutorial, and we wish you the best of luck with your future projects!
Did you come across any errors in this tutorial? Please let us know by completing this form and we’ll look into it! FINAL DAYS: Unlock coding courses in Unity, Godot, Unreal, Python and more.
Transcript
Welcome back everyone. In this lesson, we are gonna be creating the simplest possible bot that we could possibly build using the chat GPT API.
So let’s head over to our code editor and create a new file. I’m gonna click new file in Visual Studio Code and call this app.py and save that into a newly created folder. We need to begin by importing the OpenAI library that’s already installed in our computers. And next, I’m gonna be adding comments here to outline the steps that we need to take.
So we need to pass the API key so that OpenAI is able to process our requests. Then we are going to define the prompt that we are gonna pass the chat. We are going to make an API call. And lastly, we are going to print the response. So that’s the overview of what we are doing.
So let’s begin with the first one. Pass the API key, let’s type `OpenAI.api_key`, and put an equal sign. And this is where we need to enter our secret key. So what I’ll do is head over to the OpenAI website. If you click on your profile, then view API keys, that’s gonna show you a list of keys, and we’re gonna create a new key. I’m gonna copy this value and take it into Visual Studio.
It’s important to mention that the API key needs to be kept secret. Anybody possessing your API key can make calls on your behalf, which could cost you a lot of money. So always make sure to keep your keys safe. And very importantly, never upload this to GitHub. A lot of people, by mistake, might upload a file that contains a secret key. There are safer ways to work with keys, one of them being environmental variables, and we are gonna talk about that later in the course. So for simplicity, we’re just putting our key here, but I want to make this very, very clear. Okay.
Alright. So when it comes to the prompt, let’s say that we wanna ask OpenAI about dinosaurs. So I’m gonna just show you a little bit of how this normally works, as it will make it easy to understand the code aspect later. Normally, you will make a question, for example, tell me about T-rex and then we are essentially sending this to the API using the chat GPT program, and then there’s some sort of response coming up.
And then if I ask a follow-up question, for example, what about mammals? What we are doing here is I’m not only sending this back in terms of the API, what is really happening is that the whole conversation is looked at once. So there is a user-generated message, then there is an assistant-generated message, then there’s another user-generated message. So in order to get this response here, it’s assisting in sending these three things. Alright?
So when we are sending the messages to the API, we’re sending a list of different specific messages, which could come from the user or from the assistant. So a single such message is a dictionary that has a role. The role can be, for example, in this case, either user or assistant. And there’s also a system role, which we will talk about later. So I’m passing in the role and let me correct this to be in quotes as well. And now I can pass the actual content of that message. For example, why is my website down? Alright, so I’ve got a message here that I wanna send to this chatbot.
So normally you will create a messages list and then that message can have appended multiple individual messages. So we are creating an empty list and we’re putting this first dictionary into that list. Uh, messages. There we go.
Alright, so we’ve got a messages list that only contains a single message, and now we have enough to make an API call, and we’re gonna save the response of this call in the environment. So the way we make these calls is by typing `openai.`, and in this case, this is going to be a chat completion and it’s, we’re going to create a new chat completion. So that’s the create method. And now we’re gonna be passing in a few parameters.
I’m going to be passing in a model parameter. And the model that we are gonna be using at this point in time is GPT-3.5-turbo. So this, I will show you later on the documentation how to find this. It’s highly likely that when you are watching this, there will be a newer model because they’re coming out quite often. And so you’re welcome to use a newer version of the model.
Next, I’m going to be passing in the messages that we created previously. So the parameter is called messages and we are passing the messages array. So that’s it, really. That’s it. This should give us enough to have a response. And then I’m just gonna type print(response) to see what that looks like.
So, you can execute this from your command line or you can just do it from Visual Studio Code. So I’m gonna press play there, and that’s gonna execute in the terminal here. And we should be getting a response from OpenAI. Okay, so we received a response. The response is an object that has a choices key. And in this choices, we have an array or list of different possible responses.
Because we didn’t specify how many optional responses we wanted, it’ll almost return one by default. Just like when you are chatting with this, the real thing, it always gives you just one response, but in the API, you can also get multiple possible responses. Alright, so we only have one object here, and it gives us the reason why it is finished, which is that it basically stopped the index of this particular choice, which is zero. And then this is the important thing, the message and the message have this content here and also have the role, the message that we have sent had the role user, the message that we have received has the role assistant and the content here.
You can see this is a generic response as to why our website might be down. So it just, you know, tells you a few things about why a website could be down. And there is further information here such as the timestamp and id, the model that was used, as well as how many tokens you used because this has to do with billing. The billing is per token. So that just gives you an idea of how many tokens this cost. Alright?
If we just wanted to print only the actual response, you can type `response.choices` and then `zero` because we want that first one, that’s the only one that came. `Message.content`. So if we execute this code again, we can see that we received that, we’re now only displaying the actual response. Alright? So that’s how we can make a really, really simple API call to chat GPT. Thank you for watching. Looking forward to seeing you in the next lesson.
Interested in continuing? Check out our all-access plan which includes 250+ courses, guided curriculums, new courses monthly, access to expert course mentors, and more!


