Project download is located here.
This week, we will again talk about algorithms with Unity3D. The main focus will be to take a main idea and build it. We will start with breaking the concept down into smaller, more manageable sections and build up to the main idea. So, the idea we want to have in the end is a cube that has random colors that we can save and load. We also want to dynamically generate these from a single to multiple cube prefabs. I hope you guys are ready because this is going to be a very exciting tutorial.
Did you come across any errors in this tutorial? Please let us know by completing this form and we’ll look into it!

FINAL DAYS: Unlock coding courses in Unity, Godot, Unreal, Python and more.
Section 1: Building the UI
In this section, we will be using the Unity editor to create the basic prefab that has our cube and materials. So, let’s start by creating a new project that is set to be in 3D mode and calling it “Cubes Galore”.

Next up, we need a few folders. Prefabs, Scripts, and Materials are the folder names.

Let’s make about 5 different colored materials. You can follow along with the colors I used, or create your own.

Now that we have our materials created, lets add a cube to the scene.

Duplicate the cube 4 times and apply one material to each one.

Now, drag all 5 cubes into the prefabs folder and remove them from the hierarchy pane.

Create an empty game object and call it controller.

Now, we need to make a script in the scripts folder and call it “CubeController”.

The last thing to do for this section is to go ahead and add the CubeController script onto the Controller object.

Section 1 is now complete; it doesn’t look like much but this is most assuredly the basics for what we hope to accomplish.
Section 2: The first Algorithm
In this section, we are going to take a single cube prefab and have it duplicate itself multiple times to form a square. To do this, we need a little bit of information. That information would be in terms of positions. What is the Vector 3 position of the left and right sides of the square, as well as the forward and back most position? To answer this, we need a little bit of geometry to answer the question. A square by definition has 4 equal sides.

Now, we want our square’s y position to be at 0. The reason for this is because we don’t want any height difference for this first square.
The x position will start at -3 and move to 2. So, this will make the basic square be 5 long. So, we need to do the same for the depth. Which leads us to the Z position. The z position will be from 0 to 5. Now that we have the basic idea of what we need, let’s write the algorithm.
using UnityEngine;
using System.Collections;

public class CubeController : MonoBehaviour
{
    public GameObject CubePrefab;

	public void generateCubeSquare()
    {
        for (float x = -3; x < 2; x ++)
        {
            for (float z = 0; z < 5; z ++)
            {
                Instantiate(CubePrefab, new Vector3(x, 0, z), Quaternion.identity);
            }
        }
    }

    public void Start()
    {
        generateCubeSquare();
    }
}
With the algorithm, we wrote the algorithm to coincide with the x and z values to make it easier to read. Now, we need to add a cube prefab to the controller.

Let’s take a look at the results.

Hmm, let’s change the camera’s view angle so we can see the full results. We will change the Y position of the camera to be 6. Now, let’s change the X rotation to be 30.

Let’s do a slight modification to add a slight modification to this, the modification is to add a small space in between each cube.
using UnityEngine;
using System.Collections;

public class CubeController : MonoBehaviour
{
    public GameObject CubePrefab;

	public void generateCubeSquare()
    {
        for (float x = -3; x < 2; x += 1.08f)
        {
            for (float z = 0; z < 5; z += 1.08f)
            {
                Instantiate(CubePrefab, new Vector3(x, 0, z), Quaternion.identity);
            }
        }
    }

    public void Start()
    {
        generateCubeSquare();
    }
}
What we did was changed the increment portion of the for loop. Instead of adding 1 with each loop, we add 1.08 to the current z number.

As you can see, it looks a little bit more like a square grid; Which in turn looks a little more uniform and clean.
Section 3: Algorithm with a List of Prefabs
In this section, we will randomize the colors of the cubes in the square. This is most certainly going to cause some frustrations to the beginning developer. So, the way I will do this is show the incorrect way to do it first and explain why it does not work as intended and then show the correct way to do it with an explanation.
The Wrong Way:
using UnityEngine;
using System.Collections;
using System.Collections.Generic;

public class CubeController : MonoBehaviour
{
    public List<GameObject> CubePrefabList;

     public void generateColoredCubeSquare()
    {
        var index = CubePrefabList.Count;

        for (float x = -3; x < 2; x += 1.08f)
        {
            for (float z = 0; z < 5; z += 1.08f)
            {
                foreach(var item in CubePrefabList)
                {
                    Instantiate(item, new Vector3(x, 0, z), Quaternion.identity);
                }
            }
        }
    }


    public void Start()
    {
        generateColoredCubeSquare();
    }
  }
}
Let’s take a look at the results

The reason why this does not work as intended is because of the way the code is written, it tells the compiler to put a cube in the same spot as ones that are already placed. There are quite a few ways to make this mistake as well as to rectify the problem.
The Correct Way:
using UnityEngine;
using System.Collections;
using System.Collections.Generic;

public class CubeController : MonoBehaviour
{
    public List<GameObject> CubePrefabList;

    public void generateColoredCubeSquare()
    {
        for (float x = -3; x < 2; x += 1.08f)
        {
            for (float z = 0; z < 5; z += 1.08f)
            {
                Instantiate(CubePrefabList[Random.Range(0, CubePrefabList.Count)], new Vector3(x, 0, z), Quaternion.identity);
            }
        }
    }


    public void Start()
    {
        generateColoredCubeSquare();
    }
Let’s take a look at the results

As I said in the wrong way subsection, there are many ways to write this correctly. I chose a way that is simple to use and easy to read. With this method, we tell the compiler to put a cube in every open position and randomize which cube is in each position.
Section 4: Making a 3D cube
This section we will take the existing code and modify it some in order to create a cube. To do this, all we need to do is to apply a little bit more geometry to the existing geometry we have already created. We have our x and z values already done, now we need to do the Y values. Since we know we want to start at 0, that means we need to have it end at 5. This should allow us to have a 5 x 5 x 5 cube, in other words a length of 5, a width of 5, and a depth of 5.
using UnityEngine;
using System.Collections;
using System.Collections.Generic;
public class CubeController : MonoBehaviour
{
public List<GameObject> CubePrefabList;
public void generateColoredCubeSquare()
{
for (float x = -3; x < 2; x += 1.08f)
{
for (float z = 0; z < 5; z += 1.08f)
{
for (float y = 0; y < 5; y += 1.08f)
{
Instantiate(CubePrefabList[Random.Range(0, CubePrefabList.Count)], new Vector3(x, y, z), Quaternion.identity);
}
}
}
}
public void Start()
{
generateColoredCubeSquare();
}
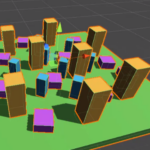
}Here are the results

What we did to accomplish this was we nested a for loop 3 times to handle each value we wanted to manipulate. X, Y, and Z values to be exact, and the code itself did not change much at all. The thing to always remember is to keep it as simple as possible when you want to add a new feature or change existing code. And you should always try to have the code to be as readable as possible.
Section 5: Randomizing the Cubes variant
In this section, we will be rebuilding the controller class to do several different things than the last. Rather than hard coding the x, y, and z position of the Vector 3, we will make it so we can change it in the editor. The reason for this is to allow for more tightly controlled testing as well as be able to see the results at runtime without needing to modify our code. The next change will be to create the rgb values and randomize those instead of using material prefabs. So, let’s look at the code all the way up to the start method.
using UnityEngine;
using System.Collections;
using System.Collections.Generic;
using System.IO;

public class Controller : MonoBehaviour
{
    public GameObject CubePrefab;
    public Vector3 GridSize;
We have our public cube prefab which we brought back from our first algorithm and we have a public Vector 3 called GridSize. The CubePrefab was brought back because we don’t want to use a list of prefabs since we can use a single one and modify the colors of that one. The GridSize Vector 3 is here because we want to be able to modify the x y and z values in the editor.
    public void Start()
    {
        CreateCubeGrid();
    }
The start method has 1 item within it. We are calling a method called CreateCubeGrid. At this point, we should see the compiler complain because we don’t have a method for CreateCubeGrid yet.
    /// <summary>Creates a new cube grid if one doesn't exist</summary>
    public void CreateCubeGrid()
    {
        for (var a = 0; a < GridSize.x; a++)
        {
            for (var b = 0; b < GridSize.y; b++)
            {
                for (var c = 0; c < GridSize.z; c++)
                {
                    var cube = (GameObject)Instantiate(CubePrefab, new Vector3(a, b, c), Quaternion.identity);
                    var renderer = cube.GetComponent<MeshRenderer>();
                    var red = Random.Range(0f, 1f);
                    var green = Random.Range(0f, 1f);
                    var blue = Random.Range(0f, 1f);
                    var color = new Color(red, green, blue);
                    renderer.material.color = color;
                }
            }
        }
    }
}
Now we have the CreateCubeGrid method and it is rather lengthy, so let’s go over it in small sections.
    /// <summary>Creates a new cube grid if one doesn't exist</summary>
    public void CreateCubeGrid()
    {
        for (var a = 0; a < GridSize.x; a++)
        {
            for (var b = 0; b < GridSize.y; b++)
            {
                for (var c = 0; c < GridSize.z; c++)
                {
                }
            }
         }
     }
The for loops here should be fairly straight forward. Var a, b, and c are placeholders for the GridSize’s x, y, and z variables and we increment by 1 with each loop.
                    var cube = (GameObject)Instantiate(CubePrefab, new Vector3(a, b, c), Quaternion.identity);
                    var renderer = cube.GetComponent<MeshRenderer>();
                    var red = Random.Range(0f, 1f);
                    var green = Random.Range(0f, 1f);
                    var blue = Random.Range(0f, 1f);
                    var color = new Color(red, green, blue);
                    renderer.material.color = color;
We create a variable called cube to instantiate the cubePrefab with the vector 3 positions of a, b, and c. We set the Quaterion at identity because we don’t want any rotations on the cubes. In order to manipulate the colors of the cube, we need a reference to the MeshRender which is what our renderer variable does. Red, Green, and Blue have a random range of 0 to 1, this allows us to specify which color we want to pick. Finally, we have a color variable that instantiates the Color class which we specify as red, green, and blue.

Section 7: Turning the cube into a hallway and stairs
In this section, we will go about taking everything we have learned from the other sections and create a little walkway and some stairs leading upwards to another walkway. Keeping with the motif, we will still be using a cube for this.
The other sections were really good for a basic start, but really couldn’t be used for too much besides an idea for a puzzle game. So, I think it is time to take what we have learned, and apply it to create something more useful for game development. Let’s make a 1 wide, by 5 long corridor that leads to stairs that are 5 tiers high.

Using my super amazing art skills to draw what we kind of want to be the end results, we can see exactly what we need to do. But how should we go about this? Should we put everything into a single method or have 3 separate methods? If we follow the KISS method (Keep It Stupidly Simple), we should have 3 methods that take care of a single task. Let’s look at the finished results of the algorithms.
using UnityEngine;
using System.Collections;

public class StairWayToWalkWay : MonoBehaviour
{
    public GameObject CubePrefab;

    public void Start()
    {
        CreateStairs();
        CreateWalkWay();
        CreateUppderWalkWay();
    }

    public void CreateStairs()
    {
        int y = 0;
        int z = 5;
        for (int x = 5; x > 0; x--)
        {
            if (x == 5)
            {
                y = 0;
                GameObject.Instantiate(CubePrefab, new Vector3(x, y, z), Quaternion.identity);
            }

            if (x == 4)
            {
                y = 1;
                GameObject.Instantiate(CubePrefab, new Vector3(x, y, z), Quaternion.identity);
            }

            if (x == 3)
            {
                y = 2;
                GameObject.Instantiate(CubePrefab, new Vector3(x, y, z), Quaternion.identity);
            }

            if (x == 2)
            {
                y = 3;
                GameObject.Instantiate(CubePrefab, new Vector3(x, y, z), Quaternion.identity);
            }

            if (x == 1)
            {
                y = 4;
                GameObject.Instantiate(CubePrefab, new Vector3(x, y, z), Quaternion.identity);
            }

            if (x == 0)
            {
                y = 5;
                GameObject.Instantiate(CubePrefab, new Vector3(x, y, z), Quaternion.identity);
            }
        }
    }

    public void CreateWalkWay()
    {
        for (int x = 5; x < 10; x++)
        {
            GameObject.Instantiate(CubePrefab, new Vector3(x, 0, 5), Quaternion.identity);
        }
    }

    public void CreateUppderWalkWay()
    {
        for (int x = -5; x < 1; x++)
        {
            GameObject.Instantiate(CubePrefab, new Vector3(x, 5, 5), Quaternion.identity);
        }
    }
}
Now, we should go over each method one at a time. To start this off, we have our CreateWalkWay method.
    public void CreateWalkWay()
    {
        for (int x = 5; x < 10; x++)
        {
            GameObject.Instantiate(CubePrefab, new Vector3(x, 0, 5), Quaternion.identity);
        }
    }
We are iterating over the x variable starting with x being at 5 and ending at 10. We then create a cube at the Vector 3 positions of x (5 – 10), y being always at 0, and z always being at 5. Pretty straight forward and simple.
Let’s take a deeper look at what is going on with the CreateStairs method.
    public void CreateStairs()
    {
        int y = 0;
        int z = 5;
        for (int x = 5; x > 0; x--)
        {
            if (x == 5)
            {
                y = 0;
                GameObject.Instantiate(CubePrefab, new Vector3(x, y, z), Quaternion.identity);
            }

            if (x == 4)
            {
                y = 1;
                GameObject.Instantiate(CubePrefab, new Vector3(x, y, z), Quaternion.identity);
            }

            if (x == 3)
            {
                y = 2;
                GameObject.Instantiate(CubePrefab, new Vector3(x, y, z), Quaternion.identity);
            }

            if (x == 2)
            {
                y = 3;
                GameObject.Instantiate(CubePrefab, new Vector3(x, y, z), Quaternion.identity);
            }

            if (x == 1)
            {
                y = 4;
                GameObject.Instantiate(CubePrefab, new Vector3(x, y, z), Quaternion.identity);
            }

            if (x == 0)
            {
                y = 5;
                GameObject.Instantiate(CubePrefab, new Vector3(x, y, z), Quaternion.identity);
            }
        }
    }
This method is vastly different from how we handled things before. So, let’s break this down into smaller and more manageable chunks.
        int y = 0;
        int z = 5;
        for (int x = 5; x > 0; x--)
        {
}
We started off by initializing our y and z variables at 0 and 5 respectively. And we are looping with a for loop that starts at 5 and ends at 0. Instead of increment by 1, we decremented by 1 (Fancy words for counting up and down respectively).
            if (x == 5)
            {
                y = 0;
                GameObject.Instantiate(CubePrefab, new Vector3(x, y, z), Quaternion.identity);
            }

            if (x == 4)
            {
                y = 1;
                GameObject.Instantiate(CubePrefab, new Vector3(x, y, z), Quaternion.identity);
            }

            if (x == 3)
            {
                y = 2;
                GameObject.Instantiate(CubePrefab, new Vector3(x, y, z), Quaternion.identity);
            }

            if (x == 2)
            {
                y = 3;
                GameObject.Instantiate(CubePrefab, new Vector3(x, y, z), Quaternion.identity);
            }

            if (x == 1)
            {
                y = 4;
                GameObject.Instantiate(CubePrefab, new Vector3(x, y, z), Quaternion.identity);
            }

            if (x == 0)
            {
                y = 5;
                GameObject.Instantiate(CubePrefab, new Vector3(x, y, z), Quaternion.identity);
            }
We have a lot of if statements here, which is just pointing to the location of the x variable. Within each if statement we are specifying the y position. Lastly, we set those locations in the Vector 3 portion of the Instantiate clause.

As you can see, converting algorithms from 2D to 3D is extremely simple and rather fun to do. I hope you learned a lot from this tutorial,