Have you ever thought how different your favorite games would be without effects like fire particles or magic particles?
Things such as sparkles shot from magic wands or fire sparks coming from a bonfire are small details that can add much more credibility to the sceneries and games we create. They are also an important aspect of “game feel” that can just, in general, improve the user’s experience with the game. So – as you can imagine – it doesn’t hurt how to learn to do them as a developer.
In this quick tutorial, we’ll show you how to make fire particles in Unity. We’ll go over the settings and adjustments needed to bring your particles alive inside this powerful game engine. Moreover, you’ll also have a glimpse of the numerous features Unity has already available for you to explore when designing your particle systems.
Let’s dive in!
Table of contents
Fire Particles – Project Files
You can download a copy of the source code files for the project done in this tutorial here.
This tutorial assumes you have a few basics of Unity and, most importantly, that you have Unity installed. Also, just to be clear, we are using Unity’s default particle system, not the VFX graph. That’s a tutorial for another day. ;)
As we delve into the complexities of Unity’s Particle Systems in this tutorial, Zenva’s Unity Game Development Mini-Degree might interest you. This comprehensive course guides you step-by-step in building cross-platform games with Unity, teaching you everything from basic game mechanics to creating cinematic cutscenes which includes helpful sessions on special effects like fire particles. As Unity’s proficiency is behind AAA game hits and its application stretches beyond the gaming industry, mastering this skill offers immense learning and earning potential.
Unity’s Particle System
First, let’s create a particle by right-clicking in the Hierarchy and selecting Effects > Particle System:
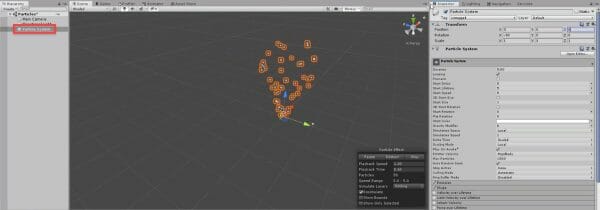
In the small pop-up menu at the bottom of the scene, we have several configuration options at the ready:

We can pause, stop or restart the particle emission by altering the playback time of the particles, and also slow it down by changing the playback speed. By checking the ‘ShowBounds‘ checkbox we can also see how far the particles are reaching:

This comes very in handy for us to quickly test how our particles are behaving. Nonetheless, we have a much richer range of settings for our particle system inside the Inspector:

Each tab has a different feature you can apply to your particle. We see that the Emission and Shape ones have a little check symbol in front of them, meaning that they are currently enabled for our particle system. The Emission tab controls how many particles we emit over time, while the Shape tab indicates the sort of shape we’re emitting from (a cone, a box, a circle, etc) and sets up the angle and radius, among other properties:

Another tab that’s checked in is Renderer, which allows us to customize how the particles face the camera. Right now they are set to ‘Billboard’ and if we change it to ‘Horizontal Billboard’ we’ll see the particles flat as well but facing the up direction instead:

We can also change the material of the particles in this tab, as well as the trail material. To add any trails to your particles, you need simply to enable the Trails tab:

Particle System Properties
Let’s see all these properties in action! We have:
- Start Lifetime – Dictates how long the particle exists in the world
Going back to the Particle System tab, if we bring down the Start Lifetime property from 5 seconds to 1 second we immediately see how it changes in height, as the particles are only alive for 1 second now:

To add a more organic feel to it, you can click on the arrow next to the value entered and select “Random Between Two Constants“. You can then enter two numbers, such as 0.5 and 1.5:

Note how the particles don’t all disappear at the same time anymore. We can do so with the Start Speed property as well to add more variety in how fast the particles are emitted.
We also have:
- Start Size – how large the particles are when they start out
- Start Rotation – the rotation of the particles when being emitted
- Start Color – the color we want the particles to be
- Simulation Space – designates the spread of the particles in the world
If we switch Simulation Space from ‘Local’ to ‘World‘, we see that the particles are now being moved along with our cursor to whatever position we place it:

Other interesting tabs are Velocity over Lifetime and Color over Lifetime, where we alter the speed and color of our particles over their lifetime periods. We can use the latter to make our particles fade out as time goes by:

Or have multiple colors to our gradient as follows:

Going to the Size over Lifetime tab, it allows us to change how large the particle is over time, based on an animation curve as seen below:

You can edit the curve by adding points to it and the particle will reflect the changes directly:

The Noise tab is also helpful to add some randomness and organic movement to our particles:

Remember to be careful of the Collision tab, as it adds a collider to every single particle and you may have an impact on performance by having too many of them. You can add colliders to make an explosion effect and also trigger an OnCollisionEnter function for that, for example.
Let’s put all this to use by creating our fire particles!
Want to learn more about particles in Unity? Try our complete Intro to Particle Systems for Games course.
Fire Particles in Unity
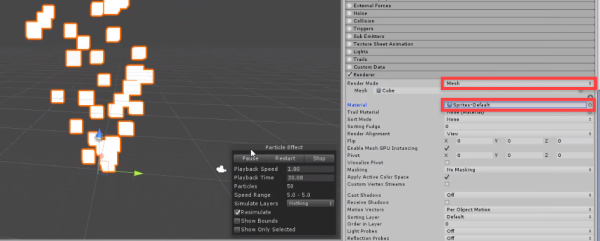
Create a new particle system and name it “Fire Particles”. From there, let’s change how the particles look by setting the Render Mode to Mesh and the Material to Sprites-Default in the Renderer tab:
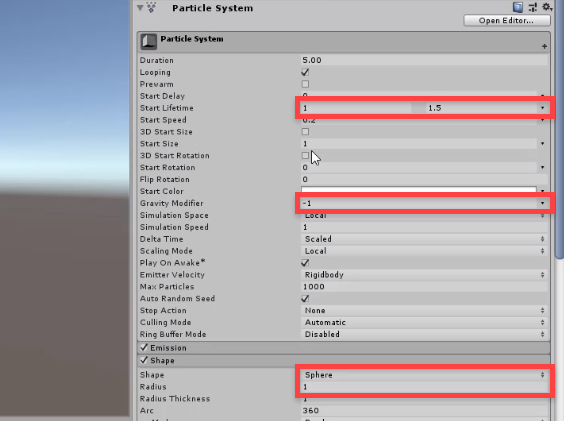
In the Particle System tab, set Start Lifetime to 1 – 1.5, Start Speed to 0.2, and Gravity Modifier to -1. Also set Shape to Sphere and Shape Radius to 1 (or 0.5) in the Shape tab:
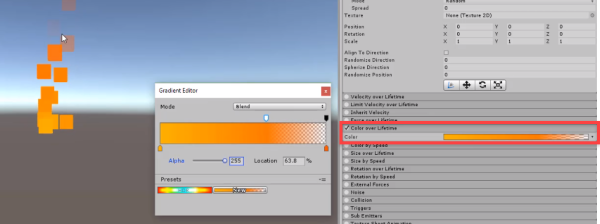
Next, enable the Color over Lifetime tab, and set the Color gradient to the one below:
Back to the Particle System tab, set the Start Size to 1 – 1.5:

Enable the Rotation over Lifetime tab, and set the Angular Velocity to 45 – 90:

Also enable the Size over Lifetime tab, and set the Size curve to the one below:
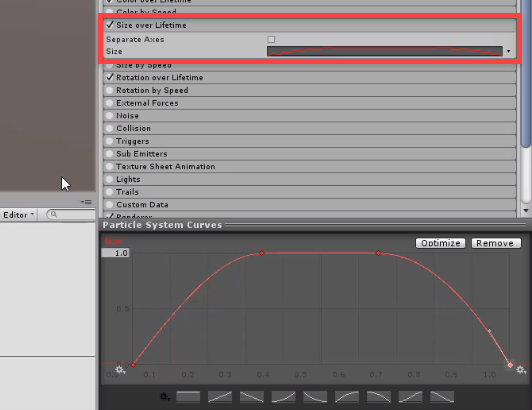
You can bring the first point more to the left-up corner for the fire to get bigger faster as well, and then it’ll get smaller as time goes by. Feel free to tweak this as you like.
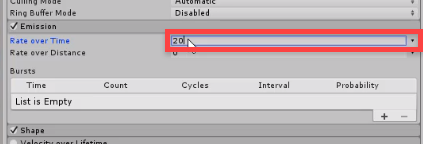
Finally, set Rate over Time to 20 in the Emission tab:
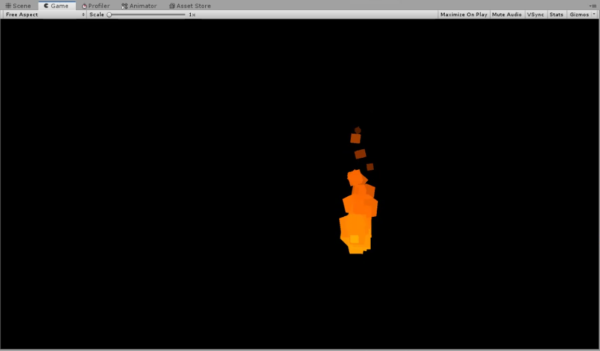
If we change the background color of the camera to a solid black, we can better visualize our fire particles all set up:

Notice how it’s changing color and has the fading-out effect, just as wanted!
Conclusion
Well done on concluding this tutorial!
Here you learned how to create simple fire particles in Unity in a fast and easy way! This is your first step towards designing all other sorts of particles, whether you want portal effects, magic attacks, or more. Unity allows us to customize our particles quite a lot through its default Particle System, and the more you explore it the more organic your particles will look.
We encourage you to practice with the Particle System more and try coming up with unique designs on your own! You may also want to take a look at Unity’s VFX Graph at some point as well, which takes particles to a whole new level with more power and performance – and much of the same fundamentals at play.
Interested in taking your Unity skills beyond particle effects? With Zenva’s Unity Game Development Mini-Degree, you can significantly enhance your proficiency in Unity, the engine that powers over half of the world’s games. Not only will you learn to create impressive fire particle systems like in this tutorial, but also dive into game mechanics, enemy AI, animation, and so much more. From tutorials for beginners to advanced lessons, this Mini-Degree offers a comprehensive look into game development that fits into any genre or platform.
Regardless, good luck with your games, and we hope they “feel” that much more exciting!
Did you come across any errors in this tutorial? Please let us know by completing this form and we’ll look into it! FINAL DAYS: Unlock coding courses in Unity, Godot, Unreal, Python and more.
