In this tutorial series, we will create a turn-based RPG game, such as the Final Fantasy series. First, we will create the battle state for our game. Then we will create a state for the world, which will change to the battle state every time an enemy is found. Finally, we will add content, such as items, levels, NPCs and save points. In this first tutorial I will cover the following content:
- Creating a battle state which will be called during the game
- Creating a menu to show the player and enemy units
- Creating a simple turn-based game, where each unit acts once
To read this tutorial, it is important that you are familiar with the following concepts:
- Javascript and object-oriented concepts.
- Basic Phaser concepts, such as: states, sprites, groups and arcade physics
Table of contents
Learn Phaser by building 15 games
If you want to master Phaser and learn how to publish Phaser games as native games for iOS and Android feel free to check Zenva‘s online course The Complete Mobile Game Development Course – Build 15 Games.
Assets copyright
The monsters assets used in this tutorial are available in http://opengameart.org/content/2d-rpg-enemy-set and were created by the following artists: Brett Steele (Safir-Kreuz), Joe Raucci (Sylon), Vicki Beinhart (Namakoro), Tyler Olsen (Roots). The characters assets are available in http://opengameart.org/content/24×32-characters-with-faces-big-pack and were created by Svetlana Kushnariova (email: lana-chan@yandex.ru). All assets are available through the Creative Commons license.
Source code files
You can download the tutorial source code files here.
Boot and loading states
We will create boot and loading states to load all the game assets before it starts. All this content will be read from a JSON file, as shown below. Notice that in this file we have to define the state assets, groups and prefabs.
{
    "assets": {
        "rectangle_image": {"type": "image", "source": "assets/images/rectangle.png"},
        "grass_tile_image": {"type": "image", "source": "assets/images/grass_tile.png"},
        "male_fighter_spritesheet": {"type": "spritesheet", "source": "assets/images/characters/fighter_m.png", "frame_width": 24, "frame_height": 32},
        "female_mage_spritesheet": {"type": "spritesheet", "source": "assets/images/characters/mage_f.png", "frame_width": 24, "frame_height": 32},
        "bat_spritesheet": {"type": "spritesheet", "source": "assets/images/monsters/bat.png", "frame_width": 128, "frame_height": 128}
    },
    "groups": [
        "background",
        "player_units",
        "enemy_units",
        "hud"
    ],
    "prefabs": {
        "background": {
            "type": "background",
            "position": {"x": 0, "y": 0},
            "properties": {
                "texture": "grass_tile_image",
                "group": "background",
                "width": 320,
                "height": 320
            }
        },
        "enemy_rectangle": {
            "type": "rectangle",
            "position": {"x": 0, "y": 200},
            "properties": {
                "texture": "rectangle_image",
                "group": "hud",
                "scale": {"x": 0.3, "y": 1}
            }
        },
        "action_rectangle": {
            "type": "rectangle",
            "position": {"x": 96, "y": 200},
            "properties": {
                "texture": "rectangle_image",
                "group": "hud",
                "scale": {"x": 0.3, "y": 1}
            }
        },
        "player_rectangle": {
            "type": "rectangle",
            "position": {"x": 192, "y": 200},
            "properties": {
                "texture": "rectangle_image",
                "group": "hud",
                "scale": {"x": 0.4, "y": 1}
            }
        },
        "fighter": {
            "type": "player_unit",
            "position": {"x": 250, "y": 70},
            "properties": {
                "texture": "male_fighter_spritesheet",
                "group": "player_units",
                "frame": 10,
                "stats": {
                    "attack": 15,
                    "defense": 5,
                    "health": 100
                }
            }
        },
        "mage": {
            "type": "player_unit",
            "position": {"x": 250, "y": 150},
            "properties": {
                "texture": "female_mage_spritesheet",
                "group": "player_units",
                "frame": 10,
                "stats": {
                    "attack": 20,
                    "defense": 2,
                    "health": 100
                }
            }
        },
        "bat1": {
            "type": "enemy_unit",
            "position": {"x": 100, "y": 90},
            "properties": {
                "texture": "bat_spritesheet",
                "group": "enemy_units",
                "stats": {
                    "attack": 10,
                    "defense": 1,
                    "health": 30
                }
            }
        },
        "bat2": {
            "type": "enemy_unit",
            "position": {"x": 100, "y": 170},
            "properties": {
                "texture": "bat_spritesheet",
                "group": "enemy_units",
                "stats": {
                    "attack": 10,
                    "defense": 1,
                    "health": 30
                }
            }
        }
    }
}
The BootState code is shown below. It will only load the JSON file and call the LoadingState.
var <a class="wpil_keyword_link" href="https://gamedevacademy.org/best-rpg-tutorials/" target="_blank" rel="noopener" title="RPG" data-wpil-keyword-link="linked">RPG</a> = RPG || {};

RPG.BootState = function () {
    "use strict";
    Phaser.State.call(this);
};

RPG.BootState.prototype = Object.create(Phaser.State.prototype);
RPG.BootState.prototype.constructor = RPG.BootState;

RPG.BootState.prototype.init = function (level_file, next_state) {
    "use strict";
    this.level_file = level_file;
    this.next_state = next_state;
};

RPG.BootState.prototype.preload = function () {
    "use strict";
    this.load.text("level1", this.level_file);
};

RPG.BootState.prototype.create = function () {
    "use strict";
    var level_text, level_data;
    level_text = this.game.cache.getText("level1");
    level_data = JSON.parse(level_text);
    this.game.state.start("LoadingState", true, false, level_data, this.next_state);
};
The LoadingState is responsible for loading all the necessary assets. To do that, it will read the assets from the JSON file and load them accordingly. The code for LoadingState is shown below. Notice that the “preload” method loads the correct Phaser asset according to the asset type. At the end, it will call the next state (in our case, BattleState).
var RPG = RPG || {};

RPG.LoadingState = function () {
    "use strict";
    Phaser.State.call(this);
};

RPG.LoadingState.prototype = Object.create(Phaser.State.prototype);
RPG.LoadingState.prototype.constructor = RPG.LoadingState;

RPG.LoadingState.prototype.init = function (level_data, next_state) {
    "use strict";
    this.level_data = level_data;
    this.next_state = next_state;
};

RPG.LoadingState.prototype.preload = function () {
    "use strict";
    var assets, asset_loader, asset_key, asset;
    assets = this.level_data.assets;
    for (asset_key in assets) { // load assets according to asset key
        if (assets.hasOwnProperty(asset_key)) {
            asset = assets[asset_key];
            switch (asset.type) {
            case "image":
                this.load.image(asset_key, asset.source);
                break;
            case "spritesheet":
                this.load.spritesheet(asset_key, asset.source, asset.frame_width, asset.frame_height, asset.frames, asset.margin, asset.spacing);
                break;
            case "tilemap":
                this.load.tilemap(asset_key, asset.source, null, Phaser.Tilemap.TILED_JSON);
                break;
            }
        }
    }
};

RPG.LoadingState.prototype.create = function () {
    "use strict";
    this.game.state.start(this.next_state, true, false, this.level_data);
};
Creating the battle state
We will create a battle state that will show the player party, enemy units and a menu so the player can choose which enemy to attack. Initially, we will just create the basic structure, showing the units without the menus. Also, in this tutorial all the units will be read from the JSON file (shown above). In the next tutorials, we will pass this data as a parameter in the “init” method.
The BattleState code is shown below. The “init” method only saves the level data and sets the game scale. The “create” method starts by creating all the groups and then create the prefabs (groups and prefabs are read from the JSON file).
var RPG = RPG || {};

RPG.BattleState = function () {
    "use strict";
    Phaser.State.call(this);

    this.prefab_classes = {
        "background": RPG.TilePrefab.prototype.constructor,
        "rectangle": RPG.Prefab.prototype.constructor,
        "player_unit": RPG.PlayerUnit.prototype.constructor,
        "enemy_unit": RPG.EnemyUnit.prototype.constructor
    };

    this.TEXT_STYLE = {font: "14px Arial", fill: "#FFFFFF"};
};

RPG.BattleState.prototype = Object.create(Phaser.State.prototype);
RPG.BattleState.prototype.constructor = RPG.BattleState;

RPG.BattleState.prototype.init = function (level_data) {
    "use strict";
    this.level_data = level_data;

    this.scale.scaleMode = Phaser.ScaleManager.SHOW_ALL;
    this.scale.pageAlignHorizontally = true;
    this.scale.pageAlignVertically = true;
};

RPG.BattleState.prototype.create = function () {
    "use strict";
    var group_name, prefab_name, player_unit_name, enemy_unit_name;

    // create groups
    this.groups = {};
    this.level_data.groups.forEach(function (group_name) {
        this.groups[group_name] = this.game.add.group();
    }, this);

    // create prefabs
    this.prefabs = {};
    for (prefab_name in this.level_data.prefabs) {
        if (this.level_data.prefabs.hasOwnProperty(prefab_name)) {
            // create prefab
            this.create_prefab(prefab_name, this.level_data.prefabs[prefab_name]);
        }
    }
};

RPG.BattleState.prototype.create_prefab = function (prefab_name, prefab_data) {
    "use strict";
    var prefab;
    // create object according to its type
    if (this.prefab_classes.hasOwnProperty(prefab_data.type)) {
        prefab = new this.prefab_classes[prefab_data.type](this, prefab_name, prefab_data.position, prefab_data.properties);
    }
};
For each prefab, the “create_prefab” method will instantiate the correct prefab according to its type. Two things are necessary for that to work:
- All prefabs must have the same constructor. To achieve that, we create a generic Prefab class (shown below) which all Prefabs must extend.
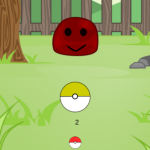
- We must have a property mapping each prefab type to its constructor. This property is defined in the BattleState constructor.Since all units are declared in the JSON file, by now they will already appear in our BattleState, as shown in the figure below. Try executing the game now, to see it. You can create empty classes for the units, just to make it work for now.

Creating the battle state HUD
Now, we are going to add three menus for our BattleState:
- Player units menu: will show the player units and their health
- Actions menu: will show the available actions of the player
- Enemy units menu: will show the enemy units so the player can choose which one to attackBefore doing this, we will create a Menu and MenuItem prefabs, as shown below. The Menu prefab has an array of MenuItems and allows navigating through them when it is enabled. Since we will have more than one Menu at the same time, we need methods to enable and disable them when necessary. The enable method will add callbacks to the keyboard to allow menu navigation. The other methods from Menu will be used later on in this tutorial.
var RPG = RPG || {};

RPG.Menu = function (game_state, name, position, properties) {
    "use strict";
    var live_index, life;
    RPG.Prefab.call(this, game_state, name, position, properties);

    this.visible = false;

    this.menu_items = properties.menu_items;

    this.current_item_index = 0;
};

RPG.Menu.prototype = Object.create(RPG.Prefab.prototype);
RPG.Menu.prototype.constructor = RPG.Menu;

RPG.Menu.prototype.process_input = function (event) {
    "use strict";
    switch (event.keyCode) {
    case Phaser.Keyboard.UP:
        if (this.current_item_index > 0) {
            // navigate to previous item
            this.move_selection(this.current_item_index - 1);
        }
        break;
    case Phaser.Keyboard.DOWN:
        if (this.current_item_index < this.menu_items.length - 1) {
            // navigate to next item
            this.move_selection(this.current_item_index + 1);
        }
        break;
    case Phaser.Keyboard.SPACEBAR:
        this.menu_items[this.current_item_index].select();
        break;
    }
};

RPG.Menu.prototype.move_selection = function (item_index) {
    "use strict";
    this.menu_items[this.current_item_index].selection_out();
    this.current_item_index = item_index;
    this.menu_items[this.current_item_index].selection_over();
};

RPG.Menu.prototype.find_item_index = function (text) {
    "use strict";
    var item_index;
    for (item_index = 0; item_index < this.menu_items.length; item_index += 1) {
        if (this.menu_items[item_index].text === text) {
            return item_index;
        }
    }
};

RPG.Menu.prototype.remove_item = function (index) {
    "use strict";
    var menu_item;
    menu_item = this.menu_items[index];
    // remove menu item
    this.menu_items.splice(index, 1);
    // update current_item_index if necessary
    if (this.current_item_index === index) {
        this.current_item_index = 0;
    }
    return menu_item;
};

RPG.Menu.prototype.enable = function () {
    "use strict";
    this.current_item_index = 0;
    if (this.menu_items.length > 0) {
        this.menu_items[this.current_item_index].selection_over();
    }
    this.game_state.game.input.keyboard.addCallbacks(this, this.process_input);
};

RPG.Menu.prototype.disable = function () {
    "use strict";
    if (this.menu_items.length > 0) {
        this.menu_items[this.current_item_index].selection_out();
    }
    this.current_item_index = 0;
};
The MenuItem prefab only has to implement the “selection_over” and “selection_out” methods (called by Menu). When a MenuItem is over the selection, it will change its color. Notice that MenuItem extends TextPrefab instead of Prefab. This class is similar to the generic Prefab class, but extends Phaser.Text instead of Phaser.Sprite, as shown below. One important thing to notice is that all texts will have the same text style, defined as “TEXT_STYLE” in BattleState. However, we must use Object.create() to use a copy of it when creating each TextPrefab, otherwise all of them would have a reference for the same object.
var RPG = RPG || {};

RPG.MenuItem = function (game_state, name, position, properties) {
    "use strict";
    RPG.TextPrefab.call(this, game_state, name, position, properties);
};

RPG.MenuItem.prototype = Object.create(RPG.TextPrefab.prototype);
RPG.MenuItem.prototype.constructor = RPG.MenuItem;

RPG.MenuItem.prototype.selection_over = function () {
    "use strict";
    this.fill = "#FFFF00";
};

RPG.MenuItem.prototype.selection_out = function () {
    "use strict";
    this.fill = "#FFFFFF";
};
Also, notice that the MenuItem prefab does not implement the method “select”, which is called by Menu. So, we have to create new prefabs that extend MenuItem and implement it. We do that by creating three new prefabs: AttackMenuItem, PlayerMenuItem and EnemyMenuItem. The first one will only disable the actions menu and enable the enemy units menu, so the player can choose the attack target.
var RPG = RPG || {};

RPG.AttackMenuItem = function (game_state, name, position, properties) {
    "use strict";
    RPG.MenuItem.call(this, game_state, name, position, properties);
};

RPG.AttackMenuItem.prototype = Object.create(RPG.MenuItem.prototype);
RPG.AttackMenuItem.prototype.constructor = RPG.AttackMenuItem;

RPG.AttackMenuItem.prototype.select = function () {
    "use strict";
    // disable actions menu
    this.game_state.prefabs.actions_menu.disable();
    // enable enemy units menu so the player can choose the target
    this.game_state.prefabs.enemy_units_menu.enable();
};
The second one will not do anything when selected, since it will only be used to show the current player unit. However, we want to show the player unit health, so it will create a ShowState prefab (whose code is shown below), which will show the player unit health.
var RPG = RPG || {};

RPG.PlayerMenuItem = function (game_state, name, position, properties) {
    "use strict";
    RPG.MenuItem.call(this, game_state, name, position, properties);

    this.player_unit_health = new RPG.ShowStat(this.game_state, this.text + "_health", {x: 280, y: this.y}, {group: "hud", text: "", style: properties.style, prefab: this.text, stat: "health"});
};

RPG.PlayerMenuItem.prototype = Object.create(RPG.MenuItem.prototype);
RPG.PlayerMenuItem.prototype.constructor = RPG.PlayerMenuItem;

RPG.PlayerMenuItem.prototype.select = function () {
    "use strict";
};
Finally, the EnemyMenuItem will be used to select the enemy to be attacked. We can do that by getting the enemy prefab (the menu item text will be the prefab name) and making the current unit attacking unit. We will add the current unit and implement the attack method later.
var RPG = RPG || {};

RPG.EnemyMenuItem = function (game_state, name, position, properties) {
    "use strict";
    RPG.MenuItem.call(this, game_state, name, position, properties);
};

RPG.EnemyMenuItem.prototype = Object.create(RPG.MenuItem.prototype);
RPG.EnemyMenuItem.prototype.constructor = RPG.EnemyMenuItem;

RPG.EnemyMenuItem.prototype.select = function () {
    "use strict";
    var enemy;
    // get enemy prefab
    enemy = this.game_state.prefabs[this.text];
    // attack selected enemy
    this.game_state.current_unit.attack(enemy);
    // disable menus
    this.game_state.prefabs.enemy_units_menu.disable();
    this.game_state.prefabs.player_units_menu.disable();
};
All the menus will be added in the “init_hud” method from BattleState, which will be called at the end of the “create” method. First, the “show_player_actions” method creates the actions menu, which in this tutorial will have only the Attack action. In the next tutorials we will add more actions, such as Magic and Item. Then, the “show_units” method is used to create the player and enemy units. Notice that this method receive as parameter the units group name and menu item constructor, so it can be used to create different kinds of units menu.
RPG.BattleState.prototype.show_units = function (group_name, position, menu_item_constructor) {
    "use strict";
    var unit_index, menu_items, unit_menu_item, units_menu;

    // create units menu items
    unit_index = 0;
    menu_items = [];
    this.groups[group_name].forEach(function (unit) {
        unit_menu_item = new menu_item_constructor(this, unit.name + "_menu_item", {x: position.x, y: position.y + unit_index * 20}, {group: "hud", text: unit.name, style: Object.create(this.TEXT_STYLE)});
        unit_index += 1;
        menu_items.push(unit_menu_item);
    }, this);
    // create units menu
    units_menu = new RPG.Menu(this, group_name + "_menu", position, {group: "hud", menu_items: menu_items});
};

RPG.BattleState.prototype.show_player_actions = function (position) {
    "use strict";
    var actions, actions_menu_items, action_index, actions_menu;
    // available actions
    actions = [{text: "Attack", item_constructor: RPG.AttackMenuItem.prototype.constructor}];
    actions_menu_items = [];
    action_index = 0;
    // create a menu item for each action
    actions.forEach(function (action) {
        actions_menu_items.push(new action.item_constructor(this, action.text + "_menu_item", {x: position.x, y: position.y + action_index * 20}, {group: "hud", text: action.text, style: Object.create(this.TEXT_STYLE)}));
        action_index += 1;
    }, this);
    actions_menu = new RPG.Menu(this, "actions_menu", position, {group: "hud", menu_items: actions_menu_items});
};
By now you can already run your game to see if the menu is being correctly displayed. You can also try enabling some menus to see if you can correctly navigate through them. The only thing still not working will be the menu selection.

Implementing the turns
In our game we will create an array with all the units and in each turn the first unit in the array will act. First, we create the “units” array in the “create” method, then we call the “next_turn” method.
// create units array with player and enemy units
    this.units = [];
    this.units = this.units.concat(this.groups.player_units.children);
    this.units = this.units.concat(this.groups.enemy_units.children);

    this.next_turn();
The “next_turn” method takes the first unit in the array and, if the unit is alive, it acts and is pushed to the end of the units array. Otherwise, it calls the next turn. The code below shows the modifications to BattleState.
RPG.BattleState.prototype.next_turn = function () {
    "use strict";
    // takes the next unit
    this.current_unit = this.units.shift();
    // if the unit is alive, it acts, otherwise goes to the next turn
    if (this.current_unit.alive) {
        this.current_unit.act();
        this.units.push(this.current_unit);
    } else {
        this.next_turn();
    }
};
Now, we have to implement the “act” method in both EnemyUnit and PlayerUnit. The EnemyUnit “act” method chooses a random player unit as the target and attack it. On the other hand, the “act” method for PlayerUnit highlights the current player unit and enables the enemy units menu, so the player can choose the enemy to attack.
RPG.EnemyUnit.prototype.act = function () {
    "use strict";
    var target_index, target, damage;
    // randomly choose target
    target_index = this.game_state.rnd.between(0, this.game_state.groups.player_units.countLiving() - 1);
    target = this.game_state.groups.player_units.children[target_index];

    this.attack(target);
};

RPG.PlayerUnit.prototype.act = function () {
    "use strict";
    var unit_index, player_units_menu_items;
    // search for the index of this unit in the player_units_menu
    unit_index = this.game_state.prefabs.player_units_menu.find_item_index(this.name);
    this.game_state.prefabs.player_units_menu.move_selection(unit_index);

    // enable menu for choosing the action
    this.game_state.prefabs.actions_menu.enable();
};
The “attack” method is the same for both units, so it will be implemented in the Unit prefab. It calculates the damage based on the unit attack and the target defense, and deals that damage to the target unit. Notice that the damage is randomized by multiplying the attack and defense by random multipliers between 0.8 and 1.2. All random generation is done using Phaser RandomDataGenerator (you can check the documentation for more information). After dealing the damage, an attack message is displayed, so the player can have some visual feedback. The ActionMessage prefab (shown below), simply shows a text inside a rectangle, which is killed after some time. One important detail is that the next turn is called when this ActionMessage is killed.
RPG.Unit.prototype.attack = function (target) {
    "use strict";
    var damage, attack_multiplier, defense_multiplier, action_message_position, action_message_text, attack_message;
    // attack target
    attack_multiplier = this.game_state.game.rnd.realInRange(0.8, 1.2);
    defense_multiplier = this.game_state.game.rnd.realInRange(0.8, 1.2);
    damage = Math.round((attack_multiplier * this.stats.attack) - (defense_multiplier * target.stats.defense));
    target.receive_damage(damage);

    // show attack message
    action_message_position = new Phaser.Point(this.game_state.game.world.width / 2, this.game_state.game.world.height * 0.1);
    action_message_text = this.name + " attacks " + target.name + " with " + damage + " damage";
    attack_message = new RPG.ActionMessage(this.game_state, this.name + "_action_message", action_message_position, {group: "hud", texture: "rectangle_image", scale: {x: 0.75, y: 0.2}, duration: 1, message: action_message_text});
};
var RPG = RPG || {};
RPG.ActionMessage = function (game_state, name, position, properties) {
"use strict";
RPG.Prefab.call(this, game_state, name, position, properties);
this.anchor.setTo(0.5);
// create message text
this.message_text = new RPG.TextPrefab(this.game_state, this.name + "_message", position, {group: "hud", text: properties.message, style: Object.create(this.game_state.TEXT_STYLE)});
this.message_text.anchor.setTo(0.5);
// start timer to destroy the message
this.kill_timer = this.game_state.game.time.create();
this.kill_timer.add(Phaser.Timer.SECOND * properties.duration, this.kill, this);
this.kill_timer.start();
};
RPG.ActionMessage.prototype = Object.create(RPG.Prefab.prototype);
RPG.ActionMessage.prototype.constructor = RPG.ActionMessage;
RPG.ActionMessage.prototype.kill = function () {
"use strict";
Phaser.Sprite.prototype.kill.call(this);
// when the message is destroyed, call next turn
this.message_text.kill();
this.game_state.next_turn();
};The “receive_damage” method is also the same for both units, and it reduces the unit health and check if it is dead. In addition, it starts an attacked animation, which changes the prefab tint to red and then goes back to the normal.
var RPG = RPG || {};

RPG.Unit = function (game_state, name, position, properties) {
    "use strict";
    RPG.Prefab.call(this, game_state, name, position, properties);

    this.anchor.setTo(0.5);

    this.stats = properties.stats;

    this.attacked_animation = this.game_state.game.add.tween(this);
    this.attacked_animation.to({tint: 0xFF0000}, 200);
    this.attacked_animation.onComplete.add(this.restore_tint, this);
};

RPG.Unit.prototype = Object.create(RPG.Prefab.prototype);
RPG.Unit.prototype.constructor = RPG.Unit;

RPG.Unit.prototype.receive_damage = function (damage) {
    "use strict";
    this.stats.health -= damage;
    this.attacked_animation.start();
    if (this.stats.health <= 0) {
        this.stats.health = 0;
        this.kill();
    }
};

RPG.Unit.prototype.restore_tint = function () {
    "use strict";
    this.tint = 0xFFFFFF;
};
Finally, we have to change the “kill” method of both EnemyUnit and PlayerUnit to update their menus accordingly. First, when an enemy unit dies, it must remove itself from the enemy units menu, which can be done using the methods we already have in the Menu prefab. On the other hand, the player unit will not remove itself from its menu, but only change the alpha of its menu item, making it darker.
RPG.EnemyUnit.prototype.kill = function () {
    "use strict";
    var menu_item_index, menu_item;
    Phaser.Sprite.prototype.kill.call(this);
    // remove from the menu
    menu_item_index = this.game_state.prefabs.enemy_units_menu.find_item_index(this.name);
    menu_item = this.game_state.prefabs.enemy_units_menu.remove_item(menu_item_index);
    menu_item.kill();
};

RPG.PlayerUnit.prototype.kill = function () {
    "use strict";
    var menu_item_index, menu_item;
    Phaser.Sprite.prototype.kill.call(this);
    // remove from the menu
    menu_item_index = this.game_state.prefabs.player_units_menu.find_item_index(this.name);
    this.game_state.prefabs.player_units_menu.menu_items[menu_item_index].alpha = 0.5;
};
Finally, you can try playing the BattleState. Try changing the enemies and player stats to see if everything is working accordingly.

And we finished the first part of this tutorial series. In the next tutorials we will add a world that the player can explore and find random enemies. We will also improve the battle state, adding more actions and a different turn-based approach based on the units speed.