You can access the full course here: Learn Practical Pixel Art Techniques in Photoshop
Table of contents
Metal Objects
In this lesson, we’re going to see how to create metallic objects.
We’re going to create a gold coin that our player can collect in our game.
Select a yellow color as the base color and make a ‘circle‘ shape:

Let’s add the shading to it in orange and a white specular pixel like so:

Coin Sparkle Animation
To create an animation of the coin twinkling in the light, duplicate the coin sprite three times:

Merge them together by selecting the three layers, right-clicking on them, and selecting ‘Merge Layers‘. Name the result layer ‘Coin‘.
We want the light to catch the edge of the coin, as it’s a cylindrical object, and so we follow the external shape of it instead of moving the reflective part to the middle of the coin:

Creating a Goblet
First, we create the outline of the goblet:

Following the same process we’ve done for the coin, we have to add the shading and the reflective specks of light to it:

We have 2 points of reflection here to give off the impression that it is a 3D object.
With pixel art, it really comes down to experimentation. You can even take a look at real-life references to better translate any object into pixel art.
Animating the Goblet Sprite
Duplicate the goblet three times to create the animation and merge the layers:

Rename the merged layer to ‘Goblet‘.
In this case, we’re going to keep the sparkly pixel on the middle of the goblet still as the light doesn’t get to hit it as much and we’re going to bring down the one on the edge like so:

Making the Sword Shiny
As our sword is already white, we can add the specular light on a blue color instead:

And the animation could be something like this:

Transcript
Welcome back everyone. In this lesson, we are going to be looking at creating metallic objects.
Objects that are metal, such as coins, such as platery, such as a bunch of other things that you might want to shine or have reflective surfaces, not necessarily reflective surfaces, but give off the illusion that these are nice, shiny pieces of gold, jewelry, et cetera.
So what we’re gonna do is, we are gonna create a gold coin that our player can collect in this game that we’re creating, Spritesville. Let’s just move the trees and the rocks up here for now.
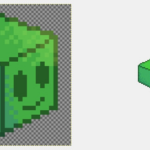
I’m gonna create a brand new layer. I’m gonna call this one coin and let’s start of course, with the silhouette. So I’m just gonna select this yellow color right here, which is gonna be the base color and I’m just gonna make this a simple little circle here. A nice four-by-four circle, like so.
Now, we’ve got this coin here. It doesn’t necessarily look shiny just yet, so we need to start by adding in some definition. I’m gonna start off by adding in the shading. I’m just gonna add that orange in like here, okay? As you can see, it sort of gives off a bit of shading.
So got the shiny side or the side that the sun is hitting on the right here. We can select the white and add in a bit of a specular, just like that. And there is our gold coin, which has a specular right here.
And the specular is basically the angle where the reflectiveness of a surface is in line with the source of that light, so it’s the brightest part and it is what’s reflecting back in your eye. So if we look from a distance, it does look pretty shiny.
And we can also go ahead and create a basic little sprite animation for this of this specular, sort of going along with the coin’s surface. So later on, once import this into a game engine, you can actually have a reflective surface animating, so it looks like the coin is, you know, maybe sort of twinkling in the light.
So for this, I’m gonna get our coin and I’m gonna duplicate it three times, like so. Let’s get all these layers and combine them into one right here, okay? Call this one coin and I’m gonna remove the specular on the last two here.
So how would this look like if we want to animate this white dot sort of moving along the surface, okay? Well, you sort of wanna go with the form that you have.
This is basically a flat cylindrical coin and if we have this running along the surface, the light is gonna be catching the edge. So we don’t want this light to go from here, then like here, then here.
Instead, what we want to do is sort of have it match the surface of where the light would be hitting, because what we’re catching here is just the edge of the coin as the light sort of flickers with whatever light source is hitting it.
So on our second coin here, what we could do, is maybe have the light over here and then on our final one, we might want to have it down here. So it has this nice little animation of the specular moving along the edge of the coin. Not the center of the coin.
Having it moving along the edge of the coin, it sort of gives off the illusion that this is a cylindrical object with a light sort of hitting the edge.
All right, just like that. So now as a bit of a challenge, I want you to go ahead and I want you to create the shading and create the specular reflections of a goblet, of like a golden cup that you may have, you know, as a piece of treasure, for example. I’m gonna go ahead here and create the silhouette.
So here, I’m just gonna call this one goblet. I’m gonna create the silhouette right here. This is just going to be a little cup, like so. Okay, something like that. Now I want you to go ahead as a bit of a challenge and create the specular for this and maybe even go ahead and create an animation as well.
So, I’ll be right back to see how you done. Okay, so I hope you had a go at that challenge. Here is what mine looks like. We’ve got this orange darker shading, where it’s sort of not in the way of the light.
So we’re not really getting the brightest part of the goblet in these areas, at the base, which would then be covered by the top and also on the left-hand side here.
Now, as you can see, I’ve got two speculars and the reason why, is because unlike the coin, which is a flat object, a goblet, you know, that would be a cylindrical object. It will be round, okay? If you think of this from a top-down perspective, it would look something like this, okay.
You have your sort of circular object, like that. Compared to a coin, which from above, would probably just look like this, all right? So with this goblet, you can add a bit more definition with the lighting to play around with it, to give off the illusion that it is a 3D object, sort of compressed down into pixel art.
And I mean, this is entirely up to you in how you do it. Experimenting with placing the light in different areas, zooming out, seeing what looks best.
You know, it really comes down to experimentation, maybe even looking at references of real life objects if you want to sort of translate a sphere into pixel art and get all the lighting correctly, I’d recommend just looking up images of spheres or you know, even a real life example would be good as well, as at the end of the day, the pixel art with the lighting, we sort of want it to simulate reality as we are trying to trick people into looking at these group of pixels and having them arranged into an object that we want them to understand.
So here we have our goblet. We can also then go ahead and duplicate it three times to create the animation, just like so. We can combine all three by selecting all the layers, right clicking them and going, merge layers, rename this to goblet.
I’m gonna remove the specular on each of these other ones. Now, the way we want the light to go on this is, we sort of want light, the first specular, which is this one right here, we want this one to actually move, just like it does with coin.
But the center one, since this is sort of at the middle where the light is, it’s hard to really explain, but we’re sort of just gonna keep this one still. So what we’re gonna do, is we’re gonna have this moving down here. It’s gonna sort of have this light still here and then have something like that, okay.
So this is gonna give off a bit of an animation with the specular moving along, just like you’ve done with the coin, but the middle one here is gonna stay put, because this is where the light is sort of not going to really be moving, ’cause if you think about it, this is if we think of this as a sphere, for example, and we have a light moving around a sphere, the edge of the sphere, the light is going to be moving quite a bit, but the center of the sphere, it doesn’t really have anywhere way to move since that is the reflection point that is hitting in your eyes.
Okay, it’s kind of hard to understand, but if you have real life objects and you look at them and you sort of rotate them around the light, you can see how these sort of behaviors can be seen. Yeah, overall, just like I said, experimentation.
We’re not really gonna know what the final animation looks like or if it’s good until we actually put it into a piece of software that we can actually preview it in.
But for now, that is just to look at how we can have metallic objects in pixel art and how we can get the specular light moving along the surface based on, you know, what sort of object it is.
If we go over to our sword here, for example, our sword’s already white and we can’t really get a whiter color, so I’m just gonna make the specular be a blue, okay? For example, on our sword, we might have the specular up here to begin with or we might have two pixels here since this is quite a long sword.
So the light might be, the specular might be a bit larger and then we can have it there. We can then have it animating down here and then we can have it here. So it’s sort of moving along the surface of whatever object you have. So, there we go. That is looking at metallic objects for pixel art. Thank you for watching.
Interested in continuing? Check out our all-access plan which includes 250+ courses, guided curriculums, new courses monthly, access to expert course mentors, and more!