You can access the full course here: Learn Practical Pixel Art Techniques in Photoshop
Table of contents
Player Sprite
In this lesson, we’re going to create our player character.
As the character is the one thing that should stand out the most in the game, we should prefer to use bright colors instead of dark ones.
For that, create a new layer (Control + Shift + N or Command + Shift + N if you’re on a Mac) and name it ‘Player‘.
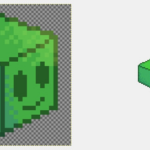
Let’s make our player a knight. We can begin with its silhouette which is basically the outline that we’re going to fill in with detail as we go.
Note that each person has their own style and may choose to draw their characters with different proportions than what’s seen in the course, so feel free to adapt it as you see fit.
We’re going to start with a 5 pixels square head for our player, plus a little feather poking out the helmet on top of his head, in white like so:

Add the torso a little bit behind his head, and then draw the legs:

The front arm will be 3 pixels in front of the torso as his rear arm is overlapping with his body. We can have 2 pixels for the shoulder and the cape that runs along his neck as shown below:

Coloring the Character
Let’s begin by coloring the helmet a light gray and then picking up a slightly darker gray for the rest of the body so that the head stands out more in contrast. You can use the same color as the helmet to paint the arms or you can choose a darker color for the arms if you want an even clear separation of the different parts that form our character:

If we zoom out, we see that our character is already starting to get shape:

Now, let’s color both the cape and feather with red to make our player pop up from the background:

Adding Details to the Helmet
Here is where we can add more traits to our character. For instance, to make him look more serious we can use a very dark gray for the visor:

As a finer detail, add a 2 pixels white reflection at the top of the helmet to indicate that it is metallic:

Building up the Character’s Look
Although our character is looking good, it’s still a bit simple as his torso is just of a plain color right now.
Let’s increase the character’s height by 1 pixel (just pull the legs down one ‘line’) and add a brown belt over his armor:

Having a belt like that, his right hand in the foreground and his left hand in the background pass the impression that the character is facing our right-hand side as well as his head. Note that it is important to create your character facing a specific direction from the beginning, especially if it’s a platformer.
Finally, let’s add a little gold belt buckle:

And this is our character ready to go! Note that it is identifiable from a distance and the cape and feather are pretty visible as wanted.
In the next lesson, we’ll create a walk animation for our player character.
Transcript
Hey everyone and welcome back. In this lesson, we are going to be looking at creating ourselves a player character. Now when creating ourselves a player character, it’s very important to know that this is the one thing that should most likely stand out the most, okay?
So when creating a player, you don’t want to be using dark colors, such as a dark green or a dark red, okay, or a dark blue, you wanna be using nice and bright colors, such as a light blue or yellow or a white, okay?
So something that is nice and bright that the player can identify along a dark surface, okay. It’s gotta contrast the background.
So I’m gonna create a new layer with Control Shift N. I’m gonna call this one our player right here. And for our player, I’m gonna make this a knight, okay, so it’s just gonna be a knight, he’ll be able to hold a sword, maybe a bow. Gonna be quite a versatile character.
So, to begin, what we’re gonna do is create the silhouette for our character, okay, and this is basically going to be the outline that we’re then gonna fill in with detail. So I’m just gonna use this white color right here for the silhouette and I’m gonna go ahead and just outline our character.
Now, in Pixel Art, there are many, many different styles of creating characters and different people have different ways of doing it. You might wanna create stuff with more realistic proportions or you might want to have more abstract proportions. That’s entirely up to you.
I have my own style I do, you might have your own style, so I’m just gonna go ahead and give you the process as I go along. So, starting with the head, what we’re gonna do is I’m just gonna give it a nice square head of five pixels, okay, just something like that, there we go.
Since it’s a knight, we’ll also probably put a little feather up on top of his head here, so poking out the helmet. From here, we can then create the torso and the torso is going to go a bit behind his head so his head’s poking a bit forward.
That can also give the illusion that he’s actually facing in forward direction rather than just standing up straight looking at you. So we’re gonna create it like so.
Okay, bring this torso down a bit here, okay, and then we can do the legs. Now for the legs, I like just doing simple little legs like this so that the legs are right there. We can give him his front arm which is just going to be three pixels in front of him like so.
His rear arm is gonna be overlapping his body right here so we can just give him two little pixels here for the shoulder, and then there’s also gonna be a cape and this cape is just gonna run along his back like so. Okay, and there we go.
That is the silhouette of our character. So from a distance, we’re gonna make it so that this, nothing else really has this design. We got the cape in the back and I think the most noticeable feature is going to be this feather here, okay, which is going to be the identifier than this is our player character.
So, we’ve got our player sprite outlined right here, now we need to fill in the details. So, let’s start with the base colors of his armor, and for that, we’re just going to select a color right here and start by coloring in the helmet. So that is gonna be the helmet color like so.
Now for the body, I am gonna make the body a bit darker, just so that the head stands out and that there’s more of a contrast between where the head starts and the body ends.
For example, if I just color the rest of him right here in this gray color, whoops, oh yeah, just like this, okay, you’ll notice that it all blends in a bit too much and we don’t really have that much definition of where the head is, where the arms are, where the legs are, it all just looks like he’s wearing one big suit.
So, what we need to do is divide these colors up but still make them appear as if they are part of the same color set.
And for that, we can just use a darker color for the body, so I’m just gonna select this other dark color that comes with our color palette right here and I’m just going to color in the body, like so. And there we go. And from here then we can fill in the arms.
Now, this is entirely up to you. You can choose to go ahead and use this same color that we used for the head for the arms like that, or you can choose to use an even darker color for the arms, okay. You can choose to use maybe something like this for the arms, okay?
I’m probably gonna go for this, since it adds another layer of contrast to show where the arms are, where the torso is and where the head is. Now we need to add in the details because we got our character here, but it doesn’t really stand out that much.
So first of all, let’s color in the cape and the feather. I’m gonna use this nice red color. We can fill those in just like so. As you can see, there we go, we’ve got some contrast added with the red, easily able to identify where our player is now.
Let’s work on the helmet now, okay, and the helmet is where you can add more to your character. Okay, what sort of character are they? Are they a stone character, a funny character.
We’re gonna make our character looks pretty serious, so he’s gonna have a dark-colored opening on his visor here, so we’re just gonna have a couple of pixels just like so.
We might even want to add a bit of a reflection at the top here, so we can get white and just add two pixels here to make it look like it is a metallic helmet. And we’ll go over looking at reflections, shine and all that later on once we get into making coins and stuff.
But yeah, adding in white specs can give it the illusion that this is some shiny armor, okay? We’ll just do on the helmet for to keep it nice and simple. So now we’ve got everything, but it still looks quite simple, okay. And the torso, this is where it’s happening.
So you might go, okay, we might wanna put some more color contrast over in the legs like so, but even that doesn’t really do much. So what I normally like to do is when I have these medieval-themed characters, I like to add in some basic, just straps, okay, because a knight, he would have straps all over his armor, he’ll have a belt and stuff.
So we can add those in too. And also, what I’m gonna do is go ahead and maybe just increase the height of our character here a bit. So I’m just gonna make the legs go down a bit more, like so. Okay, and also gonna make the cape go down a bit more as well, just like that.
And now let’s add in our belts. So for this, I’m just gonna select a brown color right here and I’m just gonna create a little belt outline like so, make it look like he also has a bit of a suspender and this also gives the player the illusion that this character is facing in the right-hand direction, okay, because they have their right arm in the foreground, their left arm in the background.
They have their face facing in a certain direction as well, so it’s important that you create your character with facing a specific direction in mind, especially if it’s a platformer.
Even if it’s just a normal 2D game, unless your character is facing directly at the camera for when they’re moving down or moving up, you should really design your character in a way so that they are facing a certain direction.
We can then also maybe add a bit of detail to the belt by adding a little gold belt buckle, okay? And there we go. You can, of course, add much more detail to this character if you wish, but I think for now, we’re gonna keep it like this.
If you zoom out, you can still see that from the distance at which the player would be from the camera when playing the game, it does look pretty good and it does stand out with the cape and with the feather, so definitely adding in these identifiable features to both your player and your enemies are going to be good, okay?
So, we’ve got our player here. Now in the next lesson, we are gonna be going over setting up a player walk cycle, okay? Because right now we have our player for when they’re just standing still, but what happens if we want our player to start walking, okay?
How are we gonna animate this player so that we have their legs lift up and what things are going to react based on that? Okay, so thanks for watching and I’ll see you all then in the next lesson.
Interested in continuing? Check out our all-access plan which includes 250+ courses, guided curriculums, new courses monthly, access to expert course mentors, and more!