You can access the full course here: Intro to Rigging Models in Blender
How can you get 3D models to move? The answer here is rigging, and in this short rigging in Blender tutorial, you’ll learn the quickest way to rig. Let’s not delay, learn how to make Blender rigs, and prepare our models to be moved around in the future!
Table of contents
A Note about Blender Rigs in This Tutorial
Before we begin, we did want to make a few notes about this rigging in Blender tutorial.
To begin, we will mainly be focused on humanoid Blender character rigging. That means two things. First, if you’re using a program like Maya, while the principles will be the same, the steps will be different. Second, if you need to do Blender character rigging for a non-humanoid (say a cat or dog model), the principles will still apply. However, your Blender rigs will indeed need a completely different bone structure than we cover (but more on that later).
With that out of the way, let’s jump back in to rigging in Blender.
Preparing Our Model for Rigging in Blender
In this section, we’ll prepare our model to be rigged – which as boring as it sounds, is necessary for rigging in Blender.
To start off, we want to make sure that our model’s normals directions are all facing the correct direction.
As we flipped the left arm and leg to create their mirrored copies for the right-hand side, we also inverted these model faces which are now pointing to the inside of such objects (instead of to the outside).
To check it, select the left upper arm, press Tab to go into edit mode, then select the ‘Display Normals‘ option under the ‘Viewport Overlays‘ menu as follows:

We can see the normals as blue lines pointing outwards:
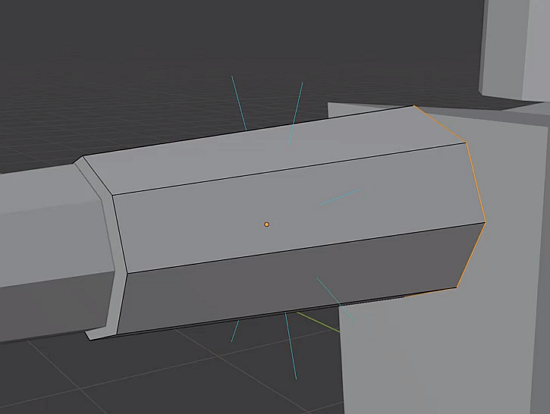
Press Tab and select the other upper arm. Press Tab again. You’ll see that no lines come out this time, but if we increase the size of the normals then we can see them pointing through from the inside. This means that the right-hand side of our model is in fact inside out (which might not technically affect how we approach our rigging in Blender, but has huge implications later when you start dealing with lighting and textures.
With the right upper arm still selected, press F3 and then type ‘recalculate’ and select ‘Recalculate Outside‘. We see that the normals are now out as expected.
To speed up this process, let’s combine all our models into a single mesh by pressing A then Control + J.
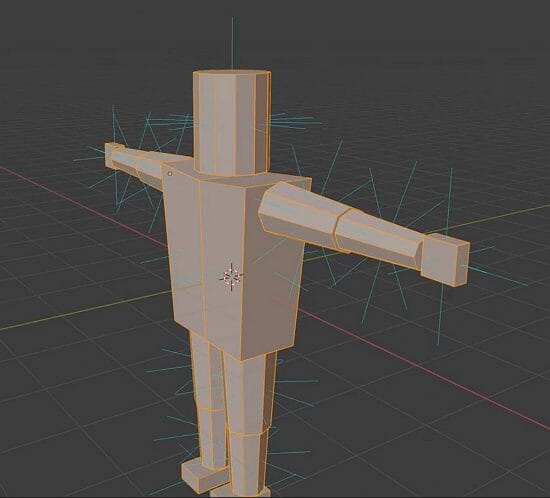
Next, go into edit mode, press F3, and go ‘Recalculate Outside‘ again to fix all normal directions at once:
Positioning the Mesh in the Scene
Before we can create Blender rigs, we’ll want to adjust the model in the scene so we can more fast-track our rigging in Blender with handy symmetry. With a front view, press G (holding down Shift so it snaps) and place the feet on the red line like so:
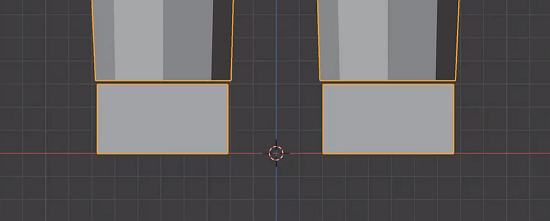
Click on the Move button on the left menu to see the model’s pivot point:
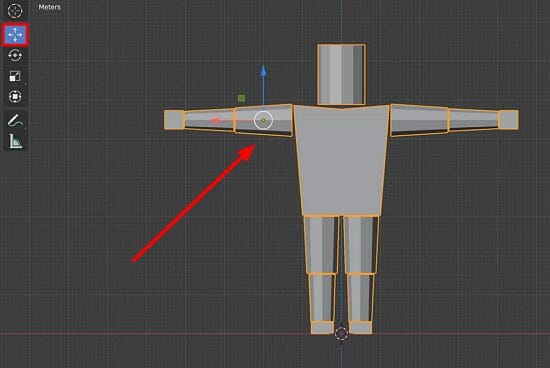
We want to define the center of the model to be at the base of its feet. For that, press F3, type ‘set origin’, and select ‘Origin to 3D Cursor‘:
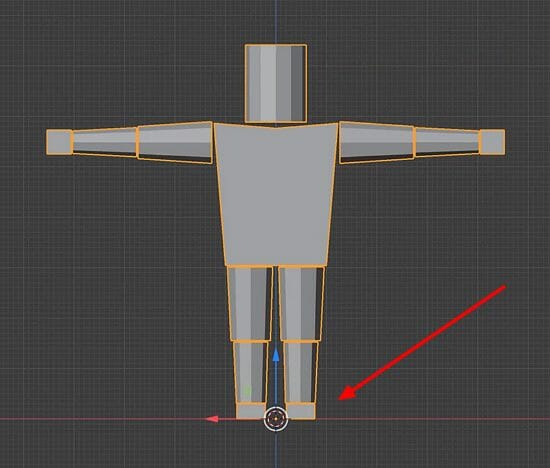
If we rotate our model, it’s going to rotate based on its feet.
Lastly, rename the mesh to ‘HumanoidModel‘.
We’ll start our Blender character rigging in the next section – but prepping the models is an essential step for mastering rigging in Blender.
Rigging – Part 1
In this section, we’re going to begin the actual rigging in Blender part of our 3D character. But, before we even attempt to make any Blender rigs, let’s talk about rigging itself.
In Blender, the process of rigging is basically like creating a skeleton for a 3D mesh where we can rotate and modify the bones in order to rotate the rest of the mesh.
We have a center root that corresponds to the main bone of the structure and branches to the shoulders, elbows, and wrists. Similarly happens with the legs, and we also have one bone for the neck as well:
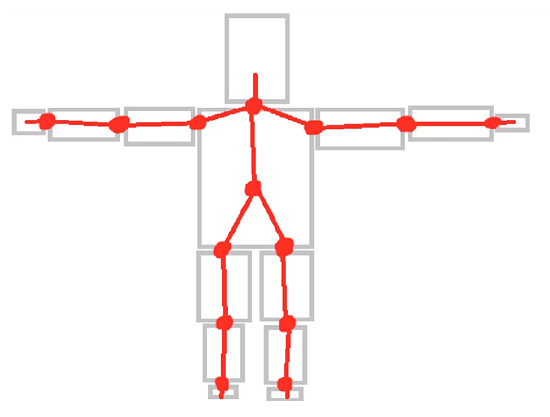
You can have more or fewer bones depending on if you want to rig each individual finger and/or toe joint, etc. When it comes to Blender character rigging for non-humanoids, that’s where you need to get creative and use this idea as a guideline to plan out your bone structure. With enough practice, though, you’ll be able to create Blender rigs for just about anything.
Enough of that, though – let’s now dive in the actual practical steps of rigging in Blender.
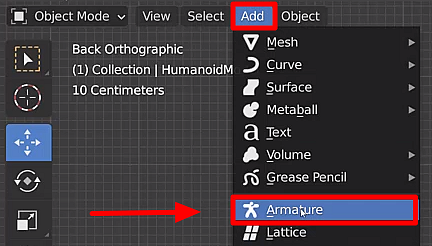
Inside Blender, a rig is known as an armature. So go over to ‘Add‘ and ‘Armature‘:
Position it in the center of the torso of our model.
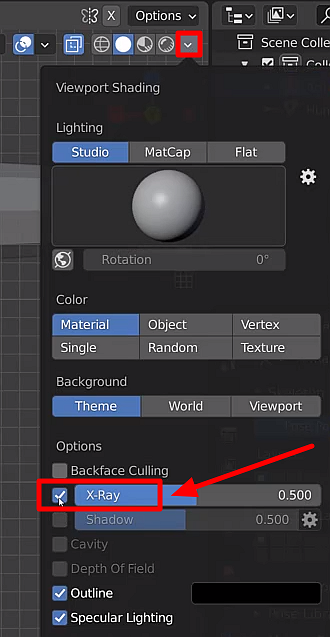
To be able to see it, enable the X-ray mode:
Now that we have the first bone in place (which congrats for taking the first step in rigging in Blender), we can connect it to other bones to create a tree hierarchy and thus move and rotate the arms and legs of our mesh.
Click on the top of the center bone and press E to create a new bone connected to the previous one, then bring it up to the neck:
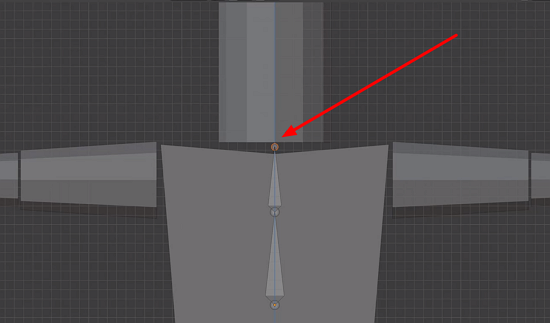
Press E again and move it to the middle of the head.
From the bottom of the center bone, add one bone down to complete the spine region as follows:

We’re going to do the same thing for the arms, starting from the chest. Press E and add the needed bones for each part like so:

Next, select all 4 bones and press Shift + D. Then press S and X to scale on the x-axis, and enter -1 to flip it over to the other side.
Press G then X to move it along the x-axis aligned to the left arm.
Note that the chest bone that comes from the right arm is not connected to the center root, however. To correct that, select it and go to its Bone menu on the right-hand side of the screen. Enable ‘Connected‘ (under the ‘Relations’ drop-down menu):

(Keep this Relations window in mind, as you’ll use it a lot more as you advance in rigging in Blender).
For the legs, repeat the same process we’ve done for the arms:
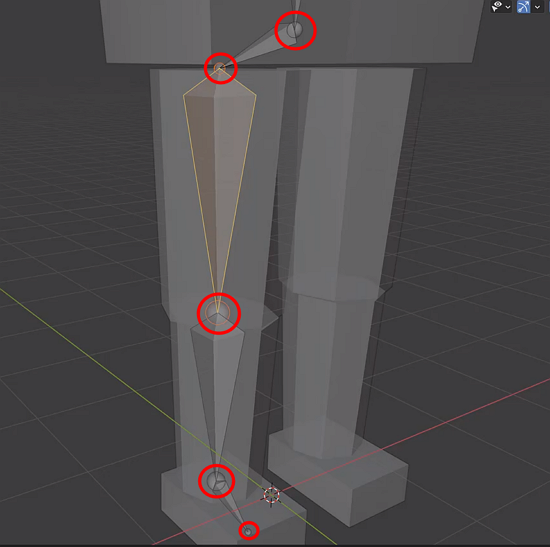
After mirroring the left leg to make the right one and connecting the upper bone to the pelvis, we have our model all set as seen below:
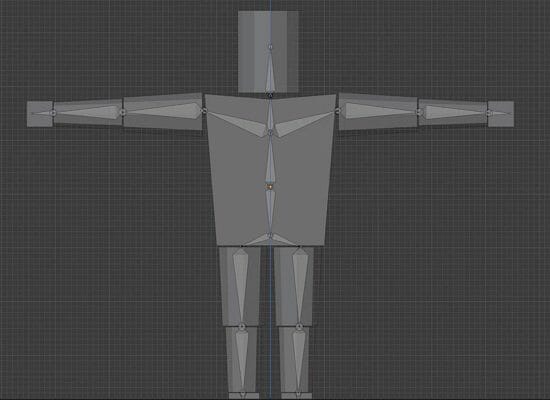
That’s it, right? We’ve learned rigging in Blender! Except not quite, as there are a few extra steps needed to finalize Blender rigs.
Rigging – Part 2
In this section, we’re going to combine the armature with our mesh. As you can see even in the windows in Blender, the armature we’ve created is still a separate object from our model and won’t move our mesh around. And, believe it or not, when it comes to Blender character rigging, the point is generally to be able to move the mesh around.
To join them, go into the object mode view and select the Armature and then the HumanoidModel, in this order:

Press Control + P so we can parent our selected elements, then choose ‘Armature Deform‘ -> ‘With Automatic Weights‘.
Click on the resulting combined object and change to the pose mode. Now, if you click on a bone then press R you’re able to rotate it around like so:
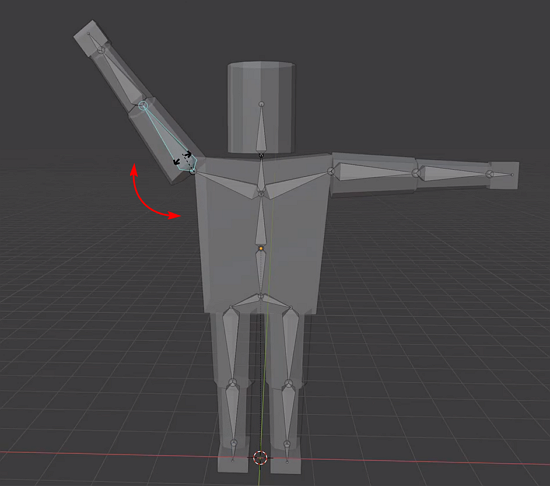
Congratulations – you now know how to do rigging in Blender. However, before we declare ourselves done, there’s one last thing we want to do.
Naming the Bones
The next thing we’re going to do is name the bones so we can keep track of all of them in our collection. This is fairly important when you start becoming a professional with rigging in Blender, so we’ve also gone with industry standard naming convention. Note, however, that each company has its own quirks – and things also get a bit hectic with more complicated models that have things like skirts or hair that need rigging too.
The images below will guide you along in this process:
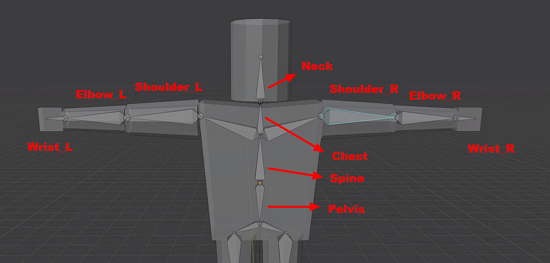
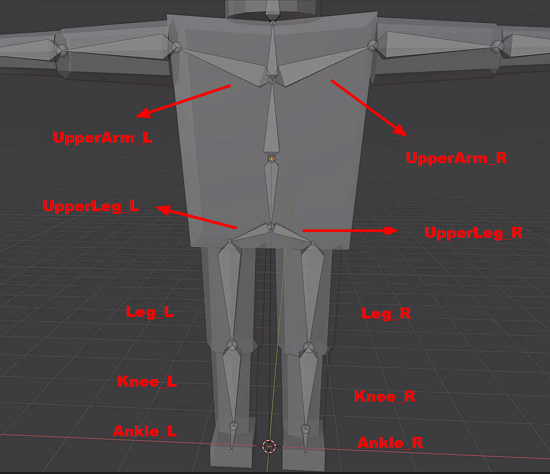
We can see the bone hierarchy under our Armature object:
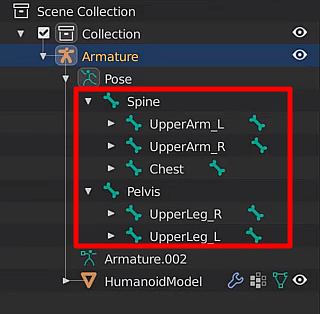
And that concludes this super fast tutorial on rigging in Blender. Fortunately, it doesn’t take much to make super simple Blender rigs, and you can have your characters moving in no time.
However, there is definitely more to learn with Blender character rigging – from working with more complicated models where you might want to rig things like hair and clothes, to just dealing with smoother deformations using shape keys. Nevertheless, you now have the foundations to start testing these skills out – so challenge yourself with complicated models, non-humanoid characters, and more!
Transcript – Preparing the Model for Rigging in Blender
Welcome back everyone. In this lesson, we are going to be preparing our model ready to be rigged. Now what I mean by preparing our model is setting it up so that once we start rigging in Blender, we’re not gonna run into any problems that we might bump into later on. So let’s get started.
First of all, what we’re going to do is make sure that our model’s normal directions are all facing the correct direction. Now, what is a model’s normal directions? Well, you see on our models, we have faces. On our torso for example, we have a face at the front, one on the side, one on the back.
On our head, we have a bunch of faces going around, one on the top, one on the bottom. And with these faces, they each have a direction that they are facing. Or more so, the vertices right here have a direction that they are pointing.
Now it’s important when 3D modeling that you don’t really have inside out 3D models. Now that might sound obvious, but when we were actually creating this model right here, we do in fact have inside out models.
And that occurs when we are flipping them over. When we were setting up the left arm here and the leg over here, we flipped them over by inversing the X scale, okay? And what that caused is not only to create a mirror copy of it, but in fact, invert it as well.
So these normal directions or these models faces are actually pointing to the inside of the model compared to this one on the right, which is pointing outwards. So how can we see that, first of all? Because right now they look exactly the same.
Well, what we’re gonna do is we’re first of all, going to select our model over here, okay? I’m selecting the arm that we started with, press tab to go into edit mode, and if we go at the top right corner here and click on this arrow, go down and select this face icon underneath normals, okay?
And what this is going to do is basically show the normal direction for each face. And you can of course change the size as well here, okay? And as you can see, we have lines pointing outwards on all of these faces right here. Even on the inside, we can see there is a little blue line pointing outwards from this side face here.
So that means the normals are pointing in the direction of these blue lines. Now let’s press tab, select the other arm and press tab. And you’ll see, we don’t really see any of those normal arrows. But if we go into the dropdown here and increase the size, you’ll see they start to poke out.
And what this is, is in fact, the faces from the other side of the model pointing through, okay? So that means that this model here is inside out. So what we need to do is we need to press F3 and we want to type recalculate, and you’ll see we have a recalculate outside right here, hit enter.
And as you can see, our normals have now been recalculated and they are now pointing in the correct direction. We can press tab again and to make this process faster we’re gonna, first of all, go ahead and combine all of our models into a single mesh, okay?
Because we don’t want to have separate models here that we can accidentally move around. So, I’m gonna press A, to select everything and then go control J to join them all. And as you can see here under cylinder, we now have a single mesh that we can select.
Now, if I press tab to go to edit mode, you’ll see that we have the normals here, okay? On the left-hand side here, they’re all correct. But as you can see on the right hand side, these arrows are a lot shorter because they’re poking through the entire model. So I want to go A to select everything. F3, recalculate outside, and there we go.
All the normal directions have now been fixed. We can bring this down a tiny bit here, like so, and as you can see, all of the model’s faces are now pointing in the same direction. Now, if we were to leave it, how it was, throughout blender, it generally would look the same.
But once you import it then into a game engine or into some other software, you’ll notice that these faces are going to be very, very dark and it’ll look quite trippy because you’re looking at the backside of the inside of the model, which yeah, is something that is good to fix early on before you notice it.
After you texture it. After you do everything and then import it into your game engine. So, we’ve got our model here. We’ve got everything set up correctly. We’ve even got it setup as a single mesh so we can move it around like that.
What we’re gonna do now is just orientate it in our scene where we want. So, I’m gonna get into a side view here. I’m gonna press G. I’m gonna hold shift so it snaps. And I’m just gonna have the feet sitting down, like so, okay? So we’re just gonna make it so that the feet are basically sitting on the ground like so, just on the red line.
And what we then want to do is go over to the left-hand side and click on this little icon right here, which is going to bring up the move gizmo. And this basically shows us where the model’s pivot point is. So if we rotate from here, as you can see, we’re rotating based on the arm, but we want to set the pivot point down to the center here, okay?
It’s just general good practice to have the center of the model defined at the base of its feet. When working with game engines and other software, it goes a long way and you don’t have to then find some work around to set it up properly, okay? So what we’re gonna do is we are gonna press F3 and we are going to go set origin, okay?
And we’re gonna go down to where it says origin to 3D cursor, which is this little circle right here, hit enter. As you can see the move gizmo has now been set down at the base of our model’s feet, okay? So if we want to rotate it or modify it, it’s gonna rotate and modify based off this pivot point.
So there we go. Okay, everything there is set up. And now what we can do is begin the process of actually creating our rig, okay? One final thing. Let’s rename this one to our, let’s go humanoid model. And now we’re ready to begin. So in the next lesson, we’re gonna go ahead and begin setting up our armature, okay?
We’re gonna set up our bones for all of our joints. And then from there, we’re gonna go into weight painting. We’re gonna make sure that all of the bones are behaving correctly. So thanks for watching and I’ll see you all in the next lesson.
Transcript – Rigging in Blender Part 1
Hey everyone and welcome back. In this lesson, we are gonna begin rigging our 3D character. So, first of all, what do I mean by rigging in Blender? Well, in blender and many of the 3D software, rigging is basically like creating a skeleton for a 3D mesh. And the skeleton allows us to rotate and modify the bones in order to rotate the rest of the mesh, okay?
So, the way it normally works is that you’ll have a root here in the center, which basically acts as the center position or the main bone of the structure. This will then branch off to the shoulders, to the elbows, to the wrists, et cetera.
We then have the neck for the head, we then have the other arms, so we have the other shoulder, the other elbow, the other wrist. This also then goes down to the legs, the knees and the ankles, okay? And these are basically the connections. So, you can of course make this as complex or as simple as you wish.
Some 3D models will earn the handful of bones while others may have quite a few, as you might want to rig each individual finger joint, each individual toe joint, really it’s entirely up to you, but for us, we’re gonna keep it nice and simple, okay? We’re just gonna have one joint for our hands and feet, but the principles for rigging in Blender remain the same regardless of how many bones you add.
So, let’s get started with creating our rig. So, inside of blender, a rig is known as an armature, okay? So, we can go over to add and down to where it says armature right here. And this is gonna create our armature along with our first bone.
Now, what we’re gonna do is we’re gonna bring this up and position it right about here, okay. And press tab to go into edit mode. Now, the first problem is that now armature is inside of our character model, so we can actually see it. So, a way we can bypass this is by enabling x-ray mode.
I’m gonna go to the top right corner here, click on this little down arrow and select x-ray. So, now we can see through our model and we can select and modify our armature. So, this here is a bone, okay? Now, a bone on itself doesn’t really do anything.
Instead, what we need to do is connect other bones to it, to create a sort of bone tree hierarchy, in order to then be able to move our arms, have our body rotate, which rotates the arms along with it, we’ll get into that. So, what we’re gonna do is we’re gonna select the top bone right here and we are going to press E to extrude.
And what this would do is create ourselves a new bone connected to the previous and we’re gonna bring this up to the neck like so, okay? And then from here we can press E again and move this into the head. So, what we have done here is pretty much this bone right here is gonna be our chest.
This bone is gonna be sort of our stomach or a center region and this here is going to be our head. So, now what we can do is from this center one right here, or our roots actually, we’re gonna press E and bring this down and this is gonna act as our pelvis, okay? So, that is the main center spine set up right here.
Now, we can move on to the arms. So, for the arms I’m gonna select the upper body chest bone right here, press E extrude that over to the left arm like so, press E again to bring that over to the elbow and E again for the hand. And finally for our arm, we need to add one more bone, which is gonna go into the hand like so.
Okay, so now here we have our shoulder bone, our elbow bone and our hand bone right here. So, let’s go ahead and now duplicate these in order to flip them over to the other side. So, I’m gonna select all four of our bones here shift + D, I’m then gonna go scale X -1, and we can then move it over like so, okay?
So, by pressing G then X to move it along, the X axis, just like that. And what we need to do is actually connect this bone up ’cause as you can see right now it’s disconnected.
So, what we need to do, is we need to select it, go over to the bone icon down here in the properties window and under the relations tab here, we just want to enable connected. And as you can see, it is now connected to this center bone right here, so everything should move like so.
Okay, so we’ve got our arms, we’ve got our head, we’ve got our spine here. Now, we need our legs. And as a bit of a challenge, I want you to go ahead and try setting up the legs, okay? It’s done in pretty much the exact same way as with our arms.
Okay, so we’re gonna select this bone, extrude it, create our legs and then create our other legs. So, have a go at that and I’ll be right back to see how you done. Okay, so if you had to go with that, pretty much we just gonna press E, this and then gonna extrude out like so.
We can then press E again to create one for our knee and then another one for our ankle. And from my ankle, we then want to extrude this out into our foot, okay? So, here we have our foot joint, here we have our knee joint and here we have our main upper leg joints, okay?
And this is the connection to our leg. And then to create our other leg, which is gonna select all of these like so, control + D, scale while pressing S, on the x-axis -1. Okay, and moving that over like so. Selecting this bone and enabling connected, okay?
So, make sure then that this is all connected up like so, okay. So, when we moved the center bone here, it moves the roots and the legs, okay. So, they’re all connected. All right, and that is our rig set up and ready to go.
In the next lesson we are going to be looking at actually, then I’m combining this and merging it into our mesh so we can then stop posing it. We’re gonna give names to each of our bones and then going on into weight painting. So, thanks for watching and I’ll see you all then in the next lesson.
Transcript – Rigging in Blender Part 2
Welcome back everyone to our rigging in Blender tutorial. In this lesson, we are going to be looking at how we can actually combine this armature to our mesh right here, okay? Because right now this armature is a separate object from our mesh and modifying it isn’t going to move our mesh around.
So what we need to do is let’s hop over into object mode by pressing tab. And what we’re gonna do is we’re gonna select our armature, hold shift and select our model. Okay, make sure it is in this order, okay? Select the armature first, then select the model.
And from here we can press control P and this is gonna open up the parent window, okay? And basically we can choose to parent this in different ways. What we’re gonna do is go over to armature deform and select with automatic weights, okay? So this is gonna generate automatic weights, which is something we’ll look at in a future lesson.
Okay, but for now you can see over here, the armature has combined into a single object, and now we are pretty much ready to pose it and see how it works.
So what we can do is we can go over to object mode. Oh, we need to select the armature, go over to pose mode right here, and we can then select a bone, press auto rotate, and as you can see, we can now rotate the arm, like so. We can rotate an elbow and we can rotate the hand.
We can then rotate this sort of upper body, like so. We can rotate our legs, our knees and our feet like so, okay? So just make sure everything has the ability to rotate the way that you want it to do. But you may notice that with the arms, when we rotate it, it rotates the body along with it.
So if we worked at the arms like this, it kind of looks a bit weird. That is something we will be fixing with weight painting. Same thing for the leg right here. It sort of morphs the body a bit, which is not exactly what we want. So yeah, there we go. We’ve got our armature now combined to our mesh.
One more thing we are gonna do is name our bones, because right now, if we open up our armature, open up pose, and look into our bones here, you’ll see that they are all named very different things, okay? And what we need to do is fix this by giving them names.
And this is gonna help us out when doing weight painting or just in general, some programs may be reading the bones for a specific direction or name. So it’s good to give them a name, okay? So first of all, we have this bone right here, which we can call the pelvis.
This one right here, which we can call our spine. This one right here, which we can call our chest. We then have our neck, okay? Over here, we can have our actually, no, we’ll do this one first. This one is gonna be our right-hand side because this is the direction that our model is looking.
So this is gonna be it’s right arm. And for that, what we’re gonna do is call this shoulder, underscore R, okay? For shoulder, underscore right. We then have elbow, underscore R. And we then have wrist, underscore R. Same thing for the left hand side.
Here we have shoulder, underscore L. We have elbow, underscore L and wrist underscore L, okay? For these parts here we are just gonna rename this one to be upper arm, underscore L, and this one is gonna be upper arm, underscore R.
Now down here for our legs, this one here is gonna be upper leg, underscore R. We then have our leg, underscore R. We then have our knee, underscore R and our ankle underscore R. Same thing for the left-hand side here. And there we go.
So now over here, inside of the hierarchy, we can see, we have our spine, upper arm, L. Inside of that, shoulder L, elbow L, and wrist L, okay? Same for everything else. Make sure that they all got the correct naming. Okay, there we go. And from here, what we can do is a number of things, okay?
If you’re happy with your model, you can go ahead export it, add it to whatever software you’re using. But as you can see here, like I said, with the rotations on the arms, it is a bit weird on the upper body.
So what we’re gonna do is modify the weight painting. So that is something we’re gonna be looking at in the next lesson. So I’ll see you all then.
Interested in continuing your rigging in Blender journey? Check out our all-access plan which includes 250+ courses, guided curriculums, new courses monthly, access to expert course mentors, and more!
