Are you tired of plain colors on your models? Well, learn how to add texture in Blender – the easy way to add more color, variety, and depth to your 3D assets.
You can access the full course here: UV Mapping in Blender for Beginners
How to Add Texture in Blender
Without further ado, let’s learn all about adding texturing in Blender.
Included in the course files (go to the ‘Course Files’ tab below the video to download) there are two textures available for us to use as we learn about Blender texturing. They are sourced from a great place to find free textures, the ambientCG website:
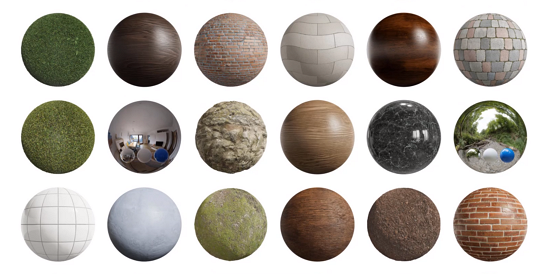
We highly recommend bookmarking this site, as the library is amazing and definitely a go-to when you’re in need of Blender textures. There is a wide variety, from Blender metal textures to various Blender image textures.
Of course, there are other resources available, so Googling “blender free textures” should show you tons of other options as well.
Before we start learning how to texture in Blender, we need to prepare our file. Delete everything from the scene collection and start afresh by adding a new cube mesh to the scene. For that, go to Add -> Mesh -> Cube at the top left of the scene window.
Then, open up the Material tab in the Properties window. Click in ‘New‘ to create a new material that’ll determine how our mesh will be rendered. Name it ‘BaseMaterial‘:
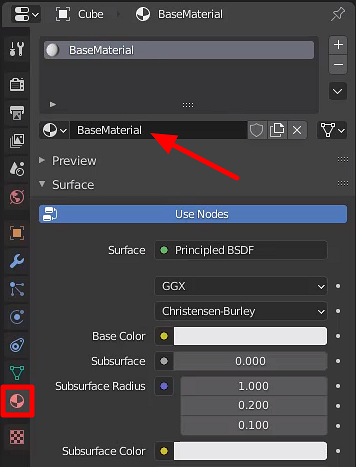
We want to set the base color property but to see its effects we need to change the way Blender is displaying our scene. Right now we’re on the ‘Solid‘ viewport shading which is basically this silver shading that’s covering our object. It’s very useful when modeling, but not so much when texturing in Blender.
So, let’s switch to the ‘Material Preview‘, which as the name suggests will let us actually see any Blender texture we might add.
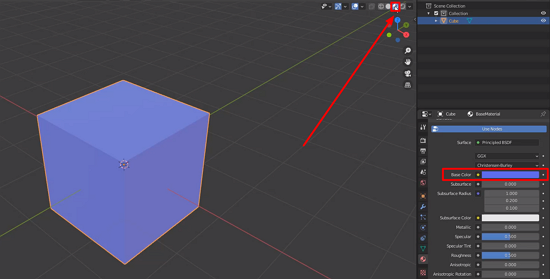
Related to this, there is something to keep in mind as you learn how to add texture in Blender.
Let’s make the base color white so our texture won’t be influenced by it. Otherwise, when applying your textures in Blender, they will take on the hue of that color. To do that, make all RGB (Red Blue Green) values equal to 1.
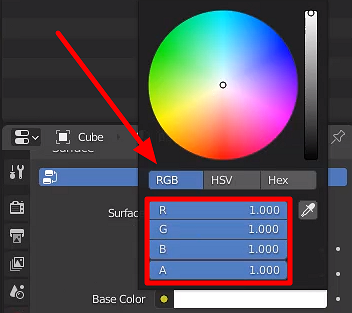
Note that next to the ‘Base Color’ option there’s a yellow dot which in Blender means that we can add in something. Blue dots stand for vectors (that is, properties with multiple values) and gray dots are used for single values. Click on the yellow dot and select ‘Image Texture‘:
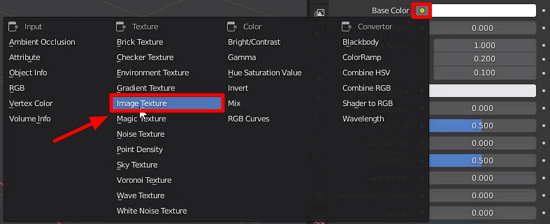
We see that the cube turns black because there’s no texture applied. However, now there’s an ‘Open‘ button below the base color property that you can go to and locate the texture file you want to use. Applying the rock texture we have, we get the following result:
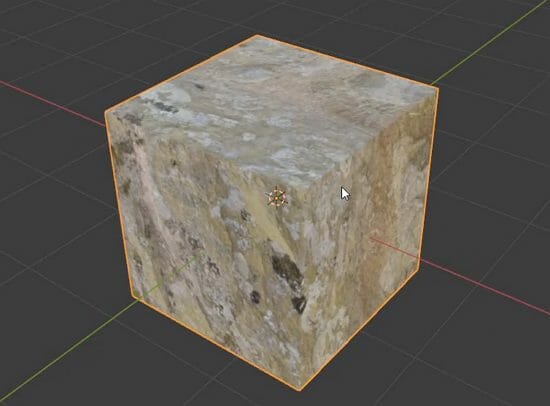
If you export the cube in the FBX format the texture will be automatically exported along with it so you can add it to the game engine of your choice.
And that’s it – you’ve learned how to add texture in Blender. The process here is quite simple, isn’t it? Of course, there is still more to explore in this area. We recommend next learning about UV mapping, as this allows you add texture in Blender on a whole new level with immense customization.
Regardless of where you go, though, we hope this guide has served as a great introduction into the world of working with textures for Blender! Good luck!
Transcript – How to Add Texture in Blender
Hey everyone and welcome. In this lesson, we are going to be looking at how we can add texture in Blender.
Okay, so let’s just say you’ve created a 3D model and you want to apply a texture to it. So how do we do that? Well, let’s just say already you have your texture and you want to apply it. Now included in the course files, I have two textures right here that we can use.
Okay. One of them is a metal texture, like so, and the other is a rock texture like this one. And these are sourced from a website called AmbientCG. Okay, this is a public domain website where you can have a look at hundreds of different physically-based rendered textures with all the different maps that you may need.
Okay, so if you’re looking for a great place for free textures, AmbientCG, it’s public domain, it’s totally free to use. Okay. And that is where these two textures are sourced from. So how do we get an image like this, for example, and apply it to a model here in Blender?
Let’s jump into the actual how to add texture in Blender part of our guide.
Well, what we need to do is let’s just say, for example, we’re just gonna apply it to our default cube. So I’m just gonna start off by deleting everything here, adding that cube back in, so we don’t have the light or the camera in our way.
I’m gonna select the cube, and then over inside of the properties window here, I’m gonna go down to this little button, which looks like a red sphere. Okay. And this is our material window.
Now what we wanna do is click on the new button right here and this is gonna create ourselves a brand new material. All right. And a material is basically what determines how an object is rendered, okay? What sort of shading has been applied (and if you want to properly learn how to add texture in Blender, we recommend reading more in the documentation).
So that can involve, for example, the texture that is the base color, how shiny it is, how rough it is, how metallic it is and all sorts of other things that Blender, of course, provides but game engines might not.
So we’re not gonna be looking at that in too much detail, but what you can do is you can double click on the material here to give it a name. I’m just gonna call this base material.
And down here, you’ll see there are a bunch of different sliders and options that we can change. But what we want to do is go over to the base color.
Now, if I click on this here, I can, of course, change this color to whatever I want. But you won’t notice that the cube is doing anything, right now it is still this default gray cube. So how do we actually see these changes of the material? Well, in order to get that, we wanna go to the top right corner here, where there are four different buttons.
And these buttons right here are basically different ways of viewing our scene. So right now we are on viewport shading, which basically means that there’s a universal gray shading applied to everything.
But what we want to do is go over here to the material preview, which is right next to it. You wanna click on that and as you can see, our cube is now blue, and we can go ahead, change the color to whatever we want. As a note, after learning how to add texture in Blender, you may want to review Blender’s documentation regarding the use case of these buttons – as they are extremely useful depending on the task you’re doing.
I’m gonna reset this back to white, so I’m just gonna set all the values back to one here, just so when we apply our material there won’t be any tint applied to it. We can change all sorts of things, such as how metallic it is.
We can change the speculars or how large or how small the specular highlight is, the roughness, so if it’s really reflective or if it’s not very reflective, but how do we apply a texture to this?
Well, if you scroll over here, you’ll notice that there’s no, you know, there’s no button that says ‘apply texture’ or there’s no field for us to drag and drop a texture in. What we need to do is go over to base color right here.
And what you’ll see is there is this yellow dot. Now in Blender, whenever you see a yellow dot-like this, it basically means that we can plug in something, okay?
Everything here has a dot for example, you have a yellow dot, you have a blue dot, you have a gray dot, blue dots are vectors, okay? So they are basically multiple values. For example, a location is a vector, a rotation is a vector.
And a gray dot basically means a value, okay? So a number, for example. The metallic, that is a number that can range between zero and one. So that is a gray dot, whereas something like a mission or base color that allows us to plug in an image, it allows us to plug in a texture (which surprise, this is the core component of how to add texture in Blender).
So what I’m gonna do is up at base color here, I’m gonna click on this yellow dot and you’ll see this window pops up. And this basically allows us to choose which sort of texture we want to apply.
Now, we’re gonna go pretty simple here. We’re just gonna go over to image texture, select that one. And you see right now is pretty much black because we have no texture applied.
But what we can do then is click on the open button, which has now appeared. And we want to basically select our texture. So I’m gonna navigate over to the folder where the texture is located. Here it is right here.
We got the rock color, I’m gonna select it, click ‘open image’ and as you can see, that rock is now applied to the cube. Okay? So we now have this texture applied to our cube.
And if we were to export it, add to our game engine, as long as you export as an FBX, the texture should come along automatically with it, so that should be no problem right there.
So, yeah, that is how we can add texture in Blender, but you will notice that, you know, the proportions might be off.
For example, you might want this part of the rock over here, you might want this face to be a different part of the rock texture, and that is where the system of UV Mapping comes into play.
Now, UV Mapping is what we’re gonna be looking at in future lessons, and basically that allows us to determine which part of the texture gets rendered on which part of the 3D model.
So, adding a texture like this is fairly straightforward yet when it comes to UV mapping, that’s where we will be spending most of our time as there are many different methods of how we can go about doing it because different objects require different forms of UV mapping, but we’ll be going over a wide range of those.
So thanks for watching and I’ll see you all then in the next lesson.
Interested in continuing and learning more about how to add texture in Blender or something else? Check out our all-access plan which includes 250+ courses, guided curriculums, new courses monthly, access to expert course mentors, and more!


