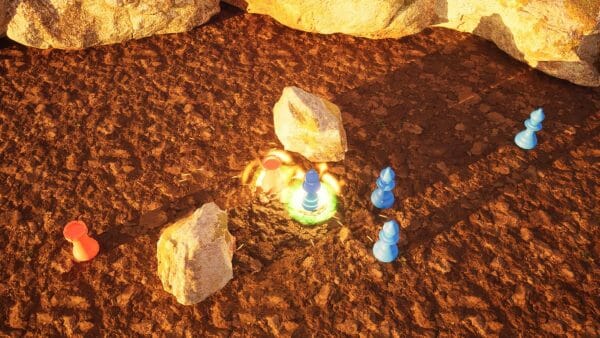
You can access the full course here: BUILD AN RTS GAME WITH UNREAL ENGINE
Strategy games remain ever popular, and we imagine an Unreal Engine RTS might be something that appeals to you. In this short guide, we’re going to give you some Unreal Engine RTS foundations by covering how to control unity movement for these types of games.
Let’s jump in.
Table of contents
Unit Movement – Part 1
In this Unreal Engine RTS lesson, we will start creating our Units.
Creating The Unit Blueprint
First of all, let’s create the Unit blueprint for our Unreal Engine RTS:
- Go to the Content folder in the Content Browser
- Create a new Blueprint Class in the Content folder
- Select the Character as the Parent Class for that blueprint
- Name that blueprint Unit
This Unit blueprint will be used as the base for both the Player and Enemy Units.
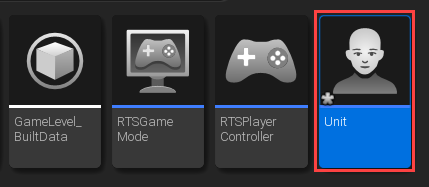
Next, let’s add some visuals to our Unit. You can use whatever visual you want for your Unreal Engine RTS, but we’ll be going for chess pieces for this example:
- Open the Unit blueprint by double-clicking on it
- Drag the Bishop model from the Content > Models folder to the Unit component in the Components panel
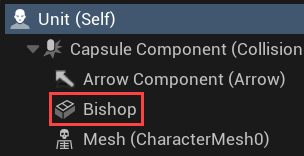
Now our Unit has the Bishop model.
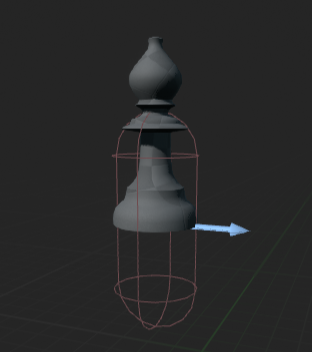
Then, let’s drag the Bishop model down so it fits nicely into the Capsule Collider our Unit has.
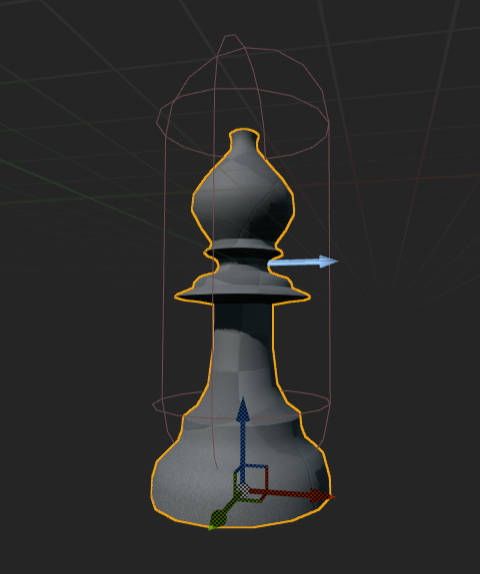
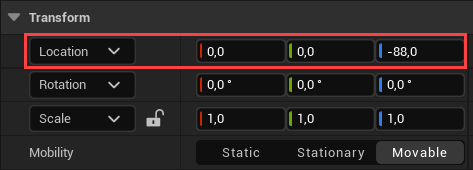
Or you can just set the Bishop’s Location in the Details panel to (0, 0, -88).
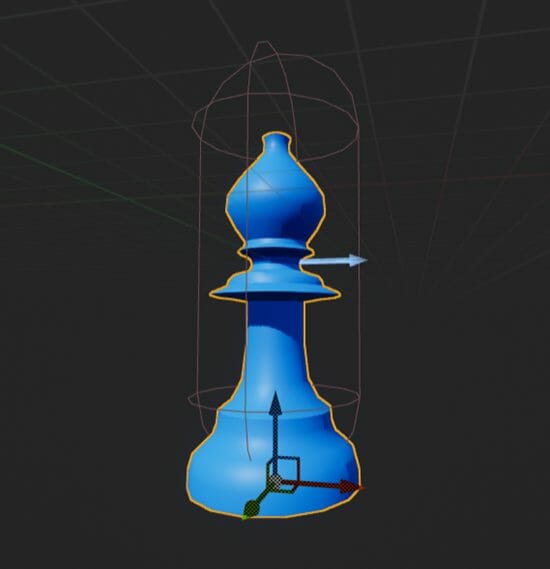
Next, we’ll give our bishop the Unit_1 material in the Details > Material dropdown.

This will make our Bishop blue.
Setting Up The Unit’s Target Position
Now, let’s go to the Unit’s Event Graph tab. This is where we will create all of the logic for moving, attacking, and taking damage – the core parts of our Unreal Engine RTS
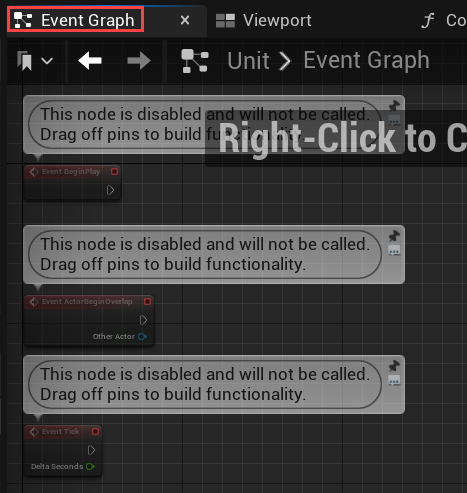
First of all, we need to create a variable to store the target movement position:
- Go to the Variables dropdown in the My Blueprint panel
- Create a new variable called TargetPosition

Then, let’s change the type of the TargetPosition variable to the Vector:
- Go to the Details panel
- Set the Variable Type property to the Vector type
- Compile the blueprint so those changes would be applied to the blueprint
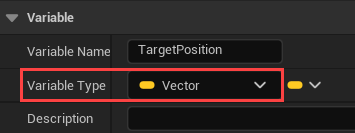
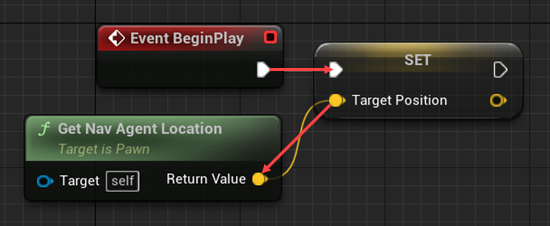
By default, the TargetPosition is (0, 0, 0), which means, our Units will go to the (0, 0, 0) position at the start of the game. As we don’t want this to happen in our Unreal Engine RTS, we will initialize the TargetPosition variable with the Unit’s position instead:
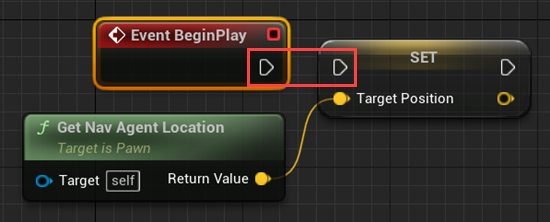
- In the EventGraph, connect the BeginPlay event node to a new Set Target Position node
- Connect the Set Target Position node’s Target Position pin to a new Get Nav Agent Location node
This way, we will get the Unit’s start position from the Nav Mesh and set it to the TargetPosition variable.
Moving To The Target Position
Next, we want to move our Unreal Engine RTS Unit towards the TargetPosition:
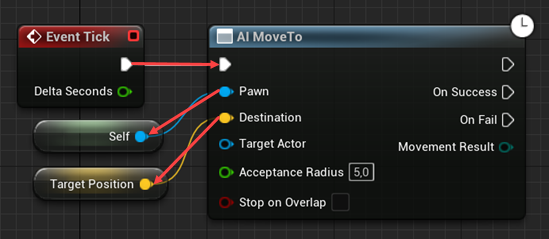
- Connect the Tick event node control flow pin to a new AI MoveTo node. This node uses the Nav Mesh to move Actors
- Connect the Pawn pin of the MoveTo node to a new Self node. This way, we’re telling the MoveTo node to move the Actor which calls it
- Connect the Destination pin of the MoveTo node to a new Get Target Position node, so this node will know where to move our Unit
- Compile the Unit blueprint so the changes would take place
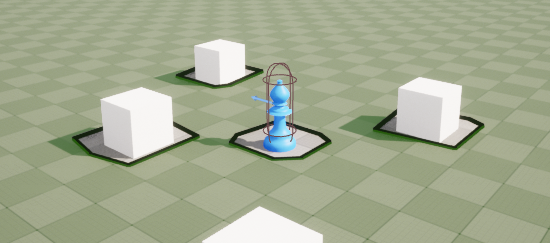
Let’s go back to the GameLevel level in our Unreal Engine RTS, add the Unit to the level, and start the game to see what happens.
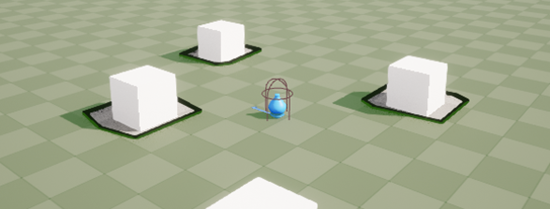
The only thing that should actually happen is the Unit Actor positioning itself to be on the Ground. As we set the TargetPosition to the Unit’s position at the start of the game and haven’t implemented any input, our Unit has no reason to move now.
Just to test the Nav Mesh in our Unreal Engine RTS, let’s disconnect the BeginPlay node from the Set node in the Unit’s Event Graph. This way, the Target Position would have the default (0, 0, 0) value at the start of the game.
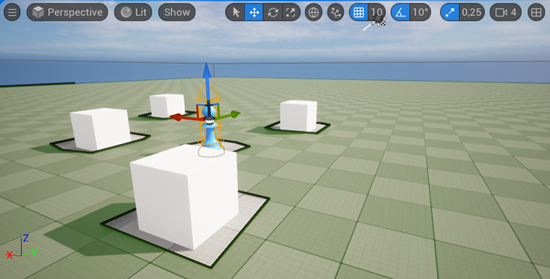
If you start the Unreal Engine RTS now, you should see the Unit go to the (0, 0, 0) location. The Unit will even go around the obstacles we set earlier.
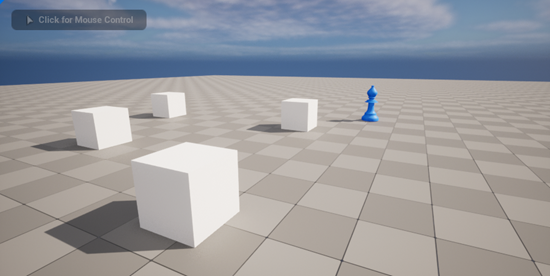
You may think that our Unit moves too fast. Let’s change the Unit’s speed now:
- Open the Unit blueprint
- In the Components panel, select the Character Movement component
- In the Details panel, in the Character Movement: Walking dropdown set the Max Walk Speed property to 300
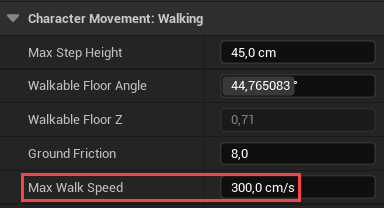
If you start the Unreal Engine RTS now, you should notice that our Unit moves slower. You can test out different speeds and pick the one you like.
Don’t forget to reconnect the BeginPlay event node to the Set node before going to the next lesson.
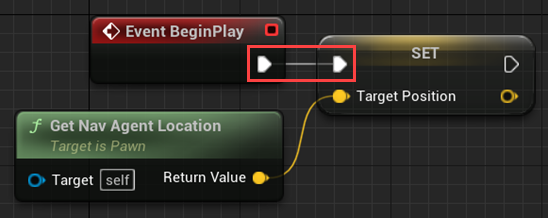
In this lesson, we created the Unit blueprint and made it go to the Target Position using the Nav Mesh. In the next lesson, we’ll add input handling, so we would be able to actually tell our Unit where to go.
Unit Movement – Part 2
In this Unreal Engine RTS lesson, we will make our Units moveable by Player.
Creating The Player Unit
First of all, let’s remove the Unit Actor from the level. Only the Cube obstacles and Nav Mesh should remain.
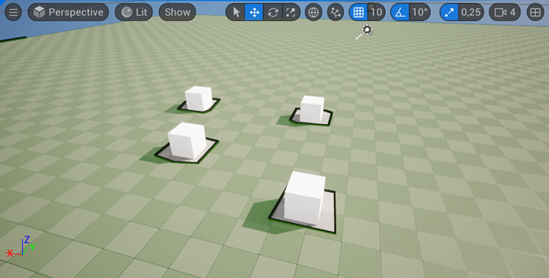
We’re not actually going to use the Unit blueprint instances in the level. Instead, we will use it as the base for the Player and Enemy Unit blueprints in our Unreal Engine RTS.
Let’s create the PlayerUnit blueprint now:
- Create a new Blueprint Class in the Content folder
- In the Pick Parent Class window, go to the All Classes dropdown
- In that dropdown, find and select the Unit class, to use the Unit as the parent class
- Click on the Select button to create that blueprint
- Name that blueprint PlayerUnit
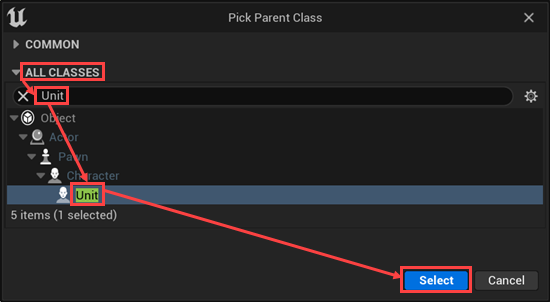
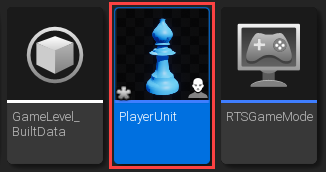
If you open PlayerUnit’s Event Graph, you will see that its event nodes are connected to the Parent event nodes. The Parent event nodes are the ones we’ve defined in the Unit’s Event Graph. This means, PlayerUnit’s Event Graph runs the code defined in its parent – the Unit blueprint.
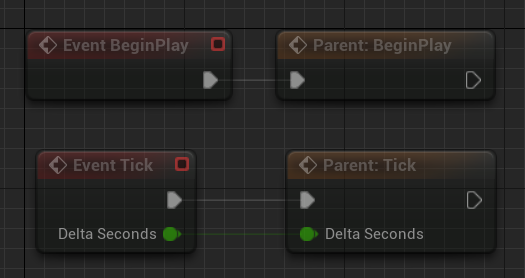
Selecting The Player Unit
Now, let’s implement the Unreal Engine RTS Unit selection with our Player Controller:
- Open the RTSPlayerController blueprint
- Go to the Event Graph tab
- In the My Blueprint panel, add a new variable called SelectedUnit.

Next, in the Details panel, we’ll set the SelectedUnit’s Variable Type property to the Player Unit.

As we want to select our Units with our mouse, let’s enable the Mouse Cursor first:
- Connect the BeginPlay event to a new Set Show Mouse Cursor node
- Enable the Show Mouse Cursor property in that Set node

Then, we’ll add the Left Mouse Button event node, to get notified on when the left mouse button is pressed.
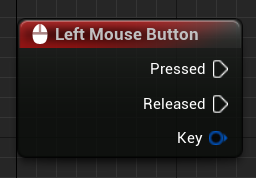
Next, we will send a raycast to check if there is any object under our cursor:
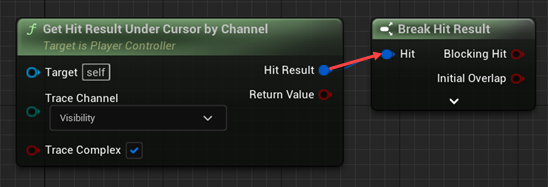
- Add a new Get Hit Result Under Cursor by Channel node to the Event Graph
- Connect the Hit Result pin of that node to a new Break Hit Result node
The Get Hit Result Under Cursor node sends the raycast from the cursor position and returns the result of that raycast. A raycast shoots through space like a laser beam and returns the objects which got in its way.
Then, we will check if we hit the Player Unit Actor:
- Expand the Break Hit Result node to see all of its output pins
- Connect the Hit Actor pin of the Break Hit Result node to a new Cast To PlayerUnit node
- You can collapse the Break Hit Result node now, as the used pins will remain visible
Now we have the Cast To PlayerUnit node which can tell us if we hit the PlayerUnit Actor by passing the control flow to its first pin.
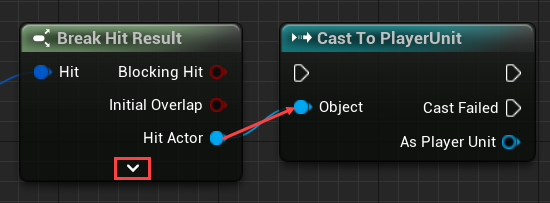
Finally, we can set the Selected Unit variable:
- Connect the Pressed pin of the Left Mouse Button node to the input control flow pin of the Cast To PlayerUnit node
- Connect the first output control flow pin of the Cast To PlayerUnit node to a new Set Selected Unit node
- Connect the As Player Unit pin of the Cast To PlayerUnit node to the Selected Unit pin of that new Set node
Now, once we press the left mouse button, we check the object under our cursor, and if it happens to be the Player Unit, we’re saving it in the Selected Unit variable.

Setting Up The Player Unit Movement
Next, we’ll make the Unreal Engine RTS Units move with the right mouse button click. Let’s add the Right Mouse Button event node to the Event Graph first.
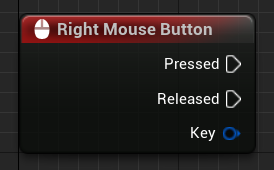
Then, let’s copy the raycast nodes we created earlier:
- Select the Get Hit Result Under Cursor by Channel and Break Hit Result nodes we created earlier
- Press Ctrl+C to copy and Ctrl+V to paste those nodes
- Move the copy of those nodes to be below the RightMouseButton event node
- The connection between those nodes must remain
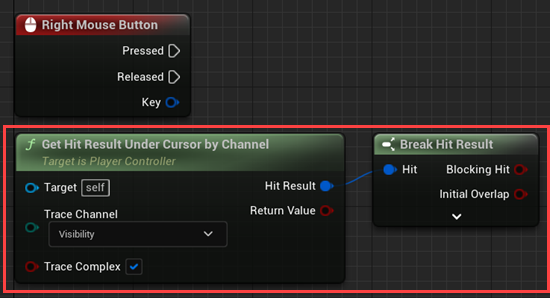
We also need to check if we actually have a Unit selected:
- Connect the Pressed pin of the Right Mouse Button node to a new Is Valid node
- Connect the Input Object pin of the Is Valid node to a new Get Selected Unit node
This way, on the right mouse button click, we’ll check if we selected a Unit first.
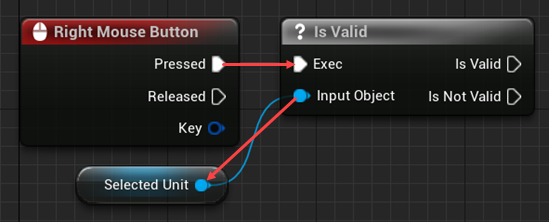
Creating The Unit’s MoveTo Function
Then, we need to return back to the Unit blueprint to set up a way to set the Target Position variable from outside. We will make changes to the base Unit blueprint, as both the Player and Enemy Units will need to get their Target Positions from outside.
Let’s do the following now:
- Open the Unit’s Event Graph
- In the My Blueprint panel add a new function called MoveTo
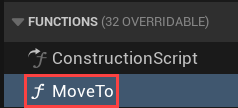
Next, in the MoveTo function Details panel, add a new input of the Vector type called ToPosition.

Finally, let’s make the Move To function set the TargetPosition variable:
- In the Move To function graph, connect the control flow pin of the Move To node to a new Set Target Position node
- Connect the To Position pin of the Move To node to the Target Position pin of the Set node
- Compile the Unit blueprint to apply those changes
Now we can set the Unit’s Target Position with the Move To function.

Back To The Player Controller
Let’s return to the Event Graph of the RTSPlayerController blueprint now. We can finally connect the script we started earlier to the Unit’s MoveTo function:
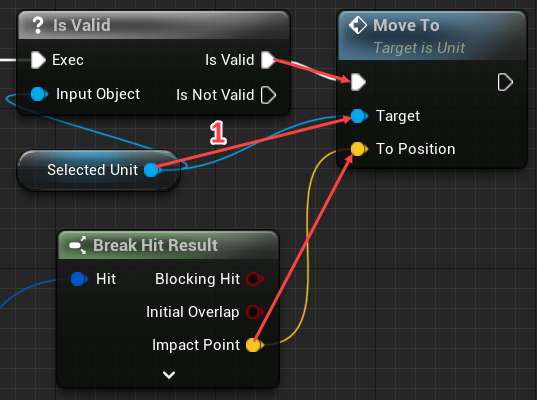
- Connect the Get Selected Unit node to a new Move To node. You need to make that connection first, as only the node of the Unit type can be connected to the Unit’s Move To function Target pin
- Connect the Is Valid pin of the Is Valid node to the input control flow pin of the Move To node
- Connect the Impact Point pin of the Break Hit Result node to the To Position pin of the Move To node
Now, when we click the right mouse button and we have a PlayerUnit selected, we will call the MoveTo function on it with the click position as the target position.
Testing The Movement
Let’s get back to the GameLevel level and test how our new input works in our Unreal Engine RTS. First, let’s add two PlayerUnits to the level to make sure that our selection works as it should.
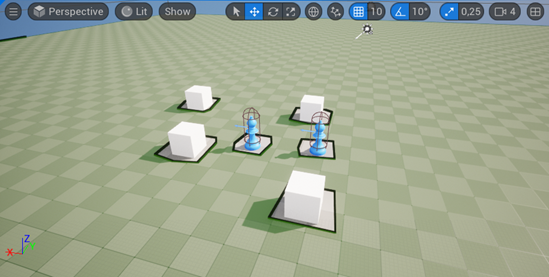
If you start the game now, you should be able to select a PlayerUnit by clicking it with the left mouse button and move it by clicking the right mouse button somewhere on the Ground. Though the selection itself is not displayed at the moment, we will work on it in one of the following lessons.
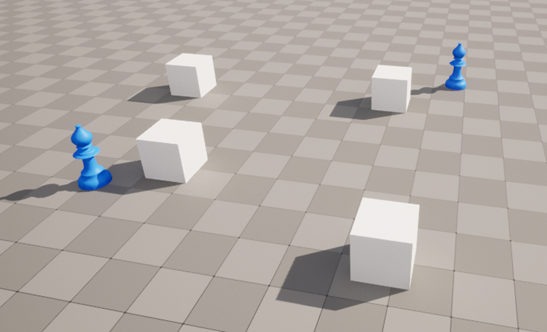
In this Unreal Engine RTS lesson, we implemented the ability to move the PlayerUnits, which is a fantastic start to the rest of our Unreal Engine RTS. Of course, we need to add things like combat and similar – but the basic units are ready for expansion!
Did you come across any errors in this tutorial? Please let us know by completing this form and we’ll look into it!

FINAL DAYS: Unlock coding courses in Unity, Godot, Unreal, Python and more.
Transcript – Unit Movement – Part 1
Welcome back everyone in this lesson we are gonna begin creating our units for our Unreal Engine RTS.
So first of all, we want to go down to our content draw and we wanna go to our content folder where we have our level and our other blueprints that have already been created.
And what we want to do is right-click go blueprint class and we want to select the character blueprint. Okay. And I am gonna call this one Unit.
Now this is gonna be the base blueprint for all of our different units, both the player and the enemy. And then from here what we’re gonna do is we are gonna extend from that for the player units and extend for that for the enemy unit.
Okay. So if you do want certain logics such as AI for our enemies cause our enemies are going to be able to attack on their own when a player gets within range but we don’t want our players to do that.
So we are going to basically have a separate player and a separate enemy blueprint. Okay. But this unit blueprint is basically going to be the parent class for both of those.
So all of the similar logics, such as being able to move to a location, move to a target is gonna be shared between them inside of this blueprint here. And we’re getting better understanding of how that works later on.
Once we start setting up the others, but for now let’s just open up this unit blueprint by double-clicking on it and we can then dock it like so. just to make it a bit neater.
Now, the first thing we want to do is give ourselves a 3-D model because right now we have no visual. So what I’m gonna do is I’m gonna open up the content draw.
I’m gonna go to our models folder and I’m just gonna drag in the Bishop 3-D model under the unit here, we can select that model.
And what we want to do is we basically wanna drag it down so that it is sitting at the bottom of this capsule right here. And this capsule is basically defining the bounds of our unit. Now let’s actually disable the grid snapping here so we can move it up a tiny bit, just so it fits correctly. There we go.
And let’s also give it a material now to give it a material we can go over to our details panel, go down to the materials and let’s give this one unit I’ll give it ‘unit_1’, which is just a blue one like so. And then we go, so that is our 3-D model. Pretty much all set up.
Now what we need to do is go over to the event graph where we are going to be spending most of our time, setting up the various different pieces of logic for our unit and Unreal Engine RTS.
Now inside of this unit blueprint, we are gonna be making a bunch of different things. First of all, we’re gonna have it so that this unit can move to a target. It can also move to a position in the world.
For example, when we right-click on the ground our player’s gonna move to that position. When we right-click on an enemy, we want it to move and attack that enemy.
We’re also gonna have logic that works for attacking a target when we get within range and also for taking damage. So let’s start simple and just get our unit moving.
So first things first, we need to create a variable here which is actually going to determine the position we want to move to. So I’m gonna create a new variable down here.
I’m gonna call this one target position over in the details panel. We can change the variable type from a boolean over to a vector, which has an X, Y and Z coordinate that we are going to move towards.
We can click compile to save all those changes. And then over inside of begin play. What we want to do is initially we want to set our target position to be our current location. And that is because we don’t want our target.
We don’t want our unit I mean to start moving over to 0, 0, 0 at the start of the game, we want them to stand still. So we’re gonna set their target position to basically be their existing one.
So from begin play I’m gonna drag out and go set target position. And the target position is basically just going to be Get Nav Agent Location. Okay. So that’s gonna get the location of our AI agent.
And an agent is basically an entity that utilizes a nav mesh. So it’s basically gonna get our current location on the nav mesh. Now the active begin overlap node which detects collisions. We don’t really need that.
So we can actually go ahead and delete it like so. but the event tick we definitely will need. Now with event tick what we want to do is we basically want to be moving towards our target position at all times for now though. Okay.
So I’m gonna do is I’m gonna drag out from event tick here with the control and I’m gonna drag this into a node called AI move to, okay this one right here, AI move to, and this node right here basically we give it some information and it is gonna automatically calculate a path and move us towards our target location.
So what information do we need to give it give? Well, first of all, we need to give it the pawn or the object that we want to move, which is gonna be ourself.
So we can just right-click and look for the self node right here, get a reference to self and drag that into the pawn. Now we also need a destination and of course that destination is gonna be our target position.
So we can drag in target position, go get target position and connect that up like so. Okay. And pretty much that is all we need to do.
So now if we compile this, if we go back to our game level we can actually go to our content draw, go back to content drag in a unit here, there we go. They’re on the ground.
And if we press play, you’ll see that nothing happens because we initially set their target position to be their existing one. But what happens if we don’t do that? What if we go to unit? What if we right-click on the begin play node and just go over to where it says break node links.
That will disconnect it. If we click compile, if we go back to game level and we move our player over here, for example and we press play.
What you’ll see is our character now moves over or it’s trying to move over to the (0,0) coordinate which is pretty much inside of this cube right here. okay. So we can move it over, down below here.
So there is an obstacle in the way, and as you can see it moves around this obstacle towards the target. Now you may think it is moving a bit fast and it kind of is.
So what we can do is go over to our unit here and select our character movement component. And what we want to do here is just change the move speed. So if we go down to where it says, max walk speed.
We can change that to let’s just say 300. So now if we compile that, go to our game level, press play you’ll see that we move at a much slower speed and we can see the AI navigation a bit easier. But yeah, that is basically how we can navigate around obstacles using the AI move to node.
Now I’m gonna reconnect the begin play to that set target position because we do want to actually have our target position set to wherever we are right now by default.
And in the next lesson we are going to be looking at making it so that we can actually tell our player where to move in our Unreal Engine RTS. Okay.
We’re gonna be able to select our player with left mouse and right-click on the ground to move to a position. okay. So we’re gonna get that Unreal Engine RTS movement and interaction set up. So Thank you for watching! and I’ll see all then in the next lesson.
Transcript – Unit Movement – Part 2
Welcome back, everyone. In this lesson, we are gonna get our player controller set up and working so we can actually start selecting our units and moving them around in our Unreal Engine RTS.
And we are first of all going to actually create another unit blueprint. And that is going to be our player unit. Because this unit right here, this unit blueprint, we aren’t going to ever be using it.
So, let’s go ahead and delete our unit that exists in our world right now, because we’re never gonna drag this unit blueprint into our world or Unreal Engine RTS directly.
Rather, we are gonna create two other blueprints, a player unit, and an enemy blueprint. And those are both going to inherit, or they’re both gonna be a child class of this unit blueprint.
So it’s basically, we want the enemy and the player to both have the same characteristics and the same logic as each other, but they’re gonna differ in certain ways that we do want to give themselves different behaviors, such as the enemy is gonna have automatic AI, and the player is going to have the ability to be selected.
So, I’m gonna right-click. I’m gonna create a new blueprint class. And we need to pick a parent class. Now, we wanna go All Classes, because we want to search for our unit right here.
And this unit is gonna be our parent class. And I’m gonna call this one PlayerUnit. Now what happens, if I open this up, you’ll see that we have the player bishop right here. We have everything set up just as it is over in Unit.
Yet, if we go to Event Graph, you’ll see that our BeginPlay connects to this thing called Parent BeginPlay. And Parent BeginPlay is basically what this code here, or this logic over in Unit, that we are setting up here.
Because everything inside of PlayerUnit is sort of overriding or inheriting from Unit. That stuff already exists. And any changes we make to the Unit blueprint, those changes get applied to our PlayerUnit as well.
And then what we can do is just attach on extra logic, extra gameplay behaviors, to our player unit here that are more player-centric. And if we create the enemy blueprint, that’s gonna be more enemy-centric with the AI.
And of course we’ll get into this a bit later on on the specifics, but for now just know that PlayerUnit is basically inheriting everything from this unit blueprint right here, with the ability to add on its own extra unique properties.
So, now what we want to do is open up our RTSPlayerController blueprint right here. And this is going to be where we are detecting all of our mouse clicks, and keeping track of which units we have currently selected.
So inside of the player controller, what we want to do is go over to our Event Graph here, and we want to create ourselves a new variable. And this variable is going to be called SelectedUnit.
And the variable type is not gonna be boolean or vector, rather it is gonna be of type player unit. Like so. We can compile that to save those settings.
And now what we need to do is we need a way of basically determining when we click on a player unit. So, first things first, in BeginPlay, we’re going to connect this over into a Show Mouse Cursor node and enable that, because we do want our mouse cursor enabled by default.
We then want to delete Event Tick, since we won’t be needing that. And instead we want to create a Left Mouse Button node. And this Left Mouse Button node is gonna basically execute once the left mouse button is pressed or released.
Now, what we want to do is we want to basically determine if we are clicking on a player unit when we select it with the left mouse buttons. How do we do that? Well, we need to use a raycast, or a hit result.
So, for this what I’m gonna do is I’m gonna create a node called Get Hit Results Under Cursor by Channel. And this node right here, basically, it is going to shoot a laser beam from my mouse cursor to whatever we are pointing.
And it is then gonna return to us that information whenever it hits something. Now from Hit Result, we wanna bring this over into a Break Hit Result node right here.
You can then pop that open to see all of the different outputs we can choose from. Now, the thing we ought to check to see is the Hit Actor. And we to know if whatever actor we hit with our mouse cursor is a player unit.
So, we can drag that out like so. And we are going to put this into a Cast to Player Unit node. Now, a Cast To node, it basically takes in an object as an input, and it basically determines if this object is of type player unit.
If it is, this Control Flow executes. Otherwise, Cast Failed executes. So, basically this is only going to be true if the object we are clicking on is a player unit. So, let’s connect this up with the pressed input like so.
And then from Cast, if it is indeed a player unit, then what we want to do is we want to basically go Set Selected Unit, and go As Player Unit. And like so. So, now when we left-click on a player unit, it is going to set it as our selected unit.
Now, how do we get that unit to actually begin moving around once we have it selected? Well, for that, we are gonna create another event node called Right Mouse Button.
And Right Mouse Button, this gets executed when, of course, we click on our right mouse button. And what we want to do with this is we basically to start off with, want to see, first of all, do we have a selected unit?
And if we do have a selected unit, then we want to move it to whatever location we have hit. So, what we can do here is actually just to save some typing,
I’m gonna select our Get Hit Result under cursor, hold down Control, and select the other node here. I’m gonna copy that and paste it down here, just ’cause we don’t have to worry about creating those nodes again.
And instead of the Hit Actor, we want to get the Location. But we don’t wanna get that just yet. Instead, what we want to do is we want to go out from Pressed, and we want to check to see if we have a selected unit.
Because we don’t wanna try and move somewhere if we don’t have a selected unit. So out from Pressed, what we want to do is we want to check to see the Is Valid. Is Valid right here, a little question mark icon.
Basically, we give it a object and it determines if it exists or not. So, right now our selected unit if we get it like so, plug it in. If it has not been set, it is equal to what’s known as null.
Null basically means empty. And if it’s empty, that means it is not valid. Otherwise, if we have set the selected unit, it will be valid. Now, if it is valid, then we want to basically set its target position.
And to do that, we are gonna go over to our PlayerUnit right here. And actually not our PlayerUnit. We’re gonna go over to our Unit, so our base unit, because this could also be given to an enemy.
And we are going to create a new function down here called MoveTo. And the MoveTo function is going to contain a input. So, we can add an input right here. And it is gonna be called ToPosition. We wanna make that of type vector.
And basically what we want to do is set our target position to be this ToPosition. So, we just wanna plug it in like so and there we go. So, basically when this Move To function is called, we send over a position and it is gonna set our unit’s target position.
Now we wanna click Compile, go back to our RTSPlayerController. And then what we want to do is we want to drag in our selected unit here, go Get Selected Unit, drag that out, and we want to call the Move To function like so.
And we wanna connect that to the Is Valid of the Is Valid node. And the ToPosition is going to be the Impact Point, the point at which our mouse cursor has impacted, probably the ground that we wanna move to.
So, that is what we need to do in order to basically set it up for our unit to be selected initially. And then when we right-click, we want to check to see if we have a unit selected.
And if we do, we want to move it to wherever our mouse cursor has clicked on the ground. So, now we can click Compile. We can go back to our game level. We can then drag in a player unit here.
Let’s actually drag in another one as well just to basically see if the selecting works. Click Play. Okay, and now what we can do is we can click on our unit.
So, if I click on the left one right here, nothing really happens so far, but we will have a selection visual appear. And if I right-click, you’ll see that our unit is now moving to whatever position I am giving it, which is pretty cool.
Now, if I select this other unit with left mouse, as you can see, I am now controlling it, and the other one is staying still.
So, we can switch between our units here and move them around wherever we wish by clicking on them and then right-clicking on the ground to basically navigate over to that location.
So, that’s all working nicely right there. All right, so we got that all set up and ready to go. Now in the next lesson, I reckon we look at setting up some sort of enemy.
Because we need a way to actually begin attacking other units, and then later on, them having the ability to attack us. So, thanks for watching. And I’ll see you all then in the next lesson of our Unreal Engine RTS.
Interested in continuing and learning more about Unreal Engine RTS games? Check out our all-access plan which includes 250+ courses, guided curriculums, new courses monthly, access to expert course mentors, and more!
