Table of contents
Introduction
Ready to challenge your players to unique, brain-busting puzzles?
Puzzle games are a fairly unique genre in game development, requiring even more work than many other genres in its level design phase. However, they can also be a rewarding experience in terms of development, as they offer unique challenges and systems that can be used across many different game projects.
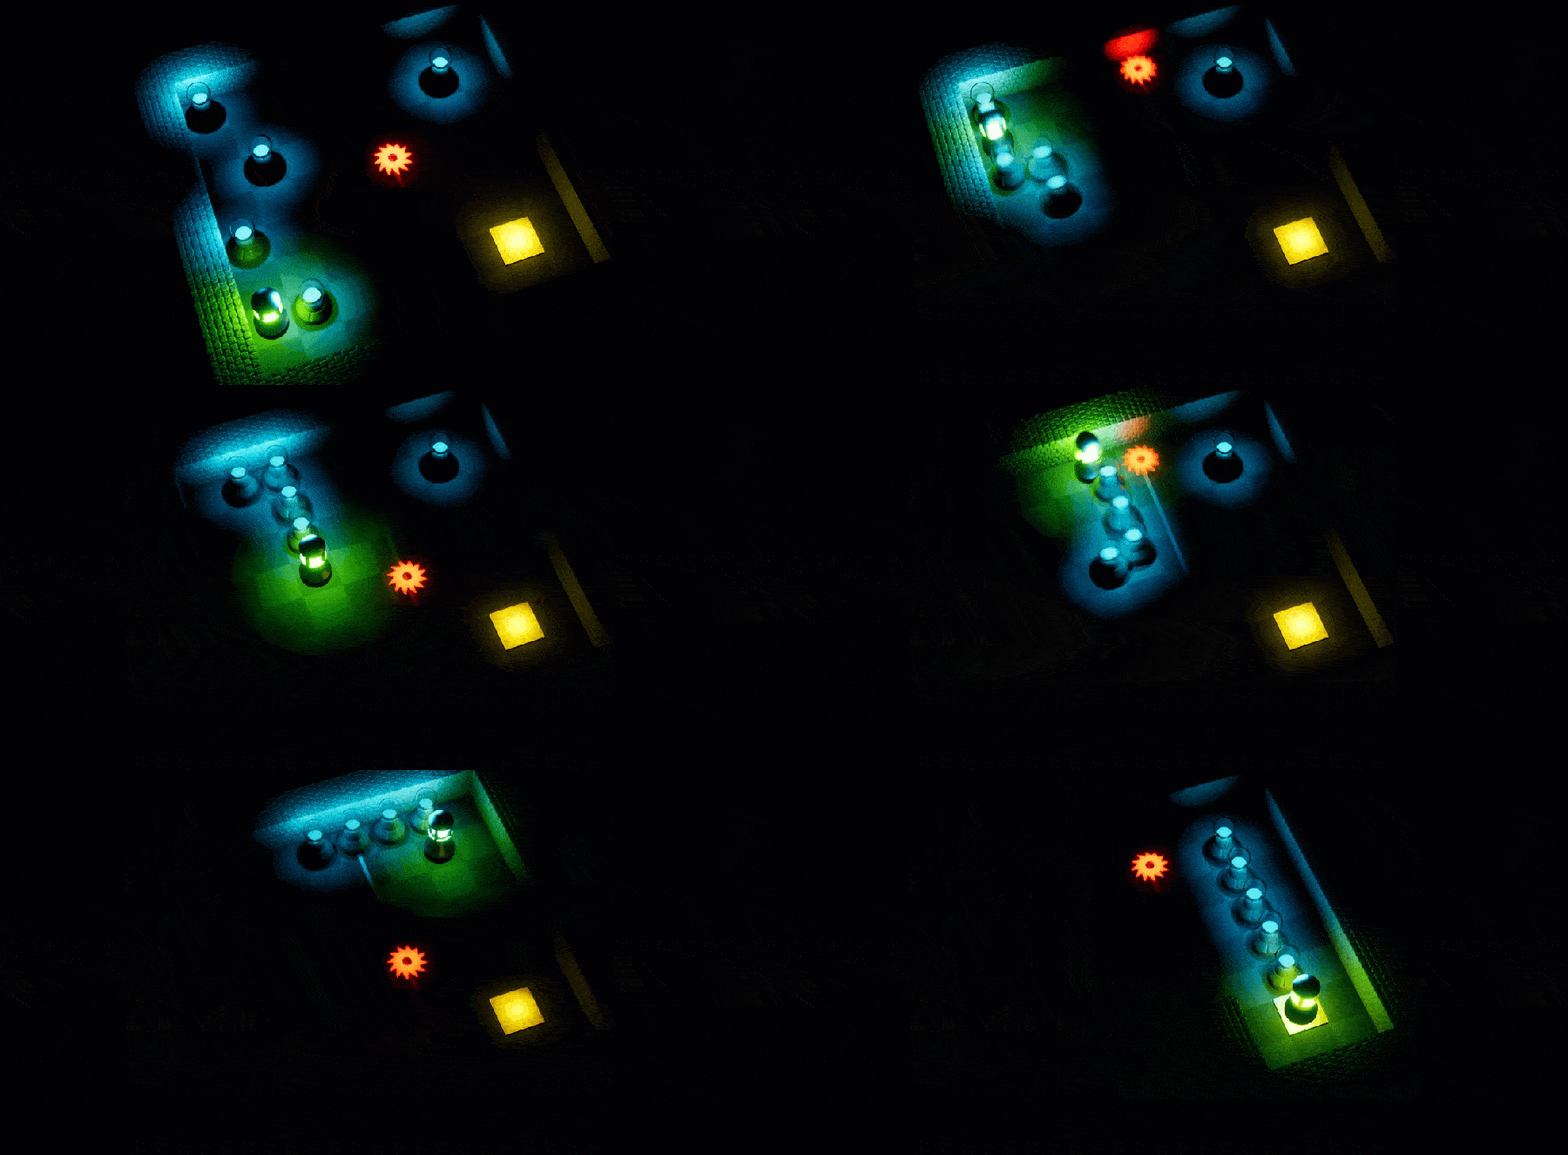
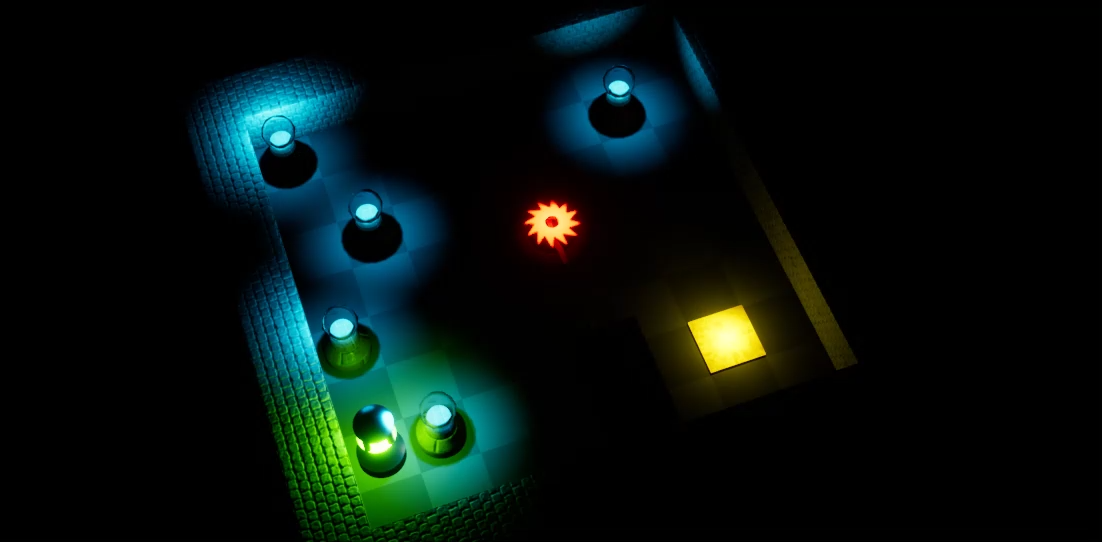
In this tutorial, we’re going to be creating a puzzle game inside of Unreal Engine. This game will feature a player who can move around on a grid and whose goal is to collect a number of followers, evade traps, and reach the end goal. Over the course of this tutorial, not only will you learn to use blueprints in Unreal for this purpose, but also gain a fundamental understanding of how to design puzzles and challenges for your games.
Before we continue, do know that this is not an introductory tutorial. If this is your first time using Unreal Engine, then we recommend you check out our Intro to Unreal Engine course here.

Did you come across any errors in this tutorial? Please let us know by completing this form and we’ll look into it!
FINAL DAYS: Unlock coding courses in Unity, Godot, Unreal, Python and more.
Project Files
For this project, there are a few 3D models we’ll be needing. You can use your own, although the tutorial will be made using these. The complete project can also be downloaded.
- Download the required assets here
- Download the complete project here (full size)
- Download the complete project here (slimmed down version)
Creating the Project
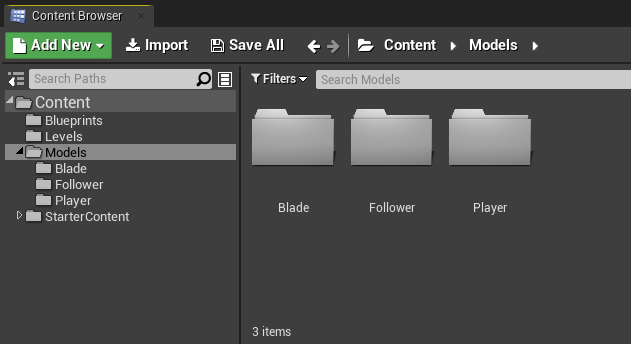
To begin, let’s create a new Unreal Engine project. When creating the project, make sure to include the starter content as we’ll be using a few of the materials. To begin, let’s create three new folders.
- Blueprints
- Levels
- Models
Then, create a new level and save it to the Levels folder as MainLevel.
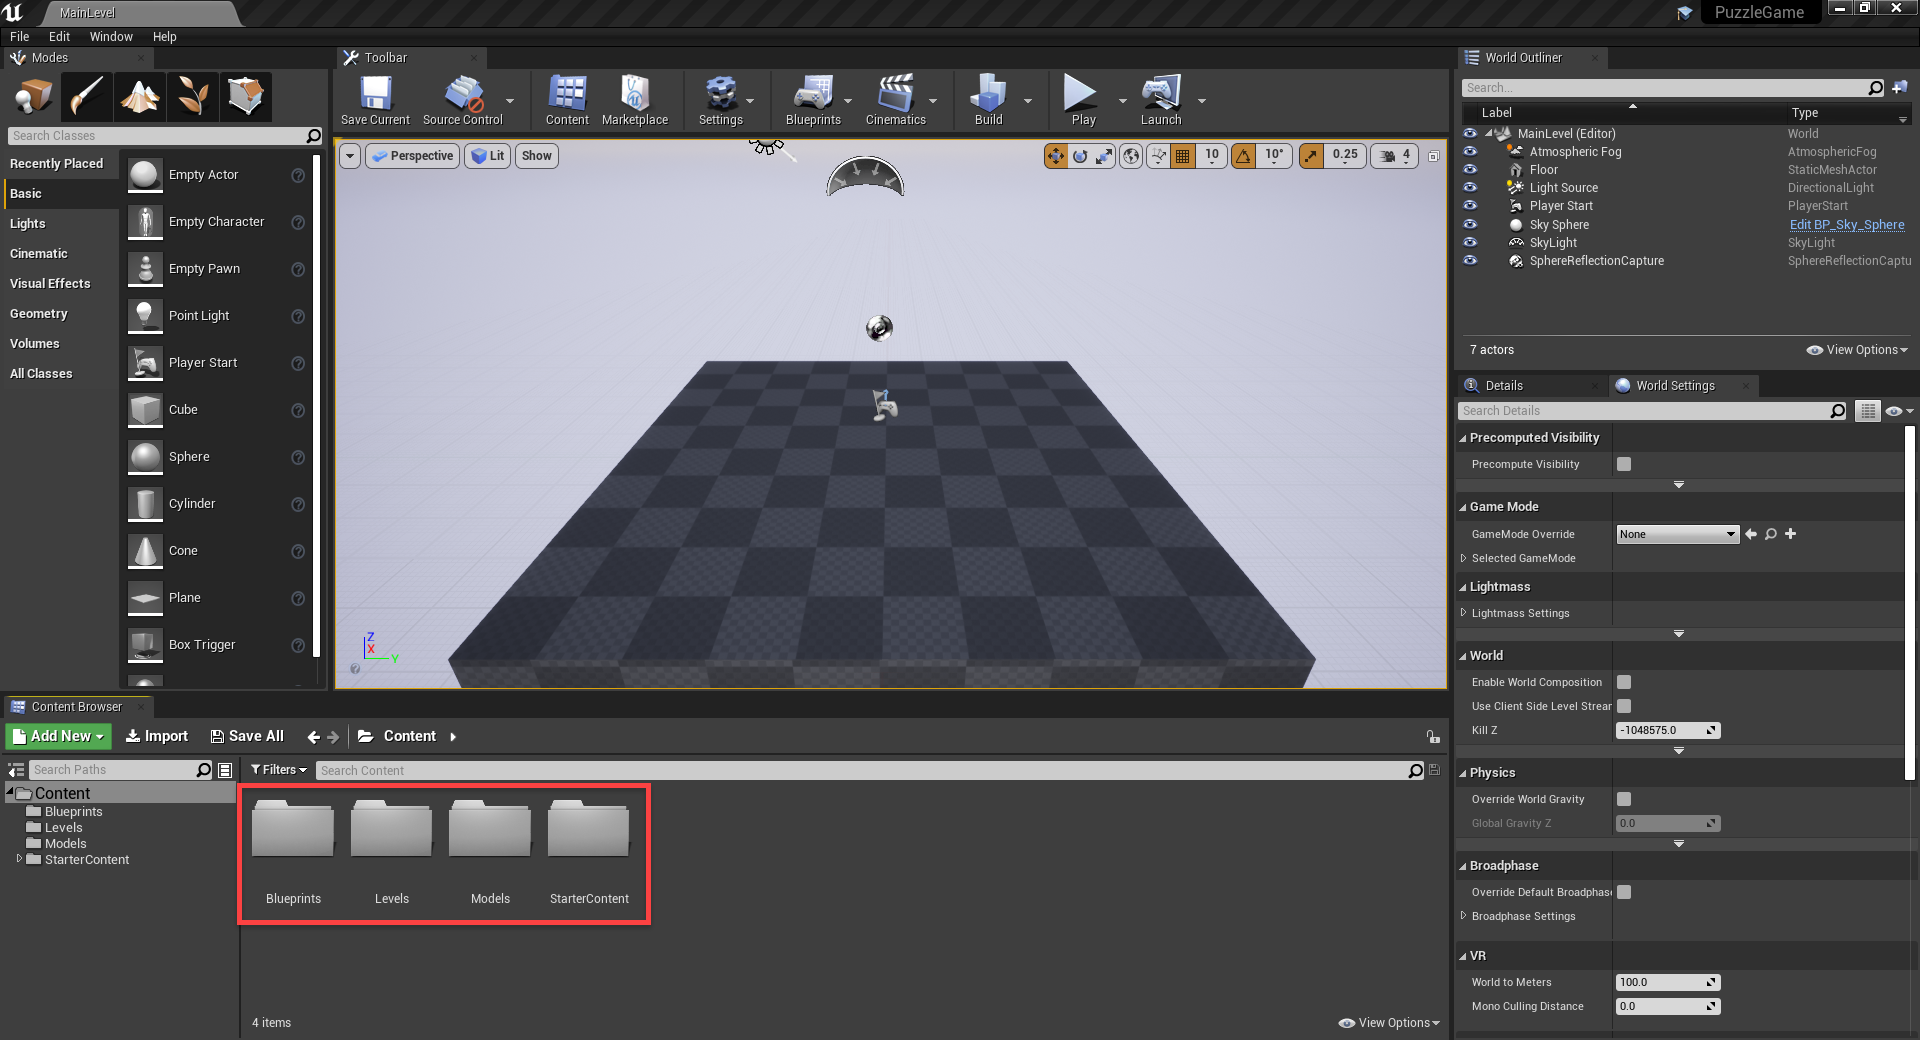
Let’s then download the required assets (linked at the top of the tutorial). There is a folder called Models Folder Content. Inside of that, drag the contents into our Content Browser‘s Models folder.
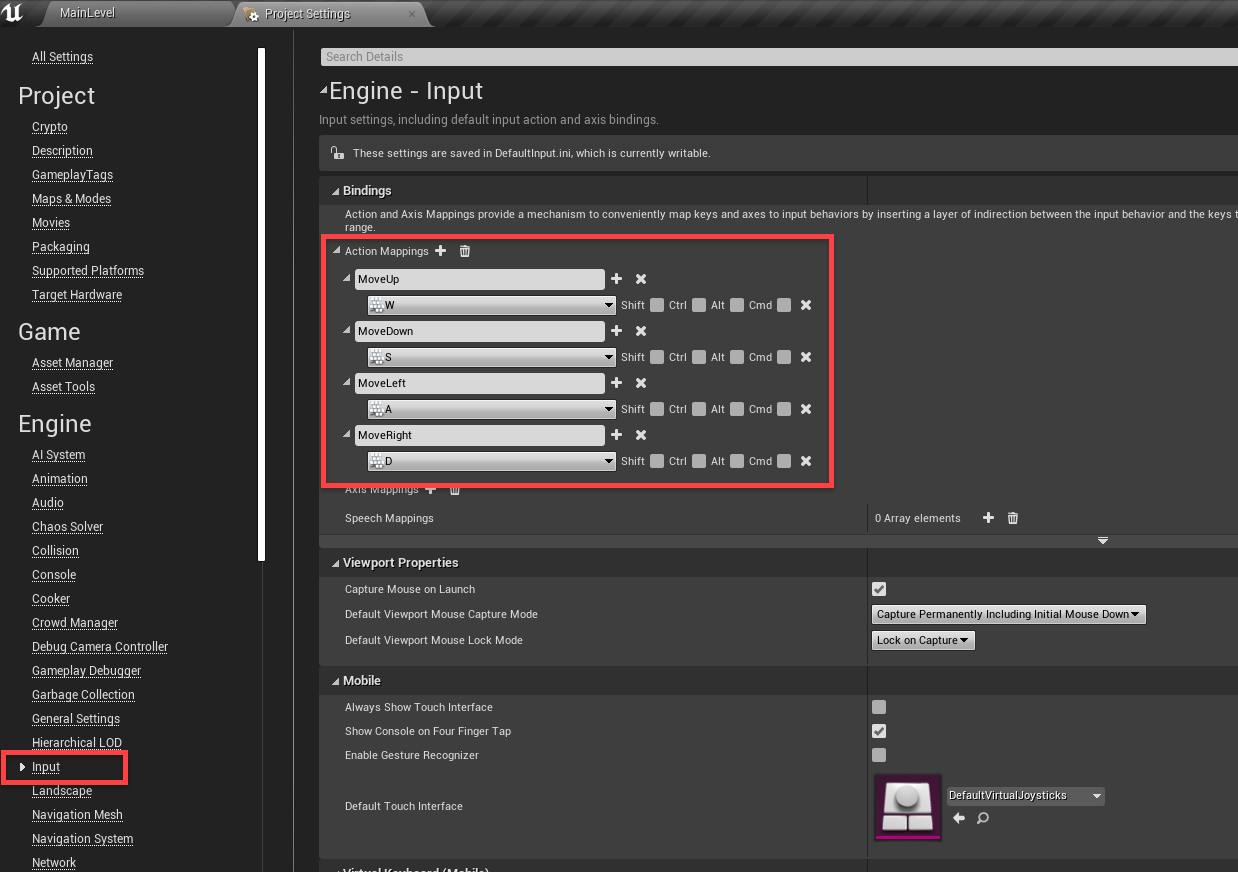
Next, let’s setup some key bindings. We need to know which buttons we’re going to use for player movement. Open the Project Settings window (Edit > Project Settings…). Click on the Input tab and create 4 new action mappings.
- MoveUp = W
- MoveDown = S
- MoveLeft = A
- MoveRight = D
Creating the Player
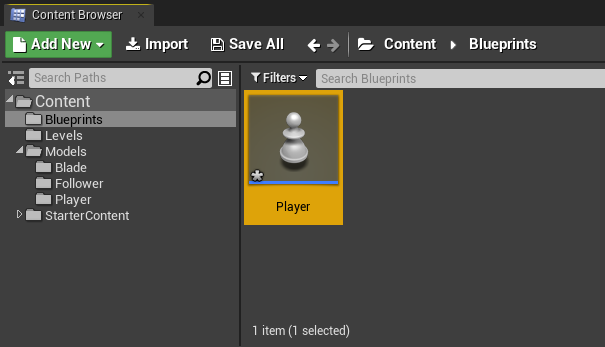
Now that we’ve got our controls sorted out, let’s create the player. In the Blueprints folder, create a new blueprint with a parent class of Pawn. Call it Player.
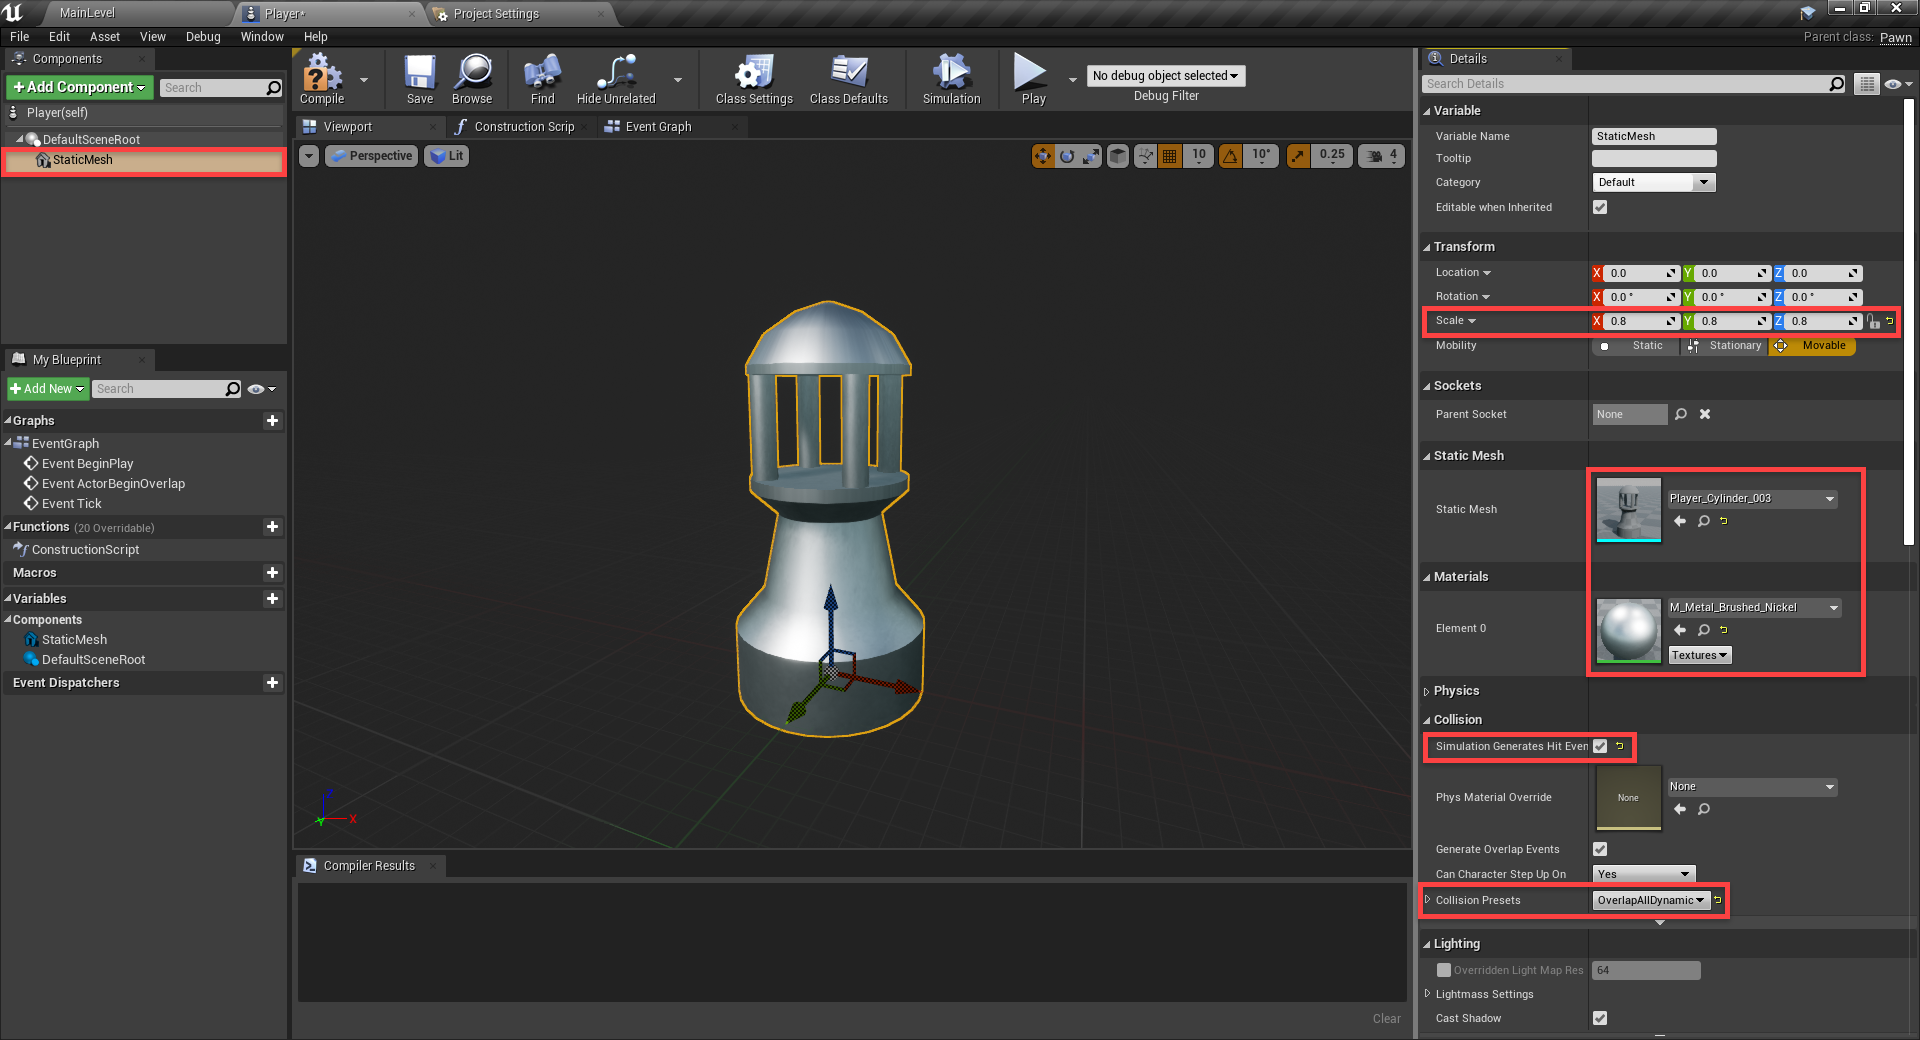
Open it up and we can begin to create the player. First, create a static mesh component.
- Set the Static Mesh to Player_Cylinder_003
- Set the Material to M_Metal_Brushed_Nickel
- Set the Scale to 0.8, 0.8, 0.8
- Enable Simulation Generates Hit Events
- Set the Collision Presets to OverlapAllDynamic
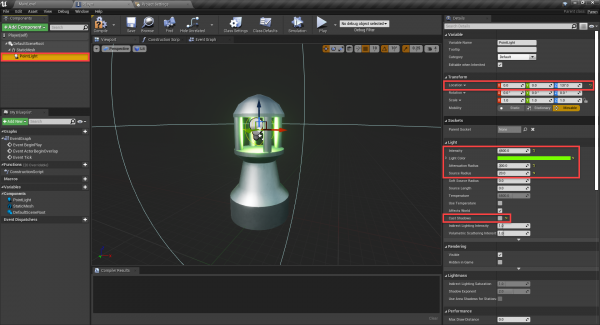
Then as a child of the static mesh, create a Point Light component.
- Set the Location to 0, 0, 137
- Set the Intensity to 4500
- Set the Light Color to Green
- Set the Attenuation Radius to 300
- Set the Source Radius to 20
- Disable Cast Shadows
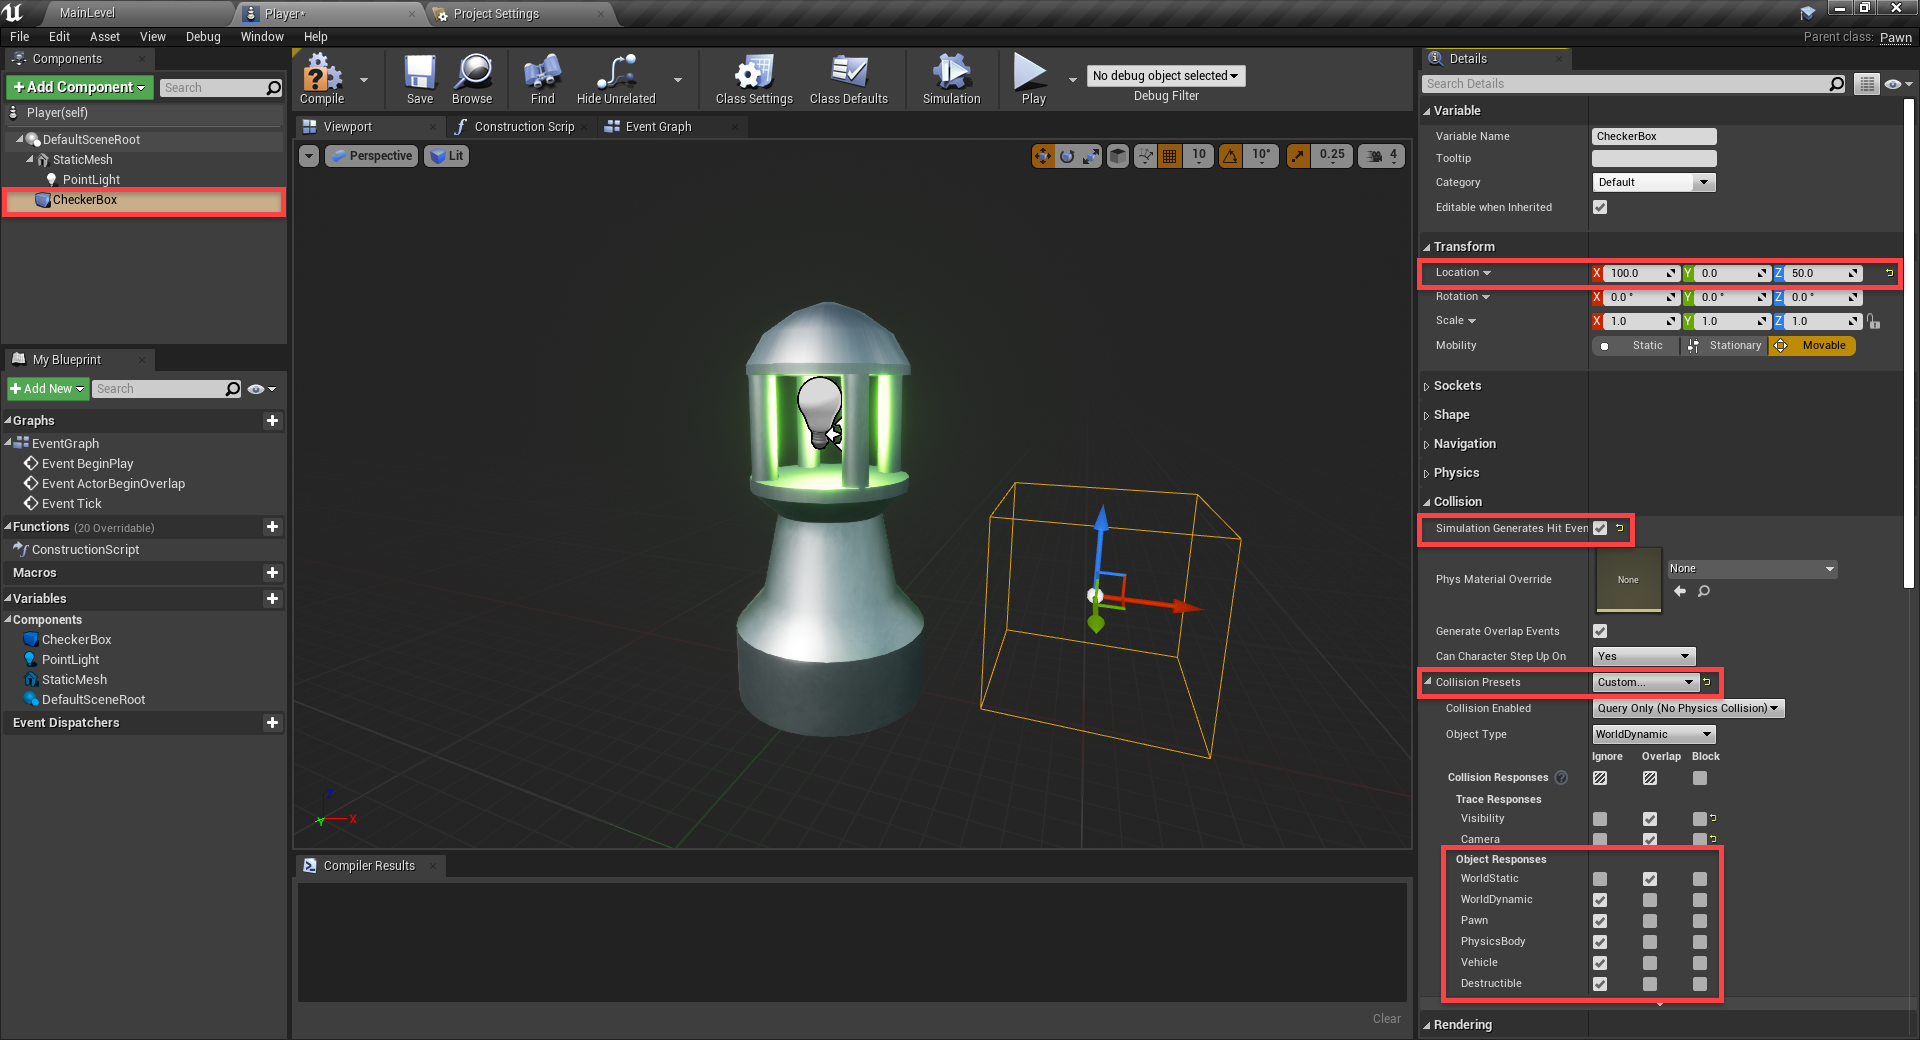
The final component will be a Box Collision, and this is used to know if we’re going to run into a wall.
- Set the Location to 100, 0, 50
- Enable Simulation Generates Hit Events
- Set the Collision Presets to Custom…
Custom collision presets means that we can choose what we want to detect with this collider. Since we’re looking for walls, they fall under WorldStatic. So under Object Responses, set everything to Ignore except WorldStatic.
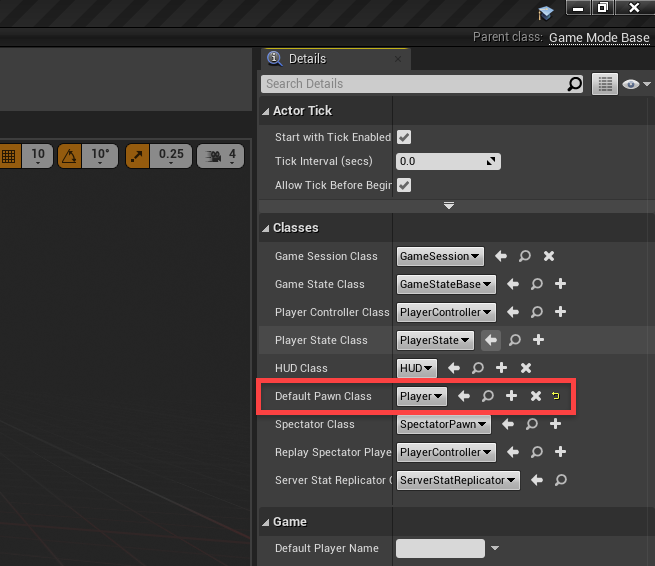
Now that we’ve got our player setup component-wise, let’s place them into the level. Back in the level editor, create a new blueprint of type GameMode Base and call it MyGameMode. Open it up and all we want to do here is set the Default Pawn Class to our Player.
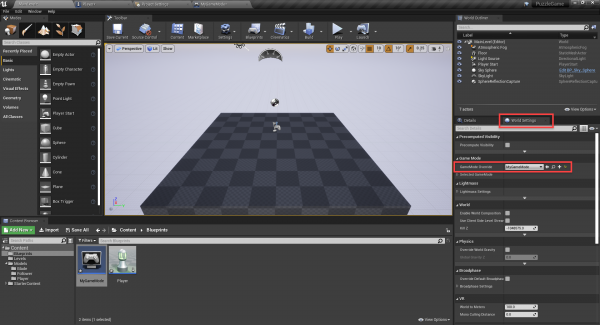
Save, compile then go back to the level editor. In the World Settings panel, set the GameMode Override to MyGameMode. Now when we press play, our player should spawn.
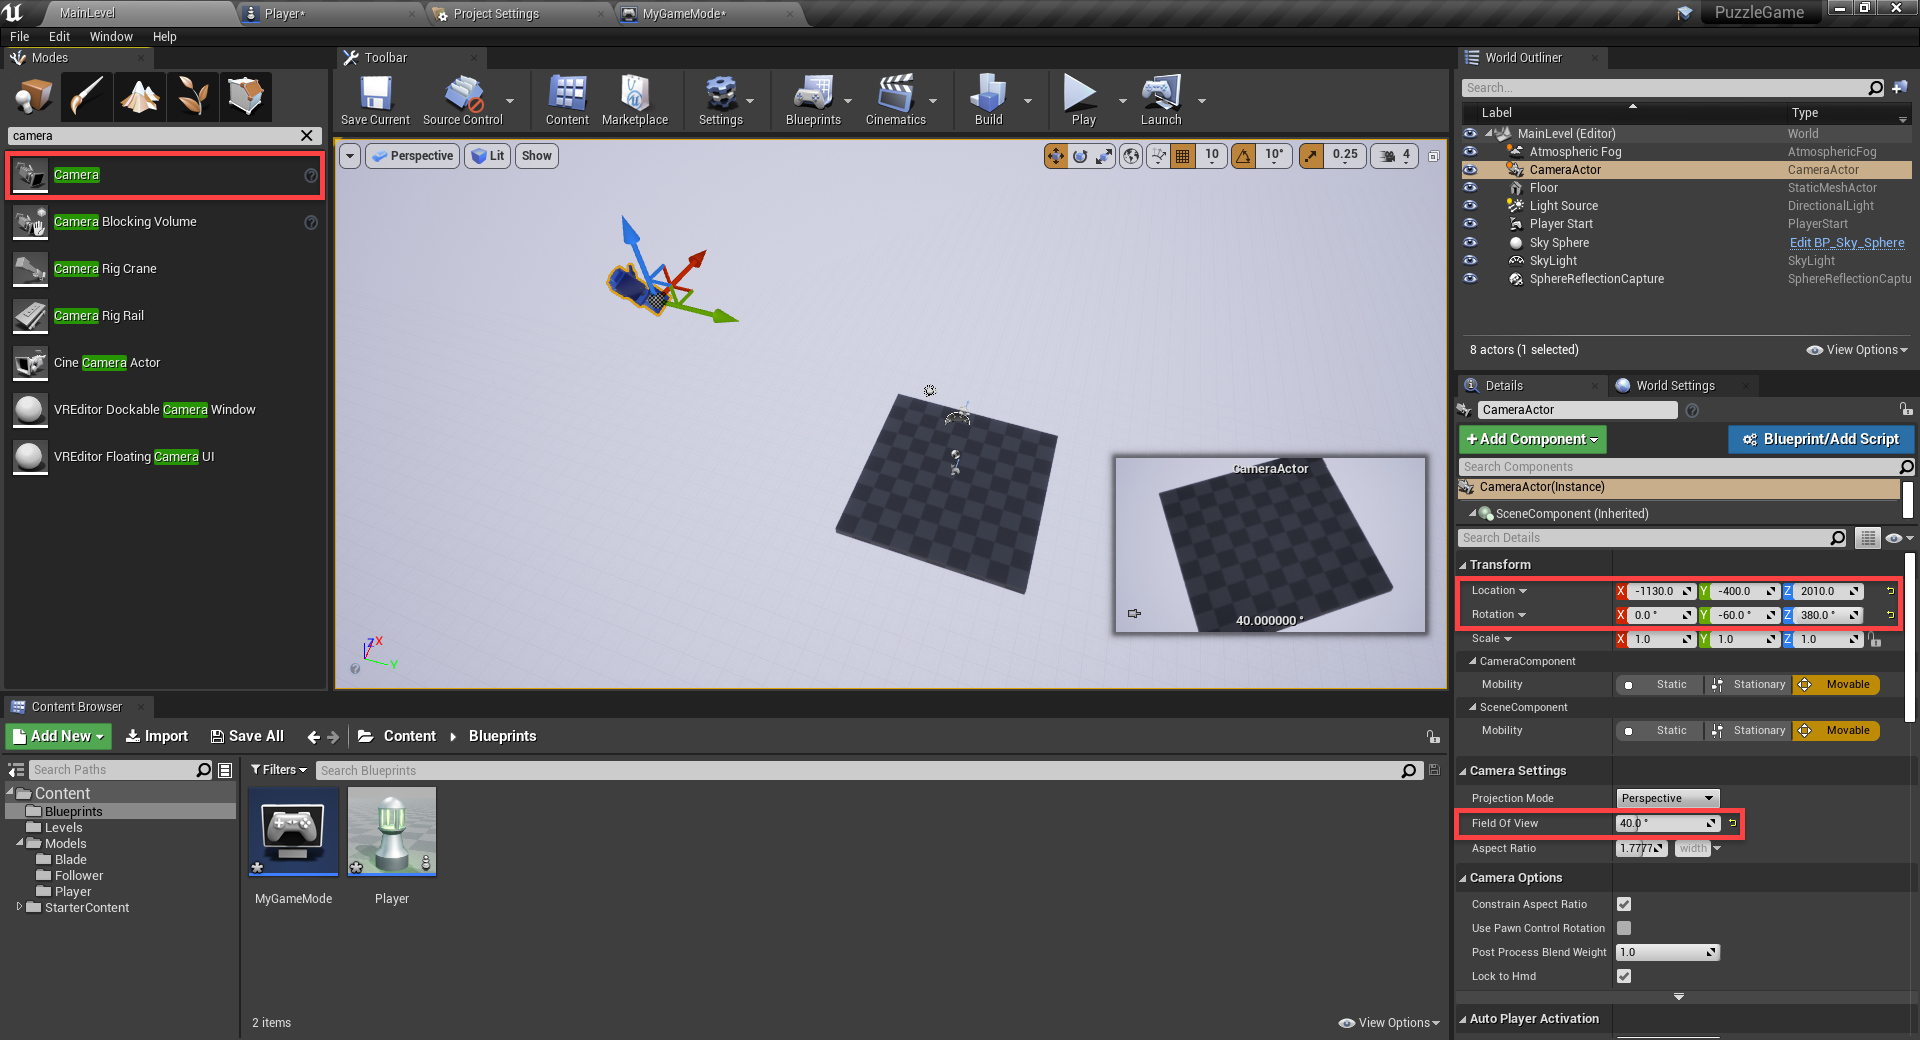
The default camera position is pretty bad, so let’s search for Camera in the Modes panel and drag that in.
- Set the Location to -1130, -400, 210
- Set the Rotation to 0, -60, 380
- Set the Field of View to 40
Now let’s setup the level bounds. Create a new cube and position it to the corner of the platform.
- Set the Material to M_CobbleStone_Smooth
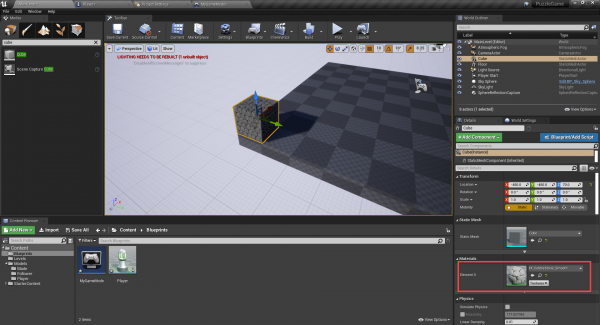
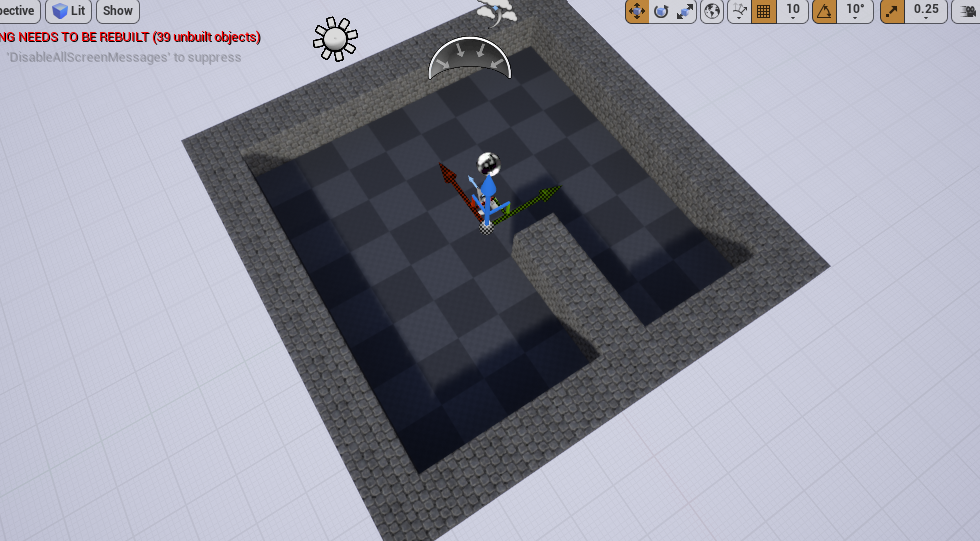
Copy and past that cube so we have something that looks like this. Also, select all the walls and in the details panel, enable Simulation Generates Hit Events and Generate Overlap Events.
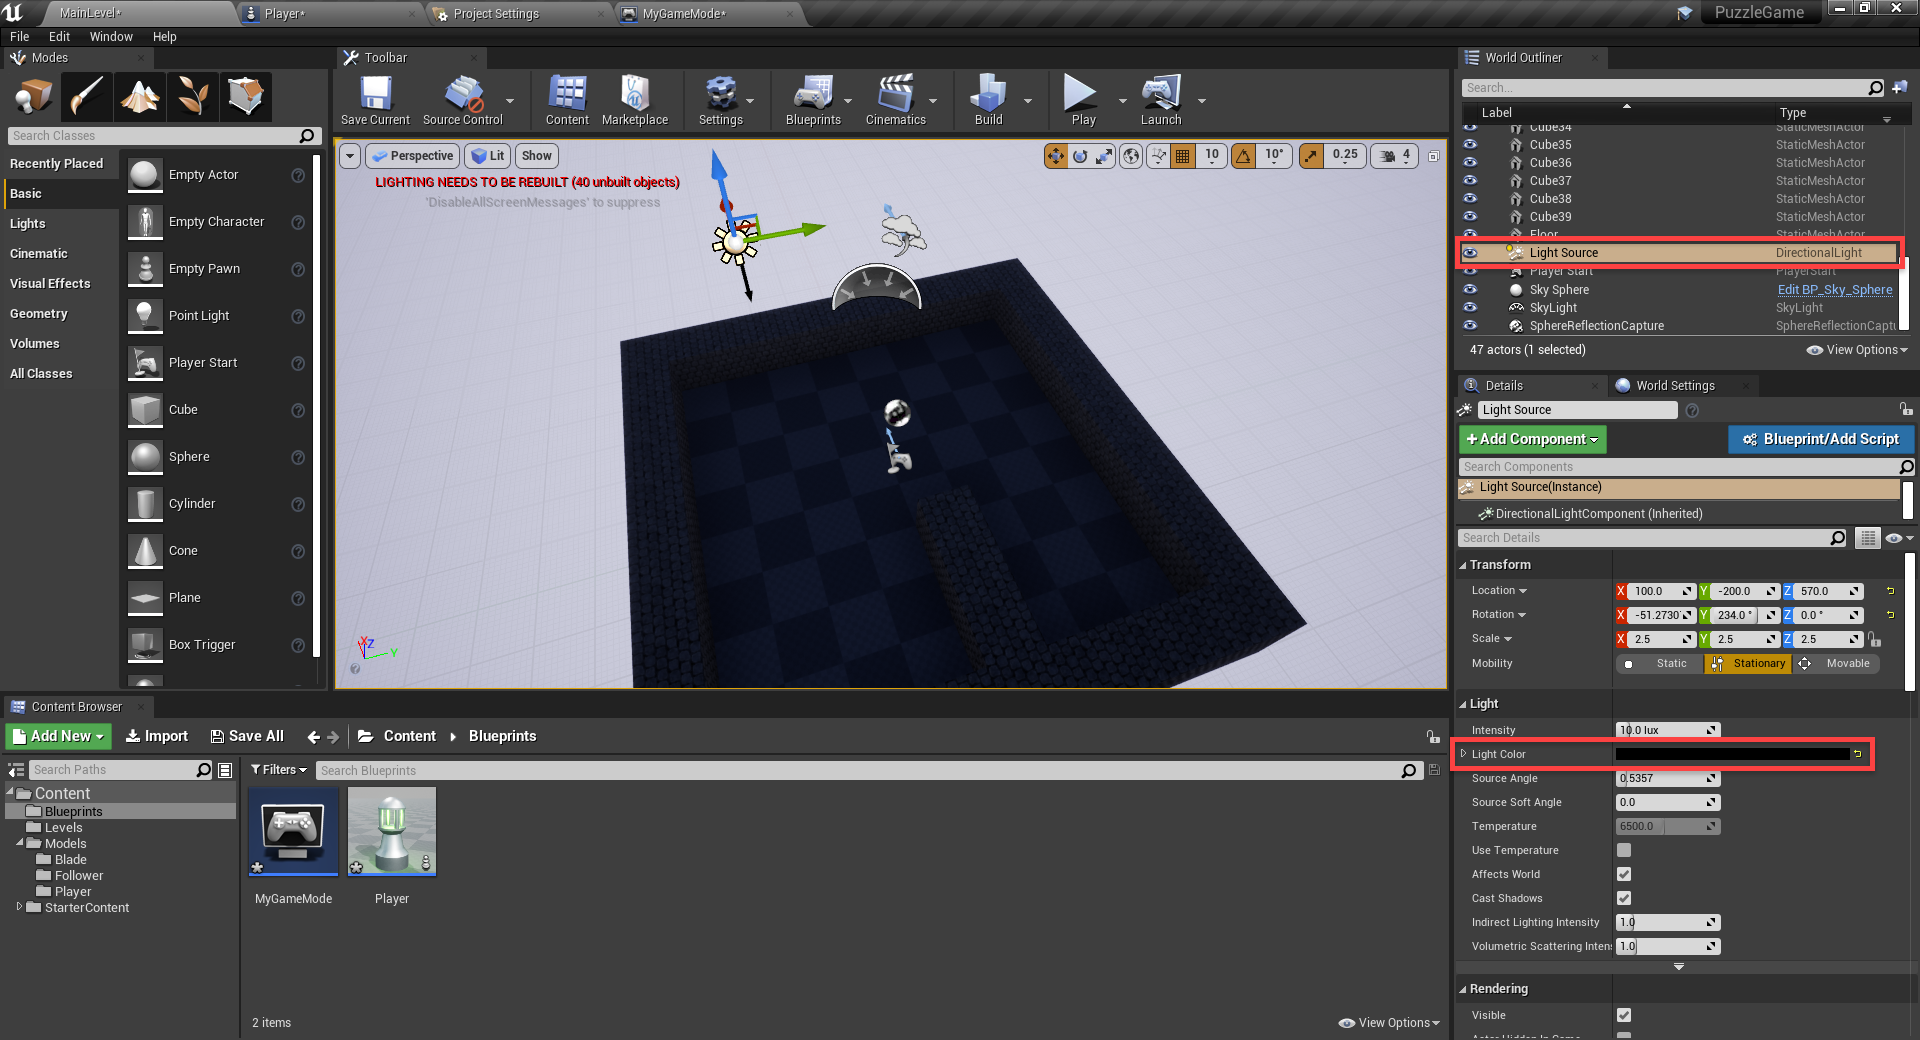
Since this puzzle game is in the dark with lights, let’s select the Light Source and set the Light Color to Black.
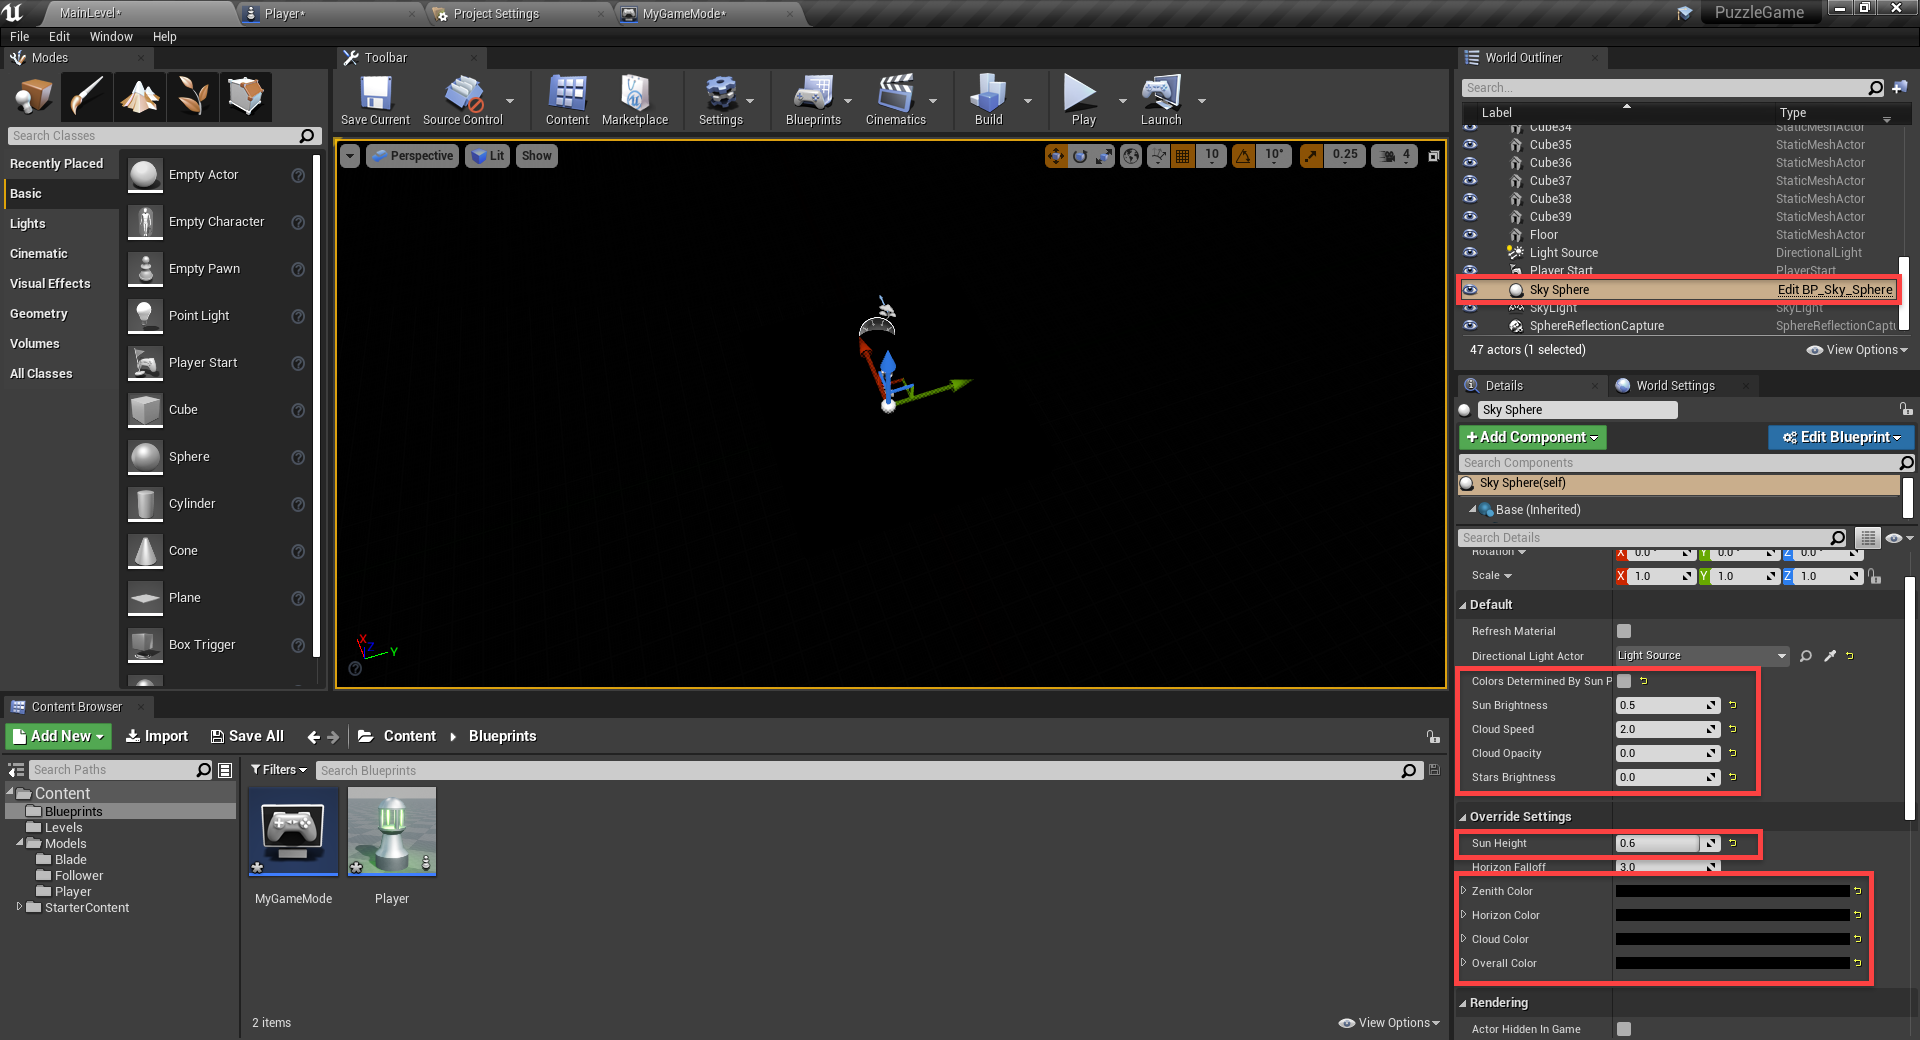
To make the sky night, we can select the Sky Sphere.
- Disable Colors Determined by Sun Position
- Set the Sun Brightness to 0.5
- Set the Cloud Opacity and Stars Brightness to 0
- Set the 4 colors to Black
After this, we need to click on the down arrow next to the Build button (in the toolbar) and select Build Lighting Only.
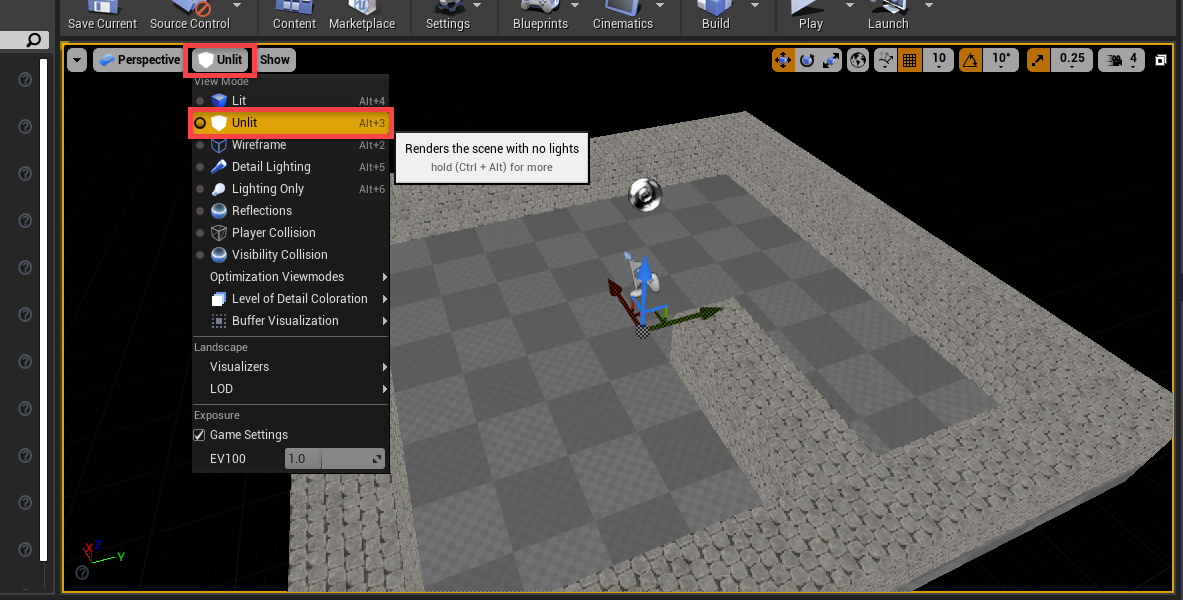
It’s pretty dark, so a way we can see is by disabling the lighting when working on the level. In the viewport, click on Lit and select Unlit.
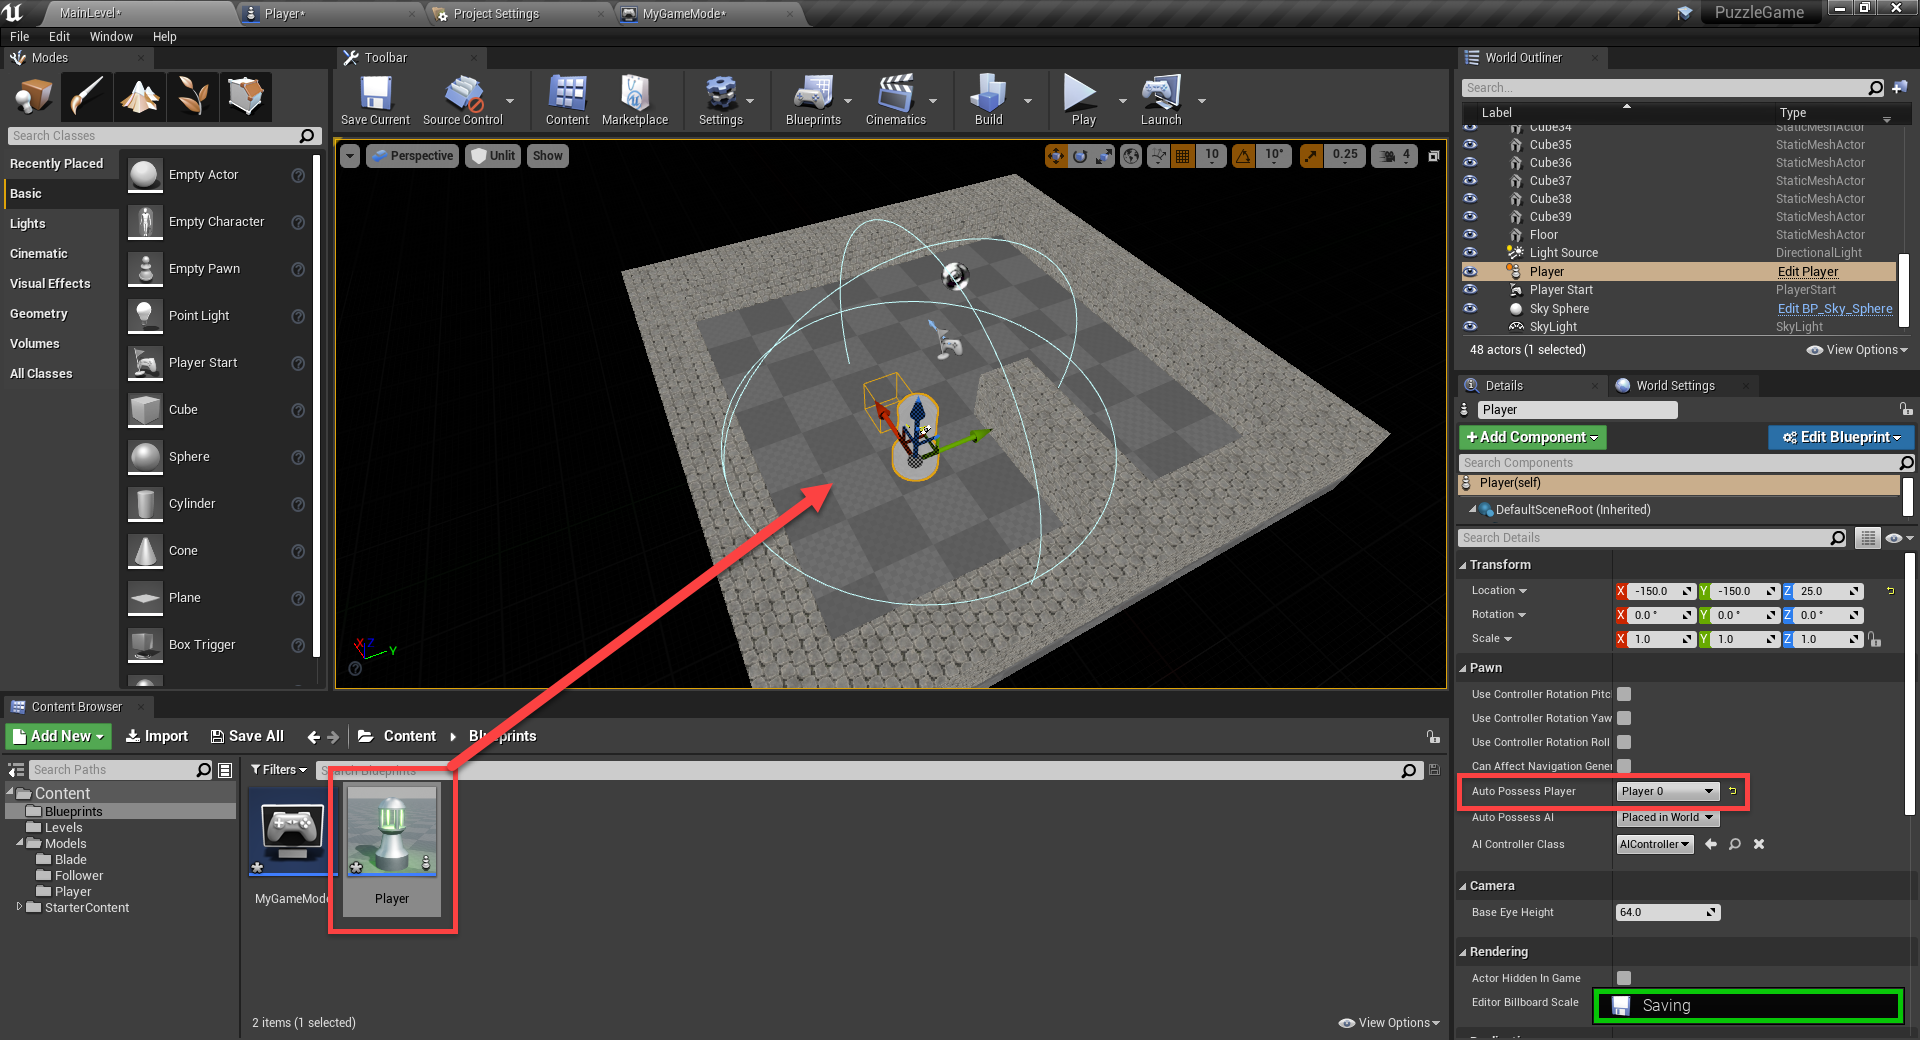
Drag in the Player blueprint. Set the Auto Possess Player to Player 0 so when we press play, we have control of the player.
Moving the Player
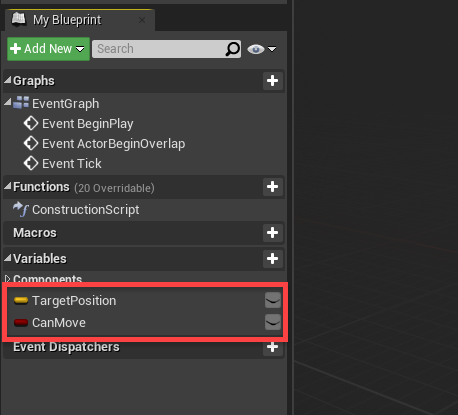
We’ll begin by adding in the ability for the player to move. First, we’ll create the variables.
- TargetPositon (Vector)
- CanMove (Boolean)
Compile, then set the CanMove default value to true.
Whenever we want to move the player, we need to see if we’re going to move into a wall. If we are, then don’t move. This will be calculated in a new function called HasWallAhead.
- Create a vector input called PositionCheck
- Create a boolean output called CanMoveAhead (different from image)
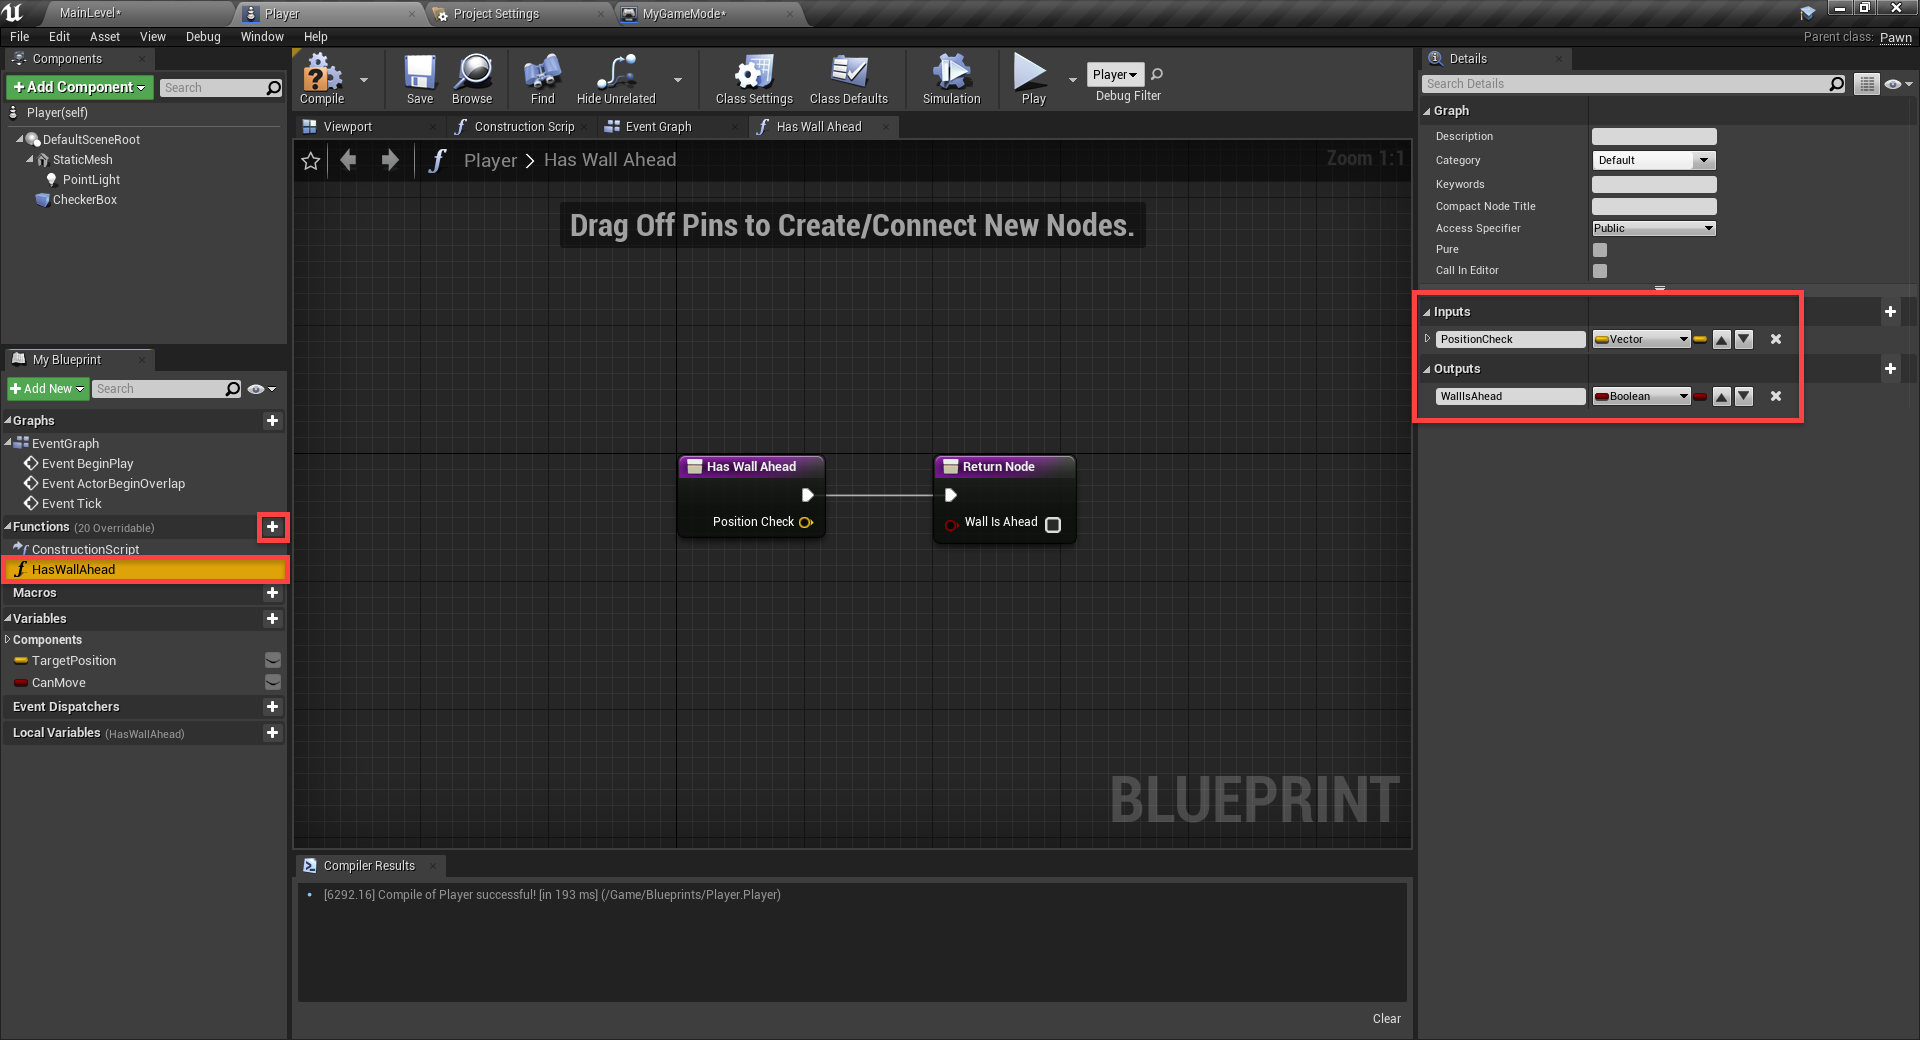
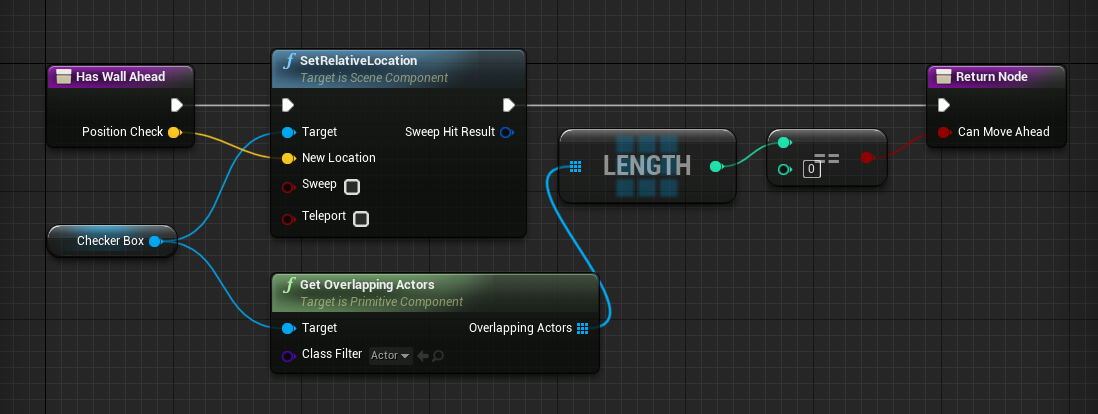
This function will change the position of the checker box, then see if it’s colliding with anything, outputting whether or not we can move ahead.
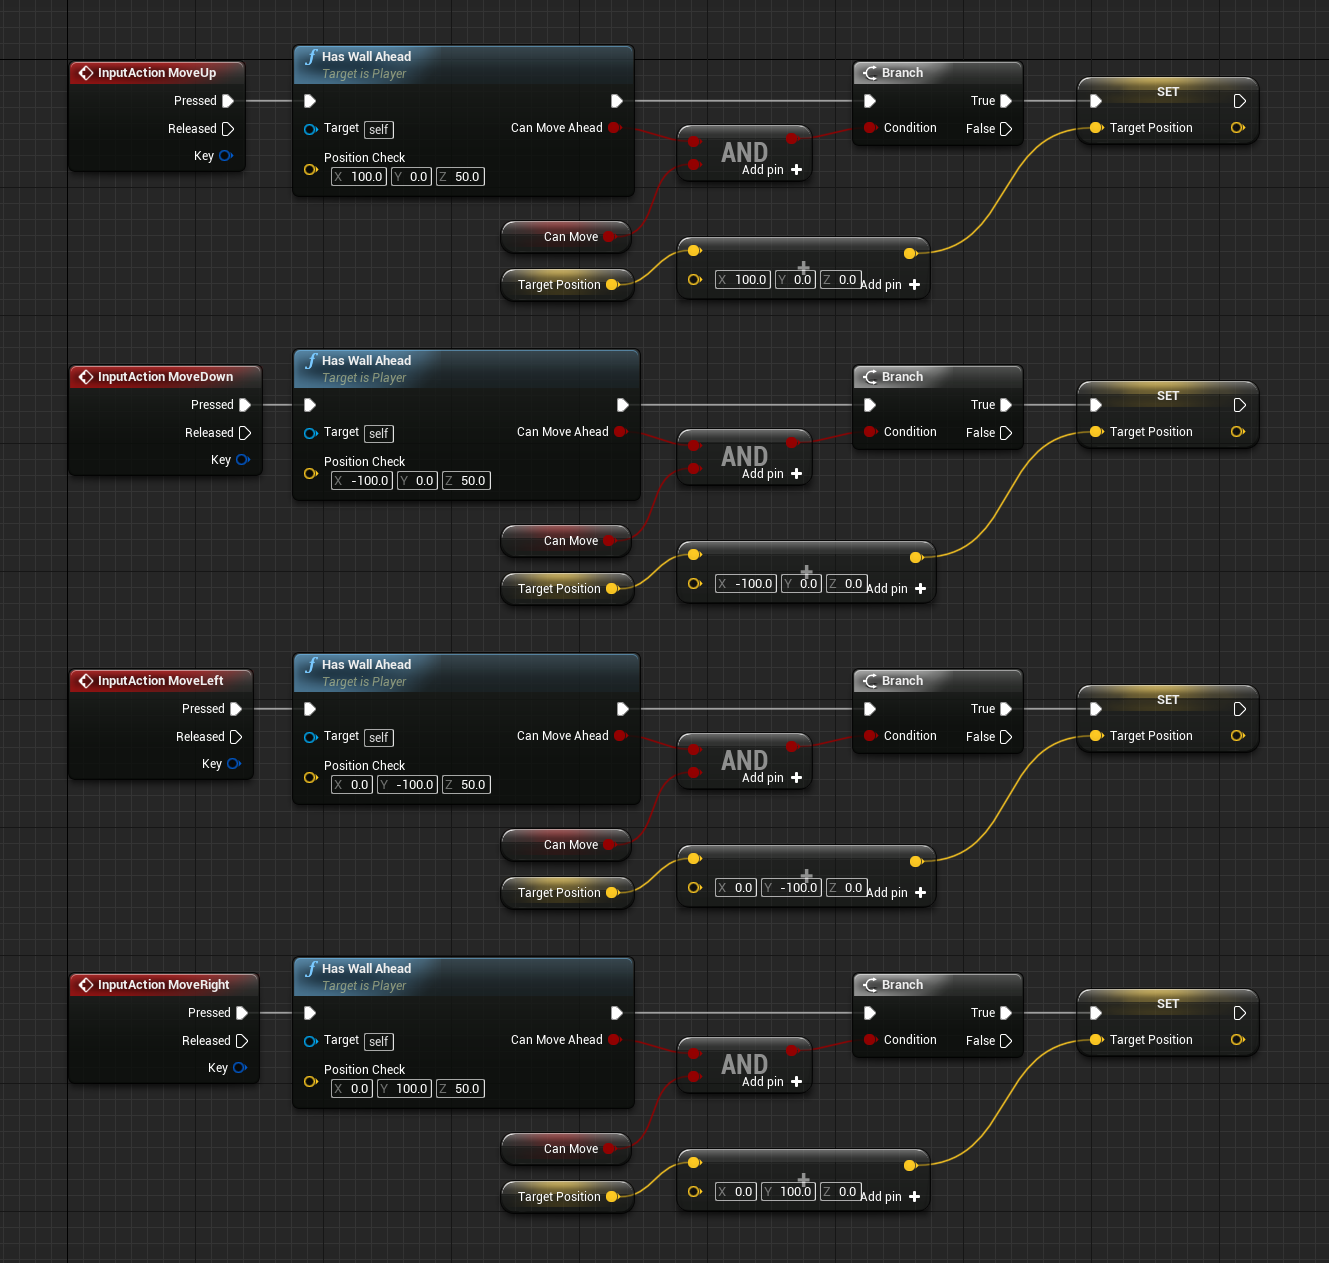
Back in the main Event Graph, we can begin to setup the movement inputs. Here’s how the movement will work:
- Detect movement key input (WASD)
- Check if we can move to that location
- Set the target position to that new position
- Overtime move towards the target position

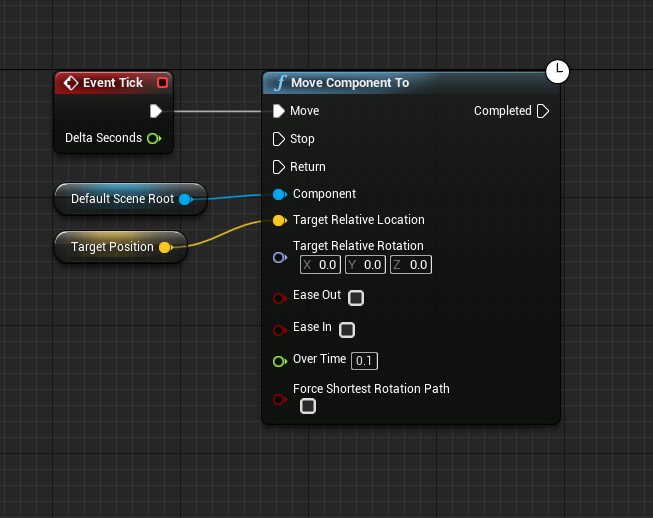
Using the tick node, we can move towards the target position every frame by plugging that into a Move Component To node.
If you press play, you’ll be able to move forward with the W key. Now let’s go ahead and setup the other three movement inputs.
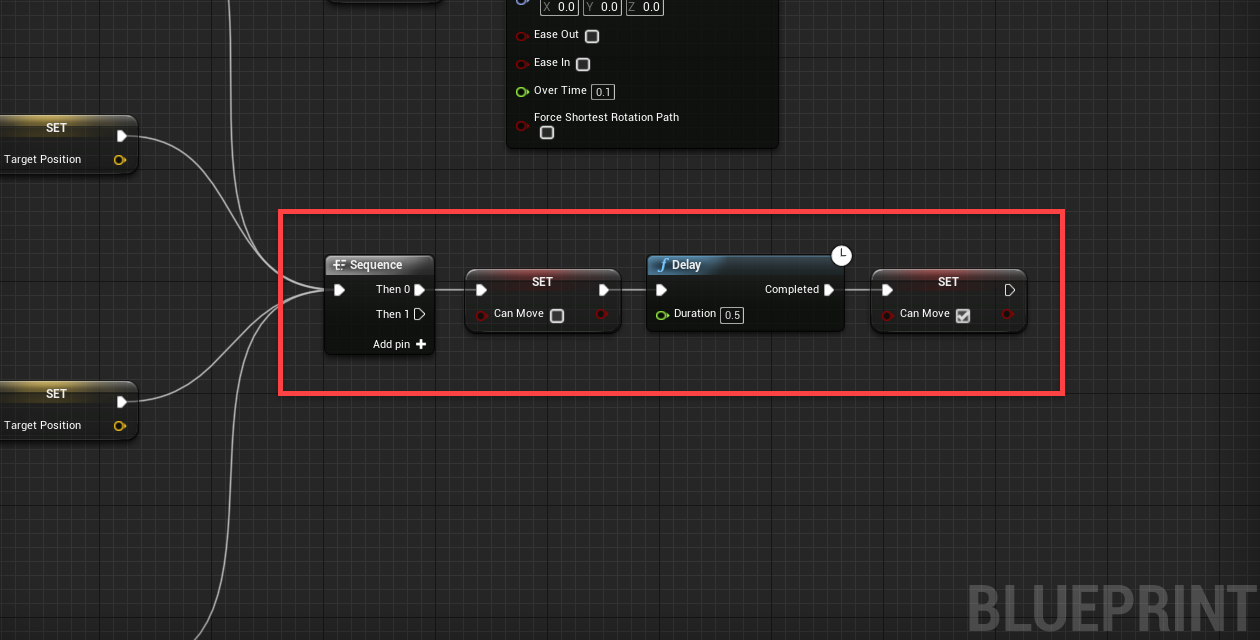
You may notice that we can move again even though we’re not at the target position yet. To fix this, create a Sequence node (we’ll be adding more to this is the future). Have the input connect to each of the set target position node outputs. What we want to do here is disable can move, wait half a second, then re-enable can move.
Creating the Progressor
This is going to be a game where everything moves only when the player moves. The followers, obstacles, etc. So to make it a nice system, we’ll create a base blueprint which all others will inherit from.
In the Blueprints folder, create a new blueprint of type Actor called Progressor. The only thing we want to do inside of this blueprint, is create a new function called OnProgress.
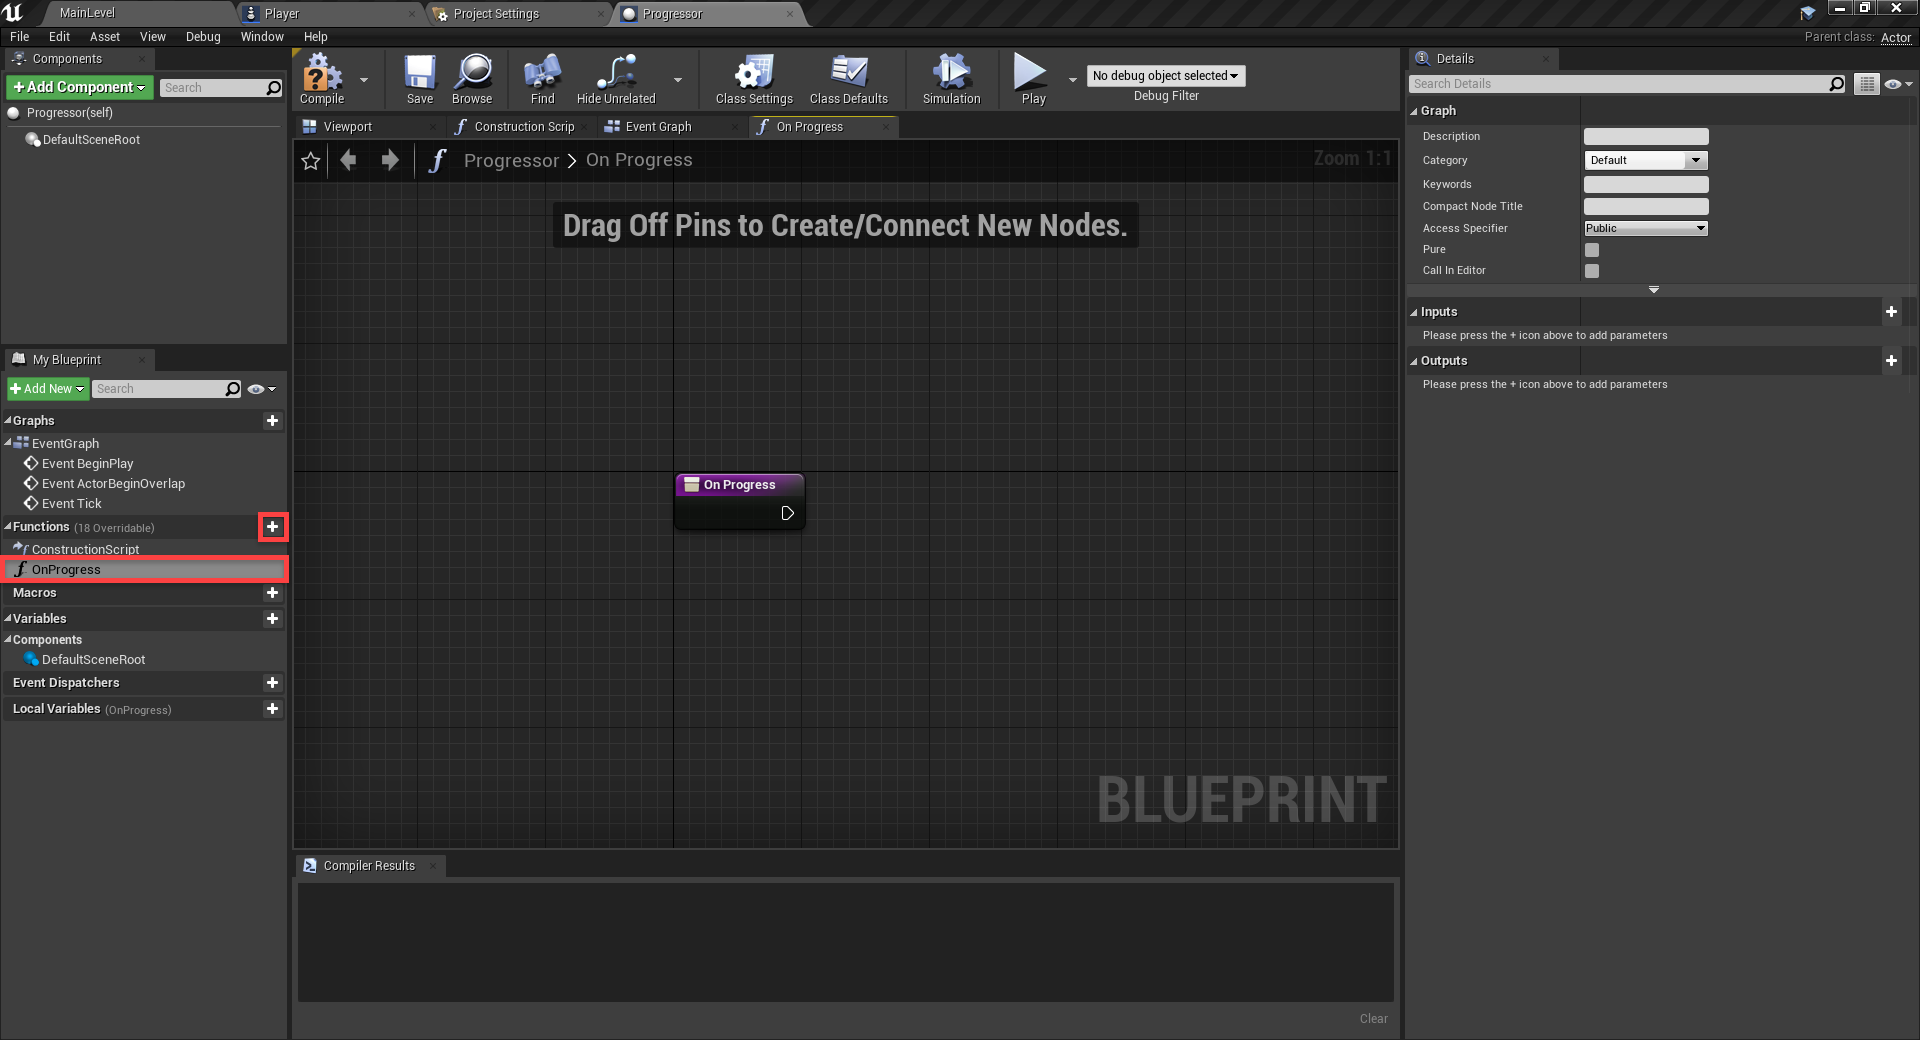
Now that we have the base of all progressors (followers, blades, etc), we can call the OnProgress function when the player moves.
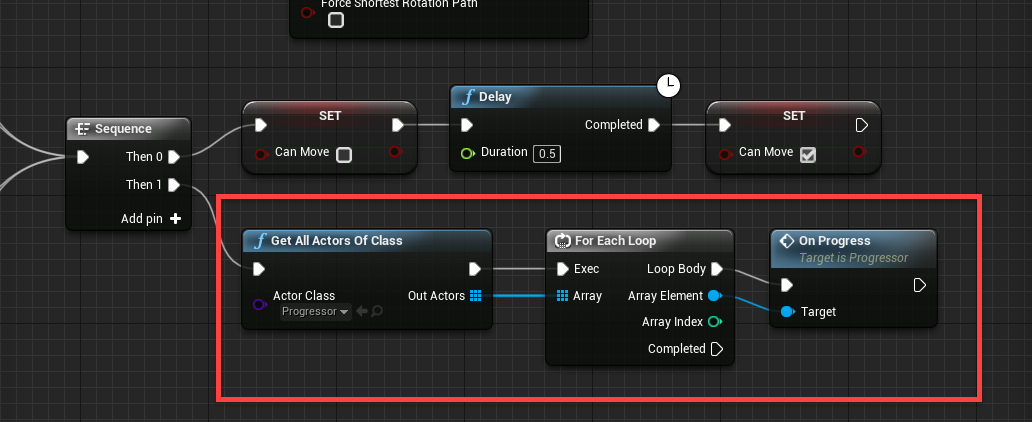
In the Player blueprint, create the GetAllActorsOfClass node and connect that to the sequence node.
- Set the Actor Class to Progressor
- Connect that to a for each loop
- This will loop through every progressor in the level
- We then want to call each progressor’s OnProgress function
Creating the Followers
Now that we’ve got the progressor system in place, let’s create our follower blueprint. This is going to be what the player can collect and then have follow them. Create a new blueprint with the parent class of Progressor. Call it Follower.
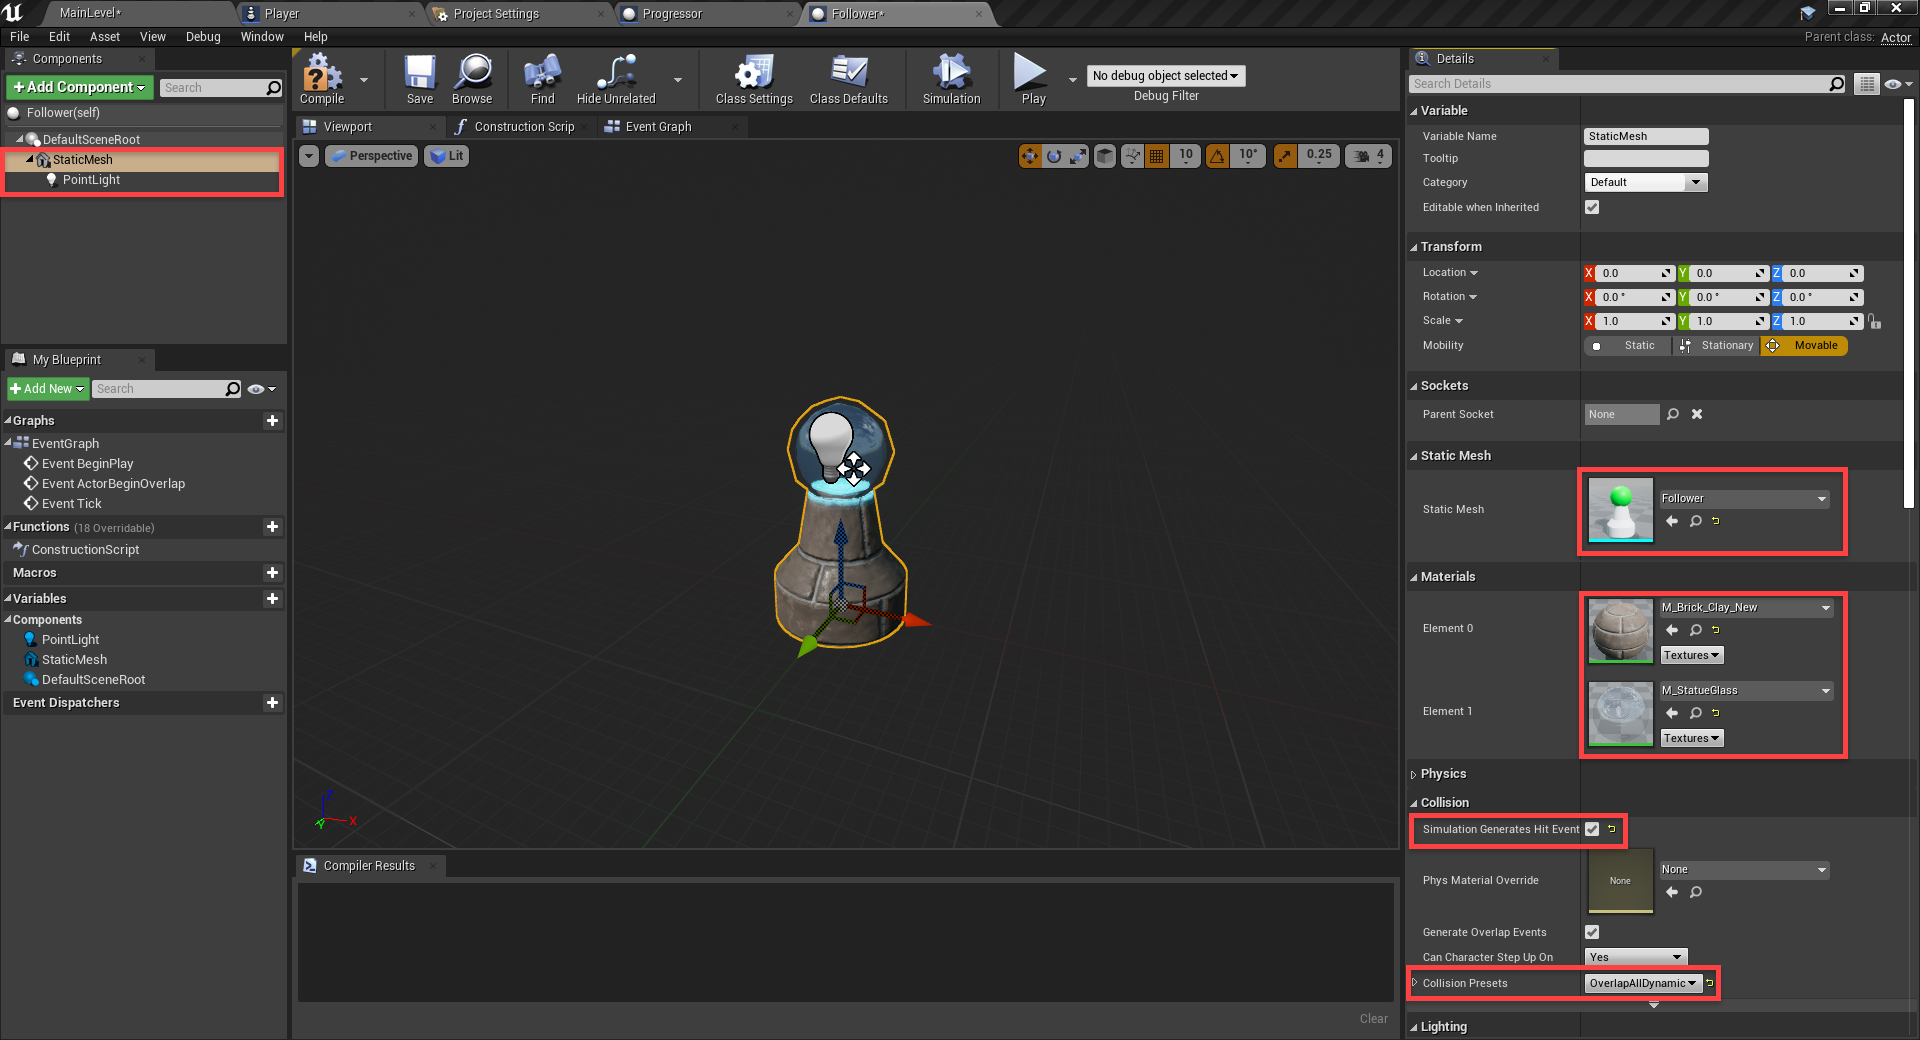
- Create a static mesh component
- Set the Static Mesh to Follower
- Set the Materials to M_Brick_Clay_New and M_StatueGlass
- Enable Simulation Generates Hit Events
- Set the Collision Presets to OverlapAllDynamic
- Create a point light with blue light
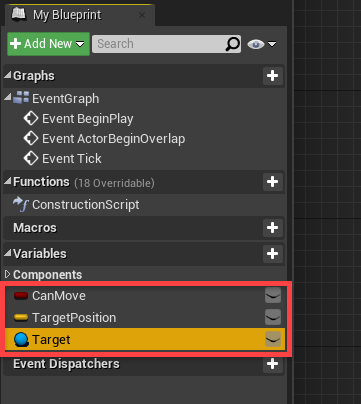
We then want to create three variables.
- CanMove (Boolean)
- TargetPosition (Vector)
- Target (Actor)
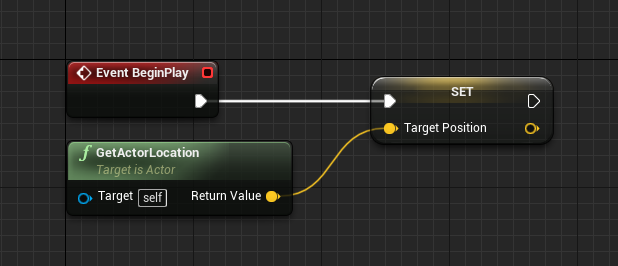
In the event graph, we first want to set the initial target position when the game starts.
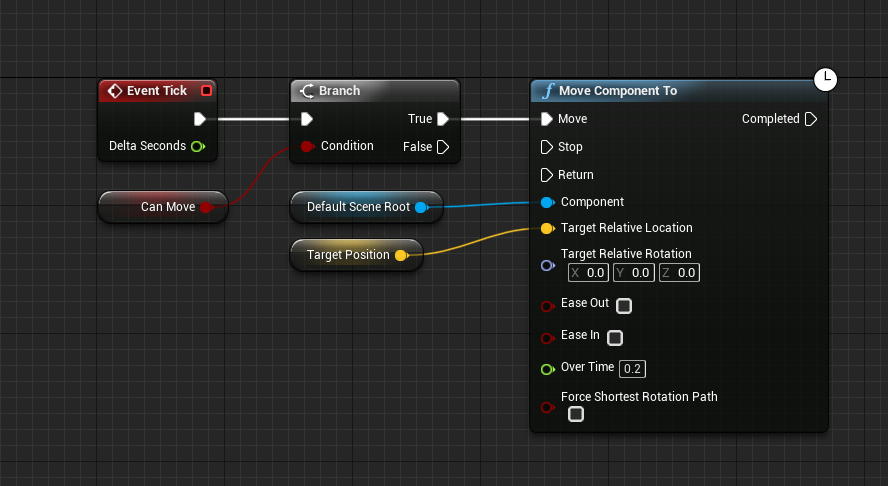
Using the Event Tick node, we want to make the follower move towards the target position every frame (only if they can move though).
When the player moves, we’re calling all progressor’s OnProgress function. Well in the follower, we can detect when that’s being called and do something. Create the Event OnProgress node. We then need to get that parent event call, so right click on the red node and select Add call to parent function.

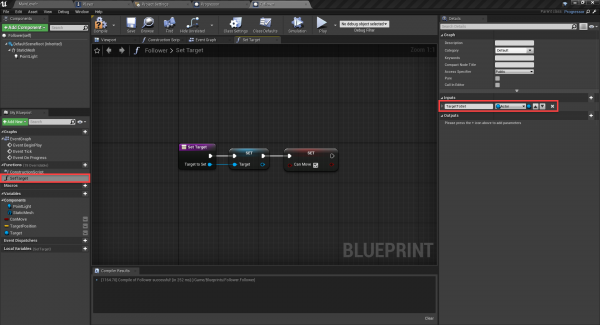
Finally for the follower, we need to create the SetTarget function. This will be called when the player collects them, allowing them to follow. Make sure to add an actor input for the target to be set to.
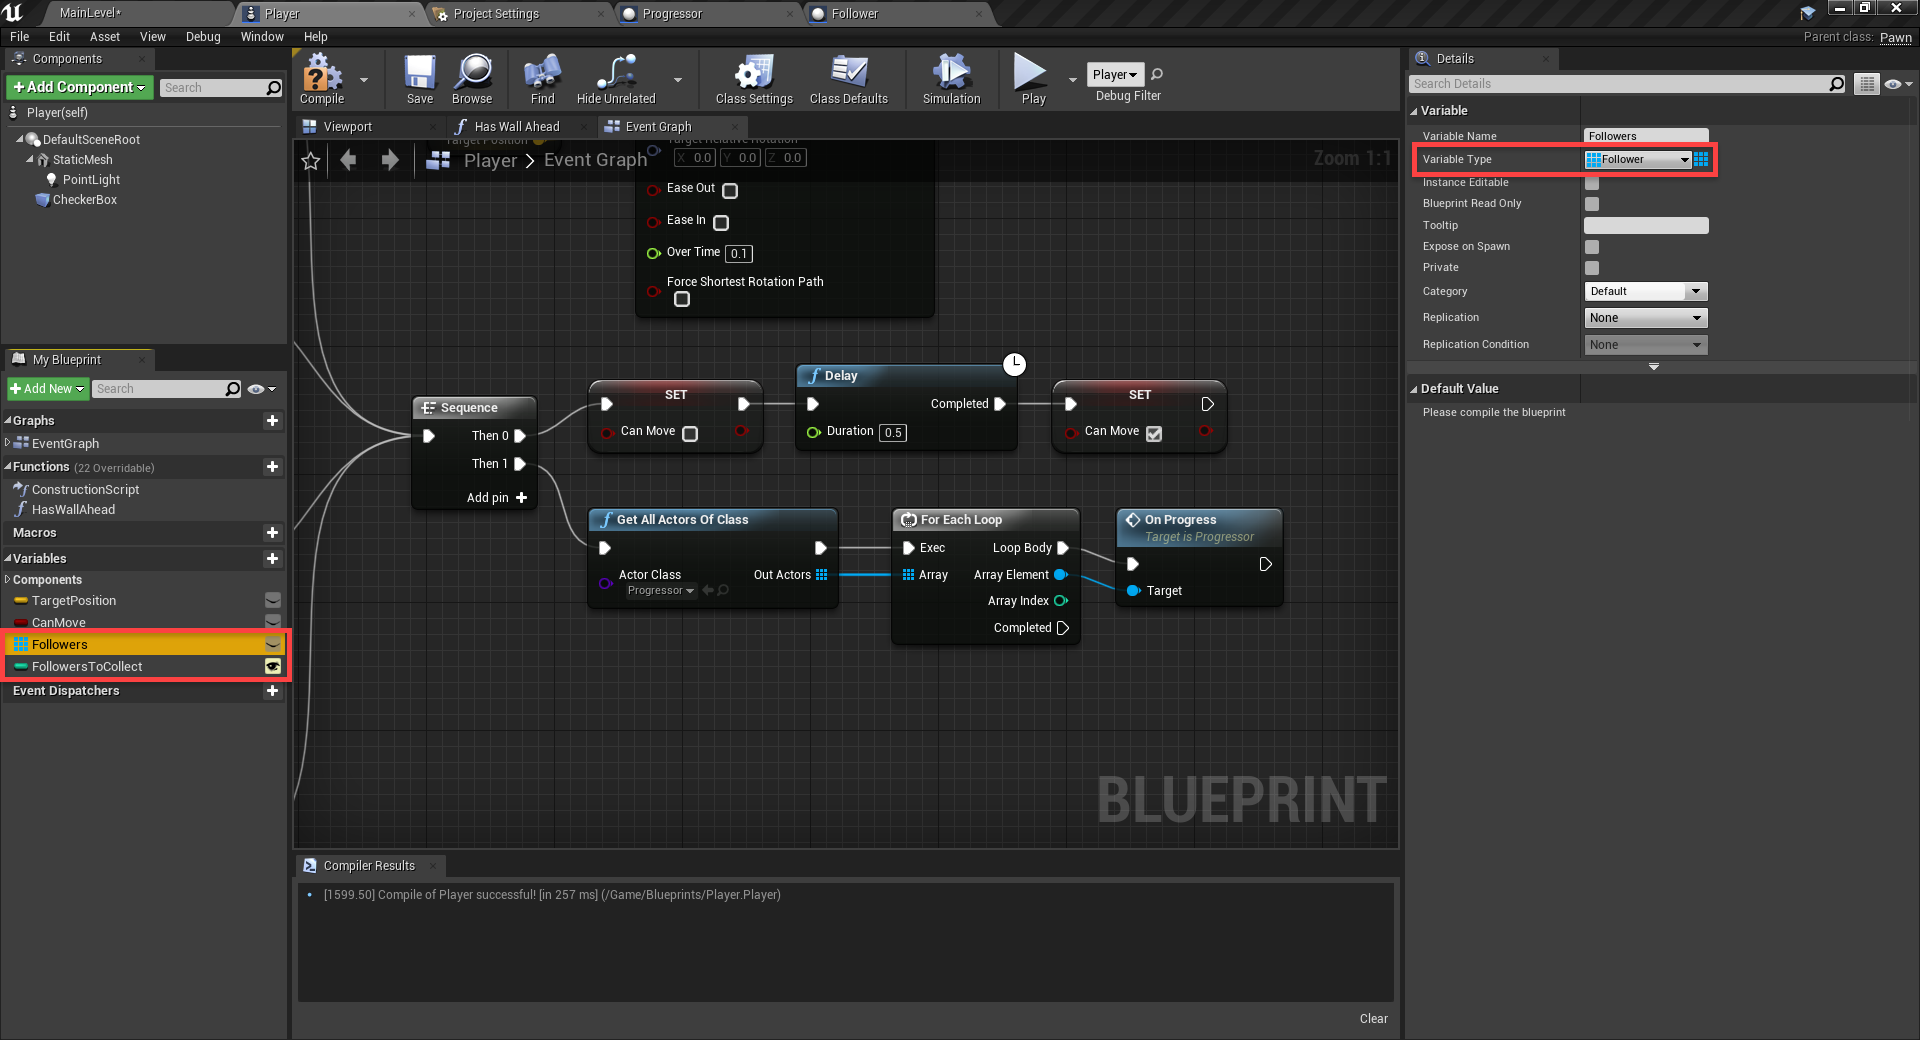
In the Player blueprint, we can setup the ability to collect these followers. First, we need some variables.
- Create a variable of type Follower called Followers
- We want this to be an array, so in the Details panel, click on the icon left of the variable type and choose Array
- Create a variable of type Integer called FollowersToCollect
- Set this to Instance Editable
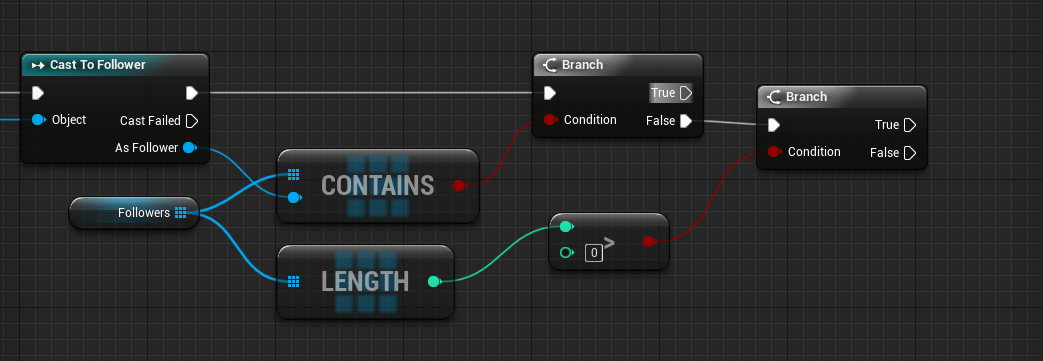
Let’s begin by creating an Event ActorBeginOverlap node to detect when we’ve overlapped an object. Then we can cast that to a follower.

We then need to check if we’ve already collected the follower. If not, then we need to check if this is the first follower we’re collecting.
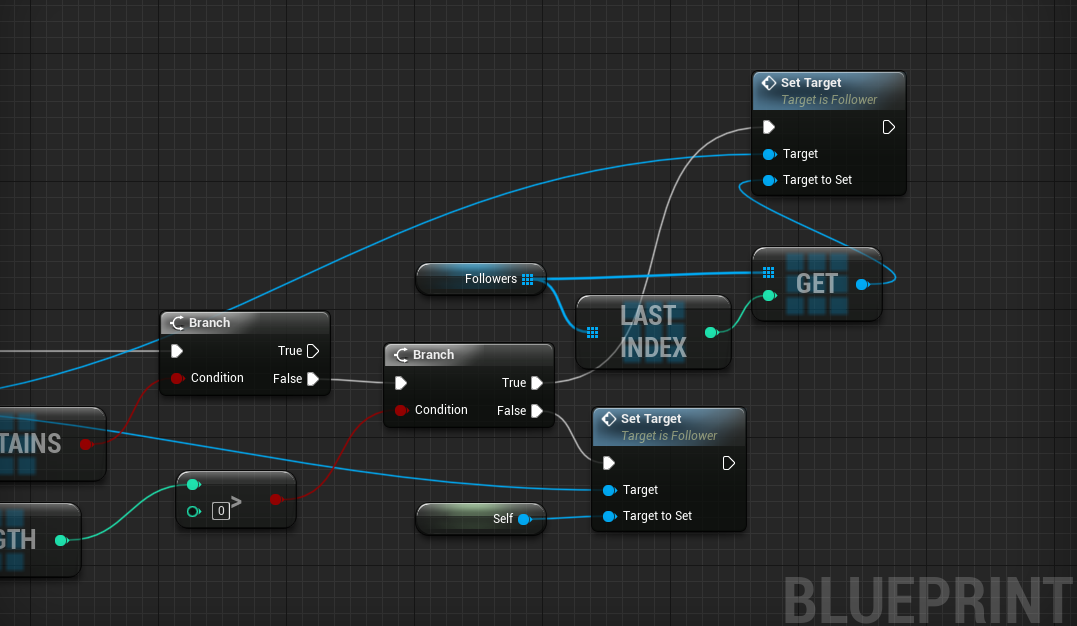
If this is the first follower, then set its target to us. Otherwise, set its target to the last follower in the line.
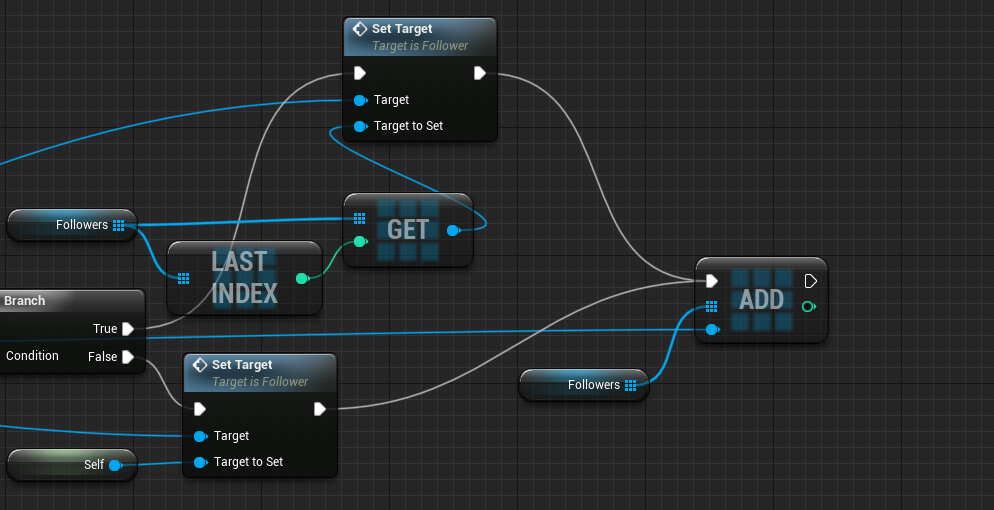
Finally, we want to add the follower, to the followers array.
Back in the level editor, drag in a follower and press play!
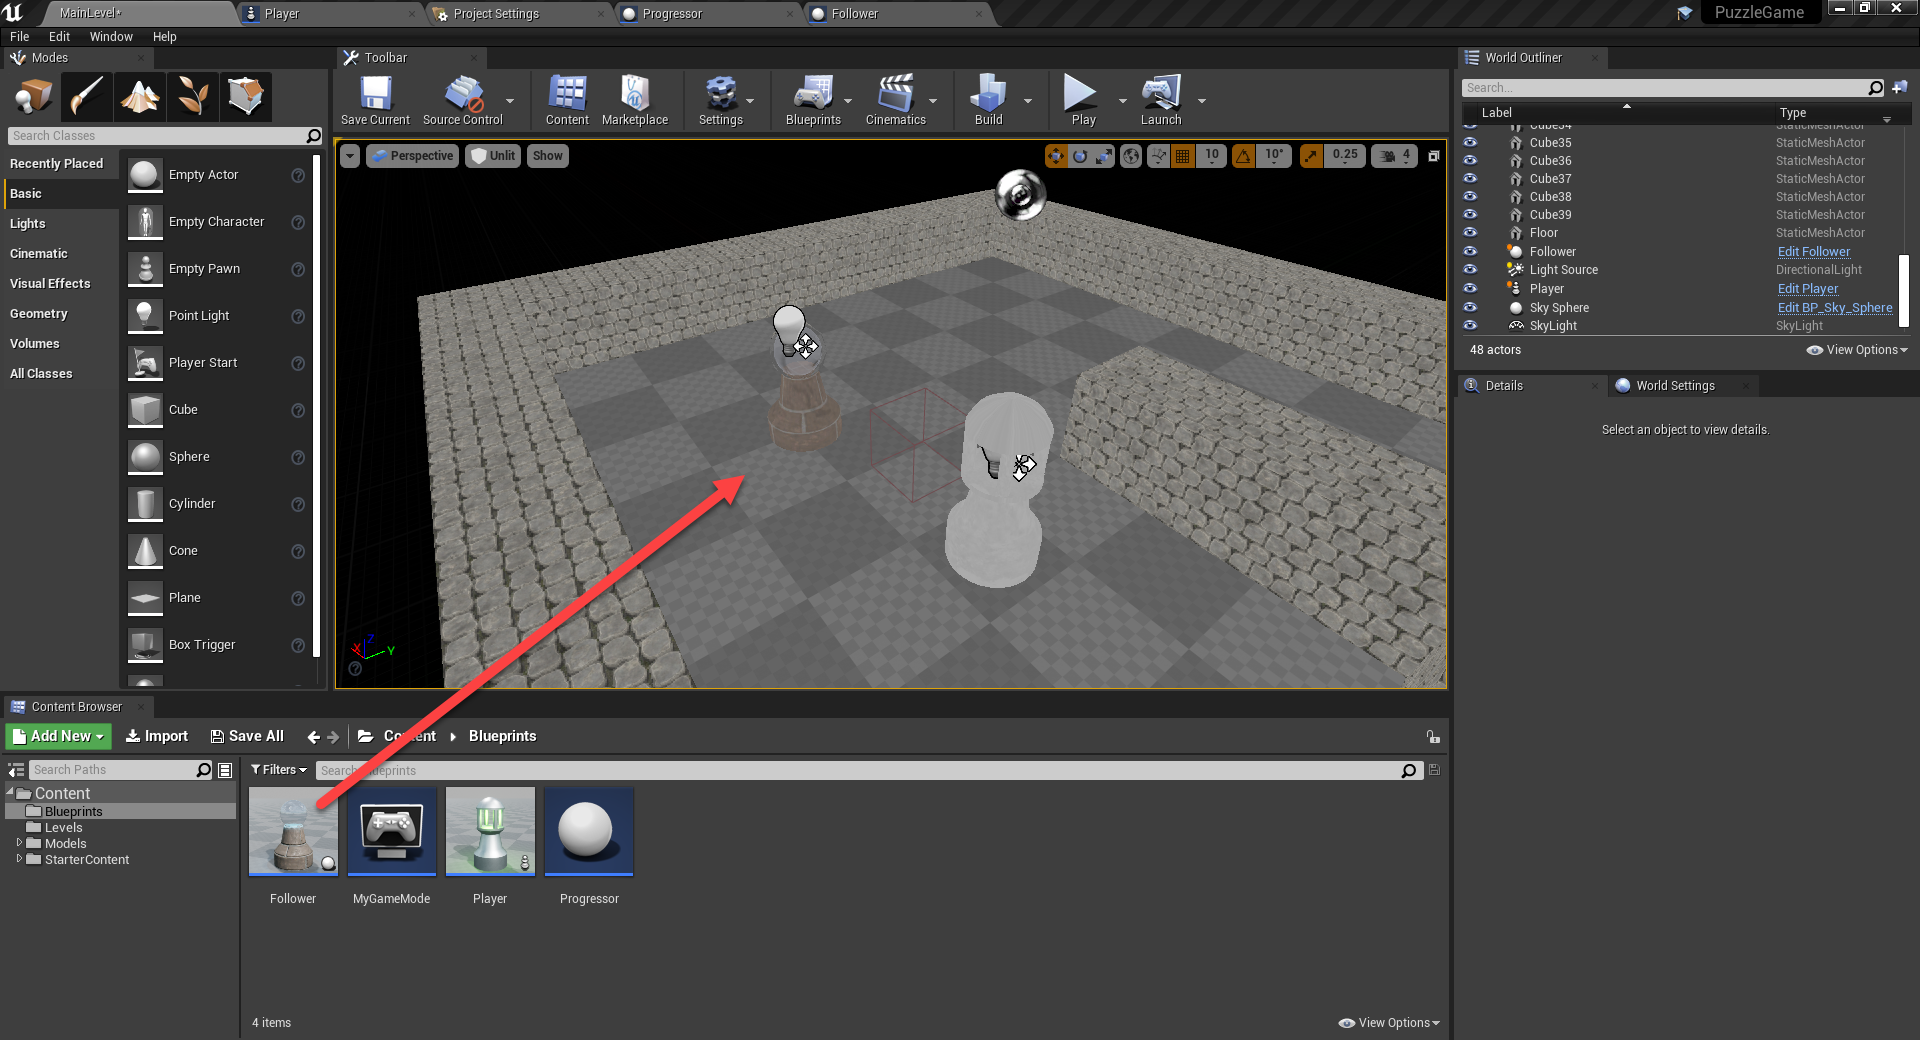
You can now also add in multiple followers and begin a chain!
Creating the Blade
As an obstacle, we can create a blade which will reset the player if they touch it. Create a new blueprint with the parent class of Progressor. Call it Blade.
- Create a static mesh component called Base
- Set the Location to 250, 0, 0
- Set the Scale to 5.0, 0.1, 0.05
- Set the mesh to Cube
- Create a static mesh component called Blade
- Set the mesh to Blade
- As a child of the blade, create a point light component
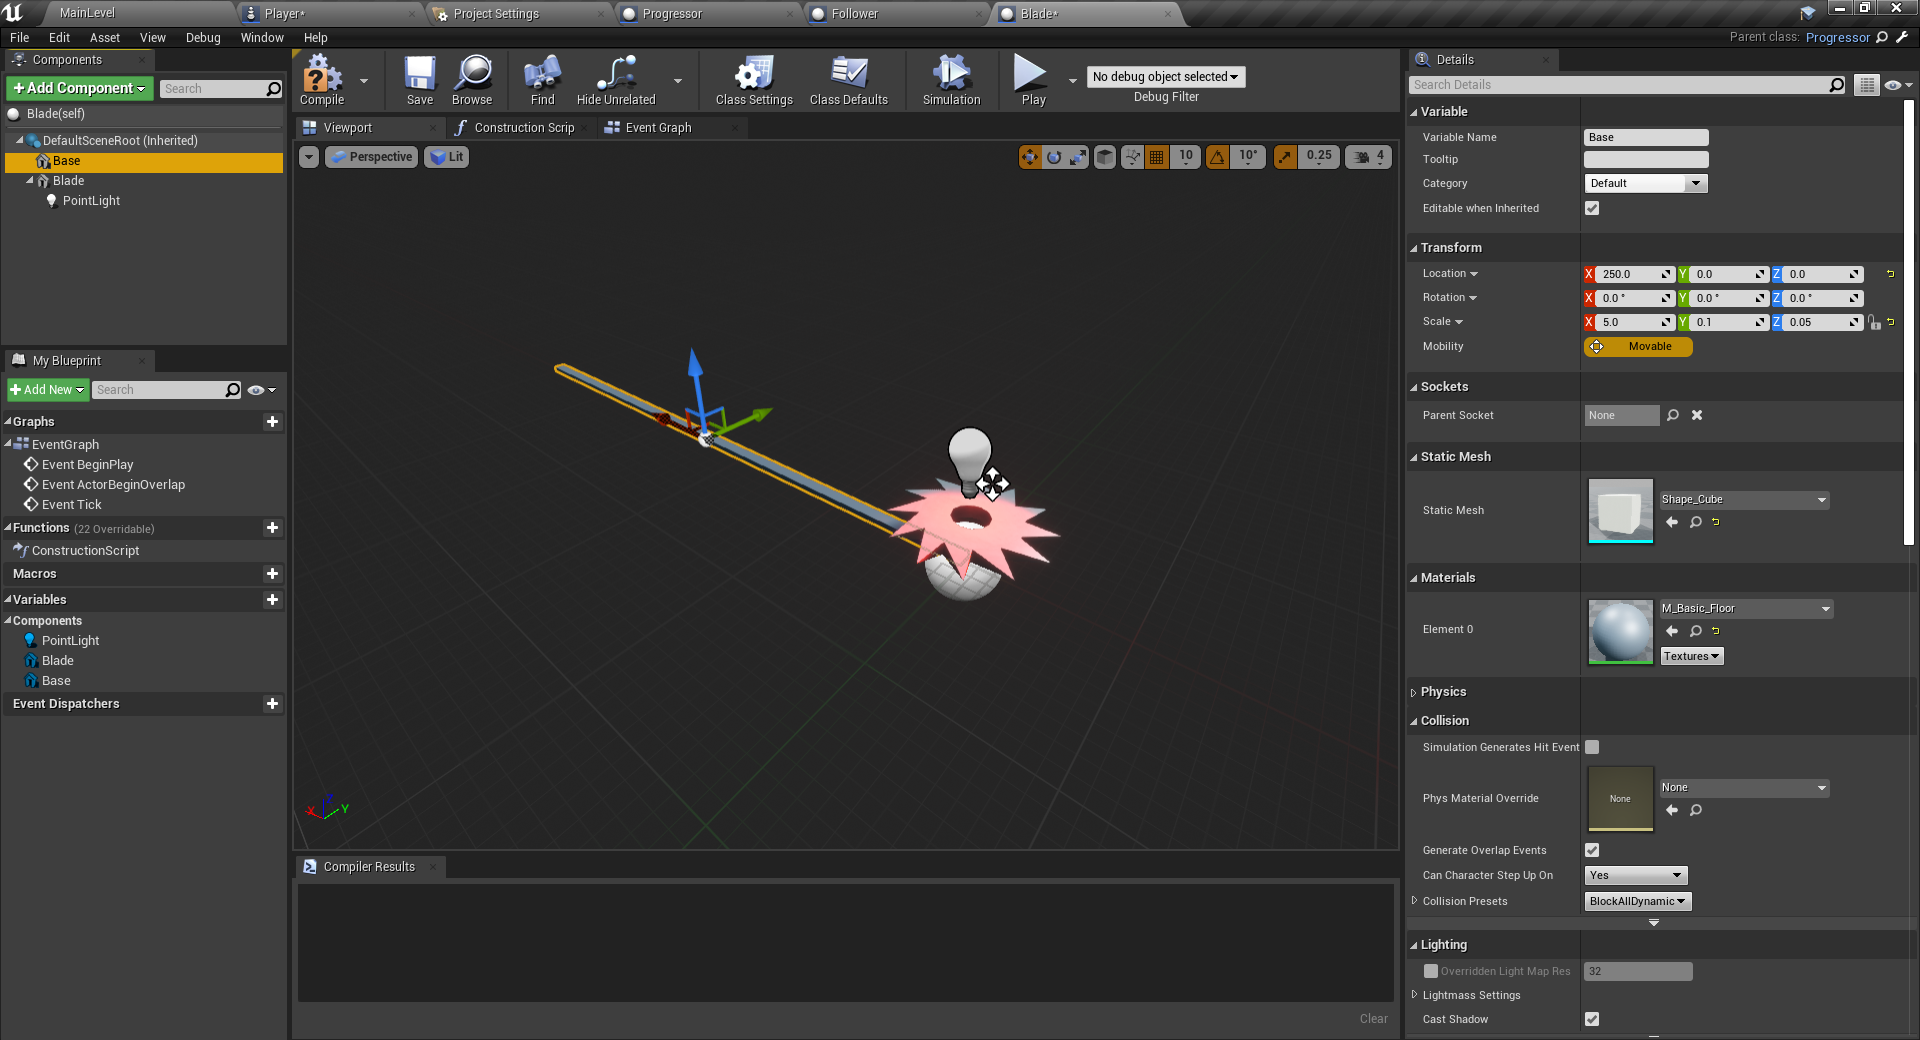
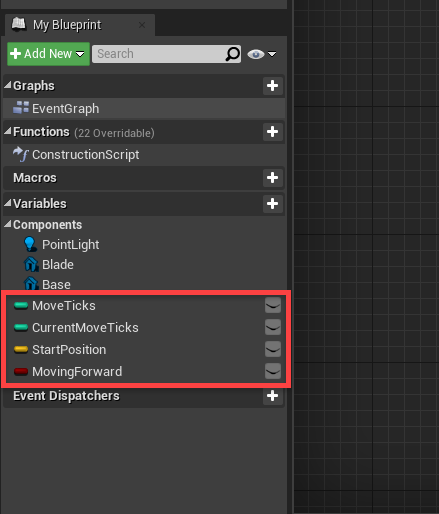
In the event graph, let’s start with some variables.
- MoveTicks (Integer)
- CurrentMoveTicks (Integer)
- StartPosition (Vector)
- MovingForward (Boolean)
Compile, and set the MoveTicks default value to 5.
First, we’ll have to set the start position.

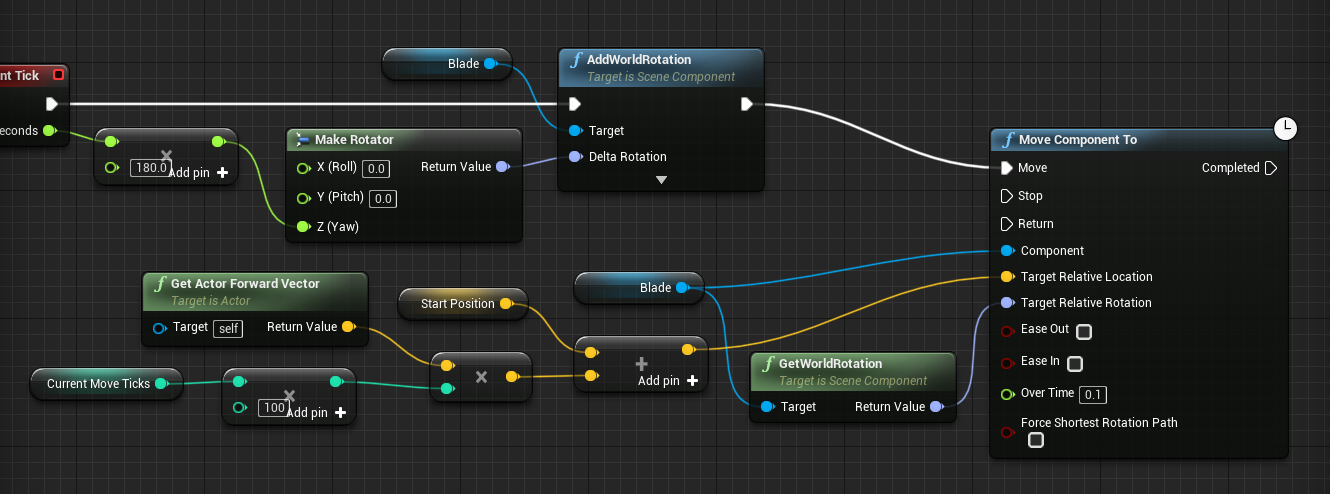
Overtime we want the blade to rotate.

Continuing from that node, we’ll make it so the blade moves based on the current move ticks variable.
The next set of nodes will increase or decrease the current move ticks whenever the On Progress event is triggered. This will make the blade move back and forth.

Coming from the second sequence execution output, let’s check if the blade has collided with anything. If so, restart the level.
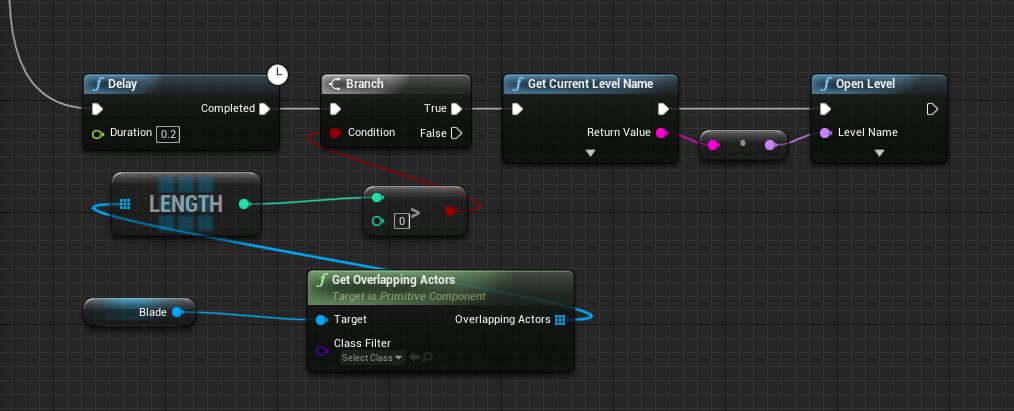
Now we should be able to play the game and reset the scene when colliding with the blade.
End Goal
Finally, we have the end goal. This will take us to other levels.
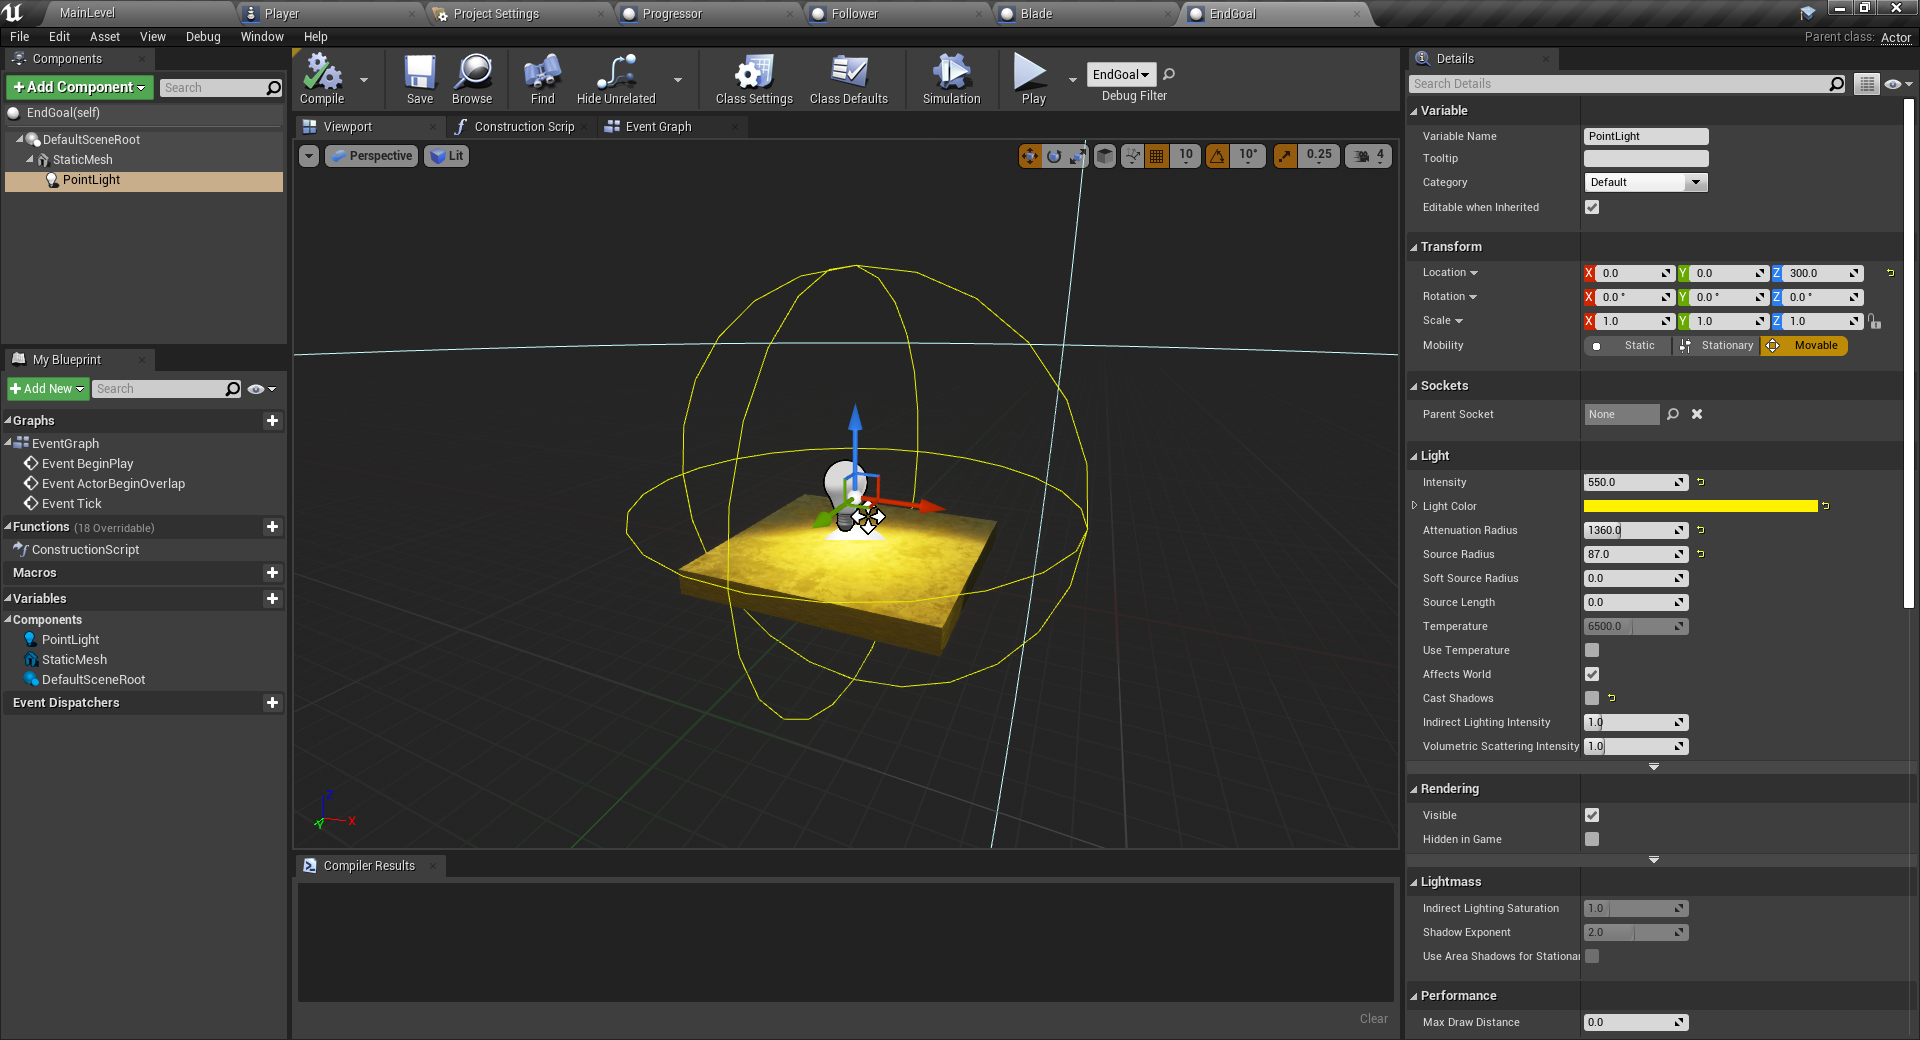
Create a new blueprint of type Actor called EndGoal. Create a cube static mesh with a light like so:
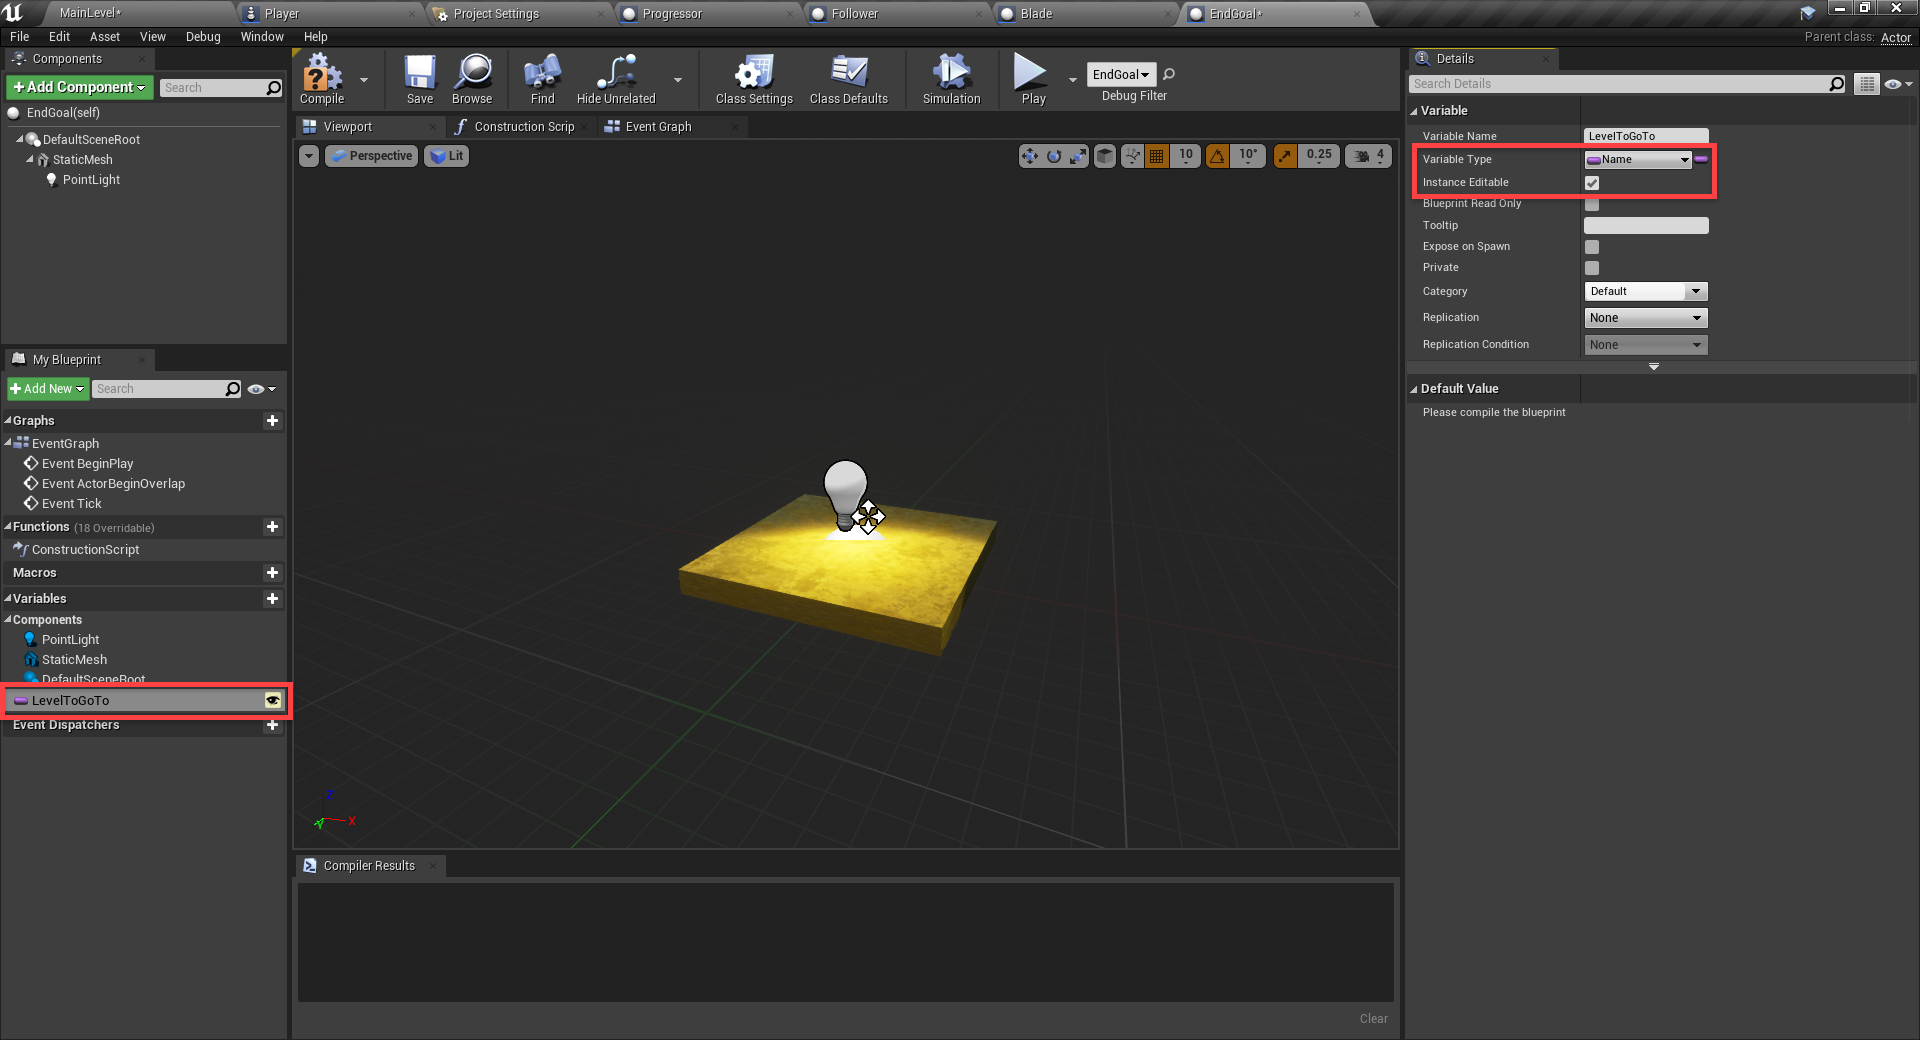
Then, create a new variable called LevelToGoTo. Make it of type Name and enable Instance Editable.
All we’re going to do here, is check for collisions. If it’s the player, we’ll check to see if they have all the followers in the level and if so, open the next requested level.

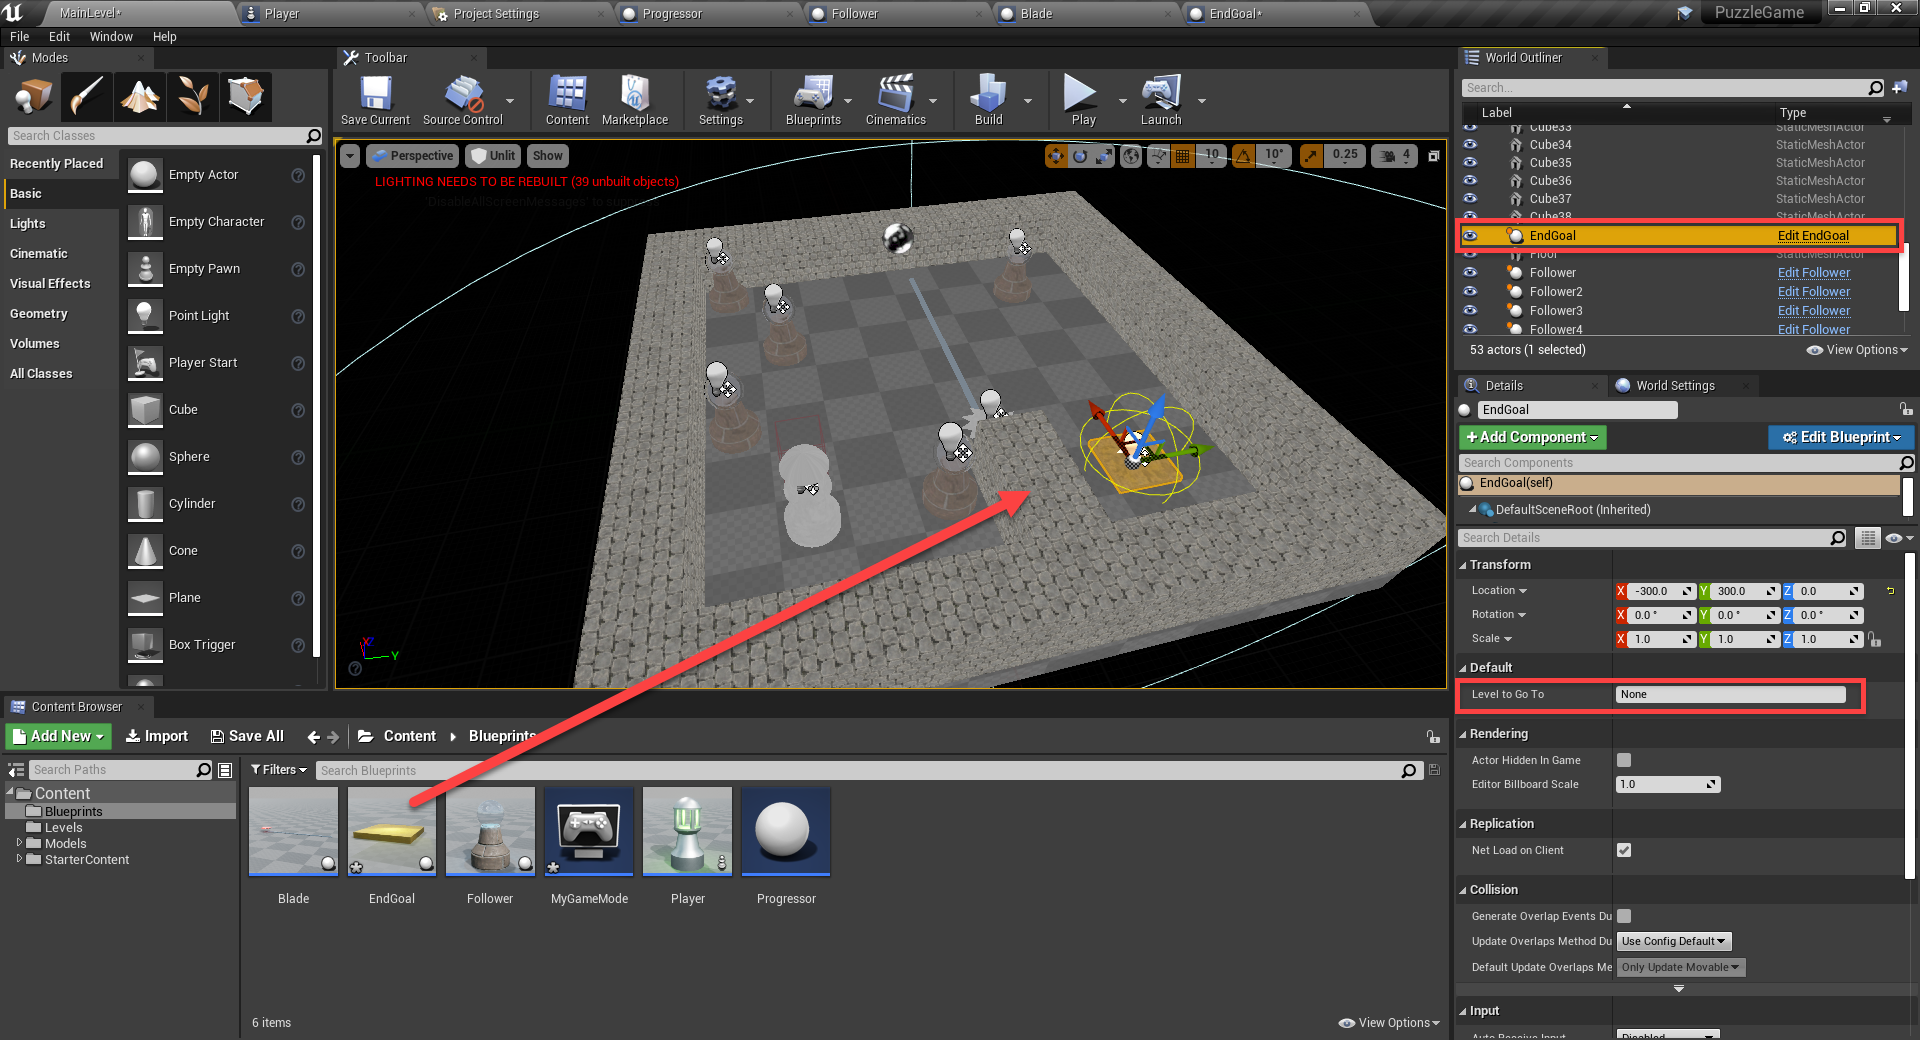
Back in the level editor, place down the end goal and if you have a level to go to, enter the name in the detail panel.
Conclusion
Congratulations on completing the tutorial!
You now have the basis for a semi-turn based puzzle game. As stated at the beginning, our game features a player who needs to collect a number of followers. Once collected, the player needs to reach the end goal – all while avoiding a blade haunting their every step. Our game features all of this and more, most of which we accomplished with Unreal Engine’s built-in features and blueprinting system.
From here, you can expand upon the game, adding in more levels, mechanics, etc. Or you could create an entirely new project with your newfound knowledge.
Whatever you decide, good luck with your future games and we hope you enjoyed developing a puzzle game with Unreal Engine!
