You can access the full course here: Game Audio Effects for Beginners
Table of contents
Doppler Effect Audio
Now we’re going to create a plane to demonstrate the Doppler Effect.
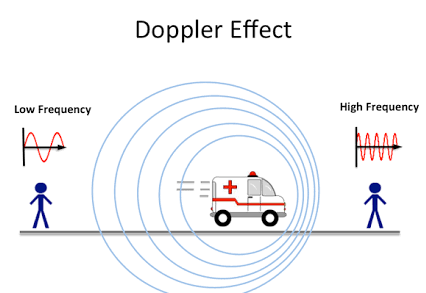
The Doppler Effect occurs when there is an audio source that is moving towards (or moving away from) us in real life. This is because everything that produces sound creates sound waves, which takes time in order for it to reach us.
If an object is moving towards you (e.g. a plane), its sound waves are going to be more compressed, which results in a higher pitch sound. Then, when that object passes you, the pitch of the sound goes down as the sound waves are more stretched out.
Creating A Plane
Let’s go ahead and create a basic plane model using cubes. Make sure to have an empty object as the parent to all the cubes.
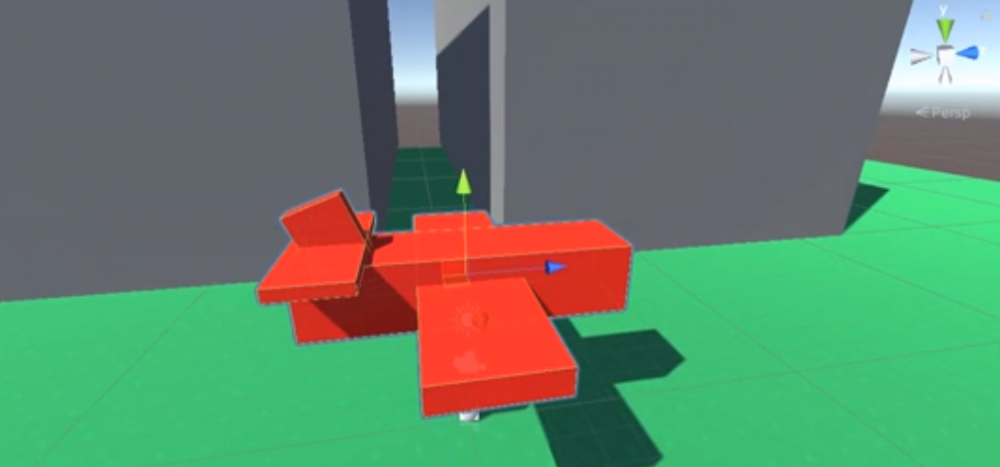
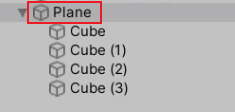
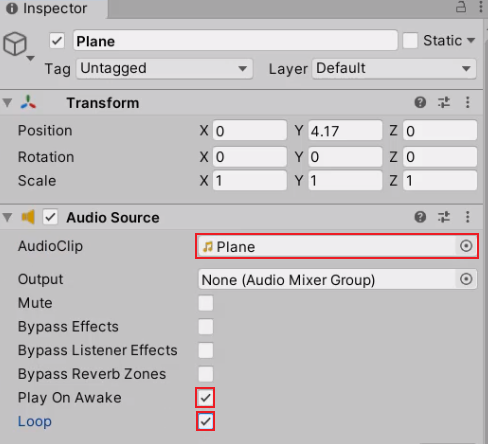
On this parent object, we’re going to attach an Audio Source component and assign a sound clip to it. The Loop and Play On Awake should be set to true, and the Spatial Blend should be set to 3D so we can hear where it is in terms of its position.
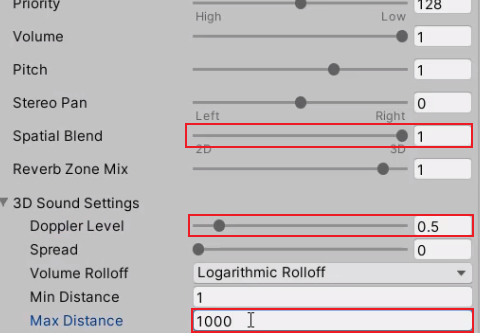
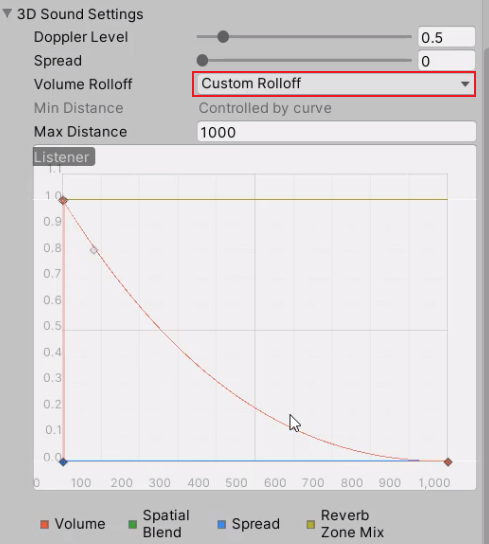
As the plane will be flying quite far away, we’re going to set the Max Distance to be 1000 and the Doppler Level to be 0.5. As soon as you change the Max Distance value, you’ll notice that the Dropoff graph changes as well.
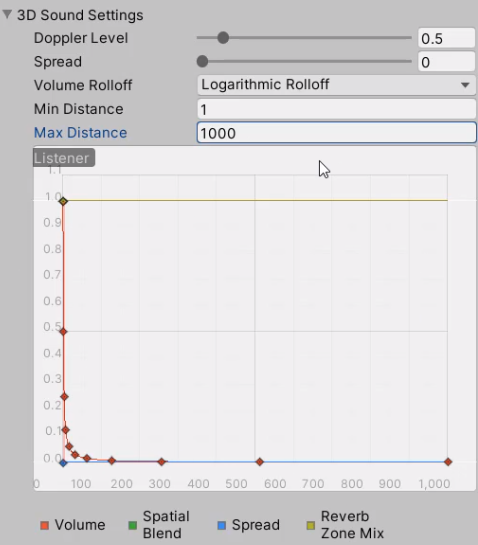
We want to still be able to hear it from a distance, so we’re going to change the Logarithmic Rolloff to be a Custom Rolloff. We can then drag on the node of the graph to make it a smooth decay.
Moving A Plane
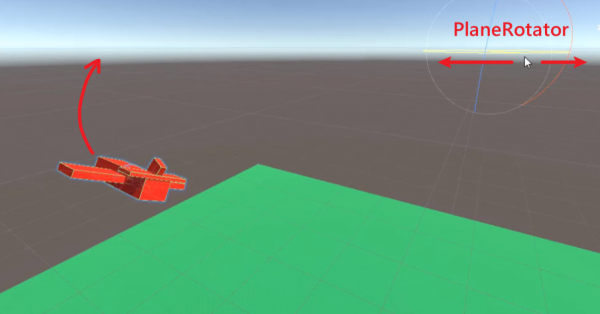
Let’s create an empty object called “PlaneRotator” and set it as the parent to the plane object. This is going to be an anchor point to the plane so that it can rotate along the Y-axis.
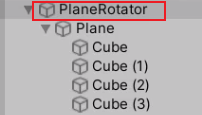
Now we need to make a C# script that rotates the PlaneRotator over time.
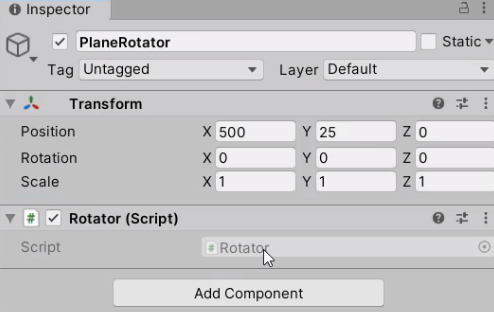
This is going to be as simple as using the transform.Rotate function in the Update function. For the Axis and Speed, we’re going to assign it manually in the Inspector so that it rotates along the Y-axis at 10 m/s.
public class Rotator : MonoBehaviour
{
    public Vector3 axis;
    public float speed;

    void Update ()
    {
        transform.Rotate(axis, speed * Time.deltaTime);
    }
}
Now, if you press Play, you’ll be able to hear that the plane sound gets lower in pitch as it flies away from us as a result of the Doppler Effect.
Transcript
Welcome back, everyone. In this lesson, we are going to be setting up ourselves a plane to basically demonstrate the Doppler Effect inside of Unity.
So, the Doppler Effect is something we experience in the real world, and it has to do with audio sources that are moving towards us, or moving away from us. Okay. So, everything that produces sound creates sound waves, which takes time in order for it to reach us. Now, if an object is moving towards you very fast, such as a plane, it’s sound waves are gonna be much more compressed if they are moving towards you which results in a high pitch sound that you hear. Then when that object passes you, the pitch of this sound goes down as the audio, as the sound waves are much more stretched out okay?
And this is something that is built into Unity by default. And we are going to experience it with this little plane example that we’ll be setting up.
So, first of all, let’s go down here, and we are gonna create ourselves a little plane model. So, I’m gonna right-click create an empty game object. Set the position to 000 here, move it up a bit, rename this to be plane. And then as a child of this, I’m gonna create a 3D object of a cube. Let’s go to our materials folder. Create a brand new material here called plane. It’s going to be red like so. We can assign that material here. And pretty much, I just want you to go through and model a basic plane model, okay? I’ll be right back to see how you done.
Okay, and there we go. That is a basic plane model set up and ready to go.
So now we need to do is on this main plane empty object, I’m gonna create an audio source component. So we go audio source right here, open that up. We’re gonna set the audio clip here to be the plane sound effect. So I’ll select it right here. There we go.
We are then going to make sure play on awake is enabled and loop is enabled as well. Since we do on the sound to be looping, We’re gonna set the spatial blend to be 3D, so we can hear where it is in terms of its position in the world. And down here with Doppler level, I reckon a Doppler setting of about 0.5 is generally good for this. So go 0.5 for that. For the max distance, we are gonna change this to be a thousand, since it is gonna be flying quite a while away.
And as you can see the drop off looks a bit weird. We want to still be able to hear it from a distance. So I’m gonna set the logarithmic rolloff to be custom one here. We can then select this node up here, bring it down so it is sort of more like a downwards curve. Like so okay? Save that.
We then want to set up our plane so that it can rotate around. And the way we’re gonna be doing this is by just rotating a empty game object, which is going to be about, let’s just say about 500 meters out into space there. So I’m gonna create a new empty game object called plain rotator. I’m gonna set the position on the X to be 500, the Y to be around 25, and the Z to be zero. Now we can drag the plane in as a child and set it’s positioned to be -500 on the X, and zero on the Y. Now, if we look here, the plane’s up in the air. Let’s also give it a bit of a tilt.
And if we select the plane rotator, you’ll see that if we drag along this Y axis, you’ll see that the plane is – oops. You’ll see that the plane is moving along like so, which is what we want. Okay. Now we need a script that is going to rotate this empty object over time.
So let’s go to our scripts folder, create a new C-sharp script called rotator, and attach this to the plane rotator game object right here. And this rotator script if we open it up, all we’re gonna be doing inside of here is creating two variables. A public vector 3 for the axis, and a public float for the speed.
So the axis is the rotational axis we’re gonna be rotating around, and the speed is how fast we’re going to be rotating at. So inside of the update function, what we want to do here is just go transform.rotate. We’ll send over the axis here and then we’ll send over the speed, multiplied by time.deltatime to bring it to a per second timeframe rather than a per frame timeframe. Save that.
Return to Unity. And for the plane rotator here, we are going to give it an axis of Victor3.up. So zero on the X, one on the Y and zero on the Z. So it’s gonna be rotating along it’s Y axis here. And for speed, we’re gonna give it 10. Okay. Save that and press play.
So you see here the plane, automatic straightaway the sound dipped in pitch I mean which is the Doppler effect of this plane flying away from us. So the sound waves emitting from this plane are been stretched out as it’s moving away from us. But you’ll see that as it starts to go around and slowly come towards us, the sound is gonna be much more high pitch because the sound waves are more compressed.
Okay. And here it comes. And you’ll hear it change when it flies above us. Just like that. Okay. And that is the Doppler effect in action inside of unity here.
Now something cool. We can also go into the alleyway here. And since we now have a reverb inside of here, when the plane passes us, we’ll also be hearing the reverb included with that, as it doesn’t matter what the audio source is inside or outside of the reverb zone, it only matters if the audio listener is inside. And here we go.
So there you go. You can hear that the reverb also applies for any audio sources outside of the reverb zone as well. Which is pretty cool. So by default, I think I’m gonna move our plane rotator over a bit, so we don’t have it hurting at you straightaway when it plays. So I’ll move it about there.
And in the next lesson, we are going to be looking at creating a simple little fireplace here. We’ll be having a challenge with that, and we’ll be setting it up so that when you go close to it, the fire gets louder, and as you walk away, the fire gets quieter. Okay. Just look at how an audio source can work alongside an object to give it much more atmosphere and make it seem much more realistic. So I’ll see you all then in the next lesson.
Interested in continuing? Check out the full Game Audio Effects for Beginners course, which is part of our Unity Game Development Mini-Degree.

