Data is a powerful thing – even in games where determining engagement is important. This guide will introduce you to Unity Analytics – which offers a perfect tracking solution for Unity-based projects.
You can access the full course here: Data-Driven Development with Unity Analytics
Table of contents
Part 1
In this first section, you will be creating a demo game to use for interacting with the Unity Analytics system.
For this demo, you will be making a simple button interface that will allow you to trigger different events that Unity Analytics will record. These buttons will mimic various events that commonly occur in games, like in-app purchases (IAP), loading and completing game levels, killing players, or gaining player levels.
It is good protocol to avoid making too many metrics for recording data, as that can be overwhelming. You want to make sure that any data you record can be either put to use for improving your game or to see how people are interacting with your game. So, before even setting up Unity game analytics in your own projects, make sure to have a sit down and verify what sort of goals you have in mind for your project.
Making the Demo Project
You will want to make a new Unity project. Name it Unity Analytics, and have it be 2D.
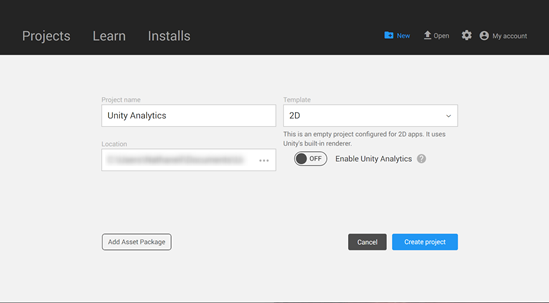
You do not necessarily have to be using the latest version of Unity, but it is recommended for the most compatibility with getting the right Unity game analytics.
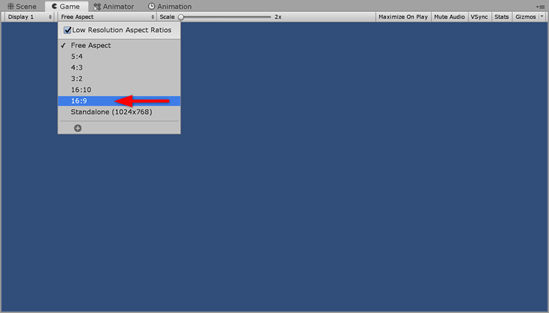
To ensure that your UI will be consistent, change the Aspect Ratio of your Game window to be 16:9.
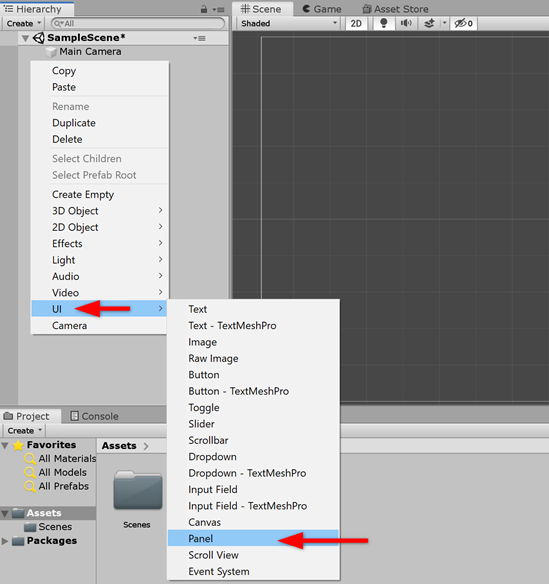
Go to the Scene window, and then right click in the Hierarchy tab. Go to the UI item in the dropdown menu, and then select Panel.
This Panel will be for the main buttons. You will need a second section later on for the IAP buttons. Using the Rect Tool, which you can get to by pressing Ctrl/Cmd + T, resize the Panel so it takes up about two-thirds of the main camera rectangle. In the Image (Script) component of the Inspector panel, change the Background field to None in the menu that pops up when you select the small circle to the right of the field. Then change the Color field to be whatever color you think looks good.

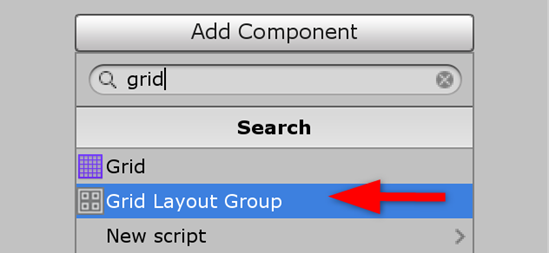
Next you will want to add a Grid Layout Group (Script) to your Panel object. Click on the Add Component button, and type in grid and then select the Grid Layout Group.
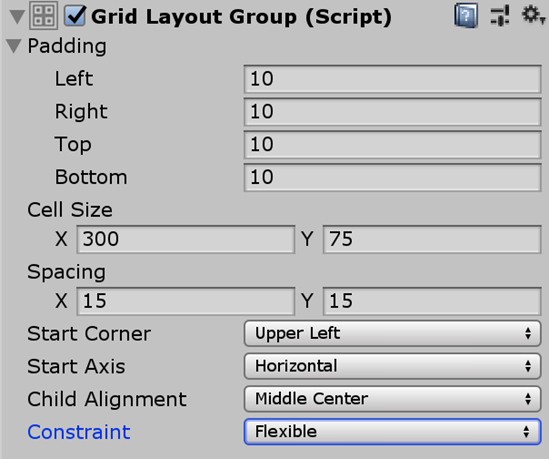
For the Cell Size field, put 300 for X and 75 for Y. Put 15 for both X and Y in the Spacing field. Open the Padding field and put 10 in all four fields. Then for the Child Alignment field, put Middle Center. Your Grid Layout Group (Script) component should be setup like this:
Now go to your Hierarchy panel, and right click on the Panel. You will be adding a Button – TextMeshPro object as a child of the Panel. This is also under UI. In the pop up window, click on Import TMP Essentials.
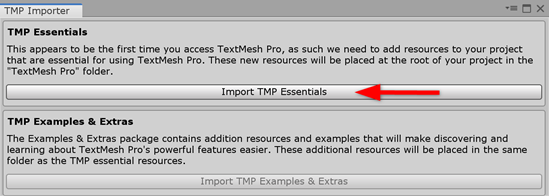
After the package loads, you should have a Button object in your Panel that says “Button.” Select the Button object and change the Color field in Image (Script) component in the Inspector. This can be any color you like, but you’ll want to have a decent contrast from the Panel color.
Select the Text (TMP) object that is a child of the Button and change the Color field in the Text Mesh Pro UGUI (Script) component. This can be any color you want. For the Font Style field, choose the B option to make the text bold. If you want to play around with some of the other features to make the text look more appealing to you, feel free to do so.
Change the Text field to say “Load Next Level”. You will also be wanting to create a Button that says “Complete Level”, to simulate the kind of information that would be helpful for ensuring user engagement in your game. Press Ctrl/Cmd + D to duplicate the Button object. Change the Text field of the Text (TMP) object for this new object to say “Complete Level” and then duplicate it again. Change the Text for this new Button (2) to say “Kill Player”. Duplicate it one more time and change the text for this Button (3) to say “+ Player Level”.
Add a Text – TextMeshPro object as a child of your Panel, move it above all the Button objects in the Hierarchy, and then change the Text field to say ‘Game Events” and make it bold. For the Alignment field, choose center both vertically and horizontally. When you are finished, your Scene window should look something like this:
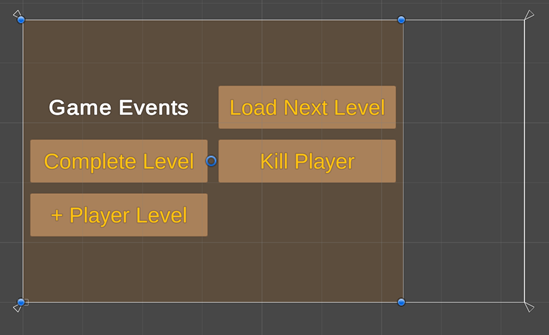
Now, to make the IAP Panel, simply duplicate the Panel object, and then resize the new Panel (1) and move it over to the blank section. If you find that it doesn’t fit properly, change your Grid Layout component so that the X value is a little smaller. Change the Color field for this Panel to something different.
For the IAP Panel (2), you are going to need to change the Text fields of the Buttons. Starting at the top, change them to the following:
- 100 Lives | $100
- 50 Lives | $50
- 25 Lives | $25
- 1 Life | $1
Finally, change the “Game Events” text to say “Store”. You should end up with something looking like this:
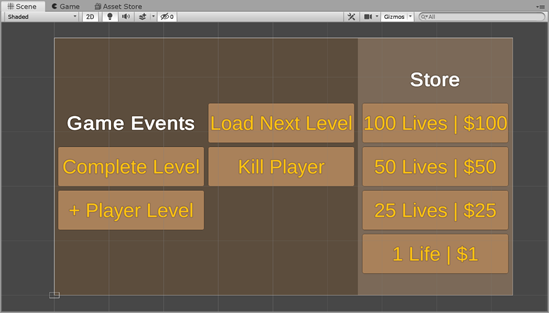
This will be the demo you will be using to interact with the Unity Analytics system.
Part 2
In this lesson you will learn how to activate the Unity analytics service and how the online dashboard works.
Activate the Unity Analytics Service
In the Unity Editor, go to the Window tab on the top of your screen, then go to General, and select Services.
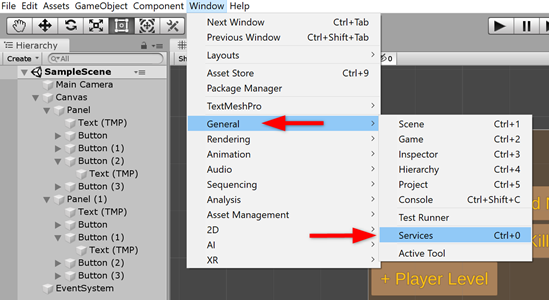
Go to the new Services window that opened, select an Organization from the dropdown list, and then click the Create button. If you do not have an Organization yet, you will need to set this up on the Unity website.
When you do this, several options will appear in the Services tab. Click on Analytics, and then enable it with the small toggle icon in the upper right. Don’t check the box for targeting children under 13. Click on Continue.
The next step is to click the Play button for your project. This will sync the project with the Unity Analytics service. When you do, the Services tab should update and say “Analytics enabled!” If it doesn’t, you can try disabling and then re-enabling the service, or right clicking on the Services tab and choosing Reload. Eventually, you should get the message showing. You will see a Validator field saying what has occurred in your game.
This Validator field will tell you when various core events have happened that Unity sends out itself, such as the app starting, running, ending, etc.
Viewing the Dashboard
In the Analytics tab there will be a link in the upper right to go to your Dashboard.
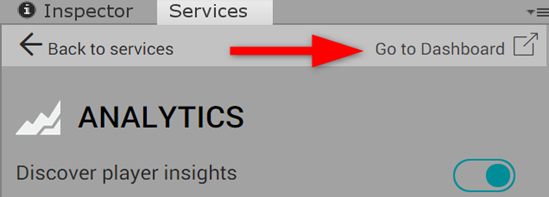
Click on this link. This will open up your web browser and take you to the Overview page in the Unity Analytics section of the Dashboard.
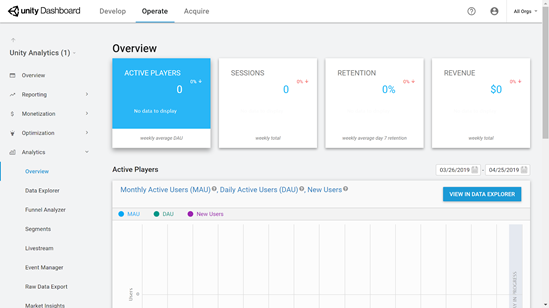
There won’t be anything here, as it will take awhile to populate this Dashboard with information from your game. In the next few lessons, you will be triggering more events to see them here in the dashboard. This course will also use an example project, with the events already populated, to show what the data will look like.
Go to the Event Manager tab.
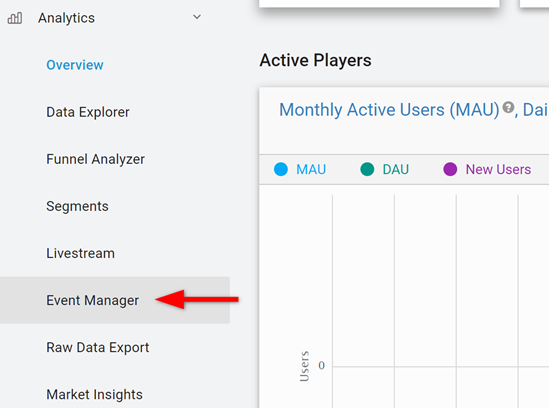
There will be a Validator here as well, and it should show the same information that the one in the Unity Editor did. It will take some time before this information is populated into the Unity game analytics system though.
Now everything is setup for you to start working with core events, which will be covered in the next lesson.
Transcript 1
Hey guys, my name is Austin Gregory and in this course we’re gonna cover Unity Analytics, which is a free service provided by Unity that allows us to track and manage player progression through our game, as well as acquisition to see when we’re picking up new players, where we’re losing players, what kind of retention we’re having, where players are finding difficulties in our games, tweaks to make the experience a bit more smooth for our players.
So in this course, we’re gonna first create a simple little demo that’s just gonna be a few buttons on the screen that allows us to send out these events that the Unity analytics service requires to build the metrics that we’re going to use. So very simple start.
Then we’re gonna set up the Unity analytics service itself inside of the editor, which is also a very simple thing to do, and then we’re gonna look at the core events that Unity sends for us. These are events that Unity handles for us. Then we’re gonna look at sending out standard events which are events that Unity has defined for us, but we get to decide when they fire off. So we can use this to track player progression through certain levels, for example. We’re also gonna track some simple in-app purchase events.
We’re gonna send some dummy data to the service that say hey, somebody bought something, just to see how that looks in the dashboard. And then we’re gonna set up and talk about funnels. Funnels are quite powerful and maybe the most powerful tool you will use from this course. And then we’re gonna take all of that that we’ve learned and talk about the individual metrics that we will need to understand to make meaningful changes to our game.
So my name is Austin Gregory and I will see you in the first lesson.
Transcript 2
Hey, guys, welcome back. In this first lesson, we’re gonna set up a quick demo that we’re going to use to interact with our Unity game analytics events. We need some way to fire off the events, some way to actually send these things to the service. So we’re going to use a simple little demo.
It’s just going to be some UI buttons that we can click and do something that would kind of mock what a game would do. So we’re gonna have buttons that actually act like they’re purchasing something from like an in-app purchase store. We’re gonna have buttons for loading and completing levels. We may end up killing player and seeing what that can do for our game-over, maybe. Maybe, we have an event for the game ending.
And we’re also going to have like leveling and stuff like that, and then we can send an event every time a milestone is reached. So every time you reach five levels, or 10 levels, we’ll send that event. You don’t wanna go too heavy on the data that you’re sending, because you’re going to have to use this data for something later on to actually make meaningful changes to your game or to see how people are interacting with your game.
So if you have too much data, you can really kinda go crazy with that. So we’re going to keep it very simple and just go over the basics and talk about what we can do with analytics in Unity.
So in Unity Hub, I’m gonna create a new project just by clicking New Project and I wanna call it Unity Analytics. And I’m gonna use the latest version I have, which is 2019.1.0b9. It’s the beta for that. And I’m just gonna select 2D because we need to keep it very simple, and just Create Project.
Once our project loads, I’m gonna go up to Layout and go to Default to make sure we’re all on the same layout here. And I’m also going to change my game aspect ratio to be 16:9, just so I know what I’m working with when I’m laying out my simple little UI here. Because we’re gonna do very basic UI stuff and I want to make it restricted to a 16:9 screen. So I’m going to create a UI panel to hold a few buttons. So just create UI panel. Double-click on that to center it in my frame here. And this is just going to be kind of like our main buttons here.
And then, off to the right here, we’ll have out in-app purchase mock buttons that will send in-app purchase events to our analytics service. So no background and we’ll change the color to be whatever you’d like. And now, inside of this panel, I’m gonna have a grid of buttons. So I’m gonna Add Component, Grid Layout Group. And they’re gonna be about 300X75. Some spacing all around. Padding all around the panel. And I want these to be centered right in the middle.
Now, with that inside the panel, we’re gonna create some more buttons here. And now, we can actually create a button that already has TextMesh Pro text in it, which is what we want to do. We don’t have to create a button, and then, remove the text and add it and all that stuff. Import TMP Essentials so we can use the nice text engine, TextMesh Pro.
Let’s grab this color here and we’ll make this a lighter version of the background. And take the text and make it kind of like a cool gold color. Bold, a little underlay, maybe. And this will say Load Next Level. So we’re gonna be able to load a level then complete a level. So we’re gonna be kind of mimicking how you play a game. Load level, complete level. Load level, complete level.
And we’re gonna have a set number of levels, maybe, that you have to complete. And then, we’re going to send all this data to our Unity Analytics service so we can see what levels people are struggling with, where they are stopping, and trying to decide what changes we have to make to get them back into the game to continue and complete the levels that they stopped on.
Or, at least, to get people in the future to continue those levels so we don’t have people dropping off on certain levels. And then, CTRL + D to Duplicate. Complete Level. Kill Player. Level-up one. And then, I’ll just add a simple text element to the top here. Game Events. Bold and center it horizontally and vertically. And we can keep going with these but this is gonna be enough for me to test these events. And then, I want to have another panel over here for in-app purchases. So I’m just gonna take this and duplicate it, and then, just scale it down, move it over just like that.
And, in fact, we could probably do with a little extra space here. 100 Lives, $100. Very cheap. A dollar every time you die. And then, change the background color of this panel. Something like that. Store. And this is going to be the demo that we’re gonna be using to interact with our analytic events to fire off these mock game events so that we can actually track what’s happening in a, quote-unquote, game.
So in the next lesson, we’re going to get started by actually setting up our analytics and Unity itself. My name is Austin, and I will see you there.
Transcript Part 3
Hey guys, welcome back. In this lesson we’re going to set up our Unity Analytics Service. It’s very simple to do, just a couple of button clicks. And then we’re gonna check out the online dashboard, where we’re going to actually view all of the data that we are sending to the service.
So back in Unity, I’m gonna go up to Window, go down to General and go over to Services. Now this is where you can play with all the services you have for your game or for your project. But in this case, I’m simply going to use that Unity Analytics Service. Now I have a few organizations setup on my account. You probably just have the one at this point, but if you have multiple, just choose the one you want the project to be under.
If you don’t have an organization showing here, you can go to your account and add an organization from the online dashboard, which I’ll show you here in a second. So I’m just gonna use and click create. Now we have a bunch of services, but I care about the analytics and the analytics only for this, so I’m gonna click on Analytics and I’m going to enable Analytics. Mine is not just for young children, so I’m gonna click Continue.
Now what is this saying to do? Whenever you click play, it will send the first set of events to the service, kind of syncing it up, so it knows. Okay, I got the project, we’re all hooked up.
So I click play and now whenever I click stop. Now if it doesn’t work immediately for you and show you what you just did in the services tab here, you can try going to the dashboard and coming back in and seeing if that will change, update your events over here for you. If not you may want to, go outta the editor and come back in or reload the services tab. Just try that a couple of different times until you get this validator showing you, okay this is what I did.
So it’s showing you, this is when this app started, this is the app running, and these are the core events that Unity is sending out for us that we don’t have to handle.
We don’t have to tell the service, hey this is my app starting, hey this is my app running, this is how long it’s running for, this is my app stopping and all that stuff. It handles all of the base events like that for us, which is great because we do want that information. We wanna know when people come back and play. We wanna know when people stop playing, how long they played for, and it handles all that by default, which is great.
So now if we go to the dashboard, you’re gonna see a whole lot of nothing here, because it’s gonna take a while to populate the dashboard with the data that you’re sending.
So what we’re gonna do is we’re gonna do some stuff with our events over the next couple of lessons, and then we’re gonna look at another project I have that I’ve already set up for this purpose that’s already been populated. Took a couple days to get everything populated, but it’s all there now. So we’re gonna be able to see the data there.
It’s gonna be a very similar setup to what we are gonna make in this course, so it’s going to look very familiar. But if I go to event manager, we can see that our validator is visible here as well, the same thing that we’re seeing in our editor. So it is working, everything’s working good, it’s just gonna take a while for this to do anything for us in our actual Unity analytics here.
But we have everything set up and we are ready to start working with our Unity game analytics. So in the next lesson we’re gonna have a quick overview of the basic core events. My name is Austin and I will see you there.
Interested in continuing? Check out the full Data-Driven Development with Unity Analytics course, which is part of our EdTech Mini-Degree.
