Are you or someone you know a first-time coder? Scratch coding may be a solution – especially if looking at plain text code sounds daunting.
If you’ve never coded before, finding the right place to start can be difficult. However, no matter the age, a good first tool/language to explore is Scratch.
Scratch is a visual coding language that allows for the creation of digital stories, games, and animations by anyone who’s interested – including kids. Scratch is also the world’s largest coding community for children and is available for free in more than 70 different languages.
In this tutorial, you’ll learn the basics of coding through the implementation of a mini-project that animates the movement of a cat sprite in Scratch.
If you’re ready to dig in, let’s get started!
Table of contents
Projects Files
The Scratch coding for our final cat animation can be downloaded here: Cat Animation in Scratch. Although we will guide you along every step of the way, it’s good to also have the complete code so that you can compare it to your version at any time!
We also recommend you check out our Jr Coder Mini-Degree to explore more topics pertaining to coding with Scratch.

A Closer Look at Scratch’s Interface
To start this tutorial off, we’ll first explore how to create Scratch codingprojects and explore the interface!
Creating a new Project
First off, head over to the Scratch homepage then click on ‘Create‘:

This will initiate a new project as seen below:

Game Stage
At the top-right corner, we have the game stage where we can see our animation running:

We can click on the green flag icon above the game stage to start our animation and on the red button to terminate it. Note that as we don’t have any coding in Scratch to run just yet, it only shows its default cat sprite for the moment. By clicking on the rightmost icon above the game stage, you can also put it in fullscreen mode:

Sprite Properties
To alter the cat’s position inside the game stage area, just drag it around as you wish. You’ll see that its x and y coordinates in the sprite properties panel vary according to its current location (foreshadowing: this is important to a lot of Scratch coding:

Here in the properties, we can also rename the sprite to ‘Cat’ and change its size and direction too. To hide or display your sprite, click on the eye icons next to ‘Show’.
At the bottom of the right-hand side of the screen, the sprite area shows us all the sprites we have in our project (only the cat, in our case). To add more sprites, click on the plus button:

From there, you’ll have a huge variety of options to choose from. When you add a new sprite to the project, it will appear next to the previous ones you already had:

To delete a sprite, just click on the trash bin icon that’s on top of its thumbnail:

Changing the Background
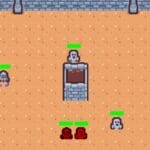
Next to the sprites, there’s the backdrop area, where you can select a different background for your animation:

Changing our default white background to ‘Room 2‘ (under the ‘Indoors‘ filter), we’d have:

Block Palette
On the left side of our screen, on the other hand, we have all possible blocks of code that we’ll be using in our Scratch coding projects. Each block contains a single instruction for the computer to execute and is assigned to one of the various categories shown below:

Some of these categories, like operators and variables, are common to all of programming. Others, like Looks and Sensing, are specific to coding in Scratch – so you’ll want to take some time to familiarize yourself with what Scratch coding specifically has to offer.
Workspace
And finally, to the very center of the screen is the workspace, where we’ll be placing all our code blocks and where most of our time will be spent in terms of Scratch coding:

Making our First Code
Now that we’ve grasped the Scratch tool and how coding with Scratch connects all together, it’s time to move on to the main part of making a Scratch coding project: block-based coding.
To start our project, let’s delete the cat sprite and add a chick character (or feel free to add the sprite of your choice):

In Scratch, we build our program using blocks that we can select from the block palette on the left side of the screen. Let’s begin by clicking and dragging the first block from the Motion category (the one that says “move 10 steps“) to the workspace:

Now, every time you click on this block the chick sprite moves 10 steps in the game stage, because that is the instruction we’re giving it. You can check its new position by the updates on its x coordinate in the sprite properties panel we discussed earlier in this Scratch coding tutorial.
Note that you can also change the number of steps the chick will move each time by entering a new number directly in the block itself:

Although we already have a line of code, when we click on the green flag to start the program nothing happens. This is so because we need to add a starting event in order for our character to move when the green flag is clicked. Otherwise, our Scratch coding block doesn’t know that the green flag is supposed to trigger it.
To do it, go to the blocks under the Events category:

Then, drag the “when green flag clicked” block to the workspace and place it on top of the move block that is already there:

With this, whenever we click on the green flag our character moves 10 steps to its right. Congrats, by the way, you’ve taken your first steps with Scratch coding already.
Adding More Blocks
On the blocks palette, go to Looks and drag the “say Hello! for 2 seconds” block to the workspace, connecting it under the move block as follows:

Note that the blocks fit together perfectly. We can change both text and duration if we want (part of coding in Scratch is about expressing yourself creatively, so we encourage you to learn how much you can customize this:

Clicking on the green flag, we see it is working correctly:

Go on and add the “think Hmm… for 2 seconds” block to our code as well (this works like the previous, but with a different sprite for the text balloon):

Order of Execution
It’s important to notice how all these commands are always executed in order, from top to bottom:

First, we are moving the sprite 10 steps, then we make it say ‘Hi’, and at last we make it think ‘Hmm’.
If we were to place the think block before the say one, we’d see that the character would think ‘Hmm’ first and only then would say ‘Hi’:

This idea doesn’t just apply to Scratch coding, but all of coding in general. It also isn’t exclusive to just these commands – coding with Scratch always follows this same order regardless of whether you’re making a game, simulation, or something else.
Side note, remember that if you want to stop the program at any time, you need only press the red icon next to the green flag. This will immediately halt the program regardless of where it’s at in the execution.
Adding Sounds
Let’s add a sound to our program. Bring the “play sound until done” block from the Sound category to the workspace:

The suggested sound ‘Chirp’ is matching the sprite we’ve chosen, so it may differ for you.
At last, let’s move the chick again by 20 steps:

Play the animation one more time to see the whole execution take place for this Scratch coding set up.
One Script for Each Sprite
Bear in mind that our code is only being applied to the chick sprite. If you add a new sprite, the workspace will appear blank for that sprite while our code remains there normally for the chick:

This can be extremely handy when you need sprites to do different sorts of Scratch coding animations.
And just like that, our first computer interactive program is done, and it already responds to user input by moving our character on the stage!
Algorithms and Flowcharts
We’ve covered a lot of ground in how the block-based coding in Scratch works. However, you might be asking, “Why” and “How” we knew what blocks to use. For that, let’s take a step back and discuss one of the most fundamental aspects of coding (whether you’re learning Scratch coding or something like Python).
What is an Algorithm?
You may not realize it, but you have just created and executed an algorithm! Algorithms are everywhere and are not only related to computer science stuff. An algorithm is merely a sequence of steps that solves a real-world problem. In this sense, coding or programming is simply the process of making algorithms for a computer to execute.
An example of an algorithm from our daily lives can be something as common as making a piece of toast. It could be represented by the following steps:
- Put a slice of bread into the toaster
- Set the toasting level
- Lower the lever
- Wait until the toast is ready
- Safely remove the bread from the toaster
As you can see, an algorithm lists all of the steps that are needed in order to achieve the desired outcome. In other words, an algorithm is nothing but a set of instructions that need to be followed in a specific order!
Flowcharts
Algorithms can be visually described by a flowchart. Our toast example above would produce this flowchart here:

We specify the start of our algorithm with a ‘Begin‘ block (in blue) then proceed to place statement blocks (green rectangles), each containing one of the steps of our algorithm. We finish it by adding an ‘End‘ block (also in blue) to point out where the algorithm ends. Note that although we’re using specific colors in this tutorial, they are not part of the flowchart convention. Flowcharts don’t need to have any particular colors.
Flowcharts are useful for code documentation and to allow us to check that we’ve implemented everything correctly, and have not skipped any of the necessary steps of our algorithm. With all this in mind, let’s now create a brand new Scratch coding project so we can move on to making our first animation in Scratch!
Using Coordinates
You may have noticed in the above section, we also mentioned the “x coordinate”. Before we proceed to our final first project, let’s talk about this concept so you understand why it’s important to moving sprites.
We’re going to use coordinates to move and position our sprite on the screen. For every spot on the game stage, we have a corresponding value for x and y that form the coordinate for that particular point in the grid. Coordinate (0, 0), also known as origin, is right at the very center of the game stage:

To help us better visualize how coordinates work, let’s choose a new background. Click on the ‘Choose a Backdrop’ button and search for “coordinates“, then select ‘Xy-grid‘:

This background allows us to see the values of x and y for the entire stage area:

The X-axis values increase as we move to the right and decrease to the left, so if you move left past zero you’ll have negative values for x. Similarly, values of y increase as we move the sprite up and decrease as we bring it down the game stage past the X-axis.
You can also enter specific values for one axis or both axes and the cat will be repositioned automatically:

Cat Animation Project
Now that we have a good understanding of coordinates (and how they’ll play a role with Scratch coding), we’ll put everything to the test by making a Scratch animation involving simple sprite movement.
Before we step into the actual code for our new project, let’s rename it to ‘Cat Animation’ at the top bar:
![]()
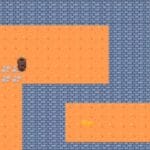
For this project, let’s change the background once more to ‘Bedroom 2‘:

We’re choosing a new backdrop because we want to make our cat sprite move to the drawer, later to the computer desk, then to the window, and lastly to the bottom right corner of the carpet of the bedroom.
For our animation to start when the player clicks on the green flag button, let’s initiate our code by adding the event block for when the green flag is clicked:

As we want to have our cat positioned by the bed once the animation is started, we can use the “go to” block (from the Motion category):

To know which values for x and y to enter, we can place the cat where we want it to be at the start of our animation (in this case, on top of the bed) and then use the same coordinates shown in the sprite properties panel in the motion block in question. That is so because if you manually move the sprite around in the stage and then proceed to use any block that has the sprite’s coordinates, the block will already have the sprite’s updated location on it.
Also, note that each category has a color, so, when you see a Scratch coding block you can automatically identify from which category that block is.
Now if we click the green flag icon, the cat is moved to the bed straight away:

Next, we want to move the cat to the drawers next to the bed. Here, we’re going to use the “glide” block instead:

The glide block takes the amount of time indicated in seconds to move the sprite, thus it’s not immediate like the go to Scratch coding block.
Challenge
Now that we’ve shown you the basic process, try the rest yourself first! Update the coordinates and complete the remaining steps:
- Glide the cat to the computer
- Glide the cat to the window
- Glide the cat onto the carpet
All moves should take 2 seconds each. Don’t worry if you get stuck – we’ll cover the final code next.

Final Code
The solution to the Scratch coding challenge is as follows.
Let’s add another glide block to our code, and move the cat to the computer:

Note that we’ve changed the duration of our first glide block to 2 seconds as well just so it matches the following glide blocks we’ll have.
Repeat this process for the window and carpet:

Our code is now complete! Running the code we see that everything goes as expected:

In the end, the cat is standing on the carpet by the bottom right corner of the bedroom.
If you have solved the Scratch coding challenge in a different manner, that’s fine! Quite often there is more than one way to do the same thing in programming. In case you couldn’t solve it, don’t worry as you can always keep practicing now that you’ve seen how the challenge was solved!
You can run our cat animation project by heading over to the public project page at https://scratch.mit.edu/projects/667377329/
Cat Animation Flowchart
Finally, let’s check the flowchart for our animation project:

For this flowchart, we’re using a new type of block (the one in orange) which can be used for user input/output, such as waiting for the user to press a button (as is the case above) or displaying a message to the user.
Where to Go Next with Scratch Coding
Congratulations on reaching the end of this tutorial on coding with Scratch! By now you not only have coded your first program in Scratch, but have also already created your first animation! You also have learned about algorithms and how to create flowcharts to better visualize the steps being taken.
Coding is an important skill that can be developed at any age and is being included more and more in schools in general. It improves creativity & problem-solving, and can offer a wide range of careers worldwide for those who take it professionally. Likewise, Scratch is used throughout the globe across many different age groups. With its intuitive drag-and-drop interface, it’s easy to learn the basics of programming and practice coding by trying out the various types of blocks from all the available categories in the block palette.
If you want to build more interactive projects in Scratch, you can check out the Jr Coder Mini-Degree offered by Zenva. This curriculum covers a slew of different Scratch projects and programming principles to help expand your skills and give you a solid understanding of programming in general.
In any case, we hope that you continue to explore and create real-world programs and games – and most of all that you have fun while doing it!
Did you come across any errors in this tutorial? Please let us know by completing this form and we’ll look into it! FINAL DAYS: Unlock coding courses in Unity, Godot, Unreal, Python and more.