You can access the full course here: INTRO TO CODING WITH SCRATCH
Table of contents
Adding Sprites
In this lesson, we’re getting started with Scratch.
First, go to the Scratch homepage and click on ‘Create‘:

This will initiate a new project as seen below:

Familiarizing Yourself with Scratch
Let’s take a look at Scratch’s interface, one part at a time so we can understand the purpose of each section. Starting with the area at the top-right corner, we have the game stage which corresponds to what the player will see when they are playing our game:

By clicking on the outermost icon above the game stage area, you can make it fullscreen:

The green flag you can see at the top bar is used to start the game while the red icon is to stop the game. At the moment, we just have the image of this cat and nothing is happening in our game just yet.
Feel free to move the cat around the game stage area as you wish. Notice that the x and y coordinates in the sprite properties vary according to its current position:

Go ahead and rename your sprite to ‘Cat‘. To hide or display your sprite, click on the buttons next to ‘Show‘. You can also change the size and direction of the sprite too.
At the bottom of the right-hand side of the screen, the sprite area shows you all the sprites you have in your project. For now, we only have our cat.
Click on the plus button to add more sprites:

This way you can choose from a large list of options:

Let’s include the bear in our sprites:

Next to the sprites, you see the backdrop area where we can select a different background for our game. Click on the add button to choose a background image from various categories, similar to what we just did with the sprites:

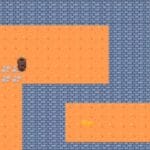
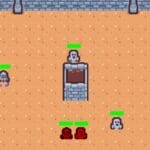
Let’s change our white background to the ‘Room 2‘ image from the ‘Indoors‘ category:

On the other hand, the larger area at the center of your screen is the workspace. This is where we’ll be adding our code:

Challenge
Create your own project and add 10 different sprites to it as well as a background. Rename the sprites, move them around, and practice hiding and showing them back before moving on to the next lesson.
Your First Algorithm – Part 1
In this lesson, we’re creating our first computer program with Scratch.
To begin, create a brand new project by going to File on the top menu and clicking on ‘New‘. Next, delete the cat sprite as we won’t be using it by clicking on the rubbish bin icon:

Let’s choose a character for our game by going to the add button on the sprites area. We’re going to use the chick, although you’re free to pick the one you prefer:

Proceeding, we’ll be adding our code to the workspace area. In Scratch, we build our program using blocks that we can select from the block palette, located on the left side of the screen:

Drag the first block (“move 10 steps”) to the workspace:

Now, every time you click on the block the chick moves 10 steps. You can check it by its x coordinate updates in the sprite properties window.
Note that you can also change the number of steps the sprite will move each time by entering a new number directly in the command block:

Your First Algorithm – Part 2
Although we already have a line of code, when we click on the green flag to start the game nothing is changing. In order for our character to move when we click the green flag, we need to add a starting event. To do it, go to the blocks under the ‘Events‘ tab:

Click on the first event block and place it over the one we had previously in the workspace as follows:

Whenever we click on the green flag makes our character move 10 steps now.
With this, our first computer interactive program is done, and it already responds to user input and moves the character on the screen!
Adding More Blocks – Part 1
In this lesson, we’re going to add more blocks to our program.
On the blocks palette, go to ‘Looks‘ and bring the “say Hello! for 2 seconds” block to the workspace (under the 2 others we already have there):

We can change both text and duration if we want:

Let’s click on the green flag to see if it works:

We can go on and add another block, the one with “think Hmm… for 2 seconds“:

Blocks Execution
It’s important that you observe how all these steps were executed in order from top to bottom:

First we moved 10 steps, then we said ‘Hi’, and finally we made it think ‘Hmm’.
If we grab the think block and move it to come before the say one, you’ll see that the character now thinks ‘Hmm’ first and only then says ‘Hi’:

Remember that if you want to stop the program at any time, you can press the red icon next to the flag.
Adding More Blocks – Part 2
Let’s add a sound to our program as well. Grab the play sound block from the ‘Sound‘ tab and drop it into the workspace:

The suggested sound is matching the character we have chosen, so it may differ for you.
Lastly, let’s move the chick again 20 steps:

Play the animation one more time to see the whole execution take place.
Challenge
Note that if you add a new sprite, the code we’ve done so far will disappear. That happens because it is only being applied to the chick sprite. So if you click on it, our code is actually still there:

Your challenge is to add a second sprite and create a new program for it containing 10 blocks of code in total. To keep it simple, use the same blocks we’ve used with the chick sprite. You can alter the durations, distances, and texts of the commands as you like.
If you want a bit of an extra challenge, however, don’t hesitate on going over a few of the other available blocks. Keep in mind that there are things we haven’t covered yet, so the blocks may not fit in with the others you’re using or you may not know what they do, but feel free to experiment especially with the first 3 categories of blocks (Motion, Looks, and Sound).
Transcript
Adding Sprites
In this lesson, I’m gonna show you how easy and how quick it is to start creating in Scratch.
Let’s begin by heading over to the Scratch homepage at scratch.mit.edu. In here, we’re gonna click on create at the top. This will initiate a new project for us.
As you can see, we were able to start without even having to create an account on the Scratch website. The first time that you create a new project on Scratch might feel a little bit intimidating.
There are so many different options in here, but we are gonna be going through all of them. And after a few videos, you are gonna be very familiar with most of what’s here on the screen.
The first part that we are gonna look at is the actual game. This area here is called the game stage and it is what the player will see when they play your game. You can make your stage full screen by clicking on this icon here.
And this is what your game looks like at the moment. The green flag is normally used to start the game and the red icon here is used to stop your game. At the moment, our game doesn’t do anything, but this is what it’s going to look like for the final player or final user.
We can exit this full-screen page by clicking on the icon again. If you want to change the position of your cat, you can grab your cat and move it around. You can change it and place it in any position that you want.
Every time you change the position, you might notice that the cat properties change, in particular the coordinates X and Y. We are gonna talk about those in a future lesson.
In this area here, we have some sprite properties, such as the name of the sprite, which we can change for instance to cat. The coordinates X and Y which represent the position of the cat on the screen.
We then have buttons to show and hide the sprite if you wanted to hide your sprite for some reason you can do so here, as well as options to change the size and the direction of the sprite.
The sprite area or sprite list shows you all of the different sprites that you have in your project. For now we only have one, this cat here. If we wanted to add more sprites, what you can do is go to this button where it says choose a sprite and click on that.
And then you can see a long list of options for you to utilize. You can filter the sprites by category. For instance, if we only wanna see animals, we can click on that and then we can select one of the animals.
I’m gonna go and select this bear here. So now we have a cat and a bear. Another important element here is the backdrop or background of your game. Currently, it’s all just white.
You can go here to the background section and click on the button to choose a new backdrop. This gives you a lot of options to choose from. Just like with the sprites, we can also filter the backgrounds by category.
So I can go and select any of these and that will change the background of my app or my game. This larger area here is called the workspace and this is where you are gonna be adding your code.
I’m gonna close this tutorial that appeared when we created a new project, but you’re welcome to watch it on your end. Before going any further, we are gonna do a challenge.
The challenge is for you to go to the Scratch website if you haven’t already, create a new project and add 10 different sprites. So go and select 10 different sprites, as well as a background.
So go and familiarize yourself with sprites, move them around, rename them, and also learn how to hide them and how to displaying them back. So that is going to be the challenge for you before you proceed to the next lesson.
Your First Algorithm – Part 1
In this lesson, we are gonna be creating our first computer program with Scratch. This is really exciting, especially if you’ve never coded before.
Let’s begin by creating a new project. We can go to File and then click on New. That will initiate a new project for us. Next, we are not gonna be using the cat here, so we can delete it. In the sprite list, let’s find our cat and click on the rubbish bin icon.
That will delete the sprite from our project. Let’s go and select a character for our game. So I’m gonna choose a sprite and from here, you can find any character that you want.
I’m gonna be choosing the chick in here, okay? So that’s gonna be my character for this particular game. The main area here is what’s called the workspace. And this is where we will be adding our code.
The way that we build these programs in Scratch is by using blocks and those can all be found in the block palette on the left side. Let’s go toward this Motion and in here, you can see the different blocks that are used to represent motion in Scratch.
And we’re gonna look at that very first one that says move 10 steps. So if you click on that, you can drag it onto your workspace. In your workspace, you can zoom in and out using these icons here. What happens if we click on this block?
You can see that every time I click on the block, it is actually moving 10 steps. If I go and change this number, if you click there, you can actually change the number of steps that it’s moving. But if I type one, you can see that now it moves a lot slower. Let’s set it back to 10.
Your First Algorithm – Part 2
In Scratch, games are usually started by clicking on the green flag icon. But currently, if I click on that icon, nothing happens, our character doesn’t move.
In order for the character to move when we click the icon, we need to find a starting event. You can find events here on the blocks palette by going to events, and this gives you a few options.
Let’s grab the very first one that says, when the green flag is clicked. So if we place that event on top of the block that we had previously added, you can see that they fit in perfectly so that when the green flag is clicked, we are gonna be moving 10 steps.
Let’s try it out to see if it works. I’m gonna go and click on that green flag again and you can see that now whenever I click on the green flag, our character moves 10 steps. So that’s our very first computer program.
We’ve created something that’s interactive, that responds to user input, and that moves a character on the screen. And this is just the beginning. We are gonna be doing really exciting things in the next few lessons.
Adding More Blocks – Part 1
In this lesson, we’re gonna be adding additional blocks to our program. Let’s begin by going to Looks, on the left side, on the blocks palette. And look at the very first one that says hello for two seconds, say hello for two seconds.
So I’m gonna grab that one and we can bring it into our workspace and you can see that it actually fits in with the previous block. So we can place it after the movement block. We can change the text here, by clicking on it.
So I can say, say Hi, and you can also change the duration. Let’s leave that as two for now. Let’s press the green flag icon to see if it works. You can see that the chicken moved and then it said, hello for two seconds. Let’s try that again.
After saying hi, we can also go and grab a different block here that says, think Hmm. So let’s place that one after the say block, and try it out. So you can see that all of these steps were executed in order. In fact, they were executed from top to bottom.
That’s how programs are executed in Scratch. We moved 10 steps, then we said hi, and then we had the think the thought, after that.
If you change the order of these blocks, so I’m gonna grab this think block and I’m gonna place it before the say block. And we run the program again. You’re gonna see that the execution order was different than the first time.
While we are executing this, if we wanna stop, we can just press that red button so you can interrupt or stop your program at any point in time, by pressing on the red stop button.
Adding More Blocks – Part 2
Let’s go and play a sound as well. If we go here to Sound, look at the first one that says play sound until done. Now in your case, because I chose the chicken, it chose me this sound here.
In your case, it might be showing a different sound. And that’s fine. Lastly, we are gonna be moving our chicken again playing the sound.
So we can go to Motion and we can go to move again and grab that one and add it at the very end, and this time we can move for 20 steps. So let’s try the whole animation one more time. Okay, before we finish here, we are gonna be doing a challenge.
And the challenge for you will be to add a new sprite. So add any new sprite that you want. And you are gonna see that when you select that new sprite, your program no longer shows. Let’s go and select our chicken again.
You can see that when we select our chicken by clicking on it, the works space, actually displaced the chicken image. The program that we created only applied to this particular chicken. So the challenge is to go and add a second sprite.
And in that second sprite, we are gonna create a new program, okay? That new program should contain 10 blocks in total. To keep it simple, use the same blocks that we have already used with our chicken.
However, if you do want a bit of an extra challenge, you can play around with a few of the other blocks. Now, keep in mind that there are a few things here that we haven’t covered, so some of the blocks might not fit in or you might not know at this point in time what they do, but you’re welcome to experiment.
In particular with the first three categories, Motion, Looks, and Sound. But again, if you wanna keep it simple, just use the same blocks that we have been using but arrange them in different order at 10 in total and also change what they say or like the durations and the distances of the different elements.
So that’s the challenge. Once you’ve had a try, then you can continue to the next lesson.
Interested in continuing? Check out our all-access plan which includes 250+ courses, guided curriculums, new courses monthly, access to expert course mentors, and more!