Suppose you’re building a strategy game. The game will have player and enemy units which navigate through a map full of obstacles. While the player units will be controlled by clicking on the map positions, the enemies will walk alone, following any AI strategy.
You may have noticed that, given an origin and target positions, the units must find a path connecting those two points avoiding any obstacles in the way. In addition, it is important that this path is the shortest as possible.
The process just described is called pathfinding and it is used in many games, as well as other AI problems. In this tutorial I’ll show how to use a pathfinding library to solve this problem in your game. At the end, we will build a map where we can click to where we want our character to move, and it will find the shortest path from its position to the desired position.
To read this tutorial, it is important that you are familiar with the following concepts:
- Javascript and object-oriented concepts.
- Basic Phaser concepts, such as: states, sprites, groups and arcade physics
- Creating maps using Tiled
Did you come across any errors in this tutorial? Please let us know by completing this form and we’ll look into it!

FINAL DAYS: Unlock coding courses in Unity, Godot, Unreal, Python and more.
Table of contents
Source code files
You can download the tutorial source code files here.
What is pathfinding?
Before writing our pathfinder, I’m going to explain by means of an example, what is our goal, and how it can be achieved.
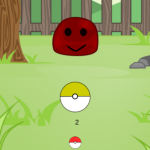
The figure below shows a character in a tile map with obstacles. Suppose we want this character to move to the highlighted position. Some possible paths are highlighted in the map, but we want to find the shortest one. How can we do that?

A common way of solving this problem is to start from the original position and to expand the search range by checking neighbor tiles, while avoiding obstacles, as showed in the example below.
However, we must choose an efficient way of expanding the search range to reduce the time we have to spend looking for a path. By simply expanding to all directions we can guarantee a shortest path, but at a high execution time, since we’re expanding to directions that would never lead to the target position. This high execution time would not be noticed for a single path, but in a game where we must constantly calculate paths for several units, this runtime can easily become prohibitively long.
The A* (pronounced as “A star”) algorithm is an efficient way of solving the pathfinding problem. The algorithm follows the idea of expanding the search range, but uses an heuristic to efficiently guide the search towards the target position. The idea is to calculate the cost of a tile by its distance to the original position plus an estimation of its distance to the target position. Then, by considering the lowest cost tile when expanding the search range, we can efficiently guide the algorithm. This video compares the A* algorithm with other algorithms that were not designed to handle obstacles, and you can clearly see its efficiency.
The EasyStar library
Instead of writing our own A* code, we are going to use a pathfinding library called EasyStar. This is an open source library created by Bryce Neal and available through the MIT license, which allows commercial usage. He also provided a github repository where you can check the source code and its usage. In this tutorial, I’ll cover the basic methods we’ll need for our pathfinding demo.
Creating the Tiled map
The figure below shows the Tiled map I created for this demo. Feel free to create your own or to use mine, provided in the source code. If you’re not familiar with Tiled, you can check our tutorial series on how to create a Platformer using Tiled, which cover in details how to use it. There are only two things you must be careful, because they will be important in our code later. First, all obstacles must be in a layer named collisions, which must have a collision property defined as true, as shown below.


In addition, in the objects layer there must be a player object with its properties defined as below. This will be the character in our demo.
After creating your map, save it in the JSON format.
Phaser states of our demo
The assets, groups and map of our demo will be described in a JSON file, as below. Then, our game will have the following states, responsible for loading this file:
- BootState: loads the JSON file before calling LoadingState.
- LoadingState: loads all game assets, including the JSON map file. After all assets are loaded, it calls WorldState.
- WorldState: create the map layers, game groups and prefabs.
The code for BootState and LoadingState are shown below. Notice that the LoadingState uses the asset key from the JSON file to load the correct asset.
var PathfindingExample = PathfindingExample || {};

PathfindingExample.BootState = function () {
    "use strict";
    Phaser.State.call(this);
};

PathfindingExample.BootState.prototype = Object.create(Phaser.State.prototype);
PathfindingExample.BootState.prototype.constructor = PathfindingExample.BootState;

PathfindingExample.BootState.prototype.init = function (level_file, next_state) {
    "use strict";
    this.level_file = level_file;
    this.next_state = next_state;
};

PathfindingExample.BootState.prototype.preload = function () {
    "use strict";
    this.load.text("level1", this.level_file);
};

PathfindingExample.BootState.prototype.create = function () {
    "use strict";
    var level_text, level_data;
    level_text = this.game.cache.getText("level1");
    level_data = JSON.parse(level_text);
    this.game.state.start("LoadingState", true, false, level_data, this.next_state);
};
var PathfindingExample = PathfindingExample || {};
PathfindingExample.LoadingState = function () {
"use strict";
Phaser.State.call(this);
};
PathfindingExample.LoadingState.prototype = Object.create(Phaser.State.prototype);
PathfindingExample.LoadingState.prototype.constructor = PathfindingExample.LoadingState;
PathfindingExample.LoadingState.prototype.init = function (level_data, next_state) {
"use strict";
this.level_data = level_data;
this.next_state = next_state;
};
PathfindingExample.LoadingState.prototype.preload = function () {
"use strict";
var assets, asset_loader, asset_key, asset;
assets = this.level_data.assets;
for (asset_key in assets) { // load assets according to asset key
if (assets.hasOwnProperty(asset_key)) {
asset = assets[asset_key];
switch (asset.type) {
case "image":
this.load.image(asset_key, asset.source);
break;
case "spritesheet":
this.load.spritesheet(asset_key, asset.source, asset.frame_width, asset.frame_height, asset.frames, asset.margin, asset.spacing);
break;
case "tilemap":
this.load.tilemap(asset_key, asset.source, null, Phaser.Tilemap.TILED_JSON);
break;
}
}
}
};
PathfindingExample.LoadingState.prototype.create = function () {
"use strict";
this.game.state.start(this.next_state, true, false, this.level_data);
};The WorldState code is a bit more complex, and it is shown below. In the “init” method it iniatilizes the physics engine and the map. Then, in the “create” method it creates all map layers, game groups and prefabs. Notice when a map layer has the collision property defined as true, as mentioned before, it is defined as collidable.
var PathfindingExample = PathfindingExample || {};

PathfindingExample.WorldState = function () {
    "use strict";
    Phaser.State.call(this);

    this.prefab_classes = {
        "player": PathfindingExample.Player.prototype.constructor
    };
};

PathfindingExample.WorldState.prototype = Object.create(Phaser.State.prototype);
PathfindingExample.WorldState.prototype.constructor = PathfindingExample.WorldState;

PathfindingExample.WorldState.prototype.init = function (level_data) {
    "use strict";
    var tileset_index, tile_dimensions;
    this.level_data = this.level_data || level_data;

    this.scale.scaleMode = Phaser.ScaleManager.SHOW_ALL;
    this.scale.pageAlignHorizontally = true;
    this.scale.pageAlignVertically = true;

    // start physics system
    this.game.physics.startSystem(Phaser.Physics.ARCADE);
    this.game.physics.arcade.gravity.y = 0;

    // create map and set tileset
    this.map = this.game.add.tilemap(this.level_data.map.key);
    tileset_index = 0;
    this.map.tilesets.forEach(function (tileset) {
        this.map.addTilesetImage(tileset.name, this.level_data.map.tilesets[tileset_index]);
        tileset_index += 1;
    }, this);
};

PathfindingExample.WorldState.prototype.create = function () {
    "use strict";
    var group_name, object_layer, collision_tiles;

    // create map layers
    this.layers = {};
    this.map.layers.forEach(function (layer) {
        this.layers[layer.name] = this.map.createLayer(layer.name);
        if (layer.properties.collision) { // collision layer
            collision_tiles = [];
            layer.data.forEach(function (data_row) { // find tiles used in the layer
                data_row.forEach(function (tile) {
                    // check if it's a valid tile index and isn't already in the list
                    if (tile.index > 0 && collision_tiles.indexOf(tile.index) === -1) {
                        collision_tiles.push(tile.index);
                    }
                }, this);
            }, this);
            this.map.setCollision(collision_tiles, true, layer.name);
        }
    }, this);
    // resize the world to be the size of the current layer
    this.layers[this.map.layer.name].resizeWorld();

    // create groups
    this.groups = {};
    this.level_data.groups.forEach(function (group_name) {
        this.groups[group_name] = this.game.add.group();
    }, this);

    this.prefabs = {};

    for (object_layer in this.map.objects) {
        if (this.map.objects.hasOwnProperty(object_layer)) {
            // create layer objects
            this.map.objects[object_layer].forEach(this.create_object, this);
        }
    }
};

PathfindingExample.WorldState.prototype.create_object = function (object) {
    "use strict";
    var object_y, position, prefab;
    // tiled coordinates starts in the bottom left corner
    object_y = (object.gid) ? object.y - (this.map.tileHeight / 2) : object.y + (object.height / 2);
    position = {"x": object.x + (this.map.tileHeight / 2), "y": object_y};
    // create object according to its type
    if (this.prefab_classes.hasOwnProperty(object.type)) {
        prefab = new this.prefab_classes[object.type](this, object.name, position, object.properties);
    }
    this.prefabs[object.name] = prefab;
};
The “create_object” method is used to create all game prefabs. It identifies the prefab class by mapping the prefab type (defined in the Tiled map) to its constructor. This is done using the “prefab_classes” property, defined in the WorldState constructor. The prefab properties are obtained from the properties defined in the Tiled map. Notice that this is possible because all prefabs have the same constructor, shown in the code below.
var PathfindingExample = PathfindingExample || {};

PathfindingExample.Prefab = function (game_state, name, position, properties) {
    "use strict";
    Phaser.Sprite.call(this, game_state.game, position.x, position.y, properties.texture);

    this.game_state = game_state;

    this.name = name;

    this.game_state.groups[properties.group].add(this);
    this.frame = +properties.frame;

    if (properties.scale) {
        this.scale.setTo(properties.scale.x, properties.scale.y);
    }

    this.game_state.prefabs[name] = this;
};

PathfindingExample.Prefab.prototype = Object.create(Phaser.Sprite.prototype);
PathfindingExample.Prefab.prototype.constructor = PathfindingExample.Prefab;
Creating a Pathfinding plugin
In Phaser you can create plugins that can be easily attached in your games, in a way you can reuse them. In this tutorial, we will write the pathfinding code in a plugin, so you can later use it in your own games. For more information about plugins, you can check Phaser documentation.
The Pathfinding plugin code is shown below. In the “init” method we initialize the EasyStar grid, which will be used during A*. EasyStar requires two things: a world grid, representing each tile with an identifier and an array of acceptable tiles, representing the tiles that are not obstacles. Notice that we are using the tile index from Phaser map to create the world grid, which is obtained from the Tiled JSON map.
var PathfindingExample = PathfindingExample || {};

PathfindingExample.Pathfinding = function (game, parent) {
    "use strict";
    Phaser.Plugin.call(this, game, parent);
    this.easy_star = new EasyStar.js();
};

PathfindingExample.Pathfinding.prototype = Object.create(Phaser.Plugin.prototype);
PathfindingExample.Pathfinding.prototype.constructor = PathfindingExample.Pathfinding;

PathfindingExample.Pathfinding.prototype.init = function (world_grid, acceptable_tiles, tile_dimensions) {
    "use strict";
    var grid_row, grid_column, grid_indices;
    this.grid_dimensions = {row: world_grid.length, column: world_grid[0].length};

    grid_indices = [];
    for (grid_row = 0; grid_row < world_grid.length; grid_row += 1) {
        grid_indices[grid_row] = [];
        for (grid_column = 0; grid_column < world_grid[grid_row].length; grid_column += 1) {
            grid_indices[grid_row][grid_column] = world_grid[grid_row][grid_column].index;
        }
    }

    this.easy_star.setGrid(grid_indices);
    this.easy_star.setAcceptableTiles(acceptable_tiles);

    this.tile_dimensions = tile_dimensions;
};

PathfindingExample.Pathfinding.prototype.find_path = function (origin, target, callback, context) {
    "use strict";
    var origin_coord, target_coord;

    origin_coord = this.get_coord_from_point(origin);
    target_coord = this.get_coord_from_point(target);

    if (!this.outside_grid(origin_coord) && !this.outside_grid(target_coord)) {
        this.easy_star.findPath(origin_coord.column, origin_coord.row, target_coord.column, target_coord.row, this.call_callback_function.bind(this, callback, context));
        this.easy_star.calculate();
        return true;
    } else {
        return false;
    }
};

PathfindingExample.Pathfinding.prototype.call_callback_function = function (callback, context, path) {
    "use strict";
    var path_positions;
    path_positions = [];
    if (path !== null) {
        path.forEach(function (path_coord) {
            path_positions.push(this.get_point_from_coord({row: path_coord.y, column: path_coord.x}));
        }, this);
    }
    callback.call(context, path_positions);
};

PathfindingExample.Pathfinding.prototype.outside_grid = function (coord) {
    "use strict";
    return coord.row < 0 || coord.row > this.grid_dimensions.row - 1 || coord.column < 0 || coord.column > this.grid_dimensions.column - 1;
};

PathfindingExample.Pathfinding.prototype.get_coord_from_point = function (point) {
    "use strict";
    var row, column;
    row = Math.floor(point.y / this.tile_dimensions.y);
    column = Math.floor(point.x / this.tile_dimensions.x);
    return {row: row, column: column};
};

PathfindingExample.Pathfinding.prototype.get_point_from_coord = function (coord) {
    "use strict";
    var x, y;
    x = (coord.column * this.tile_dimensions.x) + (this.tile_dimensions.x / 2);
    y = (coord.row * this.tile_dimensions.y) + (this.tile_dimensions.y / 2);
    return new Phaser.Point(x, y);
};
The “find_path” method is responsible for running EasyStar to find a path from “origin” to “target”. This is done by calling EasyStar “findPath” and “calculate” methods. When the path is found, the “call_callback_function” method is executed, which will create an array with all the points in the path and call the appropriate callback function in the correct context.
The remaining methods are helpful to make it easier to use the plugin. For example, the “get_coord_from_point” and “get_point_from_coord” methods convert a grid coord to a point coordinate in the world, and vice versa.
Now, we have to add our plugin in WorldState. This can be done in WorldState “init” method, as shown below. Notice that we pass the map collision layer data as the world grid, and the only acceptable tile is -1. This value is used by Phaser to represent positions without tiles. In practice, that means that any position without an obstacle is acceptable.
// initialize pathfinding
    tile_dimensions = new Phaser.Point(this.map.tileWidth, this.map.tileHeight);
    this.pathfinding = this.game.plugins.add(PathfindingExample.Pathfinding, this.map.layers[1].data, [-1], tile_dimensions);
The Player prefab
Now that we have our Pathfinding plugin, we are going to create our Player prefab, which will move to a target location using this plugin.
The Player prefab code is shown below. In the constructor, we initialize the physical body. Since the player sprite is bigger than the tilesed we used (as you may have noticed when building the map in Tiled), we are going to reduce the size of it’s physical body using the “setSize” method from the body. Also, we are going to change its anchor point to the center of its physical body, to properly handle movements and collisions.
var PathfindingExample = PathfindingExample || {};

PathfindingExample.Player = function (game_state, name, position, properties) {
    "use strict";
    PathfindingExample.Prefab.call(this, game_state, name, position, properties);

    //this.anchor.setTo(0.5);
    //this.scale.setTo(0.666, 0.5);

    this.walking_speed = +properties.walking_speed;

    this.game_state.game.physics.arcade.enable(this);
    // change the size and position of the collision box
    this.body.setSize(12, 12, 0, 4);
    this.body.collideWorldBounds = true;

    // set anchor point to be the center of the collision box
    this.anchor.setTo(0.5, 0.75);

    this.path = [];
    this.path_step = -1;
};

PathfindingExample.Player.prototype = Object.create(PathfindingExample.Prefab.prototype);
PathfindingExample.Player.prototype.constructor = PathfindingExample.Player;

PathfindingExample.Player.prototype.update = function () {
    "use strict";
    var next_position, velocity;
    this.game_state.game.physics.arcade.collide(this, this.game_state.layers.collision);

    if (this.path.length > 0) {
        next_position = this.path[this.path_step];

        if (!this.reached_target_position(next_position)) {
            velocity = new Phaser.Point(next_position.x - this.position.x,
                                   next_position.y - this.position.y);
            velocity.normalize();
            this.body.velocity.x = velocity.x * this.walking_speed;
            this.body.velocity.y = velocity.y * this.walking_speed;
        } else {
            this.position.x = next_position.x;
            this.position.y = next_position.y;
            if (this.path_step < this.path.length - 1) {
                this.path_step += 1;
            } else {
                this.path = [];
                this.path_step = -1;
                this.body.velocity.x = 0;
                this.body.velocity.y = 0;
            }
        }
    }
};

PathfindingExample.Player.prototype.reached_target_position = function (target_position) {
    "use strict";
    var distance;
    distance = Phaser.Point.distance(this.position, target_position);
    return distance < 1;
};

PathfindingExample.Player.prototype.move_to = function (target_position) {
    "use strict";
    this.game_state.pathfinding.find_path(this.position, target_position, this.move_through_path, this);
};

PathfindingExample.Player.prototype.move_through_path = function (path) {
    "use strict";
    if (path !== null) {
        this.path = path;
        this.path_step = 0;
    } else {
        this.path = [];
    }
};
The “move_to” method will receive a target position and call our Pathfinding plugin to find the path from the current position to the target. When the path is found, the “move_through_path” method is called, which will save the found path and reset the “path_step” variable. The actual movement is done in the “update” method. It moves the player towards the position indicated by the “path_step” variable. If the player has reached that position, it increments “path_step” until all the path is completed. To check if the player has reached a given position, we must consider an error margin as done in the “reached_target_position” method, since the player will not be exactly in the desired position, but close to it.
Finally, we must add in WorldState the code to move the player. We do this by adding an input event in the “create” method as shown below. This input event will call the “move_player” method (also shown below), which will move the player to the position clicked by the mouse. There is one last modification I did in the WorldState, which is showing the player physical body in the “render” method. This method is automatically called by Phaser after updating all objects, and we will use it to show the player body. This is useful to check if the movement and collisions are properly working.
// add user input to move player
    this.game.input.onDown.add(this.move_player, this);
PathfindingExample.WorldState.prototype.move_player = function () {
"use strict";
var target_position;
target_position = new Phaser.Point(this.game.input.activePointer.x, this.game.input.activePointer.y);
this.prefabs.player.move_to(target_position);
};
And now, our pathfinding demo is complete. Try moving the player to different positions and check if it is correctly avoiding obstacles.