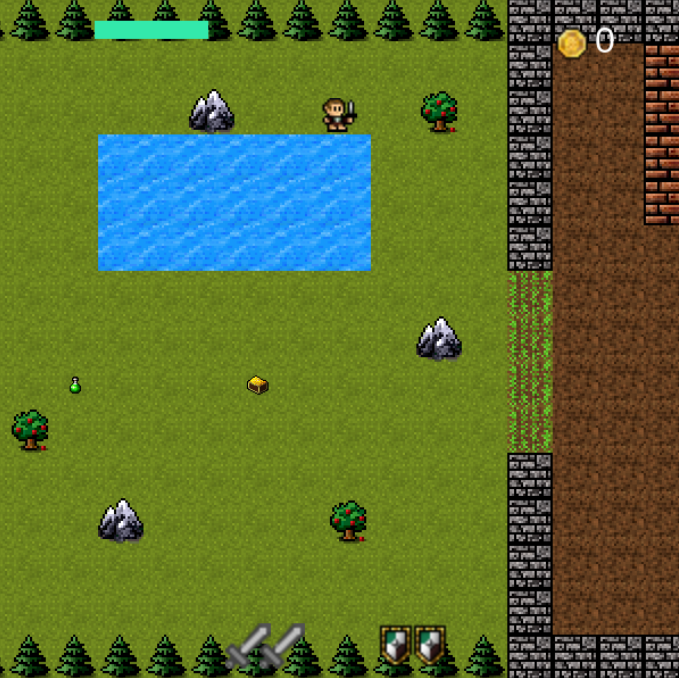
In a game, the heads-up display (HUD) is how game information is visually showed to the player, providing a feedback from the game. Usually, it provides information about player stats like health, items and menus. The HUD is very important in many games to make sure the player understands what is happening in the game. Besides, it is highly dependent on the game and during the game development, it is useful to try different HUD strategies in order to find the best one. So, it is important to have a way of easily manage HUD elements in order to try different HUD configurations.
In this tutorial we will create a HUD plugin to manage HUD elements in the game screen. We will then use it by creating a simple Tiled level and some basic HUD elements. To read this tutorial, it is important that you’re familiar with the following concepts:
- Javascript and object-oriented concepts.
- Basic Phaser concepts, such as: states, sprites, groups and arcade physics.
- Creating maps using Tiled.
Table of contents
Learn Phaser by building 15 games
If you want to master Phaser and learn how to publish Phaser games as native games for iOS and Android feel free to check Zenva‘s online course The Complete Mobile Game Development Course – Build 15 Games.
Source code files
You can download the tutorial source code files here.
Game states
We’re going to keep the game data in a JSON file as shown below. This file describes the game assets that must be loaded, the groups that must be created and the tiled map data. To load this file and setup the game data before it starts we will need three game states: BootState, LoadingState and WorldState.
{
    "assets": {
        "hero_spritesheet": { "type": "spritesheet", "source": "assets/images/player.png", "frame_width": 31, "frame_height": 30 },
        "weapon_image": { "type": "image", "source": "assets/images/attack-icon.png" },
        "coin_image": { "type": "image", "source": "assets/images/coin.png" },
        "potion_image": { "type": "image", "source": "assets/images/potion.png" },
        "shield_image": { "type": "image", "source": "assets/images/shield.png" },
        "chest_image": { "type": "image", "source": "assets/images/chest.png" },
        "healthbar_image": { "type": "image", "source": "assets/images/healthbar.png" },

        "level_tileset": { "type": "image", "source": "assets/images/terrains.png" },
        "level_tilemap": { "type": "tilemap", "source": "assets/maps/world.json" }
    },
    "groups": [
        "items",
        "heroes",
        "hud",
        "stats"
    ],
    "map": {
        "key": "level_tilemap",
        "tilesets": ["level_tileset"]
    }
}
BootState and LoadingState codes are shown below. The first one simply loads this JSON file and calls LoadingState with the level data. LoadingState, by its turn, load all game assets calling the correct Phaser method according to the asset type (for example, calling “this.load.image” to load an image).
var HUDExample = HUDExample || {};

HUDExample.BootState = function () {
    "use strict";
    Phaser.State.call(this);
};

HUDExample.BootState.prototype = Object.create(Phaser.State.prototype);
HUDExample.BootState.prototype.constructor = HUDExample.BootState;

HUDExample.BootState.prototype.init = function (level_file, next_state, extra_parameters) {
    "use strict";
    this.level_file = level_file;
    this.next_state = next_state;
    this.extra_parameters = extra_parameters;
};

HUDExample.BootState.prototype.preload = function () {
    "use strict";
    this.load.text("level1", this.level_file);
};

HUDExample.BootState.prototype.create = function () {
    "use strict";
    var level_text, level_data;
    level_text = this.game.cache.getText("level1");
    level_data = JSON.parse(level_text);
    this.game.state.start("LoadingState", true, false, level_data, this.next_state, this.extra_parameters);
};
var HUDExample = HUDExample || {};
HUDExample.LoadingState = function () {
"use strict";
Phaser.State.call(this);
};
HUDExample.LoadingState.prototype = Object.create(Phaser.State.prototype);
HUDExample.LoadingState.prototype.constructor = HUDExample.LoadingState;
HUDExample.LoadingState.prototype.init = function (level_data, next_state, extra_parameters) {
"use strict";
this.level_data = level_data;
this.next_state = next_state;
this.extra_parameters = extra_parameters;
};
HUDExample.LoadingState.prototype.preload = function () {
"use strict";
var assets, asset_loader, asset_key, asset;
assets = this.level_data.assets;
for (asset_key in assets) { // load assets according to asset key
if (assets.hasOwnProperty(asset_key)) {
asset = assets[asset_key];
switch (asset.type) {
case "image":
this.load.image(asset_key, asset.source);
break;
case "spritesheet":
this.load.spritesheet(asset_key, asset.source, asset.frame_width, asset.frame_height, asset.frames, asset.margin, asset.spacing);
break;
case "tilemap":
this.load.tilemap(asset_key, asset.source, null, Phaser.Tilemap.TILED_JSON);
break;
}
}
}
};
HUDExample.LoadingState.prototype.create = function () {
"use strict";
this.game.state.start(this.next_state, true, false, this.level_data, this.extra_parameters);
};Finally, WorldState (shown below) loads the Tiled map and create the game groups. First, in the “init” method it starts the physics engine and creates the Tiled map from the data in the JSON file. The “create” method, by its turn, creates the map layers, groups and prefabs.
var HUDExample = HUDExample || {};

HUDExample.WorldState = function () {
    "use strict";
    Phaser.State.call(this);

    this.MAP_KEY = "room_tilemap";
    this.MAP_TILESET = "dungeon_tileset";

    this.prefab_classes = {
        "hero": HUDExample.Hero.prototype.constructor,
        "item": HUDExample.Item.prototype.constructor,
        "show_stat_with_sprite": HUDExample.ShowStatWithSprite.prototype.constructor,
        "show_stat_with_text": HUDExample.ShowStatWithText.prototype.constructor,
        "show_stat_with_bar": HUDExample.ShowStatWithBar.prototype.constructor
    };
};

HUDExample.WorldState.prototype = Object.create(Phaser.State.prototype);
HUDExample.WorldState.prototype.constructor = HUDExample.WorldState;

HUDExample.WorldState.prototype.init = function (level_data, extra_parameters) {
    "use strict";
    var tileset_index;
    this.level_data = level_data;

    this.scale.scaleMode = Phaser.ScaleManager.SHOW_ALL;
    this.scale.pageAlignHorizontally = true;
    this.scale.pageAlignVertically = true;

    // start physics system
    this.game.physics.startSystem(Phaser.Physics.ARCADE);
    this.game.physics.arcade.gravity.y = 0;

    // create map and set tileset
    this.map = this.game.add.tilemap(level_data.map.key);
    tileset_index = 0;
    this.map.tilesets.forEach(function (tileset) {
        this.map.addTilesetImage(tileset.name, level_data.map.tilesets[tileset_index]);
        tileset_index += 1;
    }, this);
};

HUDExample.WorldState.prototype.create = function () {
    "use strict";
    var group_name, object_layer, collision_tiles;

    // create map layers
    this.layers = {};
    this.map.layers.forEach(function (layer) {
        this.layers[layer.name] = this.map.createLayer(layer.name);
        if (layer.properties.collision) { // collision layer
            this.map.setCollisionByExclusion([-1], true, layer.name);
        }
    }, this);
    // resize the world to be the size of the current layer
    this.layers[this.map.layer.name].resizeWorld();

    // create groups
    this.groups = {};
    this.level_data.groups.forEach(function (group_name) {
        this.groups[group_name] = this.game.add.group();
    }, this);

    this.prefabs = {};

    for (object_layer in this.map.objects) {
        if (this.map.objects.hasOwnProperty(object_layer)) {
            // create layer objects
            this.map.objects[object_layer].forEach(this.create_object, this);
        }
    }

    // initialize the HUD plugin
    this.hud = this.game.plugins.add(HUDExample.HUD, this, this.level_data.hud);

    // set the camera to follow the hero
    this.game.camera.follow(this.prefabs.hero);
};

HUDExample.WorldState.prototype.create_object = function (object) {
    "use strict";
    var object_y, position;
    // tiled coordinates starts in the bottom left corner
    object_y = (object.gid) ? object.y - (this.map.tileHeight / 2) : object.y + (object.height / 2);
    position = {"x": object.x + (this.map.tileHeight / 2), "y": object_y};
    this.create_prefab(object.type, object.name, position, object.properties);
};

HUDExample.WorldState.prototype.create_prefab = function (type, name, position, properties) {
    "use strict";
    var prefab;
    // create prefab according to its type
    if (this.prefab_classes.hasOwnProperty(type)) {
        prefab = new this.prefab_classes[type](this, name, position, properties);
    }
    this.prefabs[name] = prefab;
    return prefab;
};
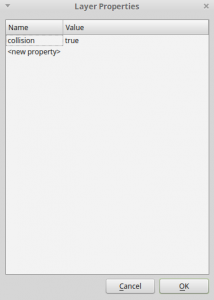
When creating the map layers we must check if the layer has a collision property as true. If so, we must set this layer as collidable.
The “create_object” method is responsible for creating the game prefabs from the map objects. First, it calculates the prefab position considering that Tiled and Phaser coordinate systems are different. Then, it calls the “create_prefab” method, which instantiates the correct prefab according to the “prefab_classes” property. This property is defined in WorldState constructor and maps each prefab type to its correspondent constructor. Notice that this can be done because all prefabs have the same constructor, which is defined in a generic Prefab class as shown below.
var HUDExample = HUDExample || {};

HUDExample.Prefab = function (game_state, name, position, properties) {
    "use strict";
    Phaser.Sprite.call(this, game_state.game, position.x, position.y, properties.texture);

    this.game_state = game_state;

    this.name = name;

    this.game_state.groups[properties.group].add(this);
    this.frame = +properties.frame;

    if (properties.scale) {
        this.scale.setTo(properties.scale.x, properties.scale.y);
    }

    if (properties.anchor) {
        this.anchor.setTo(properties.anchor.x, properties.anchor.y);
    }

    this.game_state.prefabs[name] = this;
};

HUDExample.Prefab.prototype = Object.create(Phaser.Sprite.prototype);
HUDExample.Prefab.prototype.constructor = HUDExample.Prefab;
After creating all prefabs, the WorldState only has to initialize the HUD plugin and set the camera to follow the game hero.
The HUD plugin
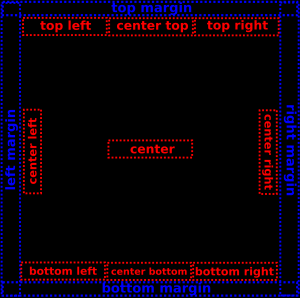
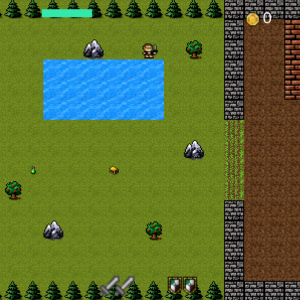
We’re going to create a HUD plugin (using the Phaser plugin class) to easily manage the HUD elements in the screen. To do this we are going to divide the screen in regions, as shown in the figure below by the red rectangles. Each HUD element must be in one region, and a given region may contain several elements. In addition, we should be able to define margins around the screen, so the HUD regions can start in custom positions, as also shown in the figure (blue rectangles).
To keep the HUD margins and elements independent from the game, we are going to add the HUD information in the JSON file. Below is an example of JSON HUD data. It defines the HUD margins on all four borders (left, right, top, bottom) and the HUD elements. Each HUD element must specify: its prefab type, which will be used to instantiate the correct prefab (the prefabs in this example will be implemented later in this tutorial); the region that the element belongs; object properties, including the texture, group and custom properties specific to each prefab.
"hud": {
        "margins": {"left": 20, "right": 50, "top": 20, "bottom": 30},
        "elements": {
            "health": {
                "type": "show_stat_with_bar",
                "region": "top_left",
                "properties": {
                    "texture": "healthbar_image",
                    "group": "hud",
                    "stat_to_show": "hero.health"
                }
            },
            "attack": {
                "type": "show_stat_with_sprite",
                "region": "center_bottom",
                "properties": {
                    "texture": "weapon_image",
                    "group": "hud",
                    "scale": {"x": 2, "y": 2},
                    "anchor": {"x": 0.5, "y": 0.5},
                    "stat_to_show": "hero.attack",
                    "stats_spacing": {"x": 30, "y": 0},
                    "stats_group": "stats"
                }
            },
            "defense": {
                "type": "show_stat_with_sprite",
                "region": "center_bottom",
                "properties": {
                    "texture": "shield_image",
                    "group": "hud",
                    "scale": {"x": 2, "y": 2},
                    "anchor": {"x": 0.5, "y": 0.5},
                    "stat_to_show": "hero.defense",
                    "stats_spacing": {"x": 30, "y": 0},
                    "stats_group": "stats"
                }
            },
            "money": {
                "type": "show_stat_with_text",
                "region": "top_right",
                "properties": {
                    "texture": "coin_image",
                    "group": "hud",
                    "scale": {"x": 2, "y": 2},
                    "stat_to_show": "hero.money",
                    "stats_group": "stats",
                    "text_style": {
                        "font": "32px Arial",
                        "fill": "#FFFFFF"
                    }
                }
            }
        }
    }
Given the JSON data, the HUD plugin code is shown below. In the “init” method it saves its properties and defines the regions begin and end coordinates, as well as assigns an empty “elements” array for each region. In the end, it calls the “create_elements” method to instantiate all HUD elements.
The “create_elements” method iterates through all elements creating them and adding them to the correct region. The elements are created using the “create_prefab” method from WorldState. That’s why we need to define the element prefab type and properties, as we did in the JSON data. Since we don’t know beforehand how many elements will be in each region, we start by creating all of them in the beginning of the region, and in the end update the elements positions in the “update_elements_positions” method.
The “update_elements_positions” method receives as a parameter a region and updates its elements positions according to the number of elements in the region. The strategy we are going to use is the following:
- If there is only one element in the region, it will be placed in the center of the region.
- If there are two elements in the region, the first one will be placed in the beginning and the second one in the end of the region.
- If there are more than two elements in the region, they will be placed equally spaced along the region.
The first two cases are easy to handle, as the code below shows. To deal with the third case, we calculate a step, which will be the space between every pair of elements. This step is given by the region dimensions divided by the number of elements. Then, it iterates through all the elements in the region, updating its positions and increasing the position by the calculated step. After all elements positions have been updated, they must be fixed to the camera, since we don’t want them to move as the game screen moves.
var Phaser = Phaser || {};
var HUDExample = HUDExample || {};

HUDExample.HUD = function (game, parent) {
    "use strict";
    Phaser.Plugin.call(this, game, parent);
};

HUDExample.HUD.prototype = Object.create(Phaser.Plugin.prototype);
HUDExample.HUD.prototype.constructor = HUDExample.HUD;

HUDExample.HUD.prototype.init = function (game_state, hud_data) {
    "use strict";
    var camera_width, camera_height, camera_center;
    this.game_state = game_state;
    this.margins = hud_data.margins;
    camera_width = this.game_state.game.camera.width;
    camera_height = this.game_state.game.camera.height;
    camera_center = new Phaser.Point(camera_width / 2, camera_height / 2);
    // define the HUD regions (begin and end points)
    this.regions = {
        top_left: {
            begin: {x: this.margins.left, y: this.margins.top},
            end: {x: (camera_width / 3) - this.margins.right, y: this.margins.top},
            elements: []
        },
        center_top: {
            begin: {x: (camera_width / 3) + this.margins.left, y: this.margins.top},
            end: {x: (2 * camera_width / 3) - this.margins.right, y: this.margins.top},
            elements: []
        },
        top_right: {
            begin: {x: (2 * camera_width / 3) + this.margins.left, y: this.margins.top},
            end: {x: camera_width - this.margins.right, y: this.margins.top},
            elements: []
        },
        center_right: {
            begin: {x: camera_width - this.margins.right, y: (camera_height / 3) + this.margins.top},
            end: {x: camera_width - this.margins.right, y: (2 * camera_height / 3) + this.margins.top},
            elements: []
        },
        bottom_right: {
            begin: {x: (2 * camera_width / 3) + this.margins.left, y: camera_height - this.margins.bottom},
            end: {x: camera_width - this.margins.right, y: camera_height - this.margins.bottom},
            elements: []
        },
        center_bottom: {
            begin: {x: (camera_width / 3) + this.margins.left, y: camera_height - this.margins.bottom},
            end: {x: (2 * camera_width / 3) - this.margins.right, y: camera_height - this.margins.bottom},
            elements: []
        },
        bottom_left: {
            begin: {x: this.margins.left, y: camera_height - this.margins.bottom},
            end: {x: (camera_width / 3) - this.margins.right, y: camera_height - this.margins.bottom},
            elements: []
        },
        center_left: {
            begin: {x: this.margins.left, y: (camera_height / 3) + this.margins.top},
            end: {x: this.margins.left, y: (2 * camera_height / 3) - this.margins.bottom},
            elements: []
        },
        center: {
            begin: {x: (camera_width / 3) + this.margins.left, y: camera_center.y},
            end: {x: (2 * camera_width / 3) - this.margins.right, y: camera_center.y},
            elements: []
        }
    };

    // create the HUD elements
    this.create_elements(hud_data.elements);
};

HUDExample.HUD.prototype.create_elements = function (elements) {
    "use strict";
    var prefab_name, prefab_parameters, prefab_position, region, prefab, region_name;
    // create the HUD elements from the JSON file
    for (prefab_name in elements) {
        if (elements.hasOwnProperty(prefab_name)) {
            prefab_parameters = elements[prefab_name];
            // find the region beginning positions
            region = this.regions[prefab_parameters.region];
            prefab_position = new Phaser.Point(region.begin.x, region.begin.y);
            // create the element prefab in the beginning of the region
            prefab = this.game_state.create_prefab(prefab_parameters.type, prefab_name, prefab_position, prefab_parameters.properties);
            // add the element to its correspondent region
            region.elements.push(prefab);
        }
    }

    // update the elements position according to the number of elements in each region
    for (region_name in this.regions) {
        if (this.regions.hasOwnProperty(region_name)) {
            this.update_elements_positions(this.regions[region_name]);
        }
    }
};

HUDExample.HUD.prototype.update_elements_positions = function (region) {
    "use strict";
    var region_dimensions, number_of_elements, step, position;
    region_dimensions = new Phaser.Point(region.end.x - region.begin.x, region.end.y - region.begin.y);
    number_of_elements = region.elements.length;
    if (number_of_elements === 1) {
        // if there is only one element, it should be in the center of the region
        region.elements[0].reset(region.begin.x + (region_dimensions.x / 2), region.begin.y + (region_dimensions.y / 2));
    } else if (number_of_elements === 2) {
        // if there are two elements, they will be in opposite sides of the region
        region.elements[0].reset(region.begin.x, region.begin.y);
        region.elements[1].reset(region.end.x, region.end.y);
    } else if (number_of_elements > 2) {
        // if there are more than two elements, they will be equally spaced in the region
        step = new Phaser.Point(region_dimensions.x / number_of_elements, region_dimensions.y / number_of_elements);
        position = new Phaser.Point(region.begin.x, region.begin.y);
        region.elements.forEach(function (element) {
            element.reset(position.x, position.y);
            position.x += step.x;
            position.y += step.y;
        }, this);
    }

    // fix all elements to camera
    region.elements.forEach(function (element) {
        element.fixedToCamera = true;
    }, this);
};
Creating the Tiled level
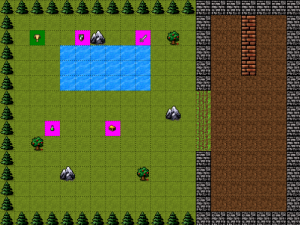
Since the focus of this tutorial is on the HUD plugin, I will not go into details on how to create the map using Tiled. If you’re interested on learning more about Tiled to create your own map, I suggest you read one of my tutorials that explains it with more details. Otherwise, you can use the map I created, provided in the source code.
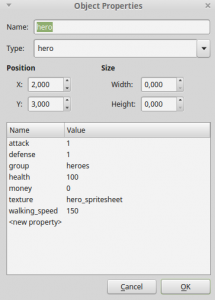
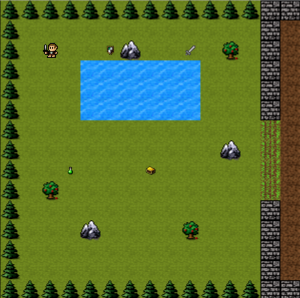
The figure below shows the map I’m going to use in this tutorial. If you’re going to create your own map the only things you must be careful are: any collidable layer must have a collision property as true (since it was used in WorldState); all prefab properties (including the prefab texture and group) must be defined as object properties, as shown below.
Hero and Item prefabs
Before creating the HUD elements, we are going to create the Hero and Item prefabs, so the hero can walks in the level and collect items.
The Hero prefab code is shown below. It will have as parameters the walking speed and the initial stats. The constructor also enables the hero physical body and creates its walking animation.
In the “update” method we use the keyboard arrow keys to move the hero. Notice that the hero can only move to a given direction if it is not already moving to the opposite direction. Also, since we use the same walking animation for all directions, we have to change the sprite scale when changing from left to right directions.
var HUDExample = HUDExample || {};

HUDExample.Hero = function (game_state, name, position, properties) {
    "use strict";
    HUDExample.Prefab.call(this, game_state, name, position, properties);

    this.anchor.setTo(0.5);

    this.walking_speed = +properties.walking_speed;

    this.stats = {
        health: +properties.health,
        defense: +properties.defense,
        attack: +properties.attack,
        money: +properties.money
    };

    this.game_state.game.physics.arcade.enable(this);
    this.body.collideWorldBounds = true;

    this.animations.add("walking", [0, 1], 6, true);

    this.cursors = this.game_state.game.input.keyboard.createCursorKeys();
};

HUDExample.Hero.prototype = Object.create(HUDExample.Prefab.prototype);
HUDExample.Hero.prototype.constructor = HUDExample.Hero;

HUDExample.Hero.prototype.update = function () {
    "use strict";
    this.game_state.game.physics.arcade.collide(this, this.game_state.layers.collision);

    if (this.cursors.left.isDown && this.body.velocity.x <= 0) { // move left if is not already moving right
        this.body.velocity.x = -this.walking_speed;
        this.scale.setTo(1, 1);
    } else if (this.cursors.right.isDown && this.body.velocity.x >= 0) { // move right if is not already moving left
        this.body.velocity.x = +this.walking_speed;
        this.scale.setTo(-1, 1);
    } else {
        this.body.velocity.x = 0;
    }

    if (this.cursors.up.isDown && this.body.velocity.y <= 0) { // move up if is not already moving down
        this.body.velocity.y = -this.walking_speed;
    } else if (this.cursors.down.isDown && this.body.velocity.y >= 0) { // move down if is not already moving up
        this.body.velocity.y = +this.walking_speed;
    } else {
        this.body.velocity.y = 0;
    }

    if (this.body.velocity.x === 0 && this.body.velocity.y === 0) {
        // if not moving, stop the animation
        this.animations.stop();
        this.frame = 0;
    } else {
        // if it is moving, play walking animation
        this.animations.play("walking");
    }
};
The Item prefab is shown below. We want to make the item collectible and allow it to change the hero stats when collected. For this, the constructor saves the stats this item increases and initializes its physical body. Then, the “update” method checks for collision with the hero and call the “collect_item” method. The “collect_item” method, by its turn checks what stats this item increases and update them on the hero accordingly. In the end, the item is killed.
var HUDExample = HUDExample || {};

HUDExample.Item = function (game_state, name, position, properties) {
    "use strict";
    HUDExample.Prefab.call(this, game_state, name, position, properties);

    this.anchor.setTo(0.5);

    this.stats = {
        health: +properties.health,
        defense: +properties.defense,
        attack: +properties.attack,
        money: +properties.money
    };

    this.game_state.game.physics.arcade.enable(this);
    this.body.immovable = true;
};

HUDExample.Item.prototype = Object.create(HUDExample.Prefab.prototype);
HUDExample.Item.prototype.constructor = HUDExample.Item;

HUDExample.Item.prototype.update = function () {
    "use strict";
    // when colliding with hero the item is collected
    this.game_state.game.physics.arcade.collide(this, this.game_state.groups.heroes, this.collect_item, null, this);
};

HUDExample.Item.prototype.collect_item = function (item, hero) {
    "use strict";
    var stat;
    // update hero stats according to item
    for (stat in this.stats) {
        // update only if the stat is defined for this item
        if (this.stats.hasOwnProperty(stat) && this.stats[stat]) {
            hero.stats[stat] += this.stats[stat];
        }
    }
    this.kill();
};
By now you can already try running the game without the HUD, to see if the player is moving and collecting items correctly.
HUD elements
Now we can finally create the HUD elements. We will focus this tutorial in creating HUD elements that show the hero stats. For this, we will use a generic ShowStat prefab as shown below, which will be extended by the other HUD elements. This prefab saves the prefab and stat it is going to show in the constructor (for example, if we want to show the hero defense, this property will store “hero.defense”). Then, the “update” method checks if the stat has changed since the last update. If so, it calls the “update_stat” method to keep it updated in the ShowStat prefab.
var HUDExample = HUDExample || {};

HUDExample.ShowStat = function (game_state, name, position, properties) {
    "use strict";
    HUDExample.Prefab.call(this, game_state, name, position, properties);

    this.stat_to_show = properties.stat_to_show;
};

HUDExample.ShowStat.prototype = Object.create(HUDExample.Prefab.prototype);
HUDExample.ShowStat.prototype.constructor = HUDExample.ShowStat;

HUDExample.ShowStat.prototype.update = function () {
    "use strict";
    var prefab_name, stat_name, new_stat;
    prefab_name = this.stat_to_show.split(".")[0];
    stat_name = this.stat_to_show.split(".")[1];
    new_stat = this.game_state.prefabs[prefab_name].stats[stat_name];
    // check if the stat has changed
    if (this.stat !== new_stat) {
        // update the stat with the new value
        this.update_stat(new_stat);
    }
};

HUDExample.ShowStat.prototype.update_stat = function (new_stat) {
    "use strict";
    this.stat = new_stat;
};
Now that we have the ShowStat prefab, we are going to create the following HUD elements, which will extend it:
- ShowStatWithText: prefab that will show the value of a stat using a text
- ShowStatWithBar: prefab that will show the value of a stat with a bar (like a health bar)
- ShowStatWithSprite: prefab that will show the value of a stat with sprites
Before going into the code, there is something important to mention. Remember that in the HUD plugin we first add all elements in the beginning of the region and then reset them to the correct position. Because of that, we can’t use the HUD element position before it is reset because it will be incorrect. That’s why in the following prefabs we use it on the “reset” method, as you will see.
The ShowStatWithText prefab is shown below. In the “reset” method (when the position is already correct) it creates the text that will show the stat value. Then, in the “update_stat” method it updates the text to show the next stat value.
var Engine = Engine || {};
var HUDExample = HUDExample || {};

HUDExample.ShowStatWithText = function (game_state, name, position, properties) {
    "use strict";
    HUDExample.ShowStat.call(this, game_state, name, position, properties);
    this.text_style = properties.text_style;
    this.stats_group = properties.stats_group;
};

HUDExample.ShowStatWithText.prototype = Object.create(HUDExample.ShowStat.prototype);
HUDExample.ShowStatWithText.prototype.constructor = HUDExample.ShowStatWithText;

HUDExample.ShowStatWithText.prototype.reset = function (position_x, position_y) {
    "use strict";
    Phaser.Sprite.prototype.reset.call(this, position_x, position_y);
    // create the text to show the stat value
    this.text = new Phaser.Text(this.game_state.game, this.x + this.width, this.y, "", this.text_style);
    this.text.fixedToCamera = true;
    this.game_state.groups[this.stats_group].add(this.text);
};

HUDExample.ShowStatWithText.prototype.update_stat = function (new_stat) {
    "use strict";
    HUDExample.ShowStat.prototype.update_stat.call(this, new_stat);
    // update the text to show the new stat value
    this.text.text = this.stat;
};
The ShowStatWithBar is also simple. The only method we have to implement is “update_stat”, which will change the prefab scale according to the stat value, making the bar bigger when the stat is greater.
var Engine = Engine || {};
var HUDExample = HUDExample || {};

HUDExample.ShowStatWithBar = function (game_state, name, position, properties) {
    "use strict";
    HUDExample.ShowStat.call(this, game_state, name, position, properties);
};

HUDExample.ShowStatWithBar.prototype = Object.create(HUDExample.ShowStat.prototype);
HUDExample.ShowStatWithBar.prototype.constructor = HUDExample.ShowStatWithBar;

HUDExample.ShowStatWithBar.prototype.update_stat = function (new_stat) {
    "use strict";
    HUDExample.ShowStat.prototype.update_stat.call(this, new_stat);
    // use the stat to define the bar size
    this.scale.setTo(this.stat, 2);
};
The ShowStatWithSprite prefab is a little bit more complex. In the “reset” method it shows the initial stats by calling the “show_initial_stats” method. This method creates a sprite for each value of the stat and add it to an array.
The “create_new_sprite” method is responsible for creating each sprite. First, it calculates the position of the next sprite from the number of sprites that already exist. Notice that the stat sprites use the same texture as the ShowStatWithSprite prefab, so all of them have the same width and height. After finding the position, it checks if there is a dead sprite in the stats group. If so, it reuses it by only resetting it to the desired position. Otherwise, it creates a new one.
Finally, the “update_stat” method will be different from the other two HUD elements. First, it checks if the new stat is lower or higher than the previous one. If it is higher, it must create new sprites (using the “create_new_sprite” method) until the new stat value is reached. Otherwise, it must kill the extra stats so as to show the correct stat value.
var Phaser = Phaser || {};
var Engine = Engine || {};
var HUDExample = HUDExample || {};

HUDExample.ShowStatWithSprite = function (game_state, name, position, properties) {
    "use strict";
    HUDExample.ShowStat.call(this, game_state, name, position, properties);
    this.visible = false;
    this.stats = [];
    this.stats_spacing = properties.stats_spacing;
    this.stats_group = properties.stats_group;
    // it is necessary to save the initial position because we need it to create the stat sprites
    this.initial_position = new Phaser.Point(this.x, this.y);
};

HUDExample.ShowStatWithSprite.prototype = Object.create(HUDExample.ShowStat.prototype);
HUDExample.ShowStatWithSprite.prototype.constructor = HUDExample.ShowStatWithSprite;

HUDExample.ShowStatWithSprite.prototype.show_initial_stats = function () {
    "use strict";
    var prefab_name, stat_name, initial_stat, stat_index, stat;
    // show initial stats
    prefab_name = this.stat_to_show.split(".")[0];
    stat_name = this.stat_to_show.split(".")[1];
    initial_stat = this.game_state.prefabs[prefab_name].stats[stat_name];
    for (stat_index = 0; stat_index < initial_stat; stat_index += 1) {
        // create new sprite to show stat
        stat = this.create_new_stat_sprite();
        this.stats.push(stat);
    }
    this.stat = initial_stat;
};

HUDExample.ShowStatWithSprite.prototype.reset = function (position_x, position_y) {
    "use strict";
    Phaser.Sprite.prototype.reset.call(this, position_x, position_y);
    // it is necessary to save the initial position because we need it to create the stat sprites
    this.initial_position = new Phaser.Point(this.x, this.y);
    this.show_initial_stats();
    this.visible = false;
};

HUDExample.ShowStatWithSprite.prototype.update_stat = function (new_stat) {
    "use strict";
    var stat_difference, stat_index, stat;
    stat_difference = Math.abs(new_stat - this.stat);
    if (new_stat > this.stat) {
        // if the new stat is greater, we must create new stat sprites
        for (stat_index = 0; stat_index < stat_difference; stat_index += 1) {
            stat = this.create_new_stat_sprite();
            this.stats.push(stat);
        }
    } else {
        // if the new stat is lower, we must kill extra stat sprites
        for (stat_index = 0; stat_index < stat_difference; stat_index += 1) {
            stat = this.stats.pop();
            stat.kill();
        }
    }
    HUDExample.ShowStat.prototype.update_stat.call(this, new_stat);
};

HUDExample.ShowStatWithSprite.prototype.create_new_stat_sprite = function () {
    "use strict";
    var stat_position, stat, stat_property;
    // calculate the next stat position
    stat_position = new Phaser.Point(this.initial_position.x + (this.stats.length * this.stats_spacing.x),
                                          this.initial_position.y + (this.stats.length * this.stats_spacing.y));
    // get the first dead sprite in the stats group
    stat = this.game_state.groups[this.stats_group].getFirstDead();
    if (stat) {
        // if there is a dead stat, just reset it
        stat.reset(stat_position.x, stat_position.y);
    } else {
        // if there are no dead stats, create a new one
        // stat sprite uses the same texture as the ShowStatWithSprite prefab
        stat = this.game_state.groups[this.stats_group].create(stat_position.x, stat_position.y, this.texture);
    }
    // stat scale and anchor are the same as the prefab
    stat.scale.setTo(this.scale.x, this.scale.y);
    stat.anchor.setTo(this.anchor.x, this.anchor.y);
    stat.fixedToCamera = true;
    return stat;
};
Now, you can add the HUD elements to your HUD JSON data and see how it works for your game. Try different combinations and see which one looks better!
