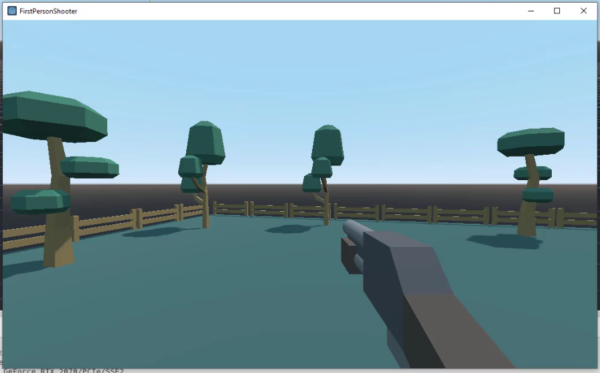
There are a lot of ways to build FPS games, but having actual bullets remains popular. So, let’s talk about Godot bullets as they pertain to this genre.
The first-person shooter (FPS) genre of video games is one of the most popular among players – with huge franchises like Call of Duty, Halo, Apex Legends, and many others.
While FPS games have a lot of different features that could be covered, there is one mechanic that stands above the rest: shooting. Even in a versatile environment with tons of different gun types, implementing the shooting of the Godot bullets looks pretty much the same.
With that in mind, we’ve prepared this Godot tutorial where we’re going over the entire process of creating the Godot bullet object and setting up its properties in the game engine. We’ll also cover the scripting of the projection of the Godot bullets out of the gun being used in the game.
If you’re ready, let’s get started!
Table of contents
Project Files
You can download a copy of the source code files (including the assets) for the project done in this tutorial here.
Creating The Godot Bullet
We’re going to start by scripting the ability for our player to shoot. For that, let’s create a new scene and save it as “Bullet.tscn”:

Here, we’re going to create the Godot bullet prefab that we’ll be spawning at the muzzle. Create a new root node of type Area, by clicking on ‘Other Node‘ and searching for “Area”:

Area is a physics node that won’t actually collide with other objects, but it can detect collisions as something goes through its collider. This is useful for Godot bullets as they don’t need to bounce off or collide with anything, we just need it to detect when it has entered another object:

Rename this node to “Bullet”, and drag the bullet model (Models > Weapon > ammo_pistol.obj) into the scene as a child node of our Godot Bullet:

Note that the “ammo_pistol.obj” asset we’re using here can be found in the project files link above.
In the inspector, set the Transform > Translation to (0, 0, 0) to center it in the scene and set the Scale to (10, 10, 10). Lastly, set the rotation to (90, 0, 0) so it is facing forward, not upward:

We’ll now add another child node (CTRL+A) of type CollisionShape to the root node of our Godot Bullet:

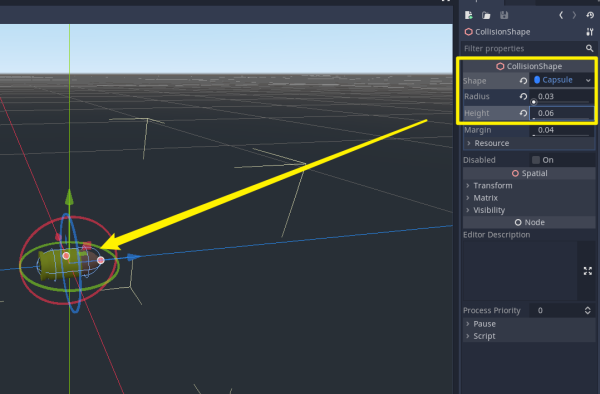
Set the collider shape to ‘Capsule‘ in the Inspector. Then, click on the text “Capsule” to view more options and set the radius to 0.03 and the height to 0.06:
Adding a Timer
We need to add just one more component (CTRL+A), which is a Timer, again as a child node of our Godot Bullet:
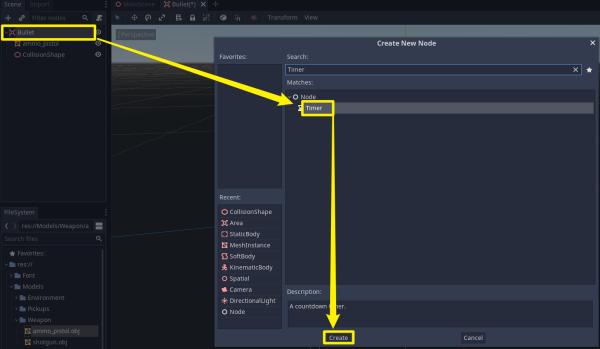
Timer is a node that waits for a given time (1 sec by default) and then emits a signal. A signal in Godot refers to an event that a node can call out once it meets a certain condition.
In the inspector, you can choose the Node tab and see the list of signals available:
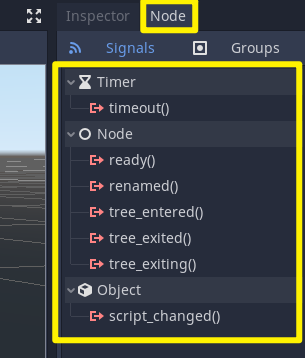
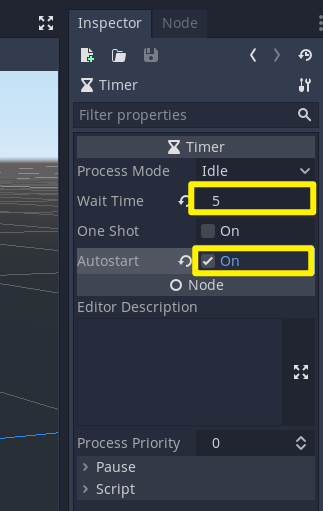
Back to the Inspector panel, let’s set the wait time to 5 and enable ‘Autostart’. This will allow the timer to automatically start as soon as the game starts:
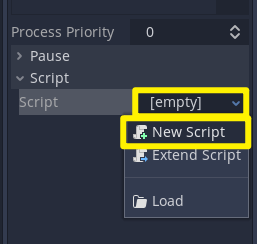
Next, select the root node (our Godot Bullet once again) and create a new script by going to Script > [empty] > New Script:
First of all, we are going to create variables for the speed and damage of our Godot bullet as follows:
extends Area

var speed : float = 30.0
var damage : int = 1
To move the bullet forward, we can multiply the global transform on the z-axis (global_transform.basis.z) by speed and apply it directly on translation within func_process(). Note that delta is multiplied here to convert it from 30 units per frame to 30 units per second:
extends Area

var speed : float = 30.0
var damage : int = 1

func _process(delta):

  translation += global_transform.basis.z * speed * delta
Now we need to create another function that destroys the Godot bullet whenever the bullet either runs out of the timer or hits an object. For this, we can use queue_free() which destroys the node:
func destroy ():

  queue_free()
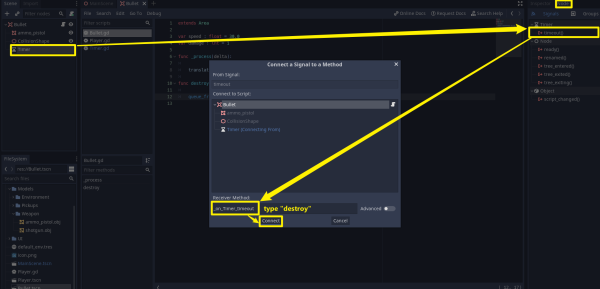
Save the script. Go back to the Timer node, open up the Node panel, and double-click on the timeout() signal. It will ask us to connect a signal to a method.
In the Receiver Method input field, type in the name of the function to call (i.e. “destroy”) and hit ‘Connect’:
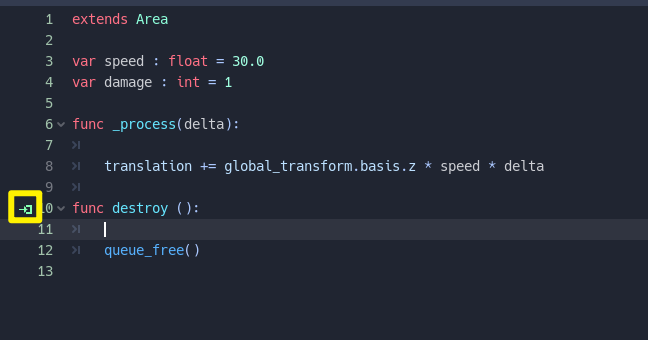
Our script now has this little green mark on the left which signifies that this function is connected to a signal. This function will be called once a signal is emitted:
Detecting An Enemy
Following, we need to be able to detect when the bullet enters another collider. Select the root node (of our Godot Bullet) and open up the Node panel.
Double-click on ‘body_entered‘ and hit ‘Connect‘:
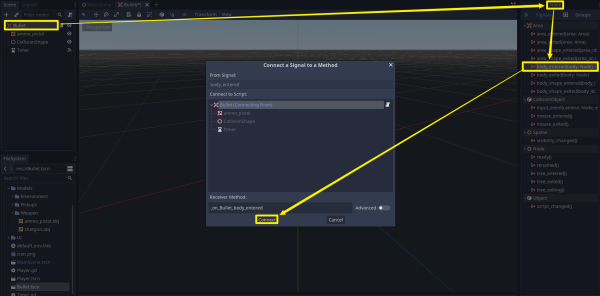
We’re going to check if the object that the bullet collided with is an enemy (by checking if the object has a method called “take_damage“), and if true, we will call the “take_damage” function and send over the damage value:
func _on_Bullet_body_entered(body):

  if body.has_method("take_damage"):
    body.take_damage(damage)
    destroy()
Shooting Bullets
Let us now make it so that we can shoot the Godot bullet from the game’s weapon.
Open up the player script file (Player.gd) and create a new variable to get a reference of the bullet scene:
onready var bulletScene = load("res://Bullet.tscn")Then we need to create a function that will be called whenever we press down on the left mouse button:
func shoot ():
In this function, we’ll create a new bullet scene node using bulletScene.instance() in a variable called “bullet”:
func shoot ():

  var bullet = bulletScene.instance()
Then we need to give it a parent node so it can actually exist in our main scene. We can do this by using .add_child() function:
func shoot ():

  var bullet = bulletScene.instance()
  get_node("/root/MainScene").add_child(bullet)
Now we need to position it and orientate it where the muzzle is at:
func shoot ():

  var bullet = bulletScene.instance()
  get_node("/root/MainScene").add_child(bullet)

  bullet.global_transform = muzzle.global_transform
We have to subtract one from our ammo as well:
func shoot ():

  var bullet = bulletScene.instance()
  get_node("/root/MainScene").add_child(bullet)

  bullet.global_transform = muzzle.global_transform

  ammo -= 1
Finally, we need to call the shoot function whenever we press the shoot button. We will put it inside _process() as we need to check if the shoot button is pressed every frame. Also, ensure that the ammo is greater than 0:
func _process(delta):

  # check to see if we have shot
  if Input.is_action_just_pressed("shoot") and ammo > 0:
    shoot()
Note that the muzzle node should be facing the correct direction. If it’s facing the wrong direction, rotate it 180 degrees on the y-axis:
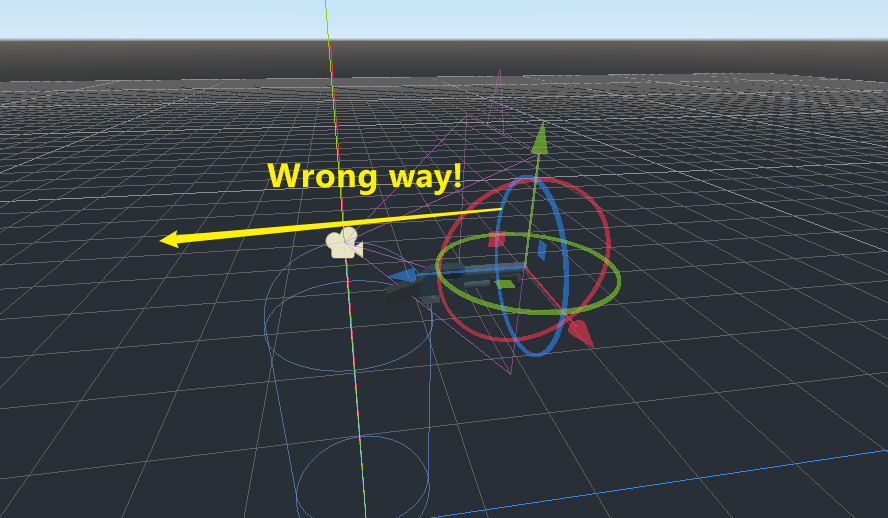
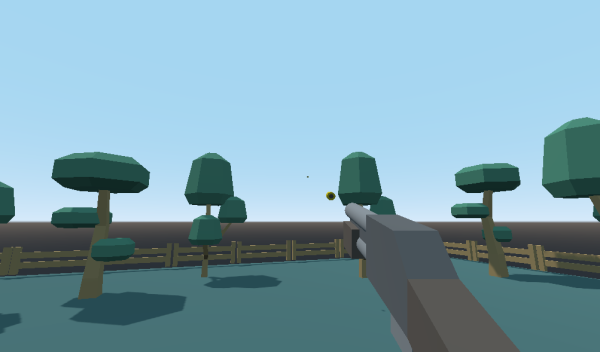
Save and hit Play. We’re now able to shoot bullets from our gun:
Godot Bullet Making Conclusion
Well done on completing this tutorial!
For those looking to build their own FPS, this is a huge step already! You can now shoot bullets from any weapon of your choice in your Godot game – with systems that make customizing your bullet assets easy!
FPS games make great projects for beginners and experience developers alike – but there’s more to do. Expanding your project further, you can design the game environment and the player’s choice of weapons as you see fit, apart from being able to add interactable pickup items and coding the enemy AI as you’d like. There are many more directions to go, but with the core shooting mechanics done you’re on the path to success!
We wish you the best of luck in your game development journey!
Want to learn more about FPS games in Godot? Try our complete Build a First-Person Shooter with Godot 3 course.
Did you come across any errors in this tutorial? Please let us know by completing this form and we’ll look into it! FINAL DAYS: Unlock coding courses in Unity, Godot, Unreal, Python and more.
