You can access the full course here: GODOT 4 MINI-PROJECTS
Table of contents
Introduction
In this tutorial, we will learn how to create a physics-based mini-game in Godot that includes a responsive playground with a player character and various crates. The player will be able to interact with the crates through force and move them around, creating a dynamic and engaging experience. We will cover concepts such as setting up the game scene, creating player and crate nodes, adjusting physics properties, and implementing movement in a 2D environment.
Project Files
In order to follow this tutorial, ensure that you download the provided project files which include the necessary assets and scripts.
Download Project Files Here
Physics – Part 1
In this lesson, we are going to begin looking at our physics-based mini-game. We are going to use this mini-game to learn Godot’s physics system along with how to push a player around based on mouse clicks.
Creating a New Scene
To start with, we want to create a new scene for our mini-game to take place in.

We will make this a 2D project, and use the 2D Scene button to select the root node.

We will also rename the root node to Main.

Before saving our scene, we want to create a new folder in the FileSystem which we call Physics.

You can then Save The Scene in the new folder and call it Physics.tscn.

Creating our Player Nodes
The first thing we need to create for our game is the player character. To do this we will need a sprite. As part of this course, there is a downloadable asset pack you can use for the sprites of our player, although of course, you can use your own assets if you would prefer. You can find the files in the Course Files section under the name Assets – Godot 4 Mini-Projects.

When you download and extract the files you will find two folders inside, we will be using the two sprites found inside the Physics Project folder. To use them in Godot we will drag the files inside the Physics folder in the FileSystem.

For the root node of our Player, we will use a RigidBody2D which will allow us to have the player be affected by the Godot Physics System.

We can rename this to Player to easily identify it.

We can then drag the PhysicsCharacter.png asset into our viewport to instantiate it as a Sprite node.

Next, rename the node to Sprite and make it a child node of our Player rigid body node.

Finally, set the Position property of the Sprite to (0,0) to center it on the Player node.

Fixing Blurry Pixel Art
You will notice that our pixel art appears blurry in Godot by default. To fix this we need to change the filtering mode of our textures. We can do this by opening the Project Settings window.

Then select the Textures tab.

Finally, change the Default Texture Filter value to Nearest. This will make our pixel art sprites appear much sharper.

We also need a collider for our rigid body to work with the physics systems. To do this we will add a new CollisionShape2D node as the child node of our Player node.

We will set the Shape property to a New RectangleShape2D.

Finally, use the orange circles to resize the collider to the same size as our Sprite.

We will also add a Camera2D node so that we can see our Player.

We can zoom in the camera by setting the Zoom property to (4,4).

If you now press Play you will see our Player node falls due to gravity, which is the result of the Rigidbody2D node. In the Inspector we can modify lots of settings, such as the mass which will affect the weight of forces applied to the object. The Gravity Scale will determine how much gravity is applied to the node. There are lots of other settings such as Linear and Angular drag which can also be modified to change other behaviors of the rigid body.
We will change the Gravity Scale to a value of 0 to stop our Player node from being affected by gravity, as we don’t want that for this game.

Adding Movement to the Player
The next step will be to add a New Script to our Player rigid body node.

We will name this script PhysicsPlayer.gd and save it in our Physics folder.

We can delete the _ready function as we won’t be using them in this script, but we will use the _process function. We will start this script by creating a variable called hit_force using the type of float and set it equal to 50.0 by default.
var hit_force : float = 50.0
We will use this variable as the force applied when the player clicks on the screen. To detect if the left mouse button is pressed we will use the following if statement in the _process function.
func _process(delta):
    if Input.is_mouse_button_pressed(MOUSE_BUTTON_LEFT):
From here we will get the direction we want to use. This will be the direction from the Player node to the mouse position when the user clicks.

We will store this direction in a variable named dir and use the direction_to function to get the direction from our Player’s global_position to the mouse position.
func _process(delta):
    if Input.is_mouse_button_pressed(MOUSE_BUTTON_LEFT):
        var dir = global_position.direction_to(get_global_mouse_position())
We can then use the apply_impulse function to apply a force in that direction.
func _process(delta):
    if Input.is_mouse_button_pressed(MOUSE_BUTTON_LEFT):
        ...
        apply_impulse(dir * hit_force)
Now if you save the script and press Play you will see the player moves in the direction you click. However, it is a little hard to control as the Player rigid body doesn’t have any drag. We can increase the drag by increasing the Damp value under the Linear section in the Inspector tab.

You can change this to any value you like to get the feeling you want, along with changing the mass which will affect how much force is applied.
In the next lesson, we will be adding our crates to the scene which will also be physics objects to finish this mini-project.
Physics – Part 2
In this lesson, we will be finishing our physics-based mini-game in Godot. We will first be looking at how to create a crate, add a collision shape, and adjust the gravity and drag.
Creating the Crates
The first step is to create a new Rigidbody2D node which we will rename to Crate.

From here we will use the Crate.png asset as a Sprite for the Crate node tree.

Remember to set the Position property of the new Sprite to (0,0) to center the node.

Next, we need to add a CollisionShape2D as a child node.

We can set the Shape property to a New RectangleShape2D and adjust the bounds to fit the crate.

Finally, we want to set the Gravity Scale to 0 to stop it from falling to the ground.

If you now press Play you will see you can move towards the crate and hit it to move it around. We will want to add some drag to this so that the crate doesn’t move around forever, we will use a value of 3 here, but feel free to change this to your liking.

Creating Multiple Crates
Finally, we can save the crate as a scene and duplicate it to create multiple crates. We will do this by dragging it from the Scene to the FileSystem.

We will then save the scene with the name Crate.tscn.

We can then duplicate (CTRL+D) to create lots of instances of the crate around the scene.

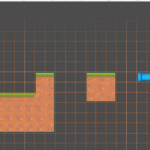
Now we can press Play and move the player around to interact with all of the crates in the scene.
Conclusion
Congratulations on finishing this tutorial! You have successfully created a physics-based mini-game using Godot. By now, you should have an understanding of how to interact with the game’s physics system, create rigid bodies, manipulate their properties, and enable the player to move objects around the scene. This project can be further expanded and integrated into other game experiences, enhancing your portfolio and showcasing your ability to use Godot’s physics system.
Did you come across any errors in this tutorial? Please let us know by completing this form and we’ll look into it! FINAL DAYS: Unlock coding courses in Unity, Godot, Unreal, Python and more.
Transcript – Physics – Part 1
Hey everyone. In this lesson we are gonna begin looking at our physics project. Now this mini project is where we are going to be learning about GODOT 4’s physics system, okay? And it is gonna be a little game involving a player that we can push around with the mouse cursor and watch as it interacts and bounces around a bunch of different cubes. Okay, so let’s hop over into Goudeau and have a look at how we can set this up.
So first of all, we need to create ourselves a brand new scene. So I’m gonna go scene, new scene and this is gonna be a 2D project. So we are going to set the root node to be a 2D scene and we are then going to rename this node to be main since I like making my root nodes call domain. And then we are going to save the scene. Now we are going to save this, um, we are gonna be creating a new folder. So let’s, before we do that, go down to our file system, right click new folder and call this one physics. Okay? We can then save our scene, save it to that physics folder. So we on to go up in the path, select the physics folder, open that up and rename this to be our physics dot tsc n. Hit save. And here we are.
Now the first thing we need to do is create ourselves, our player. Now, uh, included with this course in the course files tab is a downloadable zip file which contains all of the assets you’ll need for this course, although you can use your own sprites if you wish. So when you download and, and extract the contents of that folder, you should have a two folders here, loops project and physics project. Inside a physics project, you should have two sprites, a crate and a physics character. We are gonna select those and drag them down into that physics folder inside of our file system. Okay, so we’ll select those, drag them into physics, there we go.
Now what we’re going to do is we are going to create our player. Now our player is not going to be an area 2D or a character body 2d. Instead it is going to be a rigid body 2d. So we can add a new node here, look for a rigid body 2D and create that. Now what is a rigid body 2d? Well, a rigid body is basically an object that can be affected by forces. It can collide with objects, it has friction, it has mass inertia, um, and it’s basically what you’d expect from a real-life object that interacts with a physical environment. So I’m gonna rename the rigid body to be player. Okay, so let’s get our physics character Sprite and drag that into our scene here, making that a child of player, I’m gonna rename it to be Sprite, since I like naming my nodes pretty much exactly what they are and what they do, uh, will set its position to be zero on the X and at zero on the Y so that it is in the direct center of the rigid body.
Now you may notice that the Sprite is quite blurry and that is because of the uh, filtering mode for textures. So to fix this we can go up to project, project settings and then in project settings we are gonna go down to where we have textures and where we have our default texture filter, we are gonna change that from linear to nearest. And that basically means that instead of trying to blur the pixels together to make it look like a more uh, more concise image, it’s going to render each pixel specifically. And there we go.
Now of course this is only if you are using uh, pixel. If you are using uh, higher res images, then you probably want to keep um, linear on. So now we also need a collider for our rigid body in order for it to actually work. Uh, cause if it doesn’t have a collider then it doesn’t really serve a purpose. So we’re gonna right click on player go edge, agile node and look for a collision shape 2d. We’re gonna set that shape to be a new rectangular shape and we can then resize it to fit the bounds of that Sprite. And there we go.
So now that we have our player ridge body, what can actually do? Well let’s see, an action. So I’m gonna do is I’m gonna go up to this button here, which is run current scene or F six is the shortcut press play. And as you can see, it’s a bit hard to see, but our play actually fell with gravity. So before we continue, let’s go ahead and add in a camera. So I’m gonna create a new node of type camera 2d. There we go. Um, and if we zoom out, we can actually see this purple outline, what it’s rendering. Uh, let’s zoom it in a bit. So I’m gonna set these zoom to be two.
So now we can press play and have a look and see if it works. So I’ll press play and there we go. And as you can see, it was pretty quick but our character actually began falling down and that is because they are being affected by gravity. Now if we select our rigid body here, um, let’s move it up a bit so we can actually see it a bit more. We’ll press play again and as you can see there they go falling.
Now over here in the inspector we can modify all of the different settings. When it comes to a rigid body mass, basically defines you know, how heavy an object is and that will affect um, the amount of force it gets applied to it. Um, if a lighter object for example, hits into a heavy object, that heavy object isn’t gonna move as far. If it is heavier than the lighter object for example, we then have inertia, gravity scale, which defines how much gravity is being applied. We also have a bunch of other options as well that you can modify and change. Uh, you can add linear drag, you can add angular drag, you can add constant forces. There’s a lot of stuff you can do with a rigid body 2d.
So if I were to move the gravity scale down to about, um, let’s just say zero, do you. Wanna notice that when I press play nothing happens, it just stays there and that’s because it is no longer being affected by gravity. Now how do we actually get our character to start moving around? Okay, well to do this, what we’re going to do is we are going to select our player.
We’re gonna go down here in the inspector and we are gonna create a brand new script, which I’m gonna call our physics player. Now, inside of this script make sure that it is extending rigid body 2d. As we do need to access these specific properties, what we are gonna do is delete the ready and process function since we won’t be needing those. And we are gonna create a variable called hit force of type float. And this is gonna be equal to 50.
Now hit force is basically gonna be the amount of force we are going to apply to our character whenever we click. Now how are we going to detect a click? Well, in fact, we are actually going to use the process function. So let’s go down here and recreate that.
So funk process and with would be delta parameter. Now we are going to check to see if our mouse, if our left mouse button is being pressed. And to do that we can just go if input.is underscore mouse button pressed mouse button underscore left, then what we are going to do is we first of all need to get the direction that we want to move and the direction is basically going to be the angle from our player here to wherever our mouse cursor is. So if I’m over here and I click, that’s up, down here is down, right, and left. Okay?
So we basically want to find the direction vector and move in that and basically hit ourselves in that direction. To do this, I’m going to create a variable called D for direction. And this is going to be equal to our global underscore position direction two and that we want to get the direction two. Now get underscore global mouse position. Okay, so we are getting our position and we are calculating the direction to our mouse.
What we can do then is call the apply underscore impulse function. We need to give it a vector and this is just going to be our direction multiplied by hit force. So now if we save that and we press play again, we should see that whenever I click a player goes moving in that direction, okay? But as you can see, they’re flying all over the place and it’s kind of hard to control.
So what we need to do is apply some drag to our player, otherwise they’ll keep moving on forever as if they were in, you know, in space where there’s no air resistance. So I’m going to select our player right here. We are going to go down to where we have linear, open that up, and here we can go to damp. And this basically damps our velocity over time. And I’m just gonna set this here to be one. And now if I press play, you’ll see that whenever I move we get hit and then we slow down. Okay?
And you can of course modify this as well if you wish. We can also change our mass and I’ll show you how that affects it. So, if I change our mass to five, we are all of a sudden going to be moving a lot slower. And the reason why is because if you have something that weighs one kilo and something that weighs five kilos, it’s going to require a lot more force to push the thing that is five kilos compared to the thing that is one kilo. So that is just a look at how we have our mass and our damp, which affects quite a bit when it comes to our character control here.
Now, in fact, I’m actually going to zoom in this a little bit more just so we can get a better view. So if we’ve got a 2D here, select our camera. I’m going to bump this up to four. Press play. There we go. That’s gonna be a bit better, like so.
Now, in the next lesson, we are going to be adding in our crates, which are also going to be physics objects. And we are going to be finishing off this little project right here.
Transcript – Physics – Part 2
Welcome back everyone. In this lesson, we are gonna be finishing off our physics project right here. And to do that we are going to be creating some crates that we are gonna be moving around with our player. So to do this, I’m going to create a new node of type rigid body 2d. Once again, I’m gonna rename this to be called crate.
And this crate is going to have a Sprite of the crate png. We can make that a child of the crate, rename that to be Sprite, set its position to zero on the x and zero on the Y, and then we can move this crate over here a bit. We then want to add on a collision shape 2D node, so collision shape 2d. We then wanna give it a shape of rectangular and we can then modify its bounds a bit so it fits correctly. And there we go.
Okay, so we got our collider on our shape right here. Now what we need to do is just press play and test it out. But first we need select our crate and make sure that it doesn’t fall to the ground. So we are gonna set the gravity scale to be zero. Um, we’ll keep the mass at one. Now if we press play, you’ll notice that we can move towards the crate and if we hit it, it begins to move around. Whoops. And I just tapped out there.
Let’s press play again. So, yep, we can move around here. We can hit the crate. And as you can see, whenever I hit it, it will basically, um, move wherever we bounce. You know, it’s just like real life when you hit something, um, with another object, it’s gonna bounce off it. Um, but we can also add some drag to this crate, cuz right now it’s just gonna be floating around forever. So I’ll open up linear, set the damp to be three, and we can then press play and test it out again. So it’ll hit the crate. It moves, it stops. And there we go.
So let’s go ahead, let’s save this crate as a, um, physics. Oh, as a, as a scene, I mean. So I’ll drag to a physics folder, save that as crate. We can then duplicate this crate scene right here, control D. And we are just going to create a load of different crates here, um, for our player to fly around in and collide with it, Kate. Okay, so now we can press play and as you can see, we can move around and all these crates are gonna interact with each other. Now, when it comes to physics inside of Gau, um, there is quite a lot you can do of it. Um, there are many different game ideas.
If you have a player that you wanna be able to move a crate to maybe reach a higher place than a platformer, you can just make that create a physics object and the player should be able to push it along. Um, yeah, and there’s many other game types as well that you can use for physics. Um, I mean, I, I couldn’t have a hundred right now, but I’m sure you can probably think of a bunch as well. So experimenting with the rigid body, 2d, uh, component and also the rigid body in 3D as well, that also works as a 3D physics object. Um, yep, I recommend you experiment with it, see what you can do, and try and make some creative games.
So that is our physics project done. Thank you for watching.
Interested in continuing? Check out our all-access plan which includes 250+ courses, guided curriculums, new courses monthly, access to expert course mentors, and more!