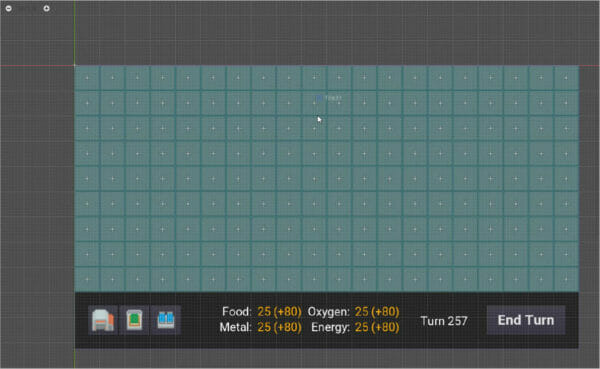
Strategy games are still one of the most popular genres – testing players’ decision-making abilities to achieve goals with limited resources.
However, they can involve some really taxing mechanics for developers as well to create, let alone balance to make a challenging but fun game. That said, with a smaller map and only a handful of different types of buildings or resources, we can already familiarize ourselves with the process of developing city-builders, which are a great start for any skill level!
In this Godot tutorial, you’ll learn how to map all the tiles of your grid in a way to know which ones have buildings on them and which are available to be selected next. We’ll also show you how to highlight tiles that are ready to receive buildings on them in each turn!
That said, let’s get started!
Table of contents
Project Files
Before you begin, note that some basic Godot experience is required, including knowledge of how to set up your project and create your tile map for the game. Aside from that, you can download a copy of the source code files for the project done in this tutorial here.
Tile Script
To start, go over to the Tile scene and select the root node:
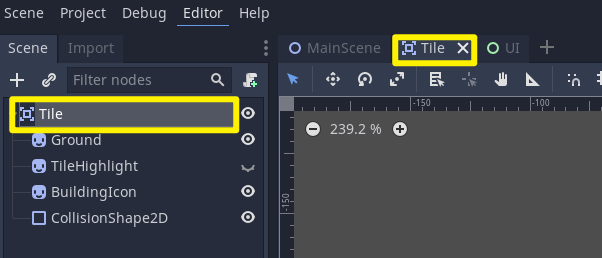
Create a new script on our tile in the inspector:
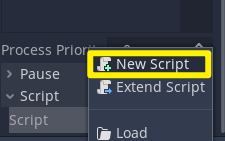
Let’s save the script as “Tile.gd”.
Creating Variables
In this script, we’ll create a boolean called ‘startTile’ using the keyword export. The export keyword allows us to set the value of the variable in the Inspector:
extends Area2D

export var startTile : bool = false
We will select the tile in the middle and set the ‘startTile‘ to be true (ticked):
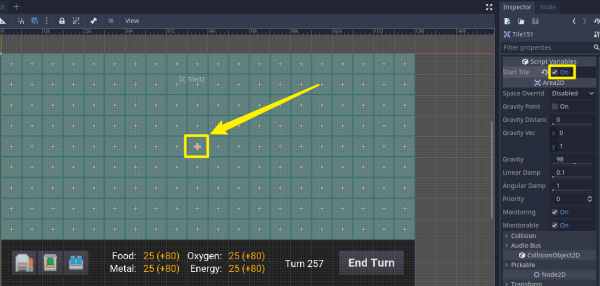
We need two more boolean variables to check whether or not this tile has a building on it, and also to check if we can place buildings on the selected tile:
extends Area2D

export var startTile : bool = false

var hasBuilding : bool = false
var canPlaceBuilding : bool = false
Functions Set Up
Now, we need to load two sprite components: one for highlighting the tiles, and one for building icons as follows.
extends Area2D

export var startTile : bool = false

var hasBuilding : bool = false
var canPlaceBuilding : bool = false

# components
onready var highlight : Sprite = get_node("Highlight")
onready var buildingIcon : Sprite = get_node("BuildingIcon")
The function below adds the current node to the “Tiles” group as soon as it appears in the scene tree:
func _ready ():

  add_to_group("Tiles")
Next, we’re going to create a toggle function that is going to be called whenever we want to enable/disable the Highlight. This will be used to check whether or not we can build on our tile:
func toggle_highlight (toggle):

  highlight.visible = toggle
  canPlaceBuilding = toggle
When we click on the tile, we will send over the Sprite to be displayed in our BuildingIcon:
func place_building (buildingTexture):

  hasBuilding = true
  buildingIcon.texture = buildingTexture
Detecting Clicks on the Tiles
We need also to add a signal to detect when we have clicked on the tile. With the “Tile” node selected, go to the Inspector and click on the Node panel:
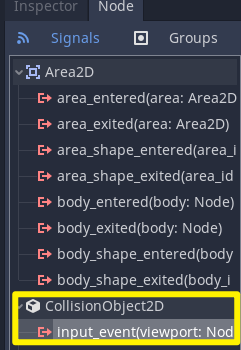
Let’s double-click on Input_event, select the “Tile“, and click on “Connect“:
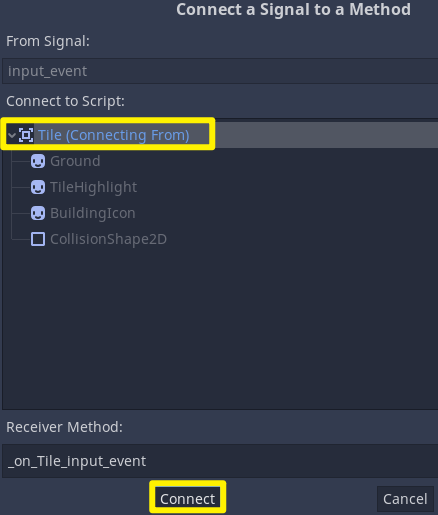
With this, a new function has been created inside our Tile script:
extends Area2D

export var startTile : bool = false

var hasBuilding : bool = false
var canPlaceBuilding : bool = false

# components
onready var highlight : Sprite = get_node("Highlight")
onready var buildingIcon : Sprite = get_node("BuildingIcon")

func _ready ():
  add_to_group("Tiles")

func toggle_highlight (toggle):
  highlight.visible = toggle
  canPlaceBuilding = toggle

func place_building (buildingTexture):
  hasBuilding = true
  buildingIcon.texture = buildingTexture

func _on_Tile_input_event(viewport, event, shape_idx):
  pass # Replace with function body.
Scripting the Map
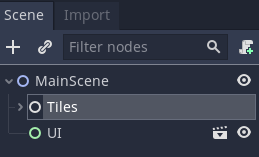
Our next step is to do the map script. The map script is going to be managing all of the tiles in our scene. It’s going to be managing tile replacement and tile highlighting.
Let’s create a new script on the “Tiles” node:
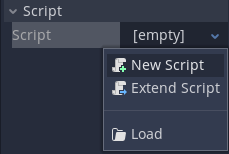
We’ll save the script as “Map.gd“:
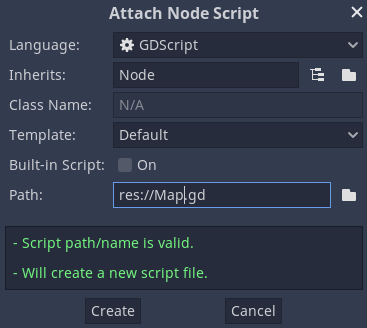
First of all, we’re going to have an array for all the tiles, another for those tiles that have the buildings, and a float for the size of each tile:
extends Node

var allTiles : Array
var tilesWithBuildings : Array
var tileSize : float = 64.0
For information about Arrays, visit the documentation: https://docs.godotengine.org/en/stable/classes/class_array.html
Getting Tile at Given Position
We will now create a function to check whether there is a tile at a certain position on the grid and if so, it also checks if there’s no building on that tile. If both conditions are true, it will return that tile to us. Otherwise, we’ll return nothing (null):
extends Node

var allTiles : Array
var tilesWithBuildings : Array
var tileSize : float = 64.0

func get_tile_at_position (position):

  for x in range(allTiles.size()):
    if allTiles[x].position == position and allTiles[x].hasBuilding == false:
      return allTiles[x]

  return null
Our next function will be called to disable every tile highlight, as we don’t want to see the highlights anymore once we’ve placed our buildings:
func disable_tile_highlights ():

  for x in range(allTiles.size()):
    allTiles[x].toggle_highlight(false)
Highlighting the Tiles
Following, we need to implement the main function for this script, which will be responsible for highlighting all the tiles we can place our building on:
func highlight_available_tiles ():
The function will loop through each of the tiles in the ‘tilesWithBuildings‘ array:
func highlight_available_tiles ():

  for x in range(tilesWithBuildings.size()):
…and check to see if the north, south, west, and east tiles can have a building placed on them. For that, we need to get those tiles relative to our selected tile position:
func highlight_available_tiles ():

  for x in range(tilesWithBuildings.size()):

    var northTile = get_tile_at_position(tilesWithBuildings[x].position + Vector2(0, tileSize))
    var southTile = get_tile_at_position(tilesWithBuildings[x].position + Vector2(0, -tileSize))
    var eastTile = get_tile_at_position(tilesWithBuildings[x].position + Vector2(tileSize, 0))
    var westTile = get_tile_at_position(tilesWithBuildings[x].position + Vector2(-tileSize, 0))
And then it is going to toggle/highlight the tiles:
func highlight_available_tiles ():

  for x in range(tilesWithBuildings.size()):

    var northTile = get_tile_at_position(tilesWithBuildings[x].position + Vector2(0, tileSize))
    var southTile = get_tile_at_position(tilesWithBuildings[x].position + Vector2(0, -tileSize))
    var eastTile = get_tile_at_position(tilesWithBuildings[x].position + Vector2(tileSize, 0))
    var westTile = get_tile_at_position(tilesWithBuildings[x].position + Vector2(-tileSize, 0))

    if northTile != null:
      northTile.toggle_highlight(true)
    if southTile != null:
      southTile.toggle_highlight(true)
    if eastTile != null:
      eastTile.toggle_highlight(true)
    if westTile != null:
      westTile.toggle_highlight(true)
And that is our map script all set:
extends Node

var allTiles : Array
var tilesWithBuildings : Array
var tileSize : float = 64.0

func get_tile_at_position (position):

  for x in range(allTiles.size()):
    if allTiles[x].position == position and allTiles[x].hasBuilding == false:
      return allTiles[x]

  return null

func disable_tile_highlights ():

  for x in range(allTiles.size()):
    allTiles[x].toggle_highlight(false)


func highlight_available_tiles ():

  for x in range(tilesWithBuildings.size()):

    var northTile = get_tile_at_position(tilesWithBuildings[x].position + Vector2(0, tileSize))
    var southTile = get_tile_at_position(tilesWithBuildings[x].position + Vector2(0, -tileSize))
    var eastTile = get_tile_at_position(tilesWithBuildings[x].position + Vector2(tileSize, 0))
    var westTile = get_tile_at_position(tilesWithBuildings[x].position + Vector2(-tileSize, 0))

    if northTile != null:
      northTile.toggle_highlight(true)
    if southTile != null:
      southTile.toggle_highlight(true)
    if eastTile != null:
      eastTile.toggle_highlight(true)
    if westTile != null:
      westTile.toggle_highlight(true)
Now you’re ready to start placing the buildings of your game on top of the available tiles as you like!
Conclusion
Congratulations on finishing up the tutorial!
You’ve learned a lot about using a tile-based strategy system in Godot, including how to know which ones already have buildings, and how to highlight empty neighbor tiles. With the tile management implementation covered in this tutorial, we’ve tackled key components for many other sorts of strategy games as well!
From here, you can continue on developing different types of buildings you want to have for your game and customize each’s impact on resource generation. You can even move to bigger maps or create personalized ones! Make sure to use all your creativity moving forward and best of luck with your future Godot games!
Want to learn more about strategy games? Try our complete Construct a Strategy Game with Godot 3 course.
Did you come across any errors in this tutorial? Please let us know by completing this form and we’ll look into it! FINAL DAYS: Unlock coding courses in Unity, Godot, Unreal, Python and more.
