Game feel, or ‘game juice’ refers to the tactile virtual sensation experienced when interacting with video games, which decides how fun or engaging the second-to-second play of the game is. It is often a combination of many different aspects, including how quickly your character’s animation plays in response to control input and how much audiovisual feedback you are provided for taking certain actions. Although these aspects are subtle in game design, their impacts can be dramatic and make the difference in creating a memorable experience for your players!
In this beginner-friendly tutorial, we’re going to look at three easy and effective techniques to enhance game feel and this virtual sensation using just animation, sound, and camera manipulation!
Did you come across any errors in this tutorial? Please let us know by completing this form and we’ll look into it!

FINAL DAYS: Unlock coding courses in Unity, Godot, Unreal, Python and more.
Table of contents
ABOUT GAME FEEL
Before we jump into a deeper discussion, let me introduce that this tutorial was inspired by these three talks:
- “Secrets of Game Feel and Juice” by GameMaker’s Toolkit → https://www.youtube.com/watch?v=216_5nu4aVQ&t=3s
- “The Art of Screenshake” by Jan Willem Nijman → https://www.youtube.com/watch?v=AJdEqssNZ-U&t=1952s
- “Juice it or lose it” by Martin Jonasson & Petri Purho → https://www.youtube.com/watch?v=Fy0aCDmgnxg&t=242s
My takes from these talks can be summarized into these 5 techniques:
- Emphasize the player’s success!
- Throw confetti, play encouraging sounds, pause screen for 0.01 milliseconds, etc.
- Combine all these effects to make a successful moment even more satisfying.
- Touch the player’s emotion!
- Slow-motion, cinematic camera, ambient sound, meaningful phrase, etc.
- Combine all these effects to give a more dramatic impact on a certain event (e.g. Death)
- Add randomness!
- Less accuracy (in shooters), random AI behavior, random sound effects, etc.
- A bit of randomness can spice up repetitive gameplay.
- Add permanence!
- Explosion, debris, enemy corpses, smoke, blood, destroyed objects, etc.
- Show the player the consequences of their actions. Make them feel like they’re interacting with the game world.
- Make the player avatar fun to control!
- Long jump, triple jump, wall kick, stomach dives, etc.
- Make more sensitive, nuanced reactions to player input. This allows players to express their intent to the system.
In an effort to prove that such techniques can be applied in any game to enhance the game feel, we will be turning this simple flappy bird type game made by Unity, from this:

“Hi… I’m just this boring game that I doubt you will ever have fun playing. Ever.”
… to this:

“LOOK AT MY AMAZING FLAPS! I JUST PASSED THE PILLARS OF DEATH! WEEEEEEEEEEEEEEEEEEE!!!!!!!!!!!!”
For this tutorial, we’ll specifically learn how to use Camera, Animation, and Sound to improve game feel. Within the download project file, there are some more advanced techniques used such as coding controls and VFX for you to further investigate. Now, let’s begin the magic of transforming a limp and lifeless game into a spectacle and engaging one!
TABLE OF CONTENTS
PROJECT SETUP
KEY EVENTS ANALYSIS
ADDING JUICINESS
- Adding Screen Shakes
- Adding Impacts to Animation
- Celebrating the player’s success using Particle System
- Adding Random Sound Effects
- Improving game feel with controls
REFERENCE/LINKS
PROJECT SETUP
‘Flappy Bird Style Example Game’ created by Unity Technologies
0. Play the game here! → https://avacadogames.itch.io/flappy-bird-style-example-game-unity (and come up with your own ideas on what can be improved)
1. Open up Unity and press Ctrl+9 to open the ‘Asset Store’ window.
2. Install ‘Flappy Bird Style Example Game’ by Unity Technologies:
Download→ https://assetstore.unity.com/packages/templates/flappy-bird-style-example-game-80330

3. Import all and open Assets/Flappy Bird Style/_Scenes/Main.
4. Start following the tutorial or start adding game juice of your own!
To download the source code used in this tutorial, click here. Make sure the unity package is installed first, otherwise it may override the project file.
Key Events Analysis
There are three key events in this game:
- Bird flaps when player input is detected,
- Score increases when the player successfully passes the gap between the pillars, and
- The game ends when the player collides with objects.
1. Player Input → Bird Flaps

2. Player Scored → Score Increases

3. Player Death → ‘Game Over’ text pops up

Let’s begin with adding impacts to the first event: when the player input is detected.
Adding Screen Shake
It is important to note that responsive and intuitive feedback is vital for a good game feel. When a player presses a key, they expect the corresponding action to be executed immediately, or at the very least expect to see a visual sign that it has started to execute. Having a slow response to the player’s input (‘Input delay’) makes the game seem laggy and disconnected. For the same reason, it helps to have some clear visual signs that the system has acknowledged the input. Screen shake is one of the most commonly used techniques to give immediate feedback to players.
To add a screen shake effect to our flappy bird example game, navigate to Window > Animation > Animation, or press Ctrl+6.

Select ‘Main Camera’ in the Hierarchy, and create an Animator by clicking ‘Create’ in the Animation window.
An empty animation clip will automatically be created and set as the default state of the animator. We will name this clip as ‘MainCam_Idle’. We can create another clip by expanding the clip list in the top left corner and clicking on ‘Create New Clip…’. We will name this as ‘MainCam_Flap’.

Enable ‘Recording mode’ and slightly move the x, y position of the camera in each frame.

Open Animator by navigating to Window > Animation > Animator.

Right-click on the default state (MainCam_Idle) and click on ‘Make Transition’. Then, click on the ‘MainCam_Flap’ clip to create a new transition arrow.
Create a new trigger in ‘Parameters’ and name it ‘Flap’

Click on the transition arrow and add a condition by clicking the ‘+’ button in the Inspector. Set the condition to our new trigger parameter, ‘Flap’.

Also, make sure to set the Transition Duration to zero. This means there will be no delay in the transition of the animation from the Idle state to the ‘Flap’ state. It is crucial to make the player’s input feel responsive, so it is best to avoid having a long transition duration.

This time we will create another transition arrow that goes from ‘Flap’ to ‘Idle’ state, and again, set the Transition Duration to 0.

Now the animator is all set up to play the screen shake animation clip (MainCam_Flap), whenever our parameter trigger (Flap) is called.
As one last step, click on the animation clip (MainCam_Flap) and disable ‘Loop Time’ in the Inspector– unless you want the animation to be repeating endlessly.

- Open ‘Bird’ Script and add a variable:
public class Bird : MonoBehaviour
{
        //Reference to the Main camera's animator component.
        private Animator camAnim;
}- Within void Start() function, add the following line:
void Start()
{
        //Get reference to the Animator component attached to main camera.
        camAnim = Camera.main.GetComponent<Animator>();
}- Within void Update() function, there is a section where it detects player input.
//Look for input to trigger a "flap".
if (Input.GetMouseButtonDown(0))
{
       //Tell the animator about it
       camAnim.SetTrigger("Flap");
}
Then your Bird script should look like this:
public class Bird : MonoBehaviour
{
	public float upForce;
	private bool isDead = false;

	public Animator anim;
	public Rigidbody2D rb2d;

	private Animator camAnim; //Reference to the Main camera's animator component.
	void Start()
	{
		//Get reference to the Animator component attached to main camera.
		camAnim = Camera.main.GetComponent<Animator>();
	}

	void Update()
	{

		if (isDead == false)
		{
			//Look for input to trigger a "flap".
			if (Input.GetMouseButtonDown(0))
			{
				camAnim.SetTrigger("Flap");  //Tell the animator about it
				anim.SetTrigger("Flap");
				rb2d.velocity = Vector2.zero;
				rb2d.AddForce(new Vector2(0, upForce));
			}
		}
	}
}
Now the screen will shake every time you click with the left mouse button. Nice!
Adding Juiciness to Animation
When we play games, we get a sense of immersion by seeing how objects interact with each other in the world. We get information such as the world’s gravity, the character’s weight, elasticity, momentum, and whatnot. In a platformer game like Celeste (2018), jumping isn’t only about the character going up and down. Madeline, the main character, initially gets stretched vertically when jumping and gets slightly squashed sideways as she lands on the ground. Her hair follows the body with a little bit of delay and dust forms on the ground as she lands. Every such little detail makes the jumping look much more fluid and alive – which is the essence of “feel” in games.
What can we possibly do to make our bird’s action look more fun? What is it like when a bird flaps in reality? How can we exaggerate a certain aspect of it? What kind of feeling do you want players to experience? … with all those considerations in mind, we can move on to the second part: adding juiciness to animation.
First, we learned that having a clear visual sign upon player input helps to make the game feel more responsive and intuitive. Let’s make our bird to slightly scale up and also switch its color for a millisecond upon player input.
Press Ctrl+6 to open ‘Animation’ window. This time, select ‘Bird’ gameObject from the Project view. Open ‘Flap’ animation; it has only two keyframes at 0:00 and at 0:02.

- Enable ‘keyframe recording mode’
- Change Colour to grey, and the x,y scale to 1.2 at 0:01.
- Move to the next frame and reset the color to create a flashing effect.
- Reset the scale back to normal at 0:04 or the end of the animation.

… feel free to adjust the values or add more as you like!

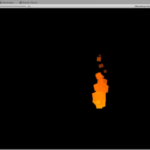
We can also create a visual effect like dust puffs, using Particle System.

Click on the Particle System and rename it. (e.g ‘Flap FX’)
If the particles are visible in the scene view but not in the game view, that is because sprites are set to be rendered behind the background by default.

We can change the order of rendering by going to Inspector > Particle System > Renderer > Sorting Layer ID and change Default → Midground or Foreground.

In the Inspector, you can change a lot of properties to make the desired look and feel. You can follow the settings I made below or try creating your own unique effect!
- Renderer >Material > Sprites-Particle → Sprites-Default
- Duration = 5 → 0.10
- Looping = Enabled → Disabled
- Start Lifetime = 5 → (Random Between Two Constants) 0.5 to 1.5
To allow Random Between Two Constants, simply click on the tiny arrow next to the input field to view more options.

- Start Size = 1 → 0.5 to 1
- Start Speed = 1 → 1 to 3
- Start Colour = White → Yellow
- Gravity Modifier = 0 → 0.5
- Emission > Rate Over Time = 10 → 3
- Emission > Bursts > Count > 5 to 15
- Shape > Shape = Cone → Donut
- Size Over Lifetime → Linearly Decreasing
Challenge!
Using the same techniques we learned today, try giving more emphasis on the other 2 key events: i.e. player scoring and death.
Tip 1: Try keyframing anything! For camera shake, you can keyframe not only the position but also z rotation and size of the camera.
Tip 2: Make sure to uncheck Loop Time of an animation clip, unless you want it to repeat itself.
Tip 3: Animator.Play(“AnimationName”, -1, 0); can also be used instead of Animator.SetTrigger(). The former forces animator to play the animation immediately disregarding conditions and transition settings, whereas the latter makes use of trigger parameters to set conditions and transition settings. For more information, Go to https://docs.unity3d.com/ScriptReference/Animator.Play.html
Adding Sound Effects
Our bird now has more visible impacts when we click the left mouse button and as we pass between two pillars. It already looks much more fun to interact with, but we’re still missing an important part of the game feel: Sound. To add a sound effect to the bird’s flap, select the Bird gameObject, click ‘Add Component’ in the Inspector and search for ‘AudioSource’.

Once that is added, go to the ‘Bird’ Script and create a variable to get a reference to the AudioSource component.
public class Bird : MonoBehaviour
{
         private AudioSource audioSource;
         //Reference to the AudioSource component.
}
Within void Start() function, assign the AudioSource component to the newly created variable.
void Start()
{
	//Get a reference to the AudioSource component attached to this GameObject.
	audioSource = GetComponent<AudioSource>();
}
Let’s hit save and go back to Unity now. Drag and drop any of the sample sound clips that you want to play for flap action into ‘AudioClip’ section.
These sound effects were created using a free online SFX maker: Bfxr (https://www.bfxr.net/). Make sure ‘Play On Awake’ is disabled.

Now, let’s go back to our script and look for the section where it detects player input and add a line of code that makes our audioSource to play the assigned AudioClip.
//Look for input to trigger a "flap".
if (Input.GetMouseButtonDown(0))
{
	audioSource.Play();
	//This plays the audioClip attached to the AudioSource component.
}
That’s it! Simple, right? But what if we have multiple sound effects to be played for one identical trigger? In that case, we can add a range of sound effects to be played randomly every time the bird takes flapping motion. A bit of randomness helps reduce repetitiveness within the gameplay so… why not?
Let’s start by adding an array of AudioClip. (Arrays allow you to store multiple objects in a single variable, and it has square brackets [ ] after the type in C#).
public class Bird : MonoBehaviour
{
	public AudioClip[] soundEffectList;
        //Holds a reference to the list of audioclips assigned in the inspector.
}
Save and go back to Unity. You will have noticed that ‘Flap Sound Effects’ is newly created in the Inspector with a little arrow next to it. You can drag and drop multiple audio clips into this.

- Within void Update() function, look for the section where it detects player input, and then add the following lines of code:
//Look for input to trigger a "flap".
if (Input.GetMouseButtonDown(0))
{
         int randomSound = Random.Range(0, soundEffectList.Length);
         //This returns a random value between 0 and the length of our sound effect list.

         audioSource.clip = (soundEffectList[randomSound]);
         //This sets a random audioClip of our list to the AudioSource component.

         audioSource.Play();
         //This plays the audioClip attached to the AudioSource component.
}
Then, your Bird script should look like this:
public class Bird : MonoBehaviour
{
	public float upForce;
	private bool isDead = false;
	private Animator anim;
        private Animator camAnim;
	private Rigidbody2D rb2d;

	public AudioClip[] soundEffectList;		//Holds a reference to the list of audioclips assigned in the inspector.
	private AudioSource audioSource;		//Reference to the AudioSource component.


	void Start()
	{
		anim = GetComponent<Animator> ();
		camAnim = Camera.main.GetComponent<Animator>();
		rb2d = GetComponent<Rigidbody2D>();

		//Get reference to the AudioSource component attached to this GameObject.
		audioSource = GetComponent<AudioSource>();
	}

	void Update()
	{
		if (isDead == false)
		{
			//Look for input to trigger a "flap".
			if (Input.GetMouseButtonDown(0))
			{

				int randomSound = Random.Range(0, soundEffectList.Length);
				//This returns a random value between 0 and the length of our sound effect list.

				audioSource.clip = (soundEffectList[randomSound]);
				//This sets a random audioClip of our list to the AudioSource component.

				audioSource.Play();
				//This plays the audioClip attached to the AudioSource component.

				camAnim.SetTrigger("Flap");
				anim.SetTrigger("Flap");
				rb2d.velocity = Vector2.zero;
				rb2d.AddForce(new Vector2(0, upForce));
			}
		}
	}

	void OnCollisionEnter2D(Collision2D other)
	{
		rb2d.velocity = Vector2.zero;
		isDead = true;
		anim.SetTrigger ("Die");
		GameControl.instance.BirdDied ();
	}
}
Bonus: Improving Game Feel with Controls
In most Mario series, the faster the player is running the higher they jump. In Celeste, players can correct their position after a jump by dashing mid-air. These generous controls allow players to master the controls and enjoy overcoming challenges. On the other hand, our flappy bird only can only flap drawing a constant curve on a fixed velocity, and its movement heavily relies on the player’s keypress timing. There is little room for players to master the controls, it feels almost like the bird is out of control. But what if holding a key longer means the bird will fly higher?

Bird flying with a fixed max-height

Bird flying higher with a longer button press
This allows players to have more precise control over the bird and it greatly enhances the game feel. To do this, open up the Bird script and create a float variable that tracks the duration of the flight. This value will increase while the player is pressing on the mouse button.
public class Bird : MonoBehaviour
{
        //Upward force of the flap.
	private float upForce = 3;

        //Duration of the flap.
	private float flapDuration;
}
And then I would create another float variable that sets up the limit for the first variable.
public class Bird : MonoBehaviour
{
        //If flapDuration is greater than or equal to this value, the bird won't fly higher.
        private float maxDuration = 0.7f;
}
We could simply tell the bird to fly only when flapDuration is less than maxDuration as such:
void Update()
	{
		if (Input.GetMouseButton(0))
		{
			if(flapDuration < maxDuration)
			{
				flapDuration += Time.deltaTime;
				rb2d.velocity = Vector2.up * upForce;
			}
		}
}
At some point, the flap duration must be reset. I will reset it whenever the player clicks the mouse button.
void Update()
	{
		//Look for input to trigger a "flap".
		if (Input.GetMouseButtonDown(0))
		{
			flapDuration = 0;
		}
	}
Quick Before vs. After
On a side note, I also added a complimenting feature that makes the score display a random message like “Awesome!” while the player is on a high-score streak.

Here is the relevant source code:
if(score > 4 && score < 10)
		{
			scoreText.gameObject.GetComponent<Animator>().Play("ScoreText 2", -1, 0);
		} else if (score >= 10)
		{
			int random = Random.Range(0, 5);
			switch (random)
			{
				case 0:
					highScoreText.text = "Superb!";
					break;
				case 1:
					highScoreText.text = "Awesome!";
					break;
				case 2:
					highScoreText.text = "Excellent!";
					break;
				case 3:
					highScoreText.text = "Amazing!";
					break;
				case 4:
					highScoreText.text = "Fantastic!";
					break;
				case 5:
					highScoreText.text = "Terrific!";
					break;
			}

			scoreText.gameObject.GetComponent<Animator>().Play("ScoreText 3", -1, 0);

		}
Conclusion
In this lesson, we learned that responsive and intuitive feedback upon player input is vital for making a good game feel (and good game design in general). This feedback may include bouncing ammo, flairs, knockback, heavy base shooting sound in shooters, and beyond. It can also be about controls, character animation, visual effects, and sound effects in platformers. All these little tweaks contribute to the game feel, yet they are often overlooked by many developers. These elements may be very subtle to be noticed individually, but when they are harmonized they add layers of satisfaction to the gameplay. However, the best way to learn game feel is to experiment yourself and try new things – so we hope you expand upon the skills taught here.
I hope you enjoyed the tutorial today and become more confident in how to make a game more alive, responsive, and fun!
Reference/Links
‘Flappy Bird Style Example Game’ by Unity Technologies:
Download→ https://assetstore.unity.com/packages/templates/flappy-bird-style-example-game-80330
Source Code ‘Flappy Bird Style Example Game’:
Download → Link
Unity’s Documentation on:
Animation Transition – https://docs.unity3d.com/Manual/class-Transition.html
Sorting Layer – https://docs.unity3d.com/ScriptReference/SortingLayer.html
Animator.Play() – https://docs.unity3d.com/ScriptReference/Animator.Play.html
Other:
Free Online SFX Maker – Bfxr (https://www.bfxr.net/)
Play Original ver. – https://avacadogames.itch.io/flappy-bird-style-example-game-unity
Play Edited ver. – https://avacadogames.itch.io/flappy-bird-style-example-game-edited-game-feel-tutorial-zenva