The goal of this tutorial is to help you create a Phaser template that you will be able to reuse and extend in any future project you work on. The benefit of having a template is that it is a good starting point for your game, and it can save you a lot of time when you are setting up your game.
This template will include the following scenes:
- Boot – the first scene that is loaded by Phaser, and it will load the assets that are required in the preloader scene.
- Preloader – displays a logo, a progress bar, and loads all of the assets that are needed in the game.
- Title – the title screen of our game, and it displays buttons to start the game, view credits, and modify options.
- Options – will contain any settings you want players to be able to modify in your game (example: mute audio).
- Credits – credits for your game.
- Game – contains the main logic for your game.
Table of contents
Source Code
You can download all of the files associated with the source code for part one here.
Did you come across any errors in this tutorial? Please let us know by completing this form and we’ll look into it! FINAL DAYS: Unlock coding courses in Unity, Godot, Unreal, Python and more.
Tutorial Requirements
For this tutorial, you will need the following:
- Basic to intermediate JavaScript skills
- A code editor
- Chrome Web Browser
- Have NodeJS installed locally
For this tutorial, it is recommended that you are familiar with basic Phaser concepts such as scenes, setting up the config for your game, running your game locally, etc. If you are not familiar with these concepts, you will be able to follow along with the tutorial, but we will not be covering these topics in depth. If you would like to learn more about these concepts or would like a refresher, you can check out the How to Create a Game with Phaser 3 tutorial here on GameDev Academy.
Also, for this tutorial, it is recommended that you are familiar with Git and NodeJS, but it is a not a requirement for this tutorial. If you are not familiar with these concepts, you will still be able to follow along.
Project Setup
For this tutorial, we are going to use the Phaser 3 Webpack Project Template as a starting point for our template, and it can be found here on GitHub. You can obtain a copy of this template in one of two ways:
1) You can use Git to clone the repository locally
2) Or you can download a zipped version of the repository from GitHub
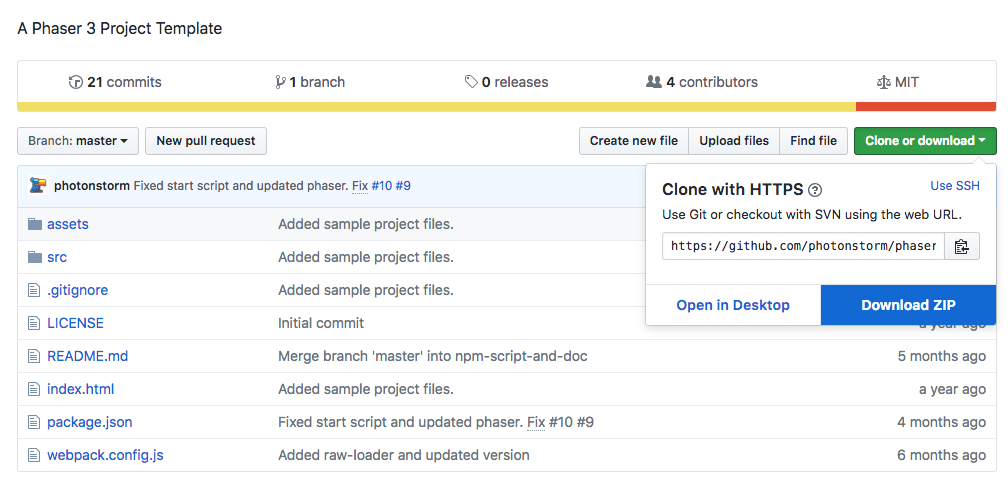
To download the repository, visit the GitHub link and click on the green ‘Clone or download’ button, and you should see the following:
Then, click on the ‘Download ZIP’ button and extract the contents of the folder.
To clone the repository, copy the URL that is shown, and in your terminal or command prompt, run the following command:
git clone https://github.com/photonstorm/phaser3-project-template.git
(Note: For the rest of this tutorial, I will just be using the word terminal.)
After you get a copy of the template files, you will need to install the required Node dependencies to get the template to run. In your terminal, navigate to the template folder, and run the following command: npm install . This will take a few seconds to run, and once it is done, you should see a message that a number of packages was added to your project.
To make sure everything installed correctly, run the command: npm run start , and you should see a message that states webpack was compiled successfully. Now, if you open your browser and visit: http://localhost:8000/ , you should see that your Phaser game is running.
With the basic project setup, we can start creating our template.
Update Project and Create Scenes
The first thing we are going to do is take all of the logic from the index.js file and split it into multiple files. We are going to take the game logic and the Phaser config, and put those components in their own files. In your project folder, go into the src folder and create two new folders: Config and Scenes. In the Config folder, create a new file called config.js and add the following code to it:
import 'phaser';

export default {
  type: Phaser.AUTO,
  parent: 'phaser-example',
  width: 800,
  height: 600
};
Then, in the Scenes folder, create a new file called GameScene.js and add the following code to it:
import 'phaser';

export default class GameScene extends Phaser.Scene {
  constructor () {
    super('Game');
  }

  preload () {
    // load images
    this.load.image('logo', 'assets/logo.png');
  }

  create () {
    this.add.image(400, 300, 'logo');
  }
};
Most of this code should look similar to the code that was in the original index.js file, but let’s review what we just added:
export defaultis part of the ES6 module system, and it allows for us to export a single function, class, or primitive from a file and it allows us to load that content in another file.extendsis used to create a class that is a child of another class.superis used to access and call functions on the parent’s object. When super is called, it calls the parent class’s constructor.- In the
config.jsfile, we exported an object that has all of the configuration settings that will be used in our Phaser game. - In the
GameScene.jsfile, we exported a class that extends the Phaser.Scene class and it currently contains logic for displaying an image in our game.
Now, to use our new config object and GameScene class we will need to import them in our index.js file and make a few other updates. Open index.js and replace all of the code in the file with the following code:
import 'phaser';
import config from './Config/config';
import GameScene from './Scenes/GameScene';

class Game extends Phaser.Game {
  constructor () {
    super(config);
    this.scene.add('Game', GameScene);
    this.scene.start('Game');
  }
}

window.game = new Game();
In the code above, we did the following:
- We imported the
configobject and theGameSceneclass from the files we just created. - We created a new class called
Gameand we set it to extend thePhaser.Gameclass. - In the
supermethod, we passed in theconfigobject to thePhaser.Gameclass’s constructor. - Since our config object did not have any information about the scenes of our game, we had to add them to our Phaser game.
- Lastly, we told Phaser to start our
Gamescene.
Now, if you go back to your browser, you should see the Phaser logo and it should not be moving since we removed the logic for tween.

Next, we will create the rest of the scenes that will be used in our template. For each scene we will create a new class that does nothing for the time being. In your project folder create the following files: BootScene.js, CreditsScene.js, OptionsScene.js, PreloaderScene.js, and TitleScene.js.
In BootScene.js, add the following code:
import 'phaser';

export default class BootScene extends Phaser.Scene {
  constructor () {
    super('Boot');
  }

  preload () {
  }

  create () {
  }
};
In PreloaderScene.js, add the following code:
import 'phaser';

export default class PreloaderScene extends Phaser.Scene {
  constructor () {
    super('Preloader');
  }

  preload () {
  }

  create () {
  }
};
In TitleScene.js, add the following code:
import 'phaser';

export default class TitleScene extends Phaser.Scene {
  constructor () {
    super('Title');
  }

  preload () {
  }

  create () {
  }
};
In OptionsScene.js, add the following code:
import 'phaser';

export default class OptionsScene extends Phaser.Scene {
  constructor () {
    super('Options');
  }

  preload () {
  }

  create () {
  }
};
In CreditsScene.js, add the following code:
import 'phaser';

export default class CreditsScene extends Phaser.Scene {
  constructor () {
    super('Credits');
  }

  preload () {
  }

  create () {
  }
};
Finally, we need to import these new scenes into index.js and add them to our game. Open index.js and replace the all of the code in the file with the following code:
import 'phaser';
import config from './Config/config';
import GameScene from './Scenes/GameScene';
import BootScene from './Scenes/BootScene';
import PreloaderScene from './Scenes/PreloaderScene';
import TitleScene from './Scenes/TitleScene';
import OptionsScene from './Scenes/OptionsScene';
import CreditsScene from './Scenes/CreditsScene';

class Game extends Phaser.Game {
  constructor () {
    super(config);
    this.scene.add('Boot', BootScene);
    this.scene.add('Preloader', PreloaderScene);
    this.scene.add('Title', TitleScene);
    this.scene.add('Options', OptionsScene);
    this.scene.add('Credits', CreditsScene);
    this.scene.add('Game', GameScene);
    this.scene.start('Game');
  }
}

window.game = new Game();
Boot Scene
With all of our scenes in place, we will start building out the rest of our template. The first scene we will focus on is the Boot Scene. This scene will be the first scene that is loaded by our game, and we will use it load any assets that will be displayed in the Preloader Scene.
For our template, the only asset we need for the Preloader Scene is a logo image. To follow along with the tutorial, you can use the following image:

If you have your own logo image, you are welcome to use it. Once you have your image, save it in the assets folder.
In BootScene.js, update the preload and create functions to match the following code:
preload () {
  this.load.image('logo', 'assets/zenva_logo.png');
}

create () {
  this.scene.start('Preloader');
}
In the code above, we loaded in our logo image and once it is loaded we transition to the Preloader scene. Note: If you used your own image, make sure you update zenva_logo.png with the name of your logo image.
Preloader Scene
With the Boot Scene in place, we can now focus on the Preloader Scene. In this scene, we are going to display the logo we loaded in the Boot Scene, add a progress bar, and finally load the rest of the assets we will be using in our template.
For the progress bar, we are going to reuse some of the code from the Creating a Preloading Screen in Phaser 3 tutorial. For the purpose of this tutorial, we will not be covering this code in depth, but if you would like to learn more about it we recommend that you check out the tutorial mentioned above.
In PreloaderScene.js, update the preload function to match the following code:
preload () {
  // add logo image
  this.add.image(400, 200, 'logo');

  // display progress bar
  var progressBar = this.add.graphics();
  var progressBox = this.add.graphics();
  progressBox.fillStyle(0x222222, 0.8);
  progressBox.fillRect(240, 270, 320, 50);

  var width = this.cameras.main.width;
  var height = this.cameras.main.height;
  var loadingText = this.make.text({
    x: width / 2,
    y: height / 2 - 50,
    text: 'Loading...',
    style: {
      font: '20px monospace',
      fill: '#ffffff'
    }
  });
  loadingText.setOrigin(0.5, 0.5);

  var percentText = this.make.text({
    x: width / 2,
    y: height / 2 - 5,
    text: '0%',
    style: {
      font: '18px monospace',
      fill: '#ffffff'
    }
  });
  percentText.setOrigin(0.5, 0.5);

  var assetText = this.make.text({
    x: width / 2,
    y: height / 2 + 50,
    text: '',
    style: {
      font: '18px monospace',
      fill: '#ffffff'
    }
  });
  assetText.setOrigin(0.5, 0.5);

  // update progress bar
  this.load.on('progress', function (value) {
    percentText.setText(parseInt(value * 100) + '%');
    progressBar.clear();
    progressBar.fillStyle(0xffffff, 1);
    progressBar.fillRect(250, 280, 300 * value, 30);
  });

  // update file progress text
  this.load.on('fileprogress', function (file) {
    assetText.setText('Loading asset: ' + file.key);
  });

  // remove progress bar when complete
  this.load.on('complete', function () {
    progressBar.destroy();
    progressBox.destroy();
    loadingText.destroy();
    percentText.destroy();
    assetText.destroy();
  });

  // load assets needed in our game
  this.load.image('blueButton1', 'assets/ui/blue_button02.png');
  this.load.image('blueButton2', 'assets/ui/blue_button03.png');
  this.load.image('phaserLogo', 'assets/logo.png');
}
Let’s review the code we just added:
- We displayed our logo image in our scene.
- We then used Phaser’s graphics and text options to create a progress bar that also displays the percentage. We also included a
Loading...message, and we display which file is currently being loaded. - We listen for the
progressevent, and use it to update the progress bar and the progress bar percentage. - We listen for the
fileprogressevent, and use it to update the file text. - We listen for the
completeevent, and use that to clean up all of the progress bar game objects. - Finally, we load the rest of the assets we will be using in our game.
The last thing we need to add to our Preloader Scene is logic to transition to the Title Scene. This logic could be put in with the rest of the logic that is triggered in the complete event, however, when there are not that many assets the progress bar will disappear quickly, and the user may not see the logo image at all. To work around this, we can either move the logo to its own scene or we can add some additional logic to our scene. For the purpose of this tutorial, we will do the latter.
To work around this issue, we will add a new time event to our Preloader Scene. We will use this event to make sure the logo is displayed for a minimum number of seconds, and when the event is triggered it will call a new function that will be used to load the Title Scene. Lastly, we will also call this new function when the complete event is fired that way we know that all assets have been loaded and the user has had enough time to view our logo.
In PreloaderScene.js, update the bottom of the preload function code to match the following:
// remove progress bar when complete
this.load.on('complete', function () {
  progressBar.destroy();
  progressBox.destroy();
  loadingText.destroy();
  percentText.destroy();
  assetText.destroy();
  this.ready();
}.bind(this));

this.timedEvent = this.time.delayedCall(3000, this.ready, [], this);

// load assets needed in our game
this.load.image('blueButton1', 'assets/ui/blue_button02.png');
this.load.image('blueButton2', 'assets/ui/blue_button03.png');
this.load.image('phaserLogo', 'assets/logo.png');
Then, add the following functions to PreloaderScene.js:
init () {
  this.readyCount = 0;
}

ready () {
  this.readyCount++;
  if (this.readyCount === 2) {
    this.scene.start('Title');
  }
}
In the code above, we did the following:
- Updated the function that is ran when the
completeevent is fired to call the newreadyfunction. - Added a new timed event that is triggered after 3 seconds. When the event is triggered, it also calls the new
readyfunction. - We added Phasers Scene’s
initfunction that is triggered when a scene first starts. We use this function to create a new variable calledreadyCountand we set it to 0. - Lastly, we added a new function called
ready, and when it is called we increment thereadyCountvariable. Once this variable is equal to 2, then we know it is safe to transition to the Title Scene.
Conclusion
With the logic for our Preloader Scene in place, this brings Part 1 of this tutorial to an end. In Part 2, we will continue our tutorial by:
- Adding the logic for the Title Scene.
- Adding the logic for the Options Scene.
- Adding the logic for the Credits Scene.
- Adding the logic for the Game Scene.
I hoped you enjoyed Part 1 of this tutorial and found it helpful. If you have any questions, or suggestions on what we should cover next, let us know in the comments below.
