In this tutorial, we’re going to explore grand central dispatch (GCD) and discuss concurrency topics and their applications. We’ll learn about concurrency, challenges with concurrency, and the application of GCD to help solve those problems.
Did you come across any errors in this tutorial? Please let us know by completing this form and we’ll look into it!

FINAL DAYS: Unlock coding courses in Unity, Godot, Unreal, Python and more.
Download the source code for this post here.
Grand Central Dispatch (GCD) is Apple’s library for concurrent code on iOS and macOS. We can use GCD to improve the responsiveness of our app and speed up our app by delegating expensive tasks to the background. For example, consider networking. Usually, we put networking operations in the background because they may take a long time.
Table of contents
Introduction to Concurrency
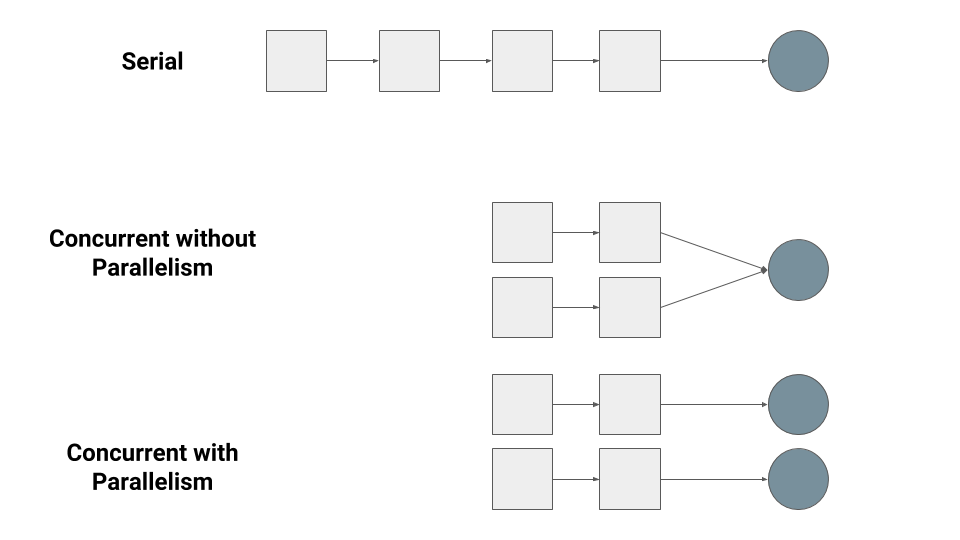
Before we get into using GCD, we have to learn about concurrency. Tasks can be executed serially or concurrently (think of a task as just a closure in Swift). A sequence of tasks is executed serially if the tasks are executed one after the other, with the next task waiting for the previous one to finish. On the other hand, a sequence of tasks is executed concurrently if multiple tasks can be executed at the same time. Imagine a bank with one bank teller and a line of people. If we wanted to go through the people in line serially, we would have one long line of people. In a concurrent setup, we would have multiple lines to one bank teller.
This also leads to another topic: parallelism. The concurrent setup with the bank is an example of a non-parallel setup. If we wanted a concurrent parallel setup, we would have multiple bank tellers so that many people could be served independently.
We can have concurrent setups that are not parallel. Imagine ordering food at a restaurant. The waiter will take your order, relay it to the chef, and move on to the next person. Whenever the chef is finished, the waiter will bring out the food. If this were a serial setup, then no one else could order food until the chef finished with your order! If we added parallelism, then we would have multiple waiters and chefs.
Parallelism requires concurrency, but concurrently does not imply parallelism.
Here’s a chart to illustrate the differences. The people, or tasks, are the blocks and the tellers/waiters are the circles.
There are a few more terms that we should be familiar with when discussing concurrency. The first is the distinction between synchronous and asynchronous code. Let’s suppose that the code is wrapped in a function, which is often the case. A function is synchronous if it returns after finishing its task. A function is asynchronous if it returns immediately and sends its task elsewhere to be completed. It does not wait for the task to complete to continue execution.
This distinction is important because synchronous functions block the main thread of execution so our user will not be able to interact with our app while a synchronous function is executing. These functions should be kept fairly small and execute fair quickly. For longer tasks or tasks whose time is unpredictable, we should use an asynchronous function and queue the work. These functions do not block the main thread of execution, and our user can still interact with our app while they wait.
Dispatch Queues
A queue is exactly like a queue in the real-world: the first thing in line gets served first. Dispatch queues are called that because we send, or dispatch, tasks to these queues to be executed in the background.
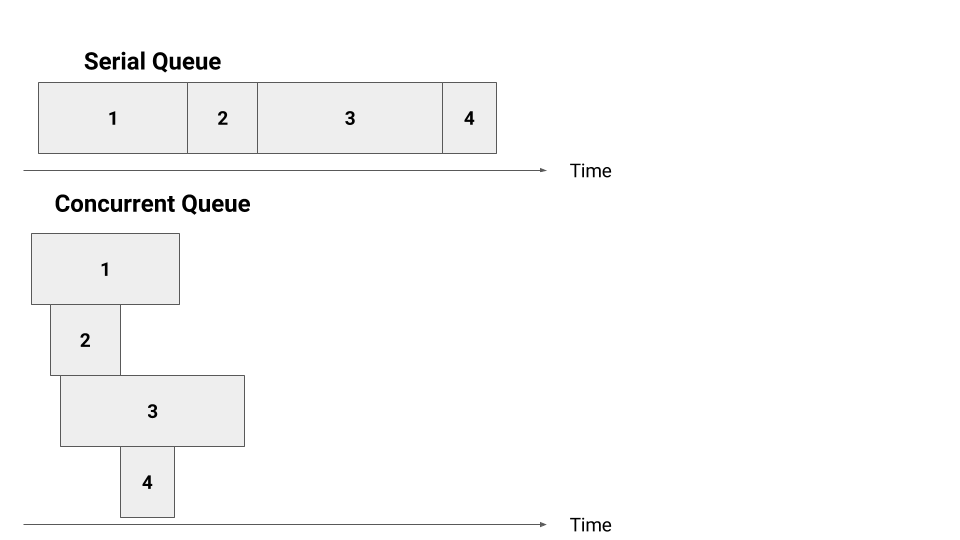
Serial queues execute tasks serially. From our previous discussion of serially executing tasks, we know that one task is executed after the other, and the next task waits for the previous one to finish. The order in which the tasks enter the serial queue is the order in which they will execute and finish.
Concurrent queues executes tasks concurrently. As tasks enter this queue, they will be started but may finish in a different order, depending on how long the tasks take.
Below is a chart that illustrates the difference between these two queues. For the serial queue, Tasks 1 – 4 execute and finish in that order. For the concurrent queue, the tasks are started in the same order, but they finish in a different order.
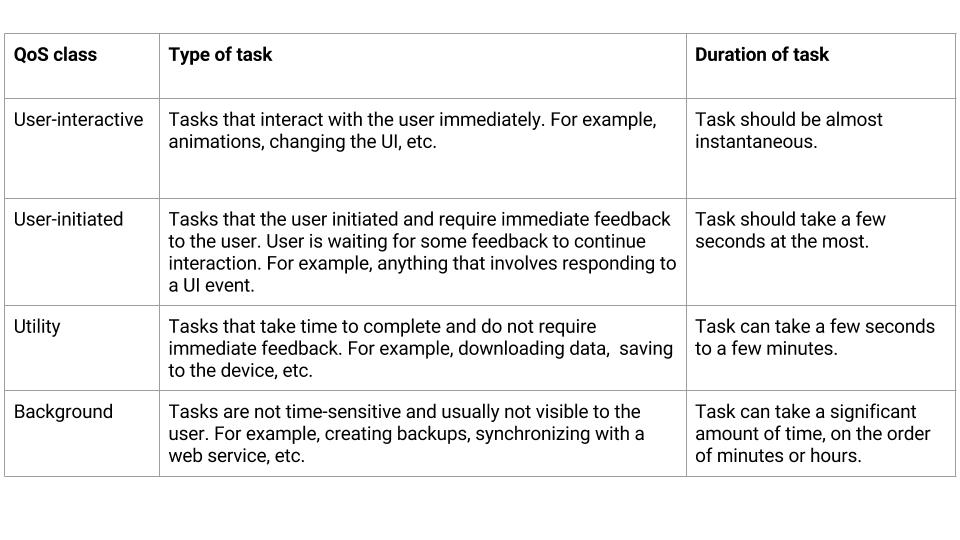
The last thing we have to discuss is the different queues that Apple provides us out-of-the-box. We offload tasks to these queues. Each queue has its Quality of Service (QoS) class/category, and we have to decide which QoS class best fits our task.
Below is a table that shows the different QoS classes, the types of tasks we should assign to a QoS class, and the approximate amount of time that task should take.
Note that these queues are system global queues; our tasks won’t be the only tasks in these queues! Also it is important to note that these queues are concurrent queues. Apple does provide us with a serial queue called the main queue. This is the queue that we use to update our UI, for example, and, in fact, it is the only queue in which we can update any UI elements.
Working with GCD in Swift
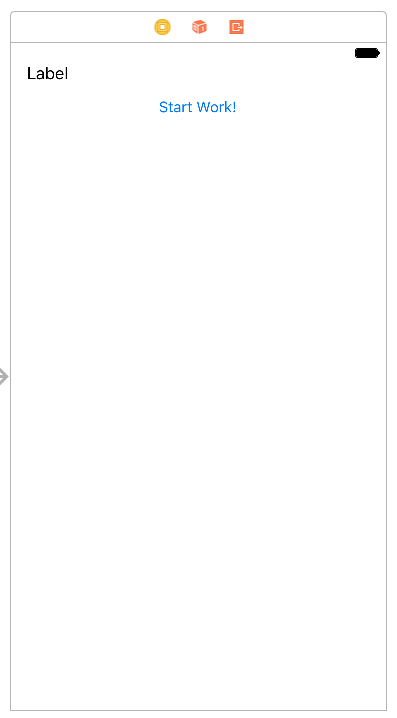
Let’s see how we can use GCD to apply what we’ve learned about concurrency. Let’s create a simple Single-View Application called Multitaskr. We’re going to demonstrate performing some miscellaneous work in the background. To visibly see progress, let’s add a UILabel to the top-left of our screen to act as a display for status text. Add a button underneath it so that we can start the task when the button is pressed.
We’ll create an outlet to the label so we can use it later.
@IBOutlet weak var statusLabel: UILabel!
We need to simulate performing some kind of work so let’s create a method that does some time-intensive task.
func performWork() {
    let n = 5000
    var matrix = Array(repeating: [Int](repeating: 0, count: n), count: n)
    for i in 0..<n {
        for j in 0..<n {
            matrix[i][j] = i + j
        }
    }
}
This method creates a 2D array, or matrix, with 5000 rows and 5000 columns. Initially, it is populate with all zeros, but we change each element to the result of an arbitrary operation. This purpose of this function is to simulate a long task. We can change the size of the n constant if we wanted this task to take longer.
Now let’s create an action to the button so that we can execute the code when we click on the button. To execute code in the main serial queue, we call DispatchQueue.main.async and use a trailing closure. The async method does not take any parameters except for a closure so we can even omit the empty parentheses! (The [unowned self] in is to ensure we’re using good memory management)
@IBAction func startWork(_ sender: UIButton) {
    DispatchQueue.main.async {[unowned self] in
        self.performWork()
        self.statusLabel.text = "Finished!"
    }
}
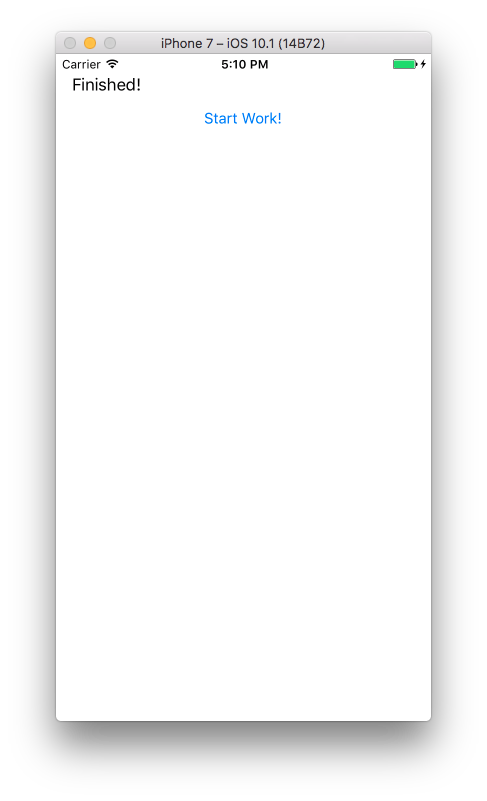
Inside of the closure, we’re going to call performWork and change the status label when we finish. We can change the label because we’re in the main queue so changes to UI elements are valid! Let’s run our app and notice the changing label.
After a few seconds, we should see the label change to “Finished!” to signify that we’ve finished the task. This is work that has been done in the main queue in the background!
Now let’s see how we can use those concurrent queues with the QoS classes that we discussed. Using those queues is almost identical to using the main serial queue, except we have to specify which QoS class we want.
@IBAction func startWork(_ sender: UIButton) {
    DispatchQueue.global(qos: .userInitiated).async {[unowned self] in
        self.performWork()
        DispatchQueue.main.async {
            self.statusLabel.text = "Finished!"
        }
    }
    self.statusLabel.text = "Started work!"
}
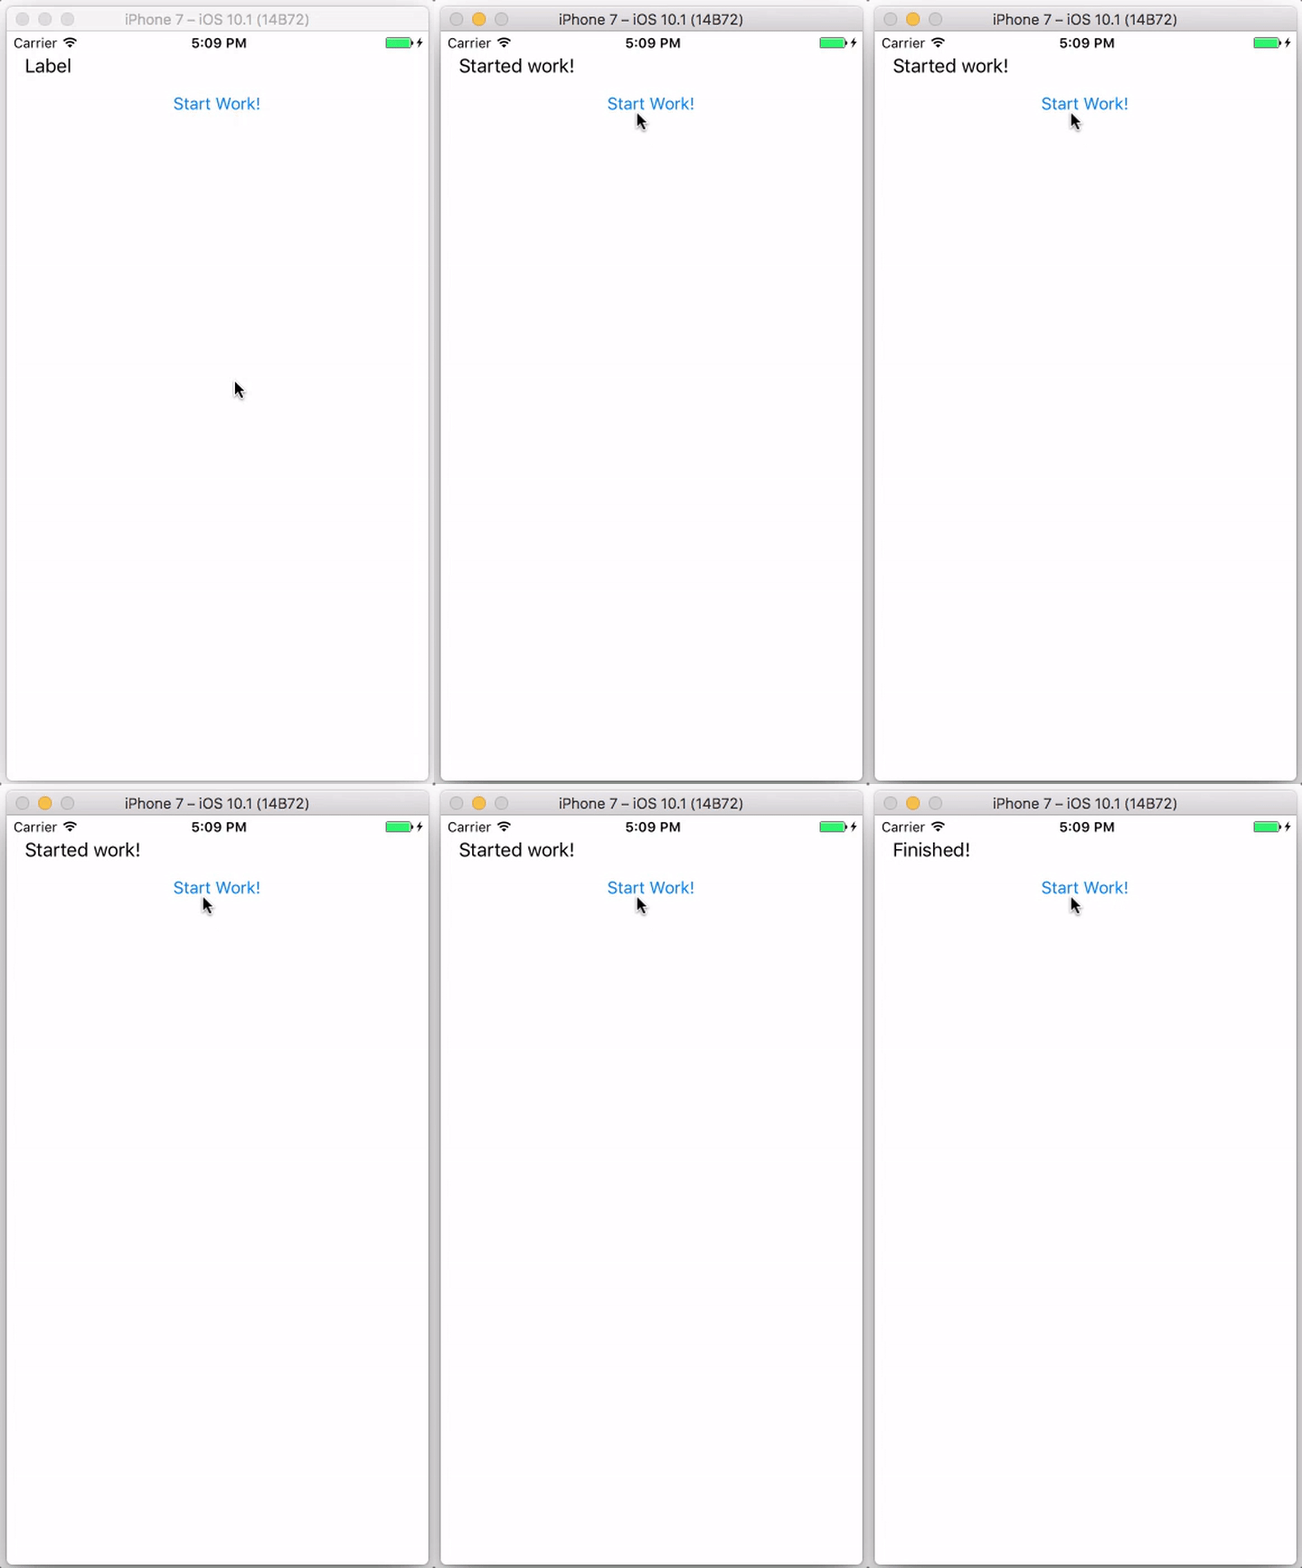
In the above code, we’re using the user-initiated concurrent queue because our operation will take only a few seconds. We use the async method to run a task on that queue. To demonstrate that this concurrent asynchronous queue returns immediately, we change the text of the label right after the call to the async method. Since the async method should return immediately, we expect the label’s text to change to “Started work!” immediately! Then it should change to “Finished!” after the work is finished.
One very important thing to note is that, inside of the task sent to the user-initiated QoS concurrent queue, we have another task that we dispatch to the main queue to update the view. This is because we should never update views in a background task! All of the view updating should occur on the main serial queue.
Let’s run our app and see the results!
Notice that the label changes first to “Started work!” and then to “Finished!” after some time!
In addition to the usual async method, we can also add a delay using another method asyncAfter.
DispatchQueue.global(qos: .userInitiated).asyncAfter(deadline: .now() + 2) {[unowned self] in
    self.performWork()
    DispatchQueue.main.async {
        self.statusLabel.text = "Finished!"
    }
}
This will wait for 2 seconds from the time of that method call to start executing the task.
Too Much Concurrency?
There is such a thing as having “too much” concurrency. It is not to our benefit to offload all work into the background. In fact, this will actually slow down our code! This is because our device is spending more time switching between tasks! This reduces the time that our device spends on actually executing the task itself! This is called CPU thrashing.
We should only offload tasks that we know have the potential to take long periods of time. For example, networking requests may take a long time depending on our user’s connectivity. These tasks should almost always be offloaded into the background.
To figure out what should be put in the background, we can use Xcode’s Instruments tool to isolate code that takes a long time to execute and offload that code.
In addition to the points mentioned above, excessive concurrency makes our code more complex and difficult to debug as well! These complications should be weighted against the benefits of concurrency for our particular case.
Remember: don’t go crazy with concurrency!
In this post, we’re learned more about grand central dispatch (GCD). We discussed concurrency topics like synchronousness, dispatch queues, parallelism, and quality of service. We also applied these concepts to writing Swift code that used GCD. Next, we discussed some interesting challenges with concurrency and when and when not to use it. Finally, we built an app that demonstrated these concepts.
