You can access the full course here: Intro to Cinemachine and Timeline
Table of contents
Cinemachine – Look At
In this lesson, we’re going to look at Cinemachine.
Cinemachine allows us to create more complex camera movements, tracking, and following targets by simple drag-and-drop methods.
If you haven’t already installed the Cinemachine package from the Package Manager, refer to Lesson 3 – Project Setup.
Creating Virtual Camera
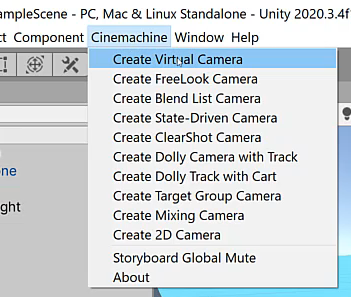
Click on the Cinemachine dropdown from the top bar and select Create Virtual Camera.
It will then create a new GameObject called “CM vcam1“.
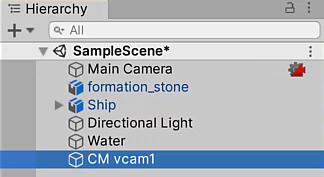
You’ll notice that there’s a red camera icon next to our Main Camera. This indicates that the camera object has the CinemachineBrain component attached to it.
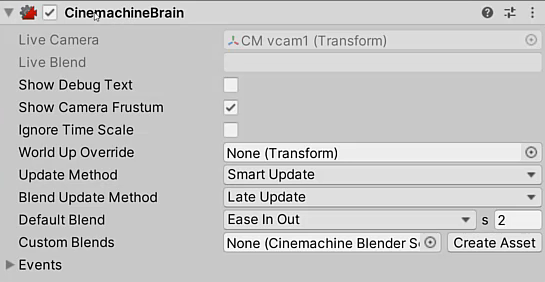
The component is what we attach to a camera to utilize it with the Cinemachine system. For now, we’ll leave it at its default settings.
Virtual Camera Settings
Let’s have a look at the CinemachineVirtualCamera component attached to “CM vcam1”.
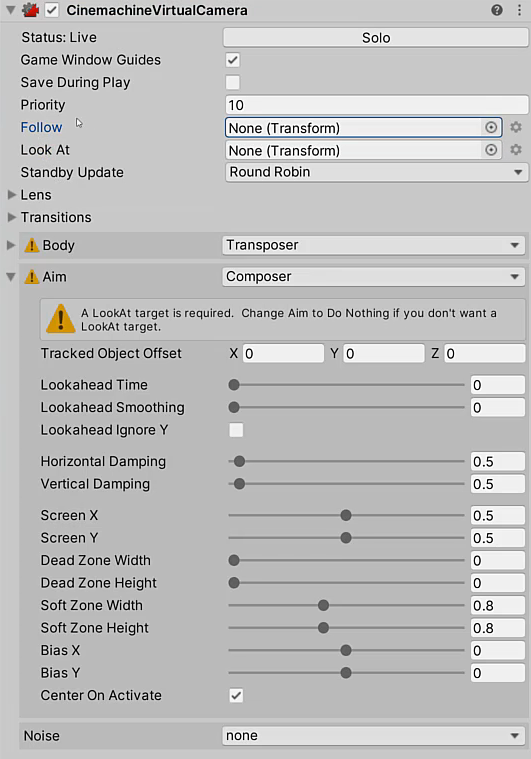
The CinemachineVirtualCamera component is what defines the properties and actions of the specific camera. For example, you can easily set the target to follow or look at in the Inspector.
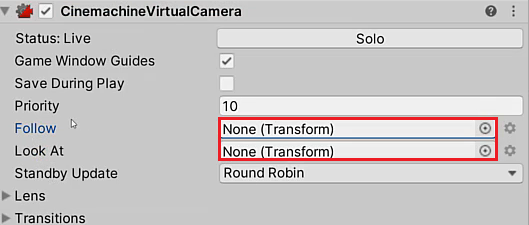
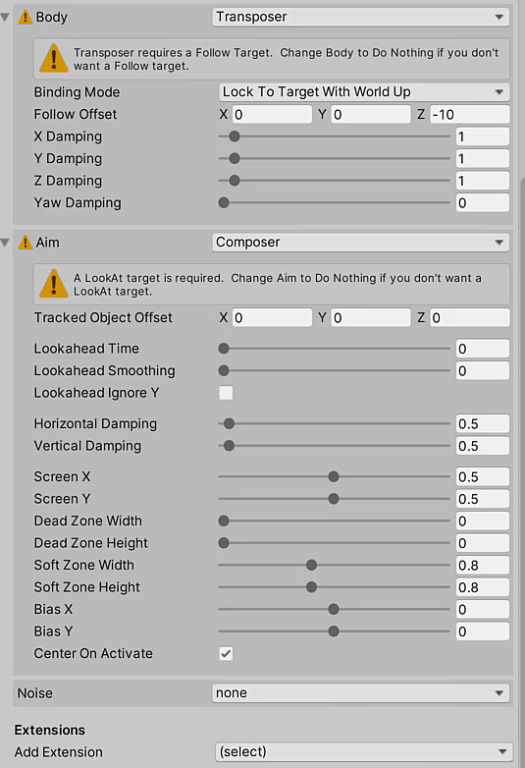
And then, we can modify the details, such as how closely it follows the target with some offsets, damping, smoothness, noise, and more.
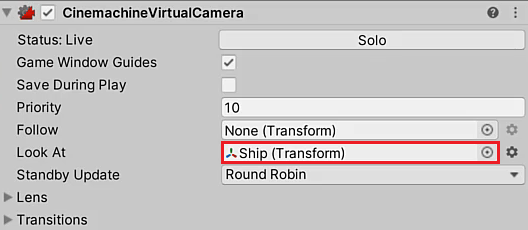
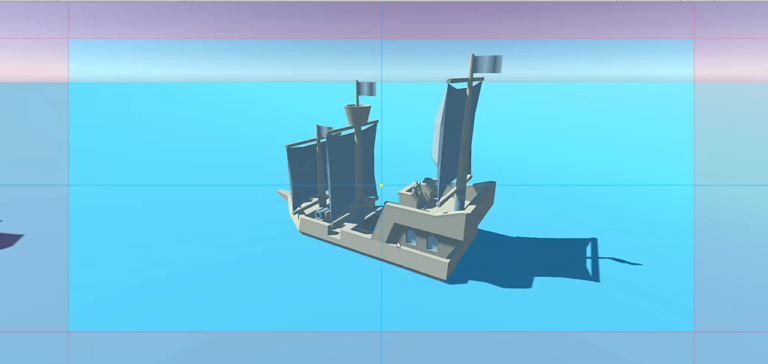
The camera instantly snaps onto the ship’s position if you drag our Ship object into the LookAt field.

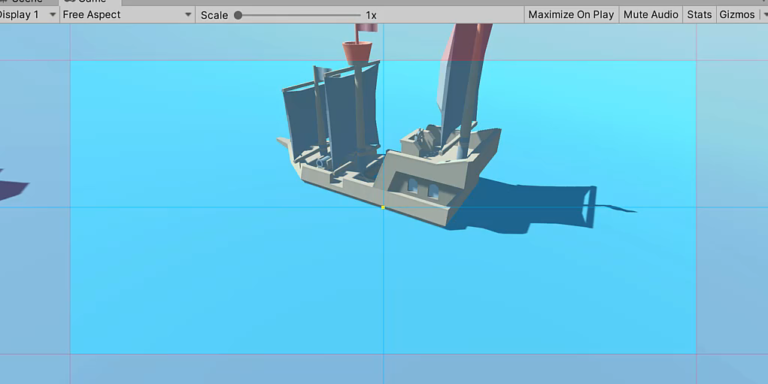
But the camera is looking a bit too low now, so we can fix that by adjusting the Tracked Object Offset (Y-Axis) field under the Aim header.

Aim Properties
The Lookahead properties allow the camera to calculate where the target will be moving to and adjust the offset based on the prediction.

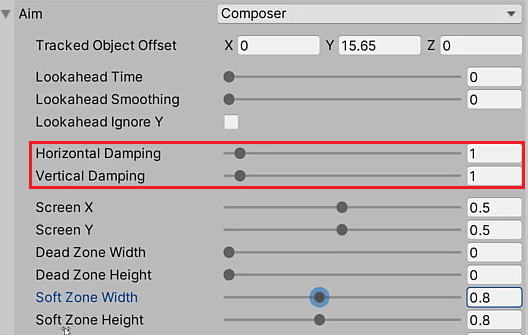
The Damping properties define how responsively the camera tries to maintain the offset in each axis. Small numbers make the camera more responsive. Larger numbers make the camera respond more slowly.
The Screen X, Y properties rotate the camera around the selected axis.

Dead Zone refers to the outermost region of the screen, in which the camera ignores any movement of the target.
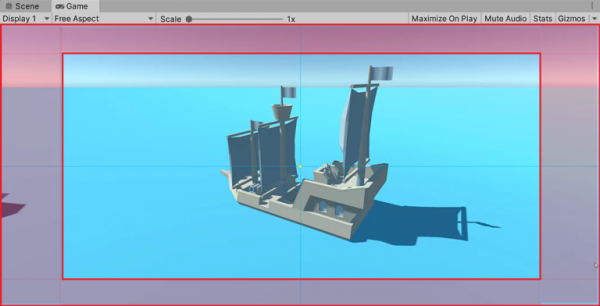
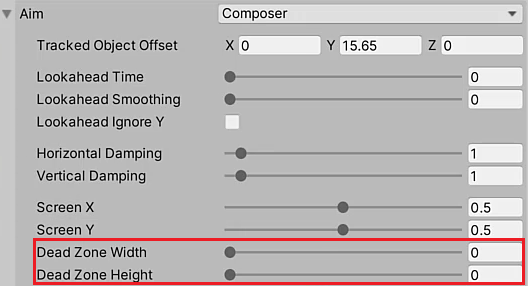
We can set the Dead Zone Width and Height so that the camera ignores minor target movement within the Dead Zone region.
Soft Zone is the blue area of the screen, which allows us for a smooth transition from the centre of the screen to the dead zone.
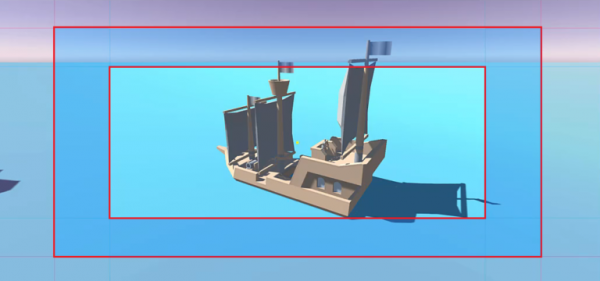
If a target enters this region, the camera will re-orient to bring it back to the Dead Zone.
The Soft Zone properties and the Bias X, Y properties can be used to set the size and position of the Soft Zone.

Finally, enabling the Center On Activate property means the camera will snap to the target as soon as the camera is initialized.
For more information on Virtual Camera properties, refer to the documentation: https://docs.unity3d.com/Packages/[email protected]/manual/CinemachineVirtualCamera.html
Cinemachine – Follow
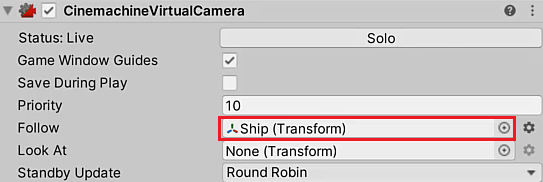
In the previous lesson, we’ve set our Cinemachine Virtual Camera to look at our Ship GameObject. Now we’re going to make it follow the ship by assigning it to the Follow field.
Let’s also adjust the camera’s position so that it looks like we’re looking at the stone from a first-person perspective.
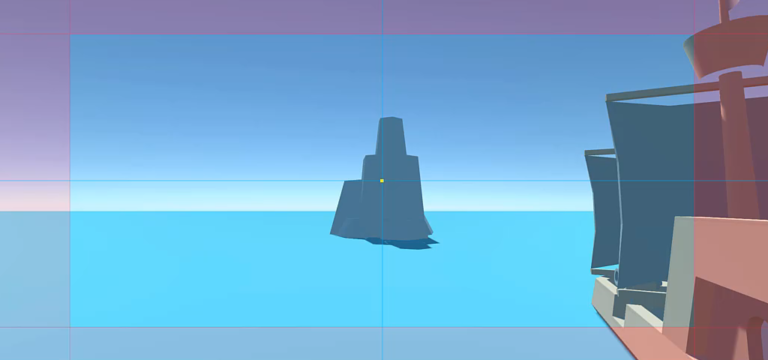
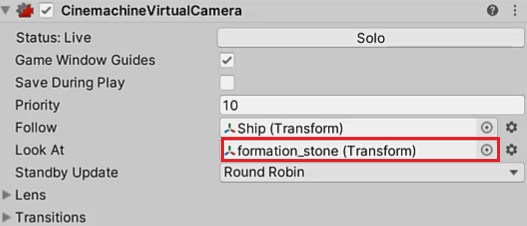
Let’s press Play to test it out. You’ll see that the camera tracks the stone while following the ship in a cinematic manner.
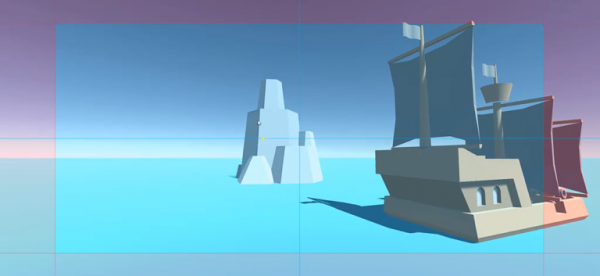
The Lens properties mirror their counterparts in the properties for the default Unity camera, such as Field of View, Orthographic Size, Clip Planes, etc.

You can also choose to animate the Virtual Camera in Timeline instead of using the Follow property.
To change how the camera moves in the Scene, you can adjust the Body properties.
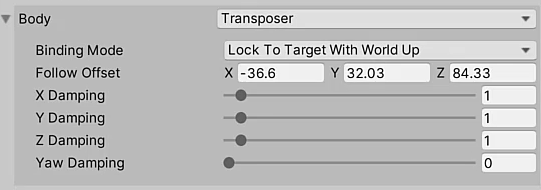
For more information on the Body Properties, refer to the documentation: https://docs.unity3d.com/Packages/[email protected]/manual/CinemachineVirtualCameraBody.html
Transcript – Cinemachine – Look At
Hey, everyone, and welcome back. In this lesson, we are going to be looking at Cinemachine, what it does and how we can use it.
So, basically Cinemachine allows us to create much more complex camera movements, tracking, following around targets, and overall create nice cinematic camera movements and angles that would rather be quite hard to do without it, in code or in animation. So, Cinemachine just allows us to drag and drop components and make it quite easy and quick.
So, how do we begin? Well, we already installed the Cinemachine package from the package manager earlier on so make sure you have this Cinemachine selection at the top of the screen. And then once you do, you wanna click on Cinemamachine and then go ‘Create Virtual Camera’.
Now a few things happened. First of all, we have this brand new game object that got created called “CM vcam1” and if we look at our Main Camera over here in the hierarchy, you’ll see there’s a little icon next to it.
Now, if we click on Main Camera, you’ll see that we have our camera component, we have our audio listener but then we also have a brand new Cinemachine brain component. And this component is just what we attach to a camera in order to actually utilize it with the Cinemachine system.
Okay, so we don’t actually really have to modify anything here. This is all specific stuff, if you wanna change the update method, blending method, and all that, but generally, we can just close it up like so as we don’t need to touch any of those components. So let’s go over to the CM vcam1 and this, as you can see, has a Cinemachine virtual camera component.
And this is what defines sort of the properties and the actions of this specific camera, okay? Because with Cinemachine, you can have as many virtual cameras as you want, and then we can choose to toggle between them as we wish, okay?
So for example, here in the inspector, what we can do first of all, is we can choose to say, “Okay, I want you to follow this, and I want you look at this.” okay? So we can choose to follow a target and look at a target, and then we can modify those properties down here.
So we can modify how closely it follows the target with some offset, some dampening. We can then choose the aim settings, for example, do we want to look at a bit of an offset, do we wanna have a nice, smooth aim? And we can change a few other things as well, such as adding a noise and even some extensions here.
So, let’s just say, we have the ship currently sailing around. Let’s just say we want our camera to stay where it is right now but look at the ship as it sails around. Well, in that case, what we need to do is drag our ship into the “Look At” property right here. And as you can see, our camera has changed.
First of all, the camera has rotated to snap onto the ship’s position. Now the ship position originally is at its base, so that’s why we are looking towards the water here. And you’ll notice there is this sort of a box right here. This basically defines the range at which the camera is gonna sort of freely move, okay?
Because we can define if it is a nice rigid look at, so we’re always looking at the exact position or if it’s a bit more natural and smooth. As if the camera is sort of tracking to keep up with the ship and we could of course modify all these properties. So, let’s just leave it as is right now and press play to see how it goes.
So as you can see, the ship goes off and we are rotating to face the camera. Okay, that was nice and easy. No code required at all. We can of course modify a few properties, if we go to our CM vcam1, let’s actually rename this one to ‘TrackCamera’. And if we go down to the “Aim” settings right here, we can change a few things.
First of all, let’s actually look at the ship a bit up more because right now, we’re looking a bit low. So where we have it ‘Tracked Object Offset’, we can raise this Y value a bit. And as you can see, we are now looking a bit above the ship’s position. So there we go.
We also have ‘Lookahead Time’, and watch what happens if I increase Lookahead Time and press play. As you can see, the camera is predicting where this ship is going to be. So we’re actually looking ahead of the ship. Now that can be useful in many cases, if you want a camera sort of looking ahead to see where an object’s going, it can be useful in those instances.
And we have ‘Lookahead Smoothing’. Now, as you can see, when we pressed play, it was quite rigid, Okay? We’re sort of snapping between the Lookahead positions, whereas if we increase the smoothing. As you can see, when we press play, it’s gonna be a nice, smooth transition between those points.
We can change on the fly as well. So, we can increase the smoothing and decrease it as we’re playing now, if you do want to modify those properties. We probably don’t want to look ahead time so we’ll bring that back down to zero. We also have the ‘Dampening’. Now Damping is basically adding smoothness to the camera movement, okay?
As you can see, if I bring the Damping down to zero on the horizontal and vertical axes and press play; you’ll see that we are basically stuck to this specific location on the ship, okay? It’s like in code. We were just telling the camera to look at this position on the ship and stay there every single frame.
But what if we want a bit of natural movement, as if there is actually a guy behind the camera sort of rotating it as the ship is moving? well, that’s when we can add in some Damping. So we can increase these values a bit. Probably don’t want to make it too high, otherwise the camera will take forever to catch up. Especially if it’s a fast moving object.
As you can see, the camera is now trying to keep up with the new position that we are trying to track. As you can see, there’s like a tiny little yellow square right here and that is the position the camera is trying to get to. And over time, based on the Damping and other settings, it will get there.
So I’m going to bring this back down to let’s just say, one, to make it nice, not too rigid but not too smooth. And then we have screen X and screen Y. And what this does is it kind of adds an offset to where we are looking or an offset to the screen. So as you can see, if I modify here on the X, you’ll see the camera is sort of rotating left and right.
And on the Y it rotates up and down, okay? Now this may be useful but we’re probably going to leave that at zero for now. Next up we have our ‘dead zone’, okay? Now the dead zone is basically the area of the screen that we are not going to track our object, okay?
And as you can see, if I increase the width and increase the height, you’ll see there is this box that appears in the middle of the screen, okay? It’s not blue and it’s not red. It’s sort of the transparent box. And if our point of reference right here, this yellow square that we’re trying to track.
If this is within this box right here, then we are not going to track our object. So watch what happens when I press play. You’ll notice that as long as this ship is within this box right here, it will not track it only when it leaves it, okay? So you can press play. And as you can see, now we start tracking it once it is outside of our dead zone.
Now this can be useful of course, in a game where you want the player to have the freedom of moving around but you don’t want the camera always stuck on them, okay? Maybe you only want them to start tracking them once they go off to the side of the screen.
We don’t really want this so we’re going to bring the dead zone back down to zero, so it’s always tracking our ship. And then we have our ‘Soft Zone width’ and ‘Soft Zone height’. Now Soft Zone is basically the area of the screen which allows us for this smooth transition, Okay? And this is basically this blue square here in the middle.
So if our point ever goes over to the red side of the screen, it’s basically going to stop right there, okay? So once we reach that point, we’re just going to snap onto a position and that’s so that the object doesn’t get too far off screen, It’s always going to be on screen.
‘Bias X’ and ‘Bias Y’ basically translates those changes and those zones are horizontally and vertically like so. And ‘Center On Active’ basically decides whether or not we’re going to snap to our ship when we start the game or when the camera is initialized.
So that is how we can set up a Cinemachine virtual Camera to start tracking and looking at an object as we move around in 3D space. Okay, in the next lesson, we are going to be looking at following our target because right now we have the camera looking at the target as it goes around the rock right here. We’ve looked for all these settings here.
Next lesson, we’re going to look at how we can actually attach this object, attach this camera to the ship, maybe as if there’s a cameraman on the ship, bobbing of the ship as it goes, okay? So thanks for watching and I’ll see you all in the next lesson.
Transcript – Cinemachine – Follow
Welcome back, everyone. In this lesson, we are going to be continuing on with looking at our Cinemachine virtual camera. So in the previous lesson, we looked at how we can actually look at an object over time. Okay.
So we’re having a camera rotate towards this ship. We have a bit of an offset, we have a bit of damping. Now, how do we actually get it to track the ship? How do we get it to actually follow the ship? Well, for this, we’re actually going to remove our look at reference right here.
So let’s just set this look at to none. So if we press play, you’ll see that our virtual camera isn’t doing anything right now and let’s get it to start actually following our ship. So I’m gonna drag ship into the follow property right here and straight away you can see that we’ve got a bit of a problem, okay.
Basically, if we go to the scene view, what’s happened here is that the camera has sort of snapped over to the position of the ship. Now, of course, if we open up body right here, we can add an offset so we can increase the Y a bit here.
Let’s actually set out rotation to zero, zero. So it is… Oh! Zero on the X and 180 on the Y. So it’s facing forward, like so, in the game view. We can then go ahead and add in some offset right here. So maybe we want it. We’ll just modify this a bit, a bit behind the ship. A bit to the left. So the camera is sort of on the left backside of the ship, like so.
We can even modify it a bit more. Okay. There we go. Maybe even a bit, add a bit of rotation Really it’s up to you. Now when we press play. We can have it follow the ship, like so. Okay. So you may notice that our ship, or our camera, doesn’t actually look at anything as the camera moves around, as the ship moves around.
So what we’re going to do is I’m actually going to set the look at here to not be the ship, but to be the stone right here, okay. So it’s going to look at the stone as the ship moves around, okay. We can change the offset of this a bit here. So we are looking. Oops. So we are looking at the stone position, move this over a bit like so.
We can then move the camera back a bit. So I’m going to get our camera. I’m going to move it about over. Let’s just say about here. Press play and look what happens. So as our ship moves, we are tracking the stone, like so. Okay. So it has a sort of a, maybe cinematic move. Maybe if the ship is circling around an object that it wants to focus on.
For example, if we’re having a ship fighting cut scene, we can have the camera tracking one ship while we’re looking at its target. We can also then go ahead and maybe increase the follow Y offset, like so. Press play again. So yeah, have a play around with these settings. There’s lots of different things that you can modify and add.
Now let’s also have a look at the lenses up here. Lens basically defines, we can define our field of view. So if we want a shallower depth of field, if we want to make a bit more cinematic, we can make it around 40 maybe. We can change our near and far clip planes. Probably don’t need to modify these.
As well as our Dutch angle, which rotates the screen left and right, like so. Okay. So we can have a lower field of view to maybe make it a bit, look a bit more like a cinematic camera Like so. You have the camera in the foreground, a rock in the background.
And in fact, we can probably move our camera back a bit here so we can add a position offset of Z a bit more something maybe like so. Okay. We can press play again, see how that looks. And yeah, there you go. So there’s a wide range of different camera moves and different things that you can do here.
You can have objects tracking. You can have objects moving over time. There’s also a large number of different cameras that you can create Right now, we’ve just looked at a virtual camera. There’s also a Dolly camera with track, which basically allows you to animate a camera to move along a predefined track.
So if you maybe have some characters walking through a hallway, or you have some sort of thing you want to track, but along a certain path, you can set that up. Cinemachine is quite an expansive package with so many different things. So I highly recommend that you just jump in, explore and just get creative.
So in the next lesson, we are going to be looking at Unity’s timeline, okay, and how we can start stitching together various different virtual cameras in order to create some sort of a cut scene, okay. Cutting between different camera angles.
We might have this one. We might have a camera on top of the rock. We might have a wide-angle camera that is just looking at the entire scene. And we’ll just be seeing how we can cut between those as well as doing some other stuff with the timeline as well. So thanks for watching and I’ll see you all in the next lesson.
Interested in continuing? Check out our all-access plan which includes 250+ courses, guided curriculums, new courses monthly, access to expert course mentors, and more!
