You can access our full Unity scripting course set here: Unity Game Development Mini-Degree
Unity Game development isn’t just about object manipulation- mastering Unity scripting with C# is the key to creating your own game logic. In this short tutorial, we’ll take a look at the fundamentals of Unity scripting so we can be ready to create any game you might imagine.
Let’s jump in.
Table of contents
Unity Scripting – Learning Goals
In this tutorial, we have three major goals:
- Discovering what is a Unity script.
- Creating and assigning a script.
- Showing text on the console.
As you delve into Unity scripting, a vital tool in mastering game development, Zenva’s Unity Game Development Mini-Degree can provide a deep-dive into building cross-platform games with Unity. This Mini-Degree offers a comprehensive suite of courses that guide you step-by-step – from creating your first 3D game to learning advanced skills like optimizing huge worlds and AI. Take the opportunity to delve deeper into Unity and its boundless applications, from game creation to VR projects and beyond.
Adding custom logic to your projects
In order to add behaviors to your game objects, you will need to learn Unity scripting. Unity scripting is the same as coding or programming. In this course, we will use the C# programming language to add behaviors to the game objects in the project.
The very first thing you should do is create a new project. Add a new folder called Scripts.
In this folder, you can create a new script by right clicking>Create>C# Script in the menu that pops up.
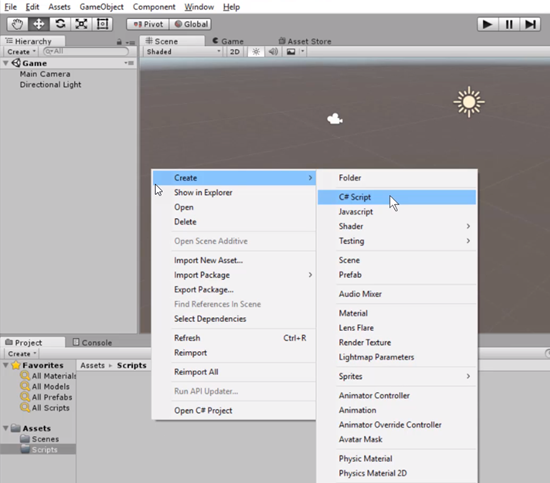
The standard convention for naming conventions when creating scripts is to start with a capital letter and capitalize the “W” in World. Name this script “HelloWorld.”
Once the script is named this creates a new C# script in the Scripts folder we created earlier.
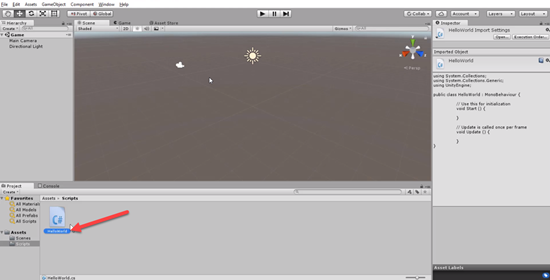
To open this script and edit it in the code editor you must double click on it. We will be editing this script in Visual Studio for this lesson. Visual Studio is the officially recommended code editor for Windows. Mac users will use a code editor called “Monodevelop.”
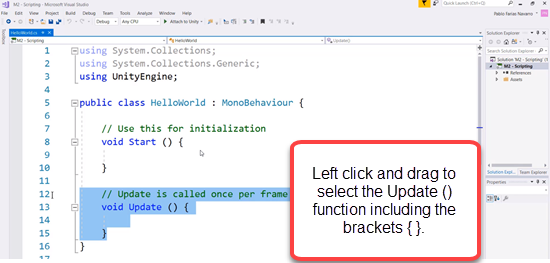
We will start by removing the Update function completely.
The best way to understand programming and Unity scripting is to think of a cooking recipe. In a cooking recipe you have to complete different steps. For example, if you wanted to make pasta, the first step is to boil the water, then add the pasta, and stir the pasta as it is boiling. Here you have different instructions and these instructions need to be performed in a certain order, which goes from top to bottom.
In programming and Unity scripting, you are issuing statements to the computer and then the computer needs to execute, these are also executed from top to bottom.
Methods, Comments, and Classes
Let’s dive into some of the technical terms of Unity scripting.
Let’s take the pasta recipe instructions and say we wanted to use this for a dinner event and you wanted to make a dessert. The dessert would be another recipe. The pasta recipe could be put into a Method. The method could be called MakePasta. So every time you wanted to make pasta you would use the method MakePasta. This method has all the instructions for the recipe in it. So when you are making your dinner you wouldn’t have to keep retyping each one of the instructions.
The Start text in the HelloWorld script is a method.
The green text above the Start function is called a comment. Comments are for humans to read. Whatever is preceded by the two forward slash signs is a comment. The computer will always ignore any comments that are written inside scripts.
We can add instructions inside the Start function by inserting them between the first { bracket and the second } bracket.
The curly brackets are used to put everything together within the function. You can think of the brackets as a bun, like the open bracket is the top of the bun and then the closed bracket is the bottom of the bun and the instructions go inside the bun, between those open and then close curly brackets.
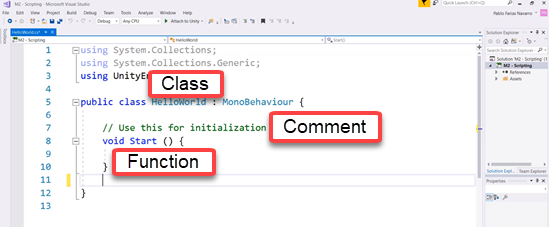
We created the class HelloWorld. A class can be compared to a Lego block. You have a block that can be used in different parts of your game. so for example, you could have one character in your game that will use the HelloWorld class and it’s going to do something. Then you could have some other different character in your game that uses that same component. So think of a class as some sort of block that can be reused.
Remember, the bun example from earlier with the function creation. Well classes use the same brackets. So a class has the open brackets and then the closing brackets. What’s contained inside those brackets is what compromises the class.
Namespaces
At the top of the script, you will notice these elements: using UnityEngine; using System.Collections.Generic; using System.Collections;
These are called Namespace. These different namespaces give us access to different APIs. The using UnityEngine; namespace gives us access to the main Unity API. The other two namespaces are part of the C# programming language. C# was created by Microsoft, and it’s part of the .NET framework. These are just tools that come with the programming language that we can use in our C# scripts when we write code for our Unity projects.
While starting out namespaces won’t matter much, as your games get more complicated, they will become integral to your Unity scripting.
Start Method
The start method is executed on the very first frame when the game starts.
MonoBehaviour
We won’t discuss MonoBehaviour in depth right now. However, for Unity scripting, just know that the reason we have access to the Start function is because we are deriving from MonoBehavior in our scripts.
Show text in HelloWorld
We can display text via the Start function in the HelloWorld script by typing print(“Hello World”); When we type a string we need to use double quotes.
 // Use this for initialization
    void Start()
    {
        print("Hello World");
    }
Whenever you type a statement in code you must end the statement with a semicolon.
Attaching Unity Scripting to game objects
In order to display the text “Hello World” on the screen once the Play button in the Unity editor is hit we must attach the script HelloWorld to a game object that is currently in the scene. Create an empty game object by right clicking in the Hierarchy window and selecting Create Empty. Rename the empty game object to “Hello World.” There are several ways to assign a script to a game object. One way is to simply drag the script all the way onto the empty game object.
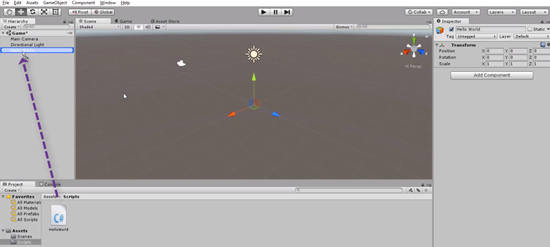
Once this is done, you can see the script as a component via the Inspector window. Components that are attached to game objects inside Unity can be removed by clicking on the Cog Wheel in the upper right-hand corner of the component you want removed and selecting Remove Component from the drop-down menu.
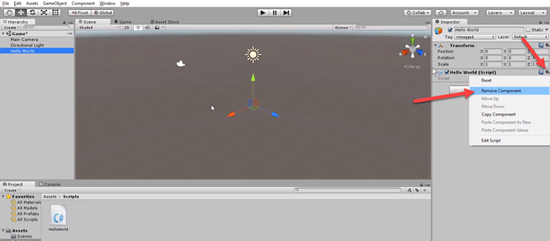
Another way to assign your Unity scripting as a component to a game object is while the game object is selected in the scene, click on Add Component button in the Inspector window; then select the script by selecting scripts from the drop-down menu, and then finding the script name you want to add as a component to the game object.
Now that the HelloWorld script is added to the Hello World empty game object if the Play button is hit in the Unity Editor, you will see the text “Hello World” displayed in the Console window inside the Unity Editor.
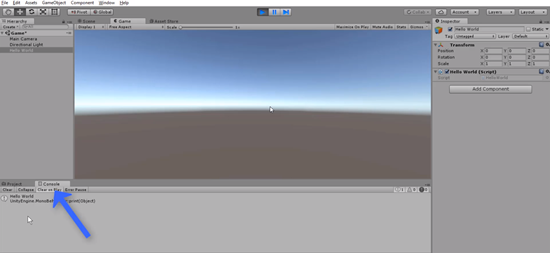
The Console window is used in the Unity Editor to send ourselves messages and if there is ever any errors in your written code it will be displayed via the Console window.
Challenge!
- Create a script.
- Assign the script to and object.
- Say hello to yourself on the console!
Challenge Tips
Make sure to create a new script, you can name it whatever you like. Assign the script to any game object in the scene. Then make sure to print your hello statement to yourself in the Start function on the script.
As you delve into learning Unity scripting, it would be beneficial to combine your newfound knowledge with practical game development techniques. Zenva’s Unity Game Development Mini-Degree is an extensive compilation of courses, allowing you to learn how to build cross-platform games with Unity. It offers the ideal stepping stone to master Unity, creating both small scale games and AAA hits, enabling you implement your scripting skills in real-world scenarios, and expanding your proficiency in the booming game industry.
Did you come across any errors in this tutorial? Please let us know by completing this form and we’ll look into it!

FINAL DAYS: Unlock coding courses in Unity, Godot, Unreal, Python and more.
Transcript – Unity Scripting
The Unity Editor can help you with many, many things. But there will come a time when you will want to implement your own custom logic or the logic for your game. And for that you need to learn Unity scripting. What we’ll do in this lesson is get started with Unity scripting, which is the same as programming or coding, or however you want to call it, using the C# programming language.
I’ve created a new project here, and the very first thing that I’m gonna do is create a folder for my scripts. So I’m gonna right-click and go to Create, Folder, and I’m gonna call this folder Scripts. Inside of that folder I’m gonna create my very first script.
So I’m gonna go to Create and select C# Script, that is C and the hash sign Script. I have to enter the name of my script now, and the convention is to start with a capital letter. So I’m gonna call this Hello, and then World, also W will be in a capital letter. That’s just how people write their names of their scripts. So I’m gonna press Enter, and that has created a new script for us.
If you select that script here, you can already see the source code of the script in the Inspector window. To open your Unity scripting, double-click on it. In my case that will open the script in Visual Studio, which is the officially recommended editor for Windows. If you are on a Mac, the script will be open in a program called MonoDevelop that works in a very similar way. Maybe, by the time you watch this, Visual Studio for Mac will be out, and you will be able to use Visual Studio as well.
So we’ve opened our Unity scripting file, and if you have never done any programming before, this can seem like a very strange thing. What does this all mean? And even if you have done programming, but you haven’t done any C#, this might also look pretty strange.
So, I’m gonna start by deleting this whole part here, this whole part that says void Update and those brackets, I’m gonna remove all of that and just keep this stuff here. And what I’m gonna do next, I’m gonna explain what this is in very simple terms with no technical term usage, and then we can move up from there and start adding some code. And now we can explain what this is.
So the best way to understand programming, and this is programming in general, is to think of a cooking recipe. So, in a cooking recipe you have different steps. For example, if you want to make pasta, the first step is to boil the water, and then you need to add the pasta, and then let’s say that you need to stir. So you have different instructions, and they can all be understood in human language in basic terms, and they all need to be performed at a certain order. So it goes from top to bottom.
The same thing happens with programming. You’re basically issuing statements that the computer needs to execute, and they are also executed from top to bottom.
Let’s say that we have the full recipe of pasta here, and we might want to use that recipe in different meals or in different events. So, for example, you could have some sort of dinner, a dinner party or something, where you need to make the pasta.
And let’s say that you also need to make a dessert. So that is another recipe. So this recipe can be put in what would be called a method, and that method could be called something like MakePasta. So every time that you want to make pasta, you just use the method MakePasta, and that method has all these instructions. So when you’re preparing your dinner, you don’t have to type each one of them. Write this down, you just say, just make the pasta, and you already have the instructions to make the pasta.
So if we now go to this code here, we are gonna start from the inside to the outside, making sense of everything. All of these instructions, they are very clear steps, would go, let’s say, here. This Start text, it is a method. So it would be something like, for example, MakePasta could be Start.
And this green text here that says, Use this for initialization is a comment. That is a comment for humans to read. So whatever is preceded by these two signs is a comment for the programmer to read. The computer is gonna ignore this. So what we have here, we will have instructions here, and those instructions are put inside of a method, in this case the Start method.
Now, what do these brackets mean? The brackets, these curly brackets are used to put everything together like the same thing that you have a burger, and you have a bun on the top and a bun on the bottom, and then you have your burger here and the lettuce and all the other things. So, think of the brackets as the bun that goes on the top and at the bottom. Things need to be within a certain space scope. So that is what these brackets mean.
What if we go one step even further. So at this point we kind of have an idea what this is. Basically, start some method, but what about this Class? This is a class and it’s called Helloworld. We gave it that name. Think of a class as like a Lego block, think of the class as a Lego block. So, you have a block that is almost like a Lego piece that you can use in different parts.
So you could have, for example, one character in your game that is gonna use this Helloworld, and it’s gonna do something. And then you could have some other character in the same game that uses that same component. So that is what a class is. Think of it as some sort of block that can be reused. And again, the brackets here are doing the same function as the burger buns on the top and at the bottom.
Then, what about this top part here? Since we said that this was like a piece of Lego, these would be other pieces of Lego that other people created that we are using in our script. In particular, this one that says UnityEngine. It gives us access to the whole Unity API.
And these other two are part of the C# programming language. It’s created by Microsoft, and this is part of the, it’s called the .NET Framework. So those are just tools that come with the programming language that we can use, and when we create, so let’s go back to Visual Studio, when we create a new script in Unity in this way, this is created for us automatically. The instructions that we put inside here, for example, boil the water or things like that.
Like it says here, they will be used at the beginning for initialization. When our game starts, and the very first frame is shown on the screen, that is when the Start method is executed.
And the last part that hasn’t been mentioned is this MonoBehaviour thing here. So, we will go over this in later lessons, but for now, just think that all this does, it just gives us the fact that we can use Start like that, it comes from here. So this gives us access to Unity’s way of working with things and connect with the Unity game itself. So, that would be a very, very general, basic way of looking at programming and Unity scripting.
Now, what can we do in our Start method? When people learn how to code, usually, they like to do what’s called a Helloworld, which is when you just say hello to the world. So, what we will do is just show the text Hello World. For that, if we type print, we can show something on the screen, and what is it that we want to print, we need to write the message.
So what I want to write is a message that says Hello World. But this kind of feels weird because see how it’s kind of underlining the words, and that is because when you are going to write a text ^what’s called a string, you need to use these quotes. ^So we are going to print Hello World on the screen.
And see how it’s still showing us this red line, it means that there’s something it doesn’t like, and it is because we are missing a semicolon. Whenever you type this type of statements, you have to put the semicolon at the end. So, we have now a little script, which all it does, it will say Hello World at the beginning of the game.
So let’s go back to Unity and see how we can make this actually happen. When a game begins, that is when you press play. So I’m gonna press play, and I’m not seeing any Hello World anywhere.
So why is that? It’s because in order for a script to actually do something, you need to put it in your game. You need to assign it to a game object. So you need to create a game object or use an existing game object, and give it the script, so that then the script has life and actually runs when the game runs. So, what I’m gonna do now is create an empty game object because we don’t really wanna show anything.
I just need a game object here. An empty game object only has the transform component. So it’s not shown, it doesn’t have a render component, it doesn’t have a material. And I’m gonna rename this and call it just Hello space World. That’s just gonna be its name.
And there are different ways of assigning a script to a game object. One of them is by simply dragging the script all the way to the game object, and that will make it appear here as a component. I can remove that component by going here, Remove Component. So, another way would be to click Add Component and then find Scripts and find that Hello World. So that’s another way of adding it.
So now that the script has been assigned in our game, we can actually play our game, and you will see the Hello World. So let’s play the game. And you can see down here Hello World. If you go here next to Project to Console, the console is an area that we use to communicate with the script. In the sense that we can send ourselves messages such as this this, and also, if there’s any error in your code, it will be displayed here.
See that Hello World entry, if I click on it, and then I go down here, it will tell me the exact location of that message. In this case the file is called HelloWorld.cs, and the line is number nine. So if you go to that file, which is by the way called HelloWorld.cs, that is the extension for C# scripts, and if you go all the way to line number nine, we can see our message.
So, that is how you can create a script and assign it to an object.
Interested in continuing and learning more about Unity scripting? Check out the full Unity Game Development Mini-Degree.
