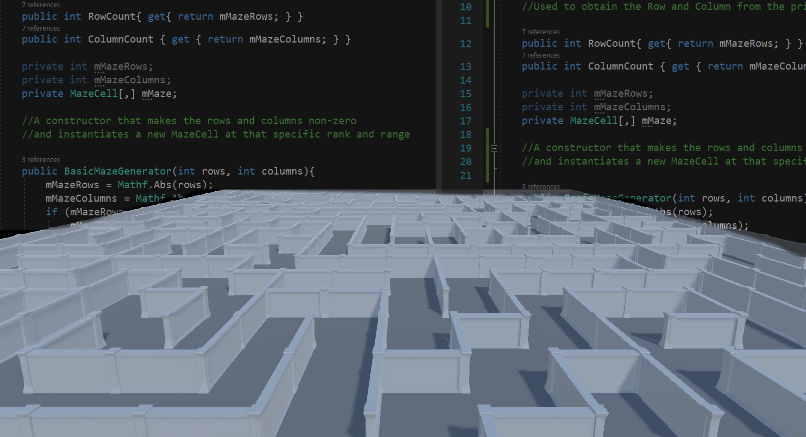
The great advantage computers have when compared with their human counterparts is the ability to perform the same task over and over again with the same level of precision. They do not tire like humans often do when faced with crunching mathematical equations over and over again. Further, given decent hardware, a computer can execute several mathematical operations in a matter of milliseconds – which is far beyond what the normal human is capable of.
What does all this mean for you as a game developer, though? It means that things like procedural generation are possible to add variety to your games – as computers are more than capable of generating a level on the fly in seconds! In this tutorial, we are going to show you how to harness this aspect of computers to procedurally generate a maze level before runtime. We will be using C# and Unity to explore not only the details of the C# data structure, but also a handy programming trick called “recursion.” We’re going to be looking at how an ancient math problem can help us build this maze generating tool.
Because of this, it is recommended that you have some familiarity with Unity and programming in C#. This could be considered an Intermediate to Advanced tutorial. However, I will be explaining everything in detail so if you are not completely confident in your C# skills, simply follow along anyway. Let’s get started!
Table of contents
Download Assets
We are going to be making use of some prefabs that we will be spawning into the scene. You can download these assets by using this link: Source Files. Download the assets and import them into an empty Unity project.
This project was inspired and based on an asset by “styanton” on the Unity Asset Store which you can check out here: Maze Generator
Did you come across any errors in this tutorial? Please let us know by completing this form and we’ll look into it! FINAL DAYS: Unlock coding courses in Unity, Godot, Unreal, Python and more.
Designing an Algorithm
Before we begin, let’s talk about designing an algorithm for our maze which we’ll use in Part 2 of this tutorial. This section will be adapted from and inspired by the book Advanced Topics in C by Noel Kalicharan – so if you’d like more details go check that book out. Here, however, I will strive to explain this topic in a more condensed, bite-sized form to suit our purposes.
If you wanted to write some code that would generate a maze for you, how would you start? Figuring out where to start can be extremely helpful for a problem such as this, mostly because it is likely a solution has already been found and we simply need to search it up. When it comes to maze creation, there are a couple of different approaches. Certain approaches worth mentioning might be having a computer generate an image texture that consists of white and black spaces that form the outline of a maze. Then we simply spawn a wall at either a black or white space (whichever color represents a wall). This method may be a bit easier to visualize but it would be a bit more difficult to write out in code.
The approach we are taking is a more mathematical approach. You might think of it as the “Recursive Method.” When we think about mazes (as in, how they are made), we can see there is a pattern to them, namely, there is a certain set of steps that, if executed exactly, will always solve the maze. Think of it like this: if you’re placed in a maze and you have no prior knowledge about how it was constructed (i.e., no map or “birds-eye view”), you could finish the maze by simply noting where you can’t go (i.e., where a wall is) and where you can go (i.e. where an empty spot is). Assume you’ve got a way to keep track of all the places you can and can’t go, then it’s a relatively simple task of checking each spot that you can go to. Eventually, you’ll end up at the exit.
Now that probably doesn’t sound like a very solid plan if you’re stuck in a maze. It would take much too long to check each possible path. Naturally, we would get quite tired if we attempted this strategy. But a computer wouldn’t get tired. As we’ve said before, a computer can execute the exact same task over and over again with much more precision and much more speed. Here’s where we can use that aspect to solve our problem. Here’s where the subject of recursion comes into play.
In computer science, “recursion” is where a method or function is defined in terms of itself. A way it sometimes crops up is when a method calls itself. This would put the method into a sort of infinite loop. Usually, some condition is set up inside of the method that prevents it from being called an infinite amount of times (it wouldn’t be particularly useful if that was the case). To illustrate the usefulness of this method, we can turn to the classic example of the Towers of Hanoi, a puzzle game with simple rules. It involves a number of disks (let’s say 3), those same disks on a number of poles (let’s say 3 again), and two rules: 1) you can only move one disk (the disk on top) and 2) you can’t put a larger disk on top of a smaller one.
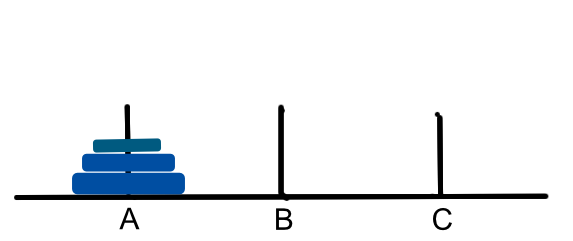
How would you go about moving the entire stack of disks to another pole while abiding by those rules? The answer isn’t intuitively obvious and I certainly wouldn’t be one to give you an answer right off the bat. Nevertheless, we can write a recursive function that would solve this for us. Further, we can write a program that could solve much larger puzzles than three discs and three poles.
Let’s have a look at the solution to this particular puzzle. Let’s assume we know how to move the top two disks to pole B by using poles B and C.
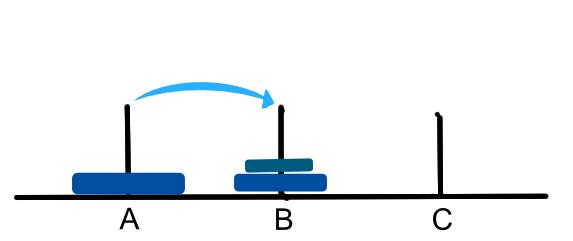
We could then move the third disk to C and (assuming we can move the top two as we did before) we can move the top two disks on top of the third on C.
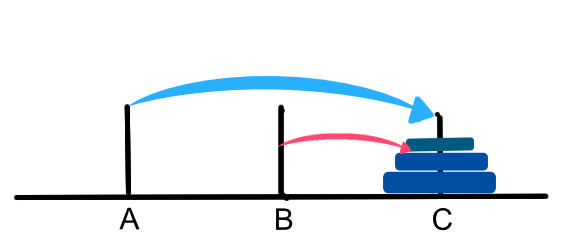
The actual specifics of how we did the intermediate steps are not particularly complicated. Based on this solution, we can abstract this process to design a recursive algorithm to solve this puzzle. Notice that we did the following:
- Moved n-1 disks from A to B using C
- Moved the nth disk from A to C
- Moved n-1 disks from B to C by using A
(in this case, n = 3)
Writing this in code looks like this:
void Hanoi (int n, pole start, pole end, pole intermediate)
{
	if (n > 0)
	{
		Hanoi (n - 1, start, intermediate, end);
		print("Moved disk from " + start.name + " to " + end.name);
		Hanoi (n - 1, intermediate, end, start);
	}
}
Assume that “pole” is a previously defined object that has a string attribute called “name”. Notice that this method calls itself twice. In each case, it goes to the n – 1 disk until n = 0 at which point the method becomes invalid.
I hope you can see a way we can do something similar to generate a maze. Let’s assume a starting point and that it has four sides with either a wall or an open space in each spot. We could check if there’s a wall and record it as not being a walkable space. We could check if there’s an open space and record it as being a walkable space. Starting off with a set number of columns and rows (basically the size of the maze in x and y coordinates) we can then do a final check to make sure we haven’t gone past either of those boundaries. If there’s a walkable space adjacent to the point we are currently at, we can move to that spot and repeat the process all over again. It may sound like we’re trying to solve a maze rather than generate one but, when you consider it more closely, those two activities are essentially the same.
Before we close out this section and begin coding, I hope you realize another important aspect of recursive functions namely, that they are not the most efficient when it comes to memory or processing power. Naturally, if we have a maze with very large boundaries, it will take a good deal longer to generate than one that is half the size. Keep this in mind if you intend to use this technique in your own projects (as I sure hope you do).
Building the Base Class
Let’s be programming optimists. Let’s assume that our code is going to work (every programmer’s dream) and that we’ll add more algorithms and techniques to this maze generator. Since we’re behaving as optimists, we can take a more abstract route when it comes to constructing our classes. Before we start coding, let’s get a plan as to how we should structure our classes. I propose the following data structure:
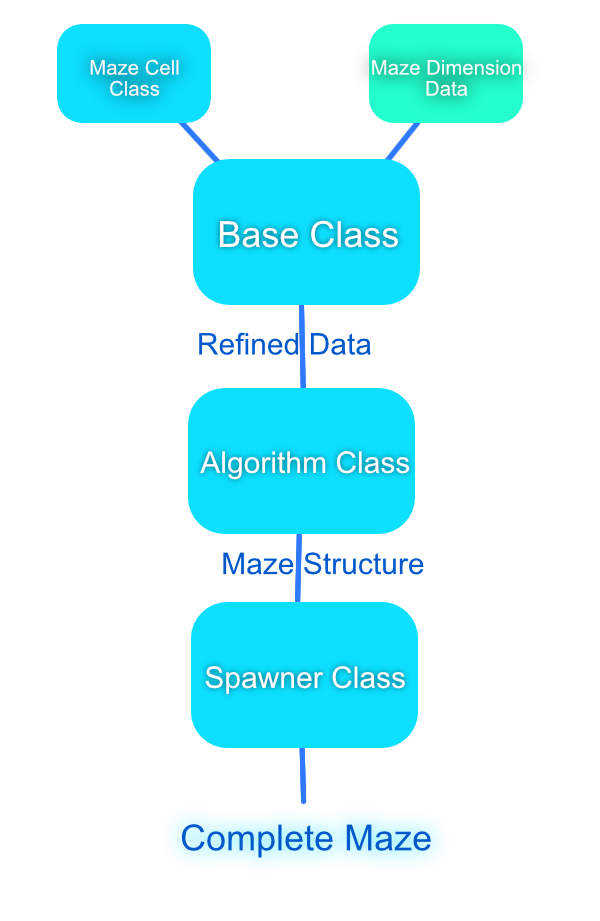
We can feed the base class some information about the characteristics of a maze cell and the dimensions of that maze. The base class will then take that data, format it to prevent any out-of-range errors, and set up some abstract methods to be implemented by the algorithm class. The algorithm class is where we can put, among other things, our recursion algorithm to generate the maze. This class will run through the algorithm and spit out the “coordinates” (for lack of a better term) where the spawning class will instantiate walls, floors, and other objects that will make up the physical parts of the maze.
We can start implementing this plan by recognizing the need to break the maze up into “cells”. If we break it up into cells, we can have discrete positions from which we can determine if there is an empty space or a wall (just like we mentioned in the previous section). If you haven’t done so already, create a new folder in Unity called “Scripts” and create a new C# script called “MazeCell.”

This will be an extremely simple script that we will mainly use for storing some information about what is surrounding a cell in the maze. To tell if there is a wall or an open space, we need 6 booleans; one to tell if the cell had been visited before, four to determine if there is a wall or not on each of its four sides, and a 6th boolean to determine if we should spawn a collectible at that point. This works out in the code like this:
using UnityEngine;
using System.Collections;

public enum Direction{
	Start,
	Right,
	Front,
	Left,
	Back,
};
public class MazeCell {
	public bool IsVisited = false;
	public bool WallRight = false;
	public bool WallFront = false;
	public bool WallLeft = false;
	public bool WallBack = false;
	public bool IsGoal = false;
}
Notice that we are not inheriting from Monobehaviour and that we are also defining an enumerator. The reason we do this is to determine which direction we should go after we have checked this cell.
Having defined the MazeCell class, we can implement it into a slightly more complicated base class that our algorithm script will inherit from. In the base class, we need a check to make sure the dimensions of the maze aren’t zero (these dimensions are supplied in the Unity Editor). We also need a method that will return any cell of the maze if its rank and range are supplied (essentially, it’s x and y position on the maze). Finally, we need an abstract class that will be implemented by the algorithm class to start the recursive algorithm. Create a new C# script called “BasicMazeGenerator” and write the following lines of code in it:
using UnityEngine;
using System.Collections;

public abstract class BasicMazeGenerator {

	//Used to obtain the Row and Column from the private variables

	public int RowCount{ get{ return mMazeRows; } }
	public int ColumnCount { get { return mMazeColumns; } }

	private int mMazeRows;
	private int mMazeColumns;
	private MazeCell[,] mMaze;

	//A constructor that makes the rows and columns non-zero
	//and instantiates a new MazeCell at that specific rank and range

	public BasicMazeGenerator(int rows, int columns){
		mMazeRows = Mathf.Abs(rows);
		mMazeColumns = Mathf.Abs(columns);
		if (mMazeRows == 0) {
			mMazeRows = 1;
		}
		if (mMazeColumns == 0) {
			mMazeColumns = 1;
		}
		mMaze = new MazeCell[rows,columns];
		for (int row = 0; row < rows; row++) {
			for(int column = 0; column < columns; column++){
				mMaze[row,column] = new MazeCell();
			}
		}
	}


	//called by the algorithim class to start the algorithm

	public abstract void GenerateMaze();

	public MazeCell GetMazeCell(int row, int column){
		if (row >= 0 && column >= 0 && row < mMazeRows && column < mMazeColumns) {
			return mMaze[row,column];
		}else{
			Debug.Log(row+" "+column);
			throw new System.ArgumentOutOfRangeException();
		}
	}
As you can see, the constructor checks to make sure the data coming from the Unity Editor is greater than zero. This is important because the recursion algorithm will only run if it’s greater than zero (we’re going to set up a condition that ensures this). The “GetMazeCell” will be used by the recursion class to determine and set the booleans on the MazeCell class; it will also be used in the spawner class to instantiate the floor and walls of that cell. There’s not that much code that is going into this class but as you will soon see, we’re going to be using this base class extensively in the next few tutorials.
Conclusion
I don’t know about you, but I find this approach to procedural maze generation quite elegant and in some ways, beautiful. In this project, we are taking advantage of the unique way C# handles inheritance. For some odd reason, it seems quite satisfying to use C# in all its glory. The other C languages can produce similar results – but in my opinion, C# does it best. Regardless of how you feel, you’ve taken the first step with procedural generation by getting the foundations and data structures sorted!
In the next tutorial, we’re going to be building the recursion algorithm from the ground up. We’re going to be utilizing both the base class and the Maze Cell class to craft the algorithm class. We’re going to be exploring even further into the C# system of inheritance, start using some neat syntactical tricks to speed up your coding, and begin implementing the methods we’ve just created. I’m looking forward to seeing you in the next lessons where we’ll really hit the ground running with procedural generation!
Keep making great games!
Resources:
- Advanced Topics in C by Noel Kalicharan
- Maze Generator Unity Asset be styanton
