When I was in school studying mathematics (like all other students), my favorite problems to work on would be the ones that had some sort of real-world meaning. That is to say, I’d rather calculate how much fence should go around a piece of land than determine whether a transformation in R3 was one-to-one or not (as an aside, the latter is probably easier to calculate). I think the same is true in this instance.
Up to this point in Part 1 and Part 2, we haven’t seen any tangible results from all our programming. It’s been “write this code, try to understand the logic, and it’ll help us later.” This tutorial marks the end of this “era of abstraction” and the beginning of finally putting tangible results to our work. In this final section of our tutorial series, we’re going to be writing the spawner class to instantiate our procedural maze in Unity – achieving the goal we’ve been after all along! So if you’re ready to conquer the final stage of procedural generation, let’s get into it.
Table of contents
Source Code
This tutorial is the third part of a series. You can read the previous tutorial here: Procedural Maze Creation in C# and Unity – Part 2 or you can simply download the source code from the previous tutorial to follow with this tutorial Source Code.
Did you come across any errors in this tutorial? Please let us know by completing this form and we’ll look into it!

FINAL DAYS: Unlock coding courses in Unity, Godot, Unreal, Python and more.
The Maze Spawner Class.
Create a new C# script called “MazeSpawner” and open it up in Visual Studio:

In accordance with our data-flow strategy, the Maze Spawner class is the final class that takes in all the data given by the Base and Algorithm classes and spits out a complete maze. The logic for the spawner class is very similar to the algorithm class in the sense that we have to check each direction to determine where the walls and open spaces are. The main difference is that the spawner class is not recursive. Most of the action in this class is going to occur at the beginning of the game (in the Start method).
Before we actually code the spawner class, let’s think about what sorts of variables we’re going to be needing. Right off the bat, you can probably already see that we need some game object variables. We’re going to be spawning in the floor, the walls, and some pillars (essentially the corners), so you know we’re going to need at least three Gameobject variables. Also, this is where we can set the size of the maze in the inspector. Remember that the base class takes in the row and column size. We can provide the row and column size by making them a public integer variable that is set in the inspector
Here are all the variables we’re going to be using:
using System.Collections;
using System.Collections.Generic;
using UnityEngine;

public class MazeSpawner : MonoBehaviour
{
	public enum MazeGenerationAlgorithm
	{
		PureRecursive
	}

	public MazeGenerationAlgorithm Algorithm = MazeGenerationAlgorithm.PureRecursive;
	public bool FullRandom = false;
	public int RandomSeed = 12345;
	public GameObject Floor = null;
	public GameObject Wall = null;
	public GameObject Pillar = null;
	public int Rows = 5;
	public int Columns = 5;
	public float CellWidth = 4;
	public float CellHeight = 4;
	public bool AddGaps = false;
	public GameObject GoalPrefab = null;

	private BasicMazeGenerator mMazeGenerator = null;

	// Start is called before the first frame update
	void Start()
       {

       }
}
Hopefully, it makes some sense why a lot of these variables are here. In this case, we’re including an enumerator which we can use to determine which algorithm we’re going to be using. We’ve only got the recursive algorithm in it but in case we were to add more algorithms, we can switch between them by using this enumerator.
Also, note that we’re using a random seed in this instance. This is going to be tied to the “FullRandom” boolean which is set to “false” by default. If it is false, then we use what’s called “pseudo-random” values. We can tell Unity to use this seed (the 12345 integer sequence) to make it look like it’s random when in fact it’s some form of a preset. Having a seed could be used to prevent the exact same maze from being generated. We aren’t going to be using this too much with the recursive algorithm, but it can be very helpful for different types of algorithms.
The “CellWidth” and “CellHeight” variables dictate the actual size of the cell itself. If this value is too large, it can leave gaps in the maze. We don’t have any goal prefabs but I’ll leave this here in case you want to add it. Finally, we have a private instance of the BasicMazeGenerator (also known as the base class) from which we’ll use the “GetMazeCell” method to grab all the specifics (namely, where the walls are) of that particular cell.
The logic for actually spawning the maze looks like this:
using System.Collections;
using System.Collections.Generic;
using UnityEngine;

public class MazeSpawner : MonoBehaviour
{
	public enum MazeGenerationAlgorithm
	{
		PureRecursive
	}

	public MazeGenerationAlgorithm Algorithm = MazeGenerationAlgorithm.PureRecursive;
	public bool FullRandom = false;
	public int RandomSeed = 12345;
	public GameObject Floor = null;
	public GameObject Wall = null;
	public GameObject Pillar = null;
	public int Rows = 5;
	public int Columns = 5;
	public float CellWidth = 5;
	public float CellHeight = 5;
	public bool AddGaps = false;
	public GameObject GoalPrefab = null;

	private BasicMazeGenerator mMazeGenerator = null;

	// Start is called before the first frame update
	void Start()
    {
		if (!FullRandom)
		{
			Random.InitState(RandomSeed);
		}
		switch (Algorithm)
		{
			case MazeGenerationAlgorithm.PureRecursive:
				mMazeGenerator = new RecursiveMazeAlgorithm(Rows, Columns);
				break;
		}
		mMazeGenerator.GenerateMaze();
		for (int row = 0; row < Rows; row++)
		{
			for (int column = 0; column < Columns; column++)
			{
				float x = column * (CellWidth + (AddGaps ? .2f : 0));
				float z = row * (CellHeight + (AddGaps ? .2f : 0));
				MazeCell cell = mMazeGenerator.GetMazeCell(row, column);
				GameObject tmp;
				tmp = Instantiate(Floor, new Vector3(x, 0, z), Quaternion.Euler(0, 0, 0)) as GameObject;
				tmp.transform.parent = transform;
				if (cell.WallRight)
				{
					tmp = Instantiate(Wall, new Vector3(x + CellWidth / 2, 0, z) + Wall.transform.position, Quaternion.Euler(0, 90, 0)) as GameObject;// right
					tmp.transform.parent = transform;
				}
				if (cell.WallFront)
				{
					tmp = Instantiate(Wall, new Vector3(x, 0, z + CellHeight / 2) + Wall.transform.position, Quaternion.Euler(0, 0, 0)) as GameObject;// front
					tmp.transform.parent = transform;
				}
				if (cell.WallLeft)
				{
					tmp = Instantiate(Wall, new Vector3(x - CellWidth / 2, 0, z) + Wall.transform.position, Quaternion.Euler(0, 270, 0)) as GameObject;// left
					tmp.transform.parent = transform;
				}
				if (cell.WallBack)
				{
					tmp = Instantiate(Wall, new Vector3(x, 0, z - CellHeight / 2) + Wall.transform.position, Quaternion.Euler(0, 180, 0)) as GameObject;// back
					tmp.transform.parent = transform;
				}
				if (cell.IsGoal && GoalPrefab != null)
				{
					tmp = Instantiate(GoalPrefab, new Vector3(x, 1, z), Quaternion.Euler(0, 0, 0)) as GameObject;
					tmp.transform.parent = transform;
				}
			}
		}
	}
}
First off, you’ll notice that we’re doing everything in the Start method and we’re using for-loops instead of recursion. This makes the most sense since all we need to do is spawn stuff in. Secondly, the logic, though dense, is fairly straightforward. We simply loop through all the rows and columns (notice the nested for-loops) and spawn a wall where there is a wall, a floor at each cell, and pillars later on. Also, note that we’re calling the “GenerateMaze” method on the algorithm class. This is extremely important since we want to make sure there is an actual maze before we start spawning things. A bit of spawning math is done in each wall check (lines 53, 58, 63, 68, and 73). This is to make sure the wall spawns on the edge and not at a corner.
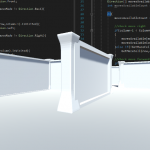
That takes care of the walls, but we also need to add some pillars. In our case, these pillars are simply there to fill in the gaps left by the walls. If you’d like, you can save this out and assign the prefabs. The maze would look something like this with the hard corners:

It’s a simple bit of code to add pillars in. Very similar to the wall logic except we want a pillar on each corner (lines 78-91).
using System.Collections;
using System.Collections.Generic;
using UnityEngine;

public class MazeSpawner : MonoBehaviour
{
	public enum MazeGenerationAlgorithm
	{
		PureRecursive
	}

	public MazeGenerationAlgorithm Algorithm = MazeGenerationAlgorithm.PureRecursive;
	public bool FullRandom = false;
	public int RandomSeed = 12345;
	public GameObject Floor = null;
	public GameObject Wall = null;
	public GameObject Pillar = null;
	public int Rows = 5;
	public int Columns = 5;
	public float CellWidth = 5;
	public float CellHeight = 5;
	public bool AddGaps = false;
	public GameObject GoalPrefab = null;

	private BasicMazeGenerator mMazeGenerator = null;

	// Start is called before the first frame update
	void Start()
    {
		if (!FullRandom)
		{
			Random.InitState(RandomSeed);
		}
		switch (Algorithm)
		{
			case MazeGenerationAlgorithm.PureRecursive:
				mMazeGenerator = new RecursiveMazeAlgorithm(Rows, Columns);
				break;
		}
		mMazeGenerator.GenerateMaze();
		for (int row = 0; row < Rows; row++)
		{
			for (int column = 0; column < Columns; column++)
			{
				float x = column * (CellWidth + (AddGaps ? .2f : 0));
				float z = row * (CellHeight + (AddGaps ? .2f : 0));
				MazeCell cell = mMazeGenerator.GetMazeCell(row, column);
				GameObject tmp;
				tmp = Instantiate(Floor, new Vector3(x, 0, z), Quaternion.Euler(0, 0, 0)) as GameObject;
				tmp.transform.parent = transform;
				if (cell.WallRight)
				{
					tmp = Instantiate(Wall, new Vector3(x + CellWidth / 2, 0, z) + Wall.transform.position, Quaternion.Euler(0, 90, 0)) as GameObject;// right
					tmp.transform.parent = transform;
				}
				if (cell.WallFront)
				{
					tmp = Instantiate(Wall, new Vector3(x, 0, z + CellHeight / 2) + Wall.transform.position, Quaternion.Euler(0, 0, 0)) as GameObject;// front
					tmp.transform.parent = transform;
				}
				if (cell.WallLeft)
				{
					tmp = Instantiate(Wall, new Vector3(x - CellWidth / 2, 0, z) + Wall.transform.position, Quaternion.Euler(0, 270, 0)) as GameObject;// left
					tmp.transform.parent = transform;
				}
				if (cell.WallBack)
				{
					tmp = Instantiate(Wall, new Vector3(x, 0, z - CellHeight / 2) + Wall.transform.position, Quaternion.Euler(0, 180, 0)) as GameObject;// back
					tmp.transform.parent = transform;
				}
				if (cell.IsGoal && GoalPrefab != null)
				{
					tmp = Instantiate(GoalPrefab, new Vector3(x, 1, z), Quaternion.Euler(0, 0, 0)) as GameObject;
					tmp.transform.parent = transform;
				}
			}
		}
		if (Pillar != null)
		{
			for (int row = 0; row < Rows + 1; row++)
			{
				for (int column = 0; column < Columns + 1; column++)
				{
					float x = column * (CellWidth + (AddGaps ? .2f : 0));
					float z = row * (CellHeight + (AddGaps ? .2f : 0));
					GameObject tmp = Instantiate(Pillar, new Vector3(x - CellWidth / 2, 0, z - CellHeight / 2), Pillar.transform.rotation) as GameObject;
					tmp.transform.parent = transform;
				}
			}
		}
	}
}
If you read through the above code, you might find some confusing characters such as the “?” in a line like this:
float x = column * (CellWidth + (AddGaps ? .2f : 0));
This is what’s called the “Ternary Conditional Operator.” It’s a special operator in C# that evaluates a boolean (like the “AddGaps” boolean) and executes what’s called the “consequent” or “alternative” expressions. In this case, the “AddGaps” boolean is evaluated. If it is true (as in, we want gaps in the maze), then we add a little bit to each x and y variable both in the logic for the pillars and the logic for the walls. This effectively creates gaps in the maze. If we don’t want gaps (which, by default, the “AddGaps” boolean is set to false), then we simply add zero to each x and y variable as we do in the above example. All that can be determined in one line which is a pretty handy trick that can make your programming better.
Setting up the scene
Now we can finally add this element to our scene. Create a new empty game object called “Maze Spawner.”

Add the “MazeSpawner” script onto this game object.

Now we need to go into the “Maze Creation Asset Pack” and drag in the floor, wall, and pillar prefabs.

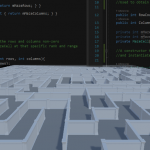
Now you can just hit play and see your newly created maze!

If you notice, however, there are very large gaps in the maze. This can easily be fixed by changing the cell size variables. I’ve found that 4 for each seems to close them quite well.


Just like that, we’ve got a brand new, procedural maze!
A Recap
Let’s say you have to solve a problem or accomplish a task which was similar to this project in many ways. A task whose solution was obviously code-oriented and required a thoroughly logic-based approach. What general practices could be taken away from this project that could help you with that project? Some key takeaways would be drawing a graph or diagramming how your classes are going to talk to each other. Kind of like this:

Just something that shows what sorts of data each class relies on, why it’s there, what it does, etc. This will mostly prevent you from getting lost as you start coding. It doesn’t have to be complicated or polished, but it might be useful.
Secondly, and this may be more psychological, do not be afraid to use all that the language gives you. In this case, part of the reason the solution is so elegant is because of the way C# does inheritance. “Inheritance” describes a language’s ability for things like classes to use or implement methods that have been roughly defined. In our case, we create our own “base” class. Normally, all scripts would inherit from “Monodevelop” but because we knew what we needed to do, we could make our own abstract class to inherit from. This is one of the strengths with C#. Being it’s an object-oriented language, we’re allowed to have multiple classes talking to each other and performing tasks.
Conclusion
This project was pretty dense when it comes to code. There were a lot of complex topics we talked about and it probably was easy to get lost in all of it. Also, it is not the most intuitive and obvious approach when it comes to procedural generation. That is to say, if you had no experience with making a procedural maze (even if you were familiar with recursion), this might not have been your immediate approach.
Nevertheless, I think it is a very effective, elegant, and efficient approach for maze creation. This is not to mention we deeply explored a lot of theory which is sure to help you in the days to come as you experiment and find out everything procedural generation has to offer. Not only are these skills bound to help you with your future projects, but you’ll be able to add even more variety to your games! I hope you enjoyed this topic as much as I did!
Keep making great games!