You can access the full course here: GODOT 4 MINI-PROJECTS
Table of contents
Introduction
In this tutorial, we are going to learn how to use loops in Godot to create a randomly generated star system. This mini-project will help you understand the concept of loops and how to use them effectively in your game projects. By the end of this tutorial, you will have gained valuable skills that can be applied to a variety of game development scenarios.
In order to follow this tutorial, you are expected to be familiar with the following concepts:
Project Files
To assist you in following this tutorial, we have included a full copy of the code files, as well as sprite assets used. You can download these project files to get started.
Download Project Files Here
Loops – Part 1
Creating the Scene
As with our previous mini-projects, we will need to create a new scene for this project. For this project, we will use a 2D root node, named Main.

We will also create a new folder in the FileSystem named Loops for storing the files related to this project.

We can then save this as Loops.tscn inside the new folder.

Adding our Assets
In the extracted asset files that we gathered in the previous project, there is also a folder named Loops Project. This contains the Star.png sprite that we will be using for our project. As with the previous project, feel free to use a different asset than the ones provided in the course files. You can then drag the Star.png file into the Loops folder that we created in Godot.

What are Loops?
To begin working with loops, we will create a New Script on our Main root node. We will call this Loops.gd and save this in the Loops folder.

We won’t be using the _process function in this lesson, so that can be deleted, but make sure to keep the _ready function for making our loops in.
So, what is a loop? A loop is a way of running a block of code multiple times. For example, if we want to print the word Hello! to the Output ten times, we could write the print line ten times but this isn’t very effective. Instead, we can use a for loop as shown in the code below.
func _ready():
    for i in 10:
        print("Hello!")
If you press Play you will see this writes the Hello! output to the console ten times, as intended. What we are doing here is creating a temporary variable named i (for iteration) and then the for loop will run the block of code inside, incrementing i by 1 each time, until it reaches the maximum of 10 that we set. We can see this by replacing “Hello!” with our i variable in the print statement.
func _ready():
    for i in 10:
        print(i)
Now if you press Play you will see 0-9 printed in the Output window, as expected

You could change 10 to any number you like, such as 1000. If you did this, you will see the numbers 0-999 printed in the Output window. It is important to note that our for loop will run in one frame and will block any other code from running until it is complete, much like an if statement when it runs.
Challenge
As a challenge before the next lesson, create a variable named score with a value of 0 and create a for loop to increase the score by 5 every iteration. And then print the final value of score after the for loop. To get you started, here is the code to create the score variable.
func _ready():
    var score = 0
Loops – Part 2
In this lesson, we are going to be creating the actual star-system scene.
Challenge Solution
To begin with, however, we set a challenge in the last lesson, to create a variable called score, which increases by five 10 times, and then print out the results. To do this, we will create a variable called score and set it to 0 in the _ready function.
func _ready():
    var score = 0
We will then create a for loop which will loop 10 times and increase the score by 5 each time.
func _ready():
    ...

    for i in 10:
        score += 5
Finally, we will print out the final value of score.
func _ready():
    ...

    print(score)
If you now press Play to run the script, you will see a result of 50 in the Output window.
It is now time to begin creating the star system, to do this we will remove the code we added in our Loops.gd script, leaving us with only the following code.
extends Node2D

func _ready():
    pass
Scene Setup
Before writing the code we first need a scene to create from our script. To do this we will drag the Star.png asset into the viewport to create a new sprite.

Make sure that the sprite is named Star and that the Position property is set to (0,0).

Finally, drag the node into the Loops folder to turn it into a scene.

We will name the scene Star.tscn and press Save.

Now that we have created the Star scene we can delete the node in the viewport.

We will also add a Camera2D node to the scene so that we can see the starfield that is generated.

We will also set the Zoom value to (2,2) inside the Inspector.

Generating our Stars
We will now return to our Loops.gd script and create two variables. The first will be called spawn_count, it will be an int and be set to 200 by default, we will also add a @export tag in front so that we can edit the value from the inspector. Our second variable will store our Star scene, we will use the preload function with the path to our Star.tscn file to get this.
@export var spawn_count : int = 200
var star_scene = preload("res://Loops/Star.tscn")
Next, inside the _ready function we will create a for loop that will use the spawn_count variable as the number of iterations. Inside this for loop, we will instantiate the Star scene. Instantiate in game engines is another word for spawning an object in the scene, such as a scene in this case.
func _ready():
    for i in spawn_count:
        var star = star_scene.instantiate()
We then need to add it to our scene tree, as currently it isn’t attached as a child of the root node.
func _ready():
    for i in spawn_count:
        ...

        add_child(star)
For this lesson, we will be using the following values as the boundaries of our starfield:
- X: -280 to 280
- Y: -150 to 150
You can find these values by taking an instance of the Star scene and taking it to the furthest points visible to the Camera2D node (shown by the pink square in the viewport). This will then tell you the furthest possible positions on each axis that we want to spawn our Star scenes at.
To set a random position we will use the randi_range function on each axis of the star.position property. We will set the range in the randi_range function to the values we have found above.
func _ready():
    for i in spawn_count:
        ...

        star.position.x = randi_range(-280, 280)
        star.position.y = randi_range(-150, 150)
Now if you save the script and press the Play button you will see the Star scene instantiated across the game scene in random positions.

To make this look more natural we will add a random size to the stars to give some depth. We will do this by generating a new star_size variable using the randf_range function. We use randf instead of randi here because we want a float instead of an integer. We will then assign the star_size variable to each axis on the star.scale property.
func _ready():
    for i in spawn_count:
        ...

        var star_size = randf_range(0.5, 1.0)
        star.scale.x = star_size
        star.scale.y = star_size
This will improve the look of our starfield by changing the size of some stars randomly.

You can reload the scene as many times as you like and you will get a random starfield every time. You can also change the Spawn Count property on the Main root node from the Index window to change the number of stars that appear.
The final thing we can do is change the Default Clear Color property in the Project Settings to black, which will make our Stars look much more natural.

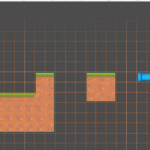
In the next lesson, we will begin work on the Skiing mini-game, which will be our final mini-game, and focus on handling collisions inside Godot.
Conclusion
Congratulations! You have successfully created a randomly generated star system using loops in Godot. This mini-project has showcased how powerful and useful loops can be in game development, both for creating interesting visuals and for optimizing your code. Now that you have a better understanding of loops, feel free to expand on this project or apply the knowledge to your own game ideas.
To further enhance your game development skills, consider checking out other tutorials and courses on topics such as physics, AI, and more. Remember, practice makes perfect, so don’t hesitate to explore new concepts and experiment with different ideas in your game projects. Good luck, and happy game development!
Did you come across any errors in this tutorial? Please let us know by completing this form and we’ll look into it! FINAL DAYS: Unlock coding courses in Unity, Godot, Unreal, Python and more.
Transcript – Loops – Part 1
Hey everyone. In this lesson, we are going to be creating our third mini project, which is based around loops. Now, in this project we are going to be learning about loops, what they are, and how we can use them inside of our games. And then using that knowledge, we are gonna be creating a star system that gets randomly generated in position and size, as you can see here. Now, let’s hop over into Goudeau and have a look at how we can start.
So to begin, we are first of all going to be creating a new 2D scene because this is, of course, gonna be a 2D project. So we’ll create that there. I’m gonna rename this to be called main, our root node. And down in the file system, I’m gonna create a new folder called loops. Okay? And this is where we’re gonna store all of the assets relating to this project.
So we can then save our scene, go to the loops folder here, and I’m gonna save this as loops dot TSC n. There we go. So now in the loops folder, we have that scene saved. And in the course files tab, there should be a downloadable zip file which contains the assets for this course. Now extract that content and inside you should see a loops project folder. And inside of that is a star Sprite. So we’re gonna click and drag that into our file system to import it, drag that into the loops folder. And this is basically the star that we are gonna be using, but we’re not going to be working with any Sprite or visuals just yet. First of all, we need to actually understand what loops are and how we can create them.
So on our main root node here, I’m gonna create a new script called Loops gd. Okay? We’ll create that there. And inside of this script, what we’re going to do is delete the process function since we won’t be needing that. And inside of ready is where we are going to be looking at how we can create a loop. Now, what is a loop? Well, basically a loop is useful for if you need to run a piece of code multiple times, okay? You could go ahead and rewrite it, uh, line off the line, or you could chuck it in a loop and run it, you know, anywhere from one time to a million times.
So let’s just say we want to print a message to the output here, okay? Let’s just say we want to print the word hello. Okay, well, we can of course do that. Press play, and down on the output, it says hello. Now what if we want to say hello 10 times? Well, you know, we could copy, copy that, paste it, you know, as many times as we need. Save it, play. We can see those messages here. But the problem with that is, you know, it’s, not very appealing-looking code. And if we wanna add or remove, it’s gonna be a bit of a hassle. So instead, what we can do is reduce all of this down to only two lines of code, which is going to run this. Print line as many times as we wish. And to do that, we’re gonna write four.
We’re then going to add in a temporary variable, which we’re creating, which we’ll just call I, then we’ll go in and then we enter in a number. So we’ll say 10, add a colon, go to a new line, and then we’ll write down the code that we wanna loop 10 times, save that. We can then press play and down the output. As you can see, it says hello 10 times.
Now what we are doing here is basically when we write four, we are giving a temporary variable here, which is sort of the iteration of the loop, okay? A loop iteration is basically, um, once you call the loop, once you run every, all the code inside of a loop, that is an iteration, then it goes onto the next one, then the next one. And we are basically telling this full loop right here that we want to run this 10 times. So basically, I is gonna be a number, which right now it’s set to zero. We run the loop, we increase it by one. So it’s now one, run it again, two, run it again, so on and so forth until it reaches 10.
So what we can do is replace hello with just the I variable here. Okay? We can run that instead. And you’ll see down here in the output, it says 0 1, 2, 3, 4, 5, 6, 7, 8, 9. So that basically is showing us that every time we run this loop, it is going to increase I by one and run it again.
Now we can do pretty much anything we want with this. We can increase the number to, let’s just say a thousand. So we are running this print line a thousand times, play that, and as you can see in the output here, it is going all the way up to 1000, which is pretty cool. So you can imagine all the interesting things you can do with a fall loop. Then for example, if you’re in a game, um, you can use a fall loop to spawn in hundreds of enemies at once. Okay? You don’t have to go through and specify line by line. I wanna spawn an enemy. Here, here, here, here, you can just use a fall loop.
And it’s also important to note that this fall loop runs within one single frame, okay? Um, so for example, if I then go to a new line outside of the fall loop and print the word, uh, complete, what you’ll notice is that this fall loop will run a thousand times, then it will go onto the next line of code. So if I run this here, you can see the output goes all the way up to a thousand. Then it says complete. Okay? Um, so it is important to note that with a fall loop, it doesn’t run it once, then continue on with the rest of the function code, rather it runs everything inside the fall loop, however many times you have iterated here, and then it moves on with the rest of the code.
So as a bit of a challenge between now and the next lesson, what I want you to do is create a variable here called score. It’ll be equal to zero. And what I want you to do is create a four loop that loops 10 times and increases score by five every iteration of the loop. And then afterward, I want you to print out the final result of score. So have a go at that, and I’ll see you all in the next lesson.
Transcript – Loops – Part 2
Welcome back everyone. In this lesson, we are going to begin starting on our actual star system scene. But first, I left you off of a challenge and that was to create a variable called score, which increases by five 10 times and then print out the results. So for this, I’m going to create a variable called score equals zero and then we’re going to create a for loop that is going to loop 10 times, and every iteration of the loop, we want to increase the score by five. So score plus equals five and then at the end, we want to print out the results and if we press play, we should see that the result is 50.
Okay, so that was just a little challenge right there for you. Now let’s get started on actually making our star system. First of all, I’m just going to delete the code here, add and pass, and then we’re going to go back to our 2D viewport right here and we are going to be creating our star scene.
To create the star scene, I’m going to drag in the star dot PNG and set its position to be zero on the x axis and zero on the y axis. Then, I’m going to rename this to be “Star” and drag this into loops and save it as star. This will be a nice and simple scene. We can then delete that there because we don’t need it anymore.
Next, we’re going to create a camera. I’m going to create a camera 2D and change its zoom so it’s zoomed in a bit. I’ll change the zoom to about 3. Then, let’s just see what it looks like about the Star. Actually, we’ll make the Zoom 2, I reckon. There we go. So we’ve got our camera here, let’s go to Zoom.
Now, we need to have a way of randomly spawning in stars. Let’s go over to our script here and create a variable called spawn_count, and set it to 200. We also want our star scene because we are going to be spawning in our star scene. To do this, we can create a variable here called star scene and this is going to be equal to “preload”. We can find the file path which goes to our star, and this is going to create a reference or a link to the star scene right here and preload it when we start the game.
Now, how do we go about doing that? Well, down here inside of the ready function, we are going to create a for loop that’s going to loop through the number of stars we want to spawn. We instantiate the star scene, and then add it to our scene tree.
Next, we want to give our star a random position. To do this, we need to know the bounds of our environment. We can set a random position for the x axis, and then do the same thing for the y axis. Now, we can save that and press play, and we can see that we have all these random stars in the sky.
We can also give a random size to these stars, so we can create a variable called star_size and set it to a random float between 0.5 and 1. Then, we can set the star’s scale to the star_size, and press play to see the random stars with varying sizes.
Now, we can adjust the spawn count as needed and change the background color to black to make it look more like space.
Interested in continuing? Check out our all-access plan which includes 250+ courses, guided curriculums, new courses monthly, access to expert course mentors, and more!