In this tutorial, you’ll be building a simple skiing game using Godot’s 3D collision system. We will design our scene step by step, starting with setting up the ski slope, creating a player character, and adding some trees as obstacles to avoid. You’ll learn how to create collidable objects, handle collisions between objects in the game, and reload the scene upon a specific event, such as hitting a tree while skiing down the slope.
To follow this tutorial, you are expected to have a basic understanding of the following concepts:
Table of contents
Project Files
While you’ll need to set up your own Godot project, we have included the asset files used in this tutorial. For the tree models, you can choose to create your own or use simple 3D shapes available in Godot.
Download Project Files Here

Collision – Part 1
In this lesson, we are going to start the fourth mini-game project which will focus on Godot’s collision interactions using a skiing game.
Setting up the Scene
As with the other mini-projects, we will start by creating a new scene. This game will be a 3D project, so we will use a 3D root node, which we will name Main.

We will create a new folder called Collision for this project.

Inside the new folder, we will save the scene as Collision.tscn.

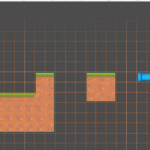
Creating the Ski Slope
We are going to begin by creating our Ski Slope. This will be a StaticBody3D node, which is used for having physical, static objects in a 3D game world.

We can then rename this to Ground to represent its use in the scene.

Next, we will add a MeshInstance3D node as a child of our Ground node.

This will be used to render the mesh to the screen, and we will use a New BoxMesh as the value for the Mesh property.

We will then add a CollisionShape3D to match this.

For the Shape property, we will use a New BoxShape3D value to match the MeshInstance3D node. We then need to change the size of the cube. Select the static body parent, and select the Scale Tool (R). Scale the cube on the X-axis to 12, the Y-axis to 0.3, and the Z-axis to 30.

Then select the Rotate Tool (E), and rotate the Ground node around -20 on the X-axis.
Creating the Player
We now need to create our player. For the parent of our Player, we will use a RigidBody3D node.

We will then add a MeshInstance3D node as a child so that we can see it.

The Mesh property will be a New BoxMesh.

We will be using multiple MeshInstance3D nodes to create a model of our player. For this cube, we want to change the color by adding a New StandardMaterial3D in the Surface Material Override of the mesh instance.

From here we will change the Albedo Color to be a color you like, we will use blue.

From here you can duplicate, resize, rotate, and move the cubes to design your own player character model.
Collision – Part 2
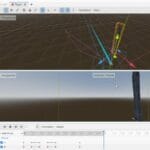
In this lesson, we will be setting up our character’s movement and environment in the game engine Godot. Before doing this, however, in the last lesson, we set the challenge to create a character model using different mesh instances with their own materials. Here is the example we made using five different MeshInstance3D nodes to create our skiing character.

Creating the Player
First, we will create a CollisionShape3D as a child of the RigidBody3D node.

We will make the Shape property a New BoxShape3D to match our character.

We then want to fit this to the bounds of our player model, using the orange circles to scale the box.

We then want to add a Camera3D as another child node of the RigidBody3D node, so that we can track the player down the slope.

Then we want to move and rotate our camera so that it is looking down on our player.

We then want to enable the Current property in the inspector, to tell Godot to use this as the camera for the game window.

Creating the Environment
We will then create a DirectionalLight3D node to provide lighting in our scene.

From here, position the light to shine down on an angle at our player.

Finally, enable the Shadow property of the DirectionalLight3D.

Now, when you press Play you will see the scene is lit and we can see our character.

Currently, however, it doesn’t really look like a skiing environment. To fix this we will use a WorldEnvironment node, which will allow us to change things such as background color, fog, and lots more.

We will create a New Environment for the Environment property.

To begin with, we will change the Mode to Custom Color in the Background tab. We will change this to a light blue hue.

Finally, we will move the RigidBody3D player node to the top of the slope, so that when we press Play it starts at the top.

We will also rename the RigidBody3D node to Player so that we can easily identify it.

To make the Player slide down the slope, we will also add a Physics Material Override value.

We will then set the Friction property to 0 so that our Player slides down the slope.

Now when you press Play you will see the Player slides down the hill as intended.
Creating the Movement
We will then select our Player node and create a script called PlayerMovement.gd, and make sure it inherits from RigidBody3D.

We will delete the _ready and _process functions and create an exported variable called moveSpeed of type float that has a default value of 2.0.
@export var move_speed : float = 2.0
We will then create a function called _physics_process which will detect our key presses. The _physics_process function is useful for physics because it runs at a fixed rate, unlike _process which can change depending on the FPS of the game.
func _physics_process(delta):
We will then set our linear velocity on the x-axis to be negative or positive move_speed depending on whether the left or right arrow key is pressed.
func _physics_process (delta):
    if Input.is_key_pressed(KEY_LEFT):
        linear_velocity.x = -move_speed
    if Input.is_key_pressed(KEY_RIGHT):
        linear_velocty.x = move_speed
Now when you press Play you will be able to move left and right as we ski down the hill.
In the next lesson, we will begin implementing our trees for the Player to collide with.
Did you come across any errors in this tutorial? Please let us know by completing this form and we’ll look into it!

FINAL DAYS: Unlock coding courses in Unity, Godot, Unreal, Python and more.
Collision – Part 3
In this lesson, we will be creating our tree obstacle.
The first step is to create a new StaticBody3D node, which we will call Tree.

We will then add a MeshInstance3D node as a child of Tree.

This will be a Cylinder for the trunk of the tree.

We will then give this brown material to be the color of bark.

From here you can add more MeshInstance3Ds to create leaves on the tree, or alternatively create an entirely different model to be an obstacle.

We also want to add a CollisionShape3D as a child of our tree, so that our Player has something to collide with.

This will be a CylinderShape3D, which we can fit to the bounds of our tree trunk.

We then add a group to our tree node, we will do this in the Node tab with the Tree node selected. We will use a group to add a label to our tree so that we can detect if it is a tree our Player has hit. This will allow us to detect the difference between the Tree’s and the Ground’s StaticBody3D nodes.

We will add a new group to our node with the name Tree.

Finally, we will drag the Tree node into the FileSystem to turn it into a scene, allowing us to edit multiple instances at once. Remember to save the scene in the Collision folder. We will be using the name Tree.tscn.

You can now duplicate (CTRL+D) the obstacles around the level, to give the Player something to dodge as they slide down the slope.

Detecting Collisions
Currently, if you press Play you will notice when you touch a tree nothing happens. To fix this, we will select our Player rigid body node and go to the Signals tab. We can then connect the body_entered signal to our Player node. A signal is a way of calling a function when an event happens, in this case when the Player makes a collision with another object.

In the pop-up window, make sure the Player node is selected and press Connect.

Inside the new _on_body_entered function, we can now check to see if the body that we have collided with is within the Tree group. If so, we then reload the scene.
func _on_body_entered(body):
    if body.is_in_group("Tree"):
        get_tree().reload_current_scene()
Enabling Contact Monitoring
If you press Play now, you will notice nothing happens still. This is because we need to enable the Contact Monitoring property on our Player node.

This will allow us to detect contacts with other colliders. We will also change Max Contacts Reported to 3. This will mean we can track multiple collisions at once, which is necessary as we will have one collision with the ground so we need more than one collision report at a time to be able to hit the trees.

Now if you press Play you will see you can ski down the hill and collide with the Trees, which will reset the Player to the top of the slope. As a challenge, feel free to add a collider at the end to detect when the Player has reached the end of the slope.
That is everything for this mini-game, which has taught us to add colliders to our objects, detect collisions between the objects, and check the type of an object by the groups applied to it.
Conclusion
This tutorial concludes our simple skiing game using Godot’s 3D collision system. We’ve covered how to create collidable objects in the 3D environment, detect and handle collisions between these objects, and reload the scene upon specific events like hitting a tree. While the game is small and simple, you can expand on this concept by adding more obstacles, improving the player movement controls, and even creating a procedural level generation system for endless skiing experience.
You can also explore more advanced game development topics in Godot, such as creating multiplayer games, improving your 3D art skills, or working with more complex physics interactions to keep expanding your game development knowledge and portfolio.
We hope you’ve learned a lot from this tutorial, and we wish you the best of luck in your future game development projects!
Want to learn more? Try our complete GODOT 4 MINI-PROJECTS course.