Hello World! In this post, we’re going to cover the basics of SQLite and databases. SQLite is the main database backend that Android uses to manage complicated data. It provides more structure and functionality than storing data in a file or anywhere else. Database backends are widely used to store data locally on the device and sync with a web server, for example. But before we can do this, we need to learn more about databases and SQLite, which defines it’s own “programming language” and system. We’ll learn about what databases are and how to do basic CRUD (Create, Read, Update, and Delete) operations with them in SQLite.
The database itself can be downloaded here.
Table of contents
Prerequisites
It is highly recommended that this tutorial be followed on a UNIX-based operating system like Linux or Mac OS X. You can download Ubuntu Linux here and a Virtual Machine here to run it on to prevent you from going through the ordeal of dual-booting. While it’s certainly possible to do this whole tutorial on Windows, the commands I’ll be using are UNIX bash commands so having access to a shell is ideal.
We’ll obviously need SQLite! You can download it here and find all kinds of great documentation on the website. We just need the shell executable and not the analyzer. Unzipping the file will give the actual executable. We’ll want to put it in a folder so we have access to it or we can copy it to a more useful directory by running the following terminal command: sudo cp sqlite3 /usr/local/bin and we should be able to access the executable from anywhere. We can test this by running sqlite3 –version and we should get the current version of SQLite.
What is a Database?
A database is an organized collection of information or data. More specifically, SQLite is a relational database, meaning that each datum conforms to a highly-specific format or schema. We can visualize databases as being giant tables, with potentially many rows and columns. However, databases are much more powerful than just spreadsheets because we can do complicated queries to retrieve exactly what data we want, subject to any number of constraints. More concretely, databases are just files that hold this organized data.
Databases primarily consist of many tables; each table is defined by its columns. Each column needs a name and a data type, much like in Java. Each table can then have many hundreds of rows, which each row is a tuple whose elements correspond to the columns. Suppose I had a table whose columns were simply an artist name and an album name, both as text data. Then an example of a row would be (“Led Zeppelin”, “Led Zeppelin IV”). Note that the order that data appears in the tuple must correspond to the order that columns were defined.
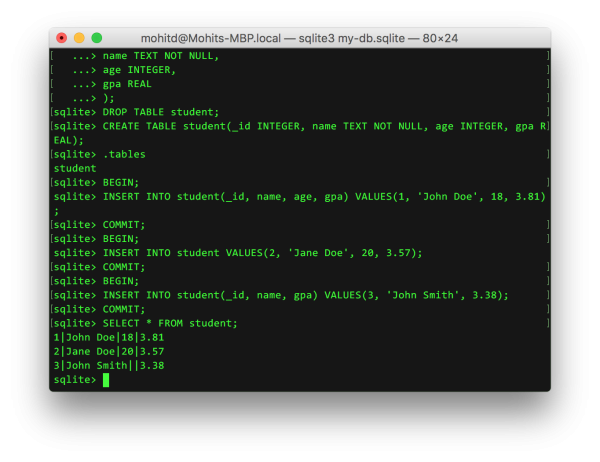
Let’s see what this looks like in action. Open up a terminal and navigate to any directory you want to create the database file in. Then type sqlite3 my-db.sqlite and we should see the SQLite prompt like in the following figure.
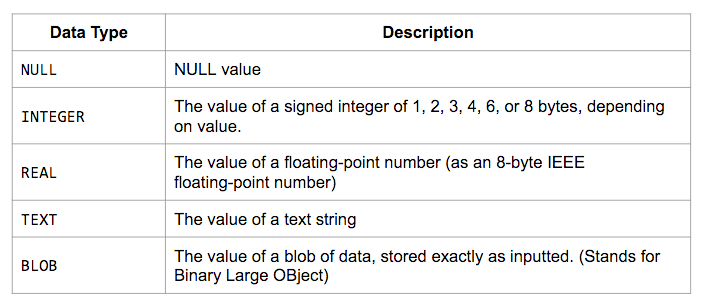
Now that we have a blank database, we can create a table with a very specific schema. But before we do that, we need more information on what the data types for SQLite columns. They’re enumerated in the table below.
In this post, we’ll only be using INTEGER, REAL and TEXT since they’re the most common, but NULL and BLOB exist as well. These data types store exactly what you think they store based on their names: INTEGER, REAL, TEXT. We’ll need to use them when declaring our table and columns. Let’s declare a table called student with an ID, Name, Age, and GPA. This will illustrate using working with all of the common data types. Type the following into SQLite:
CREATE TABLE student(
    _id INTEGER,
    name TEXT NOT NULL,
    age INTEGER,
    gpa REAL
);
The will create the table named students with the given schema. At any time, we can view all of our tables by typing .tables and we can view the full schema for all tables by typing .schema . You’ll notice that the name column has some additional properties. By putting NOT NULL after a column type, we’re telling SQLite that any row inserted into this table must have a value for the name column. There are more helpful properties that we’re going to get to later. You’ll also notice that we have this _id column. It’s common practice to have some identification for each row so we can uniquely identify that particular row for being deleted or updated, for example. Currently, we have to manage this uniqueness ourselves, but when we talk about additional properties at the end of this post, we can actually have SQLite manage this for us.
Create
Now that we have a table, let’s actually add some rows to it! To insert rows, we have to begin a transaction since we’re modifying the database. We can query all we want, but if we’re adding new rows, updating existing rows, or deleting rows, we need to use a transaction to do so. All transactions begin with BEGIN; and end with COMMIT; and we’ll be wrapping all of our potential database changes in these markers like so. Execute the following SQLite commands.
BEGIN;
INSERT INTO student(_id, name, age, gpa) VALUES(1, 'John Doe', 18, 3.81);
COMMIT;
Let’s talk about the insert statement. First we have to say what table we’re inserting rows into! Then comes a comma-delimited list of columns in parentheses that we want to insert into and then the values that we want to insert into those columns. After this, we should have our row inserted into the database! We’ll learn how to read it later, but let’s add a few more rows and go over different styles of insert statements.
The purpose of the above syntax is to specify that we’re going to be inserting exactly these values into these columns of the table. If we’re going to provide values for each column, we can omit the comma-separated list of columns. Execute the following statement:
BEGIN;
INSERT INTO student VALUES(2, 'Jane Doe', 20, 3.57);
COMMIT;
We can see that the columns are omitted and SQLite associates the first value with the first column and so on. This is why the ordering of the columns in the table is important! It allows us to do this kind of shorthand. In addition to this method of inserting, we can insert only values into particular rows. Suppose we wanted to omit one’s age for privacy reasons. As long as that column isn’t marked with the NOT NULL attribute, we can do something like the following. Execute the following statement:
BEGIN;
INSERT INTO student(_id, name, gpa) VALUES(3, 'John Smith', 3.38);
COMMIT;
We can see that we omitted the age column so this row will not have an age if we were to query for it. Note that the age isn’t simply zero; the age doesn’t exist! Now we have 3 rows in our database! Let’s learn how to access these columns next.
Read
Now that we have some data, let’s see how we can query for it. Let’s first retrieve all of rows in our only table. Note that we’re not actually modifying the database, so we won’t need to use a transaction. Instead, we can use a select statement. Execute the following statement: SELECT * FROM student; We should see 3 rows where the columns are delimited by a pipe character |.
The star means to get all of the columns. We can choose to only retrieve specific columns by replacing the asterisk in the select statement with comma-delimited columns names like SELECT name FROM student; and we can only get all of the names. Now suppose we want to retrieve rows that fit a criterion. We can add a where clause and search for more specific data like the following query that only retrieves student names who have a GPA of 3.5 or higher: SELECT name FROM student WHERE gpa >= 3.5;
This only scratches the surface of the kinds of powerful queries we can do with databases!
Update
Suppose we want to make a change to an existing row. We can do that by using the update statement. For example, suppose John Smith did very well in his classes so we need to update his GPA. We can do that using the following.
BEGIN;
UPDATE student SET gpa=3.52 WHERE _id=3;
COMMIT;
Note that this does change the database so we needed to use a transaction. You can see we use the unique id of John to change his GPA. We could also have used the condition where name was John Smith, or, better yet, we could use wildcard characters, but we won’t get into those in this post. After the SET keyword, we could provide any number of columns to change, delimited by commas. Any columns not in the list won’t be changed.
Delete
Suppose we want to delete a row from our database. This is going to look similar to update, except we won’t need any values. Suppose John Smith transferred to another school and we need to remove him from our database.
BEGIN;
DELETE FROM student WHERE _id=3;
COMMIT;
The delete statement is fairly straightforward and will remove any row from our database that satisfies the where clause.
Additional Properties
I mentioned earlier that it’s common to have an ID column where each row can be identified uniquely. We’ve been managing it ourselves, but we can have SQLite do this for us. This happens at database creation though, so we’ll also learn how to safely transfer data between tables so we don’t lose all of our users’ data! First, we’ll rename the old table and create the new one. You’ll notice that we now use the additional attributes PRIMARY KEY and AUTOINCREMENT. The former means that this column holds unique values for each row and the latter means to automatically increment this column if it isn’t given a specific value in the insert statement. Then we copy over all of our data and delete the old table. All of this looks like the following:
BEGIN;
ALTER TABLE student RENAME TO tmp_student;
CREATE TABLE student (_id INTEGER PRIMARY KEY AUTOINCREMENT, name TEXT NOT NULL, age INTEGER, gpa REAL);
INSERT INTO student SELECT * FROM tmp_student;
DROP TABLE tmp_student;
COMMIT;
Now we can use insert statements like INSERT INTO student(name, age, gpa) VALUES(‘Michael Smith’, 20, 3.77) and there will be a new row with an ID that’s one greater than the previous row, even if that row is deleted! We’re guaranteed unique values for rows and PRIMARY KEY helps to enforce that as well.
This technique can be used whenever we want to change our table schema drastically. We can use ALTER TABLE to rename our old table, create a new one with a new schema and copy over all of our old data and remove the old table. This method is safe, secure, and prevents your users from losing all of their data!
Conclusion
In this post, we learned about relational databases (RDBs) and SQLite. We covered the data types of the language and how to create tables. We then learned the basic create, read, update, and delete (CRUD) operations that we can perform. Then we finished with some basic techniques and additional modifiers. SQLite is the backend that Android’s ContentProviders use to store data and they can be synced with data from web servers or other providers.


