Welcome to another exciting tutorial on Unity3D. Today’s lesson will focus on animations within Unity3D. Since animations occur not only in 2D games but 3D games as well, Ive decided to break this up into two separate tutorials. This tutorial will focus on 2D animations, and a subsequent tutorial in the future will discuss 3D animation techniques.
As always, I have broken this tutorial down into two distinct segments. The first segment explaining the basic premise of how animations work within Unity3D, and the second segment will be an actual implementation of animations within a scene that you can control.
become a professional vr game developer with unity
Pre-Order The Complete Virtual Reality Game Development with Unity and learn to create immersive games and experiences by building 10 VR games. The course assumes no prior Unity or VR experience – We’ll teach you C#, Unity and 3D programming from the ground-up
Check it out on Zenva Academy and get Early Access!
Table of contents
Requirements
- A basic understanding of the C# language
- Basic knowledge of the Unity3D editor (see my previous tutorial)
Segment 1: Animation Basics
Unity3D allows for multiple animations to play at the same time in multiple layers or a single animation to play on a base layer. This makes for Unity3D to be extremely flexible in how you can create a game. For example, let’s say you wanted to build a game where you have a ship that tilts left and right according to movement trigger and auto fires constantly. Unity3D’s animation allows you to do this with relative ease.
Let’s explore how to start working with animations in Unity.
Section 1: Setting up the Project
The art used in this tutorial was from http://opengameart.org under the public domain license.
–http://opengameart.org/content/animated-robot-set-png – Without SpriteSheet artwork
–http://opengameart.org/content/ghost-animated – With SpriteSheet artwork
Zip file for the entire project is located here.
To begin, let’s start by opening Unity3D and creating a new project. We will name the project “2D Animations Tutorial”, make sure the 2D option is selected, and we want the Visual Studio 2015/ 2013 tools asset imported.

In the assets folder, let’s make some folders we know we will need from the start. Images, Prefabs, Scenes, and Scripts.
Inside the Images folder, create 2 more folders. Animations and Character.
Just a few more things to add and we will be ready to begin. Inside the Character folder, create 2 more folders. With SpriteSheet and Without SpriteSheet. We will need both for later sections.

Inside the Without SpriteSheet folder, add the robot images. (I dragged the three folders with the images inside of it to keep things organized).


Now, let’s select the With Spritesheet folder and add the Ghost spritesheet to it.

We want the Texture Type to be Sprite( 2D and UI), SpriteMode to be Multiple, Pixels Per Unit to be 1 instead of 100, Generate Mip Maps to be checked, Filter Mode to be Bilinear, Max Size 2048, and Format to be compressed.
After these have been set, click on Apply.

Now, click on the Sprite Editor option underneath Pixels per unit.

On the top of the Sprite Editor Window, select slice. Type should be Automatic, Pivot center, method is delete existing. Click on the button called Slice.
(Note: If for any reason the slice method did not slice the images into their own sprite block, you can manually do this. Simply select somewhere within the editor box and drag, it will create a box that you can modify in size.)
After you are done, click on apply to apply the changes made.

Your Unity3D editor should now look like the image below.

Before we move on to the next section, I want to point out 2 very useful window components for animations within the main Unity3D editor. Animator and Animations.
Click on the Window button and select Animator. You will see why it is important in the next section.

It will appear in its own window, click and drag on the tab above with the name Animator in it. I put it next to my game and Scene tab.

Now, we can do the same thing with the Animation editor view. Click on Window and select the Animation option. Alternatively, you can select Ctrl + 6 / Cmd + 6 (if using Mac OS).

Again, click and drag on the tab. I put it next to the animator.

Section 2: Let’s Make an Animation
Now we can begin with actually making an animated object within Unity3D. So, let’s go back to our With SpriteSheet Folder and minus down the spritesheet image. We want to select images 16 through 19.

And we drag it on the scene view.

It should have the name 16 on it in the hierarchy view. Make sure to have that selected and click on the Animator. It will show you the beginnings of the Animation State Machine you can create.

For convenience purposes, I rename it from 1 to IdleGhost.

We are done with the Animator tab, I just wanted to show a brief preview of how the Animator is displayed. Don’t worry, the next section will deal heavily with using it.Now we can view the Animation tab.

If you click on the right facing arrow next to 16: Sprite, it will give you a brief preview of the actual images used for this animation.

At the top of the Animaton tab, you will notice a box that has the name Samples in it. The original sample rate is 12 and if you play the animation, it is going a bit too fast. Let’s change the sample rate from 12 to 5.

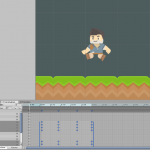
Go back to the scene view and press play. the ghost should now be animated on the screen. That is the overall basics of Animations within Unity3D. Before we go into the next section, let’s finish this off to prepare for the next section.Click on file, New Scene. It will ask you if you want to save the old scene.

Save it in the Scenes folder under the name Scene1.


Section 2: Controlling animations via Scripting
I realized that anyone reading this tutorial would say, “Well, I know how to make an animation, but how do I control it using code?”; And this section will explain it all to you, using the scene we already created to show that. This section will be relatively short and to the point, so if you don’t fully understand it, Segment 2 will show it in more detail with more controls.
To get started, load Scene1 back up. To do this, click on the scene’s folder and double click on Scene1.

Next up, we create a script inside of the Scripts folder and call it GhostlyBehaviour.

Open up the script inside Visual Studio or MonoDevelop and Remove the Start and Update Methods from the editor.Create a public Animator and call it animator. We also want a void Awake method. The awake method should get the component of the Animator from the animator. Your code editor should look like the image below:

Now we want to add a void Update method. This next part is super simple. We take the animator’s transform position which is a Vector 3 location and add to its current position a new Vector 3 to add 1 to its x position.Your code editor should look like this image below.

Go back into Unity3D, make sure the ghost animation is selected from within the Hierarchy pane. And in the inspector either drag the GhostlyBehaviour script onto the inspector or click Add Component, Scripts, GhostlyBehaviour.

Drag the Ghost Animation from the Hierarchy pane to the Animator underneath the Ghostly Behaviour Script. This ties the gameobject to the script and vice versa.

Last step, Change the Ghost’s animation location via the transform position inside of the inspector pane. X should be -45.9, Y should be 0, and Z should also be 0.

Run the program and your ghost should be animated and move across the screen until it is no longer within view and continue that way forever. Congratulations, you have just created a simple animation and controlled it via scripting.
Segment 2: Player controlled Sprite with Animations
This segment will take what we have learned from Segment 1, expand upon it a little and make a scene where you can control the character with the left and right mouse buttons. Although it doesn’t sound very exciting, it will most certainly open doors for creating a full game with the techniques used in this article.
So where do we begin? Well, we always start from the beginning. Remember the new scene we created and then went back to Scene1? If you saved that new scene, go ahead and open that scene up, if not…
Click on new scene to begin. We want to navigate to the Folder WithoutSpriteSheet for this section of the project.
Open the Idle folder and reveal the sprites located within it. Ctrl + A or control click all of the images. Change the Pixels Per Unit to 1 in the Inspector tab. Everything else can stay the same and click apply.

Drag it on the Scene.

Now, you may notice that the sprite is HUGE on the screen, no need to worry about it, we will address that in a moment. Simply click on the Camera on the Hierarchy tab and in the Inspector, change the Size to 1000. Boom, problem solved!

Now, Select the Left folder from within the Without SpriteSheet folder and again, we want to select all of the images and drag them on the scene. (I tend to drag them to the same position as the Idle animation on the scene).
You will see two new files on the screen. One is the Animation Clip and the other is the Animator Controller. We will need these later.

Repeat one last time with the images for Right inside of the Without SpriteSheet folder.

Now we can delete Gold Right and Gold Left from the Hierarchy pane.

Make sure you select Gold Idle 4 and then click on the Animator Pane next to Game. Your screen should roughly look like mine.

Navigate to the right folder inside of the without Spritesheet folder and drag the first item from the list, which is the Gold Right Animation Clip, to the animator.
Repeat for the Left Animation.

Make a transition from Any State to Gold Idle, Gold Right, and Gold Left.

Click on the transition from Any State to Gold Idle. Open the Settings and lets make a couple changes to it. Transition Duration should be set to 0 and Can Transition to Self check mark should be unchecked.

Repeat for transition from Any State to Gold Left

Last time, repeat for Any State to Gold Right.

Next to layers, you should see Parameters, click on that. Then Click on the plus icon just underneath that. We want this to be set as an Integer (Int) and we can leave it set to 0 for now.
Once that is set, click on the transition from Any State to Gold Idle and look in the Inspector pane for Conditions. Add the Condition we created called transitionInt and set it to equals 0.

for Gold Left and Gold Right’s transition from Any State, we repeat but making sure we change the int values to 1 and 2 respectively.


Go back to Scene view. Now create a new script called RobotBehaviour.

Click on Gold Idle 4 inside of the Hierarchy pane and drag your RobotBehaviour script onto the Inspector pane for Gold idle 4.

Open up the script inside of Visual Studio or MonoDevelop. Your code should look like the images below.


Let’s take a moment and discuss the code above. Whenever we call a component, we always want to make sure we get a reference to it. The most effective way to do so is by using a public property. We could have very easily just put this code inside of the update method, although by convention, you want to avoid this.
Instead of doing a generic left and right arrow or specific buttons on the keyboard, I felt that controlling the sprite by mouse movement would be a bit more fun to code. Input is a utility built directly into MonoDevelop and does not use the built in .NET Framework’s capabilities on it.(For those curious about this, they extend upon what was built into the .NET Framework and used their own).
Input.GetKey is a boolean by nature, which is why we can use it inside of an if statement without issue. And we specify which direct boolean we want to compare to, in this case it is KeyCode.Mouse0 (left mouse button) and KeyCode.Mouse1(right mouse button). If neither of these two buttons have been pressed, play the idle animation and do not move. Otherwise, if the right mouse button is pressed, play the right movement animation and move to the right by 1 on the x axis.(Same goes for moving to the left).
Now you can save your scene. Click run and reap the rewards of a job well done! Congratulations, you have now animated a sprite and allowed it to move. You are well on your way to becoming a game developer using Unity3D. Give yourself a pat on the back for a job well done!
As always, if you have any questions or comments about this tutorial please comment below. Alternatively, if you are having any issues learning about a specific portion of Unity3D, comment below and we can make a tutorial on it as soon as possible.