You can access the full course here: The Complete Mobile App Development Course with Flutter
Table of contents
Part 1
Before creating apps in Flutter, you need to install it. To access the official guide, follow the link: https://flutter.dev/docs/get-started/install/windows
From there, download the latest version of Flutter SDK and extract the zip file into your desired location – it can be anywhere, but it’s not recommended to place it into Program Files.
Next, open the Windows search bar and input “env” in there to edit environment variables.
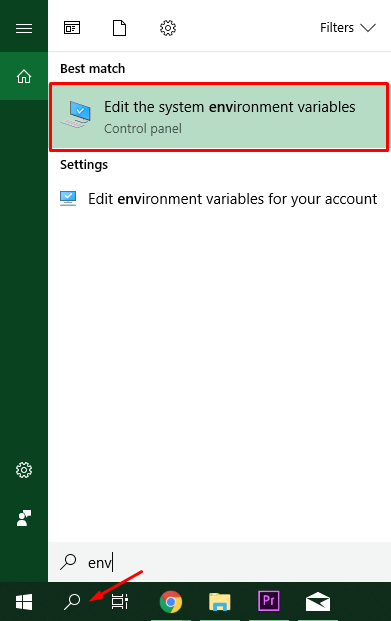
You want to edit the Path variable to contain the Flutter bin folder location.
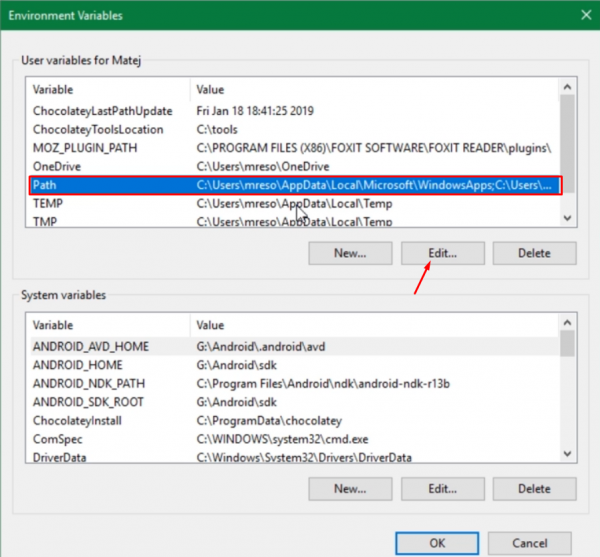
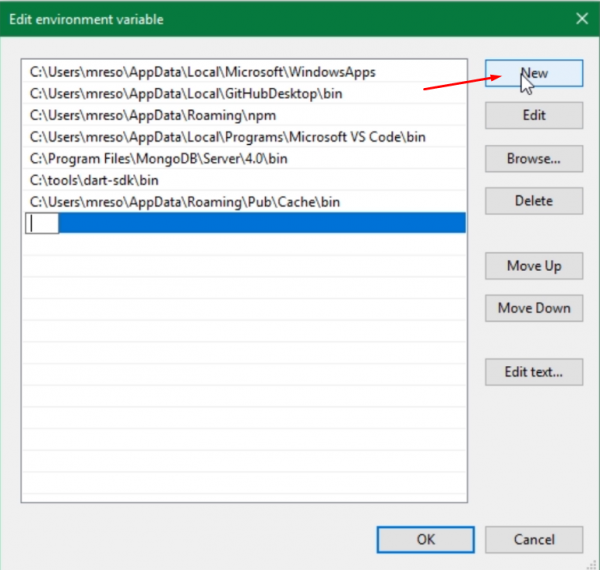
For example, if your Flutter folder is on the C drive, the path to the bin folder would look something like this – C:*your_flutter_folder_location*flutterbin. Paste this location as a new path environment variable so that you can access the flutter command from anywhere in the system.
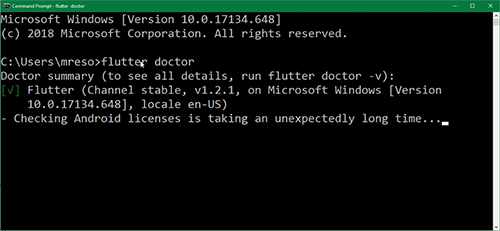
Now open a command line and you should be able to run flutter doctor command which should indicate that you have installed Flutter correctly. Don’t worry about some other errors which it may output, we are going to deal with them later by installing Android SDK.
Part 2
Before creating apps in Flutter, you need to install it. To access the official guide, follow the link: https://flutter.dev/docs/get-started/install/macos
Download the Flutter SDK zip file and extract it anywhere. Then, proceed to add “flutter” to the bash profile – as explained in the linked docs or in the video. Once you’ve done that, open a terminal and run flutter doctor. This command will output the “health” of your Flutter installation. It should indicate that it is installed correctly.
You might get an error saying that Android Studio is not installed. Don’t worry about that, you are going to install it in the next lesson.
Part 3
First, download Android Studio from this link https://developer.android.com/studio
Even though you aren’t going to use Android Studio as your development environment in this course, it comes with Android SDK which is needed for Flutter development.
Flutter can create iOS apps too – all from a single codebasedeveloper.android.com/studio. However, because Android emulator can run both on Windows and MacOS, this course will deal with developing for Android. After you finish the Android app, you can run the same app on iOS very easily without changing a single line of code.
Proceed through the installation wizard as usual with the default settings. After opening Android Studio for the first time, you will be prompted to select an installation type. Choose “standard”.
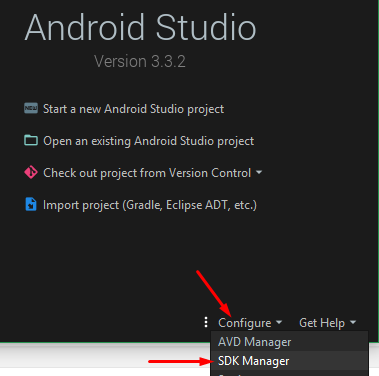
Continue by installing and/or updating certain Android SDK components by clicking on Configure -> SDK Manager.
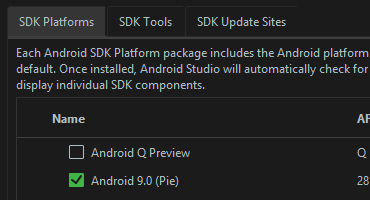
Install an SDK platform (the latest is recommended).
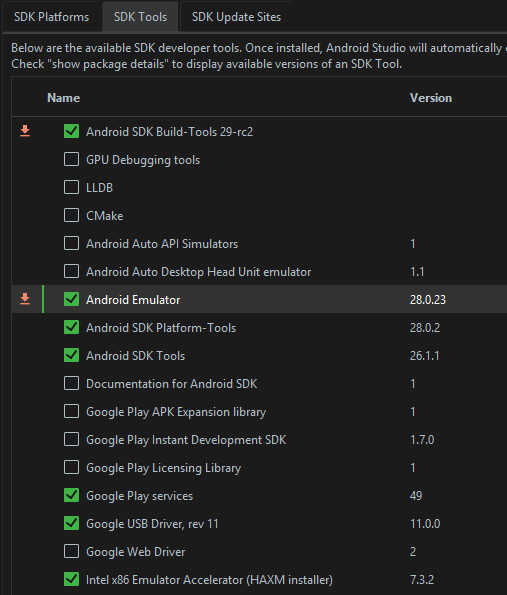
Install SDK tools which you see in the following screenshot.
Once you have that, hit the Apply button, open a command line and run flutter doctor again. This time, you should have a green checkmark next to the Android installation too.
Transcript 1
Hello and welcome to this course. First off, we’re going to start by installing Flutter SDK on Windows, and then there will be also a part about installing Flutter on Mac.
So first, let’s go to Flutter.dev, and once you are here at this URL, you want to click on get started. Now, we are going to select Windows, and we are going to actually follow along this Windows install guide. We can see that they have some system requirements. I think that probably every single one of you should fulfill these requirements, because they are pretty low. Flutter does not need the power horse of a PC to develop in.
And now we are getting to the interesting stuff, which is getting the Flutter SDK. You want to download this Flutter SDK by just clicking this button. It’s going to download a zip file, and you want to put it somewhere where you are later going to extract it. For me, that somewhere is a place called Flutter on local disk C, on the main drive. So there is a folder called Flutter, and over there, you want to download this zip file (I have already done that) Just wait until it downloads, and you’re going to be good to go.
Now the next step as it says here is that you want to extract the zip file and place the contained Flutter in the desired location for the Flutter SDK. And since we have already downloaded this zip file into a folder, which is created by us, not just into a classic download folder but into an actual folder where you want to put that SDK, you can extract it right inside that folder where you have downloaded it. And by the way, for zip files, I recommend 7zip. This zip file contains a single folder nested, and you want to take this folder and drag it out of here, wait until it extracts, and you are going to be left with a Flutter folder right here.
Now the next step here says that we want to locate flutter_console.bat and start it by double-clicking. We are actually not going to do that, because we are going to go to the next step, which is updating our path. And path is used so that we can call Flutter commands from anywhere in the system. So no matter in which folder you open your command prompt, you can still run Flutter commands, which is pretty important, because we are going to be creating projects- Flutter projects- all over the place and not just in this Flutter folder on the C drive.
To update the path, you want to Start search bar and type ‘env’ as it writes here, which stands for environment, so edit the system environment variables. Once you are here, you want to edit environment variables. And here is one important variable called Path. You want to edit that. And by the way, if you do not have a path, you want to create a new variable, call it Path, and then paste the value, which I am going to be placing in the editing of the path, right inside variable value here.
So, but if you have path (if you are a developer, you probably have path from other development environments and from other things), so we just want to edit it if you have it. I already have this C:\FlutterFlutterbin. I am just going to delete it for demonstration purposes. And you want to create new. And the path is the path to the Flutterbin folder. In our case, the Flutterbin folder is located under C, Flutter, with capital F, flutter with lowercase F, and bin. So just copy this. And we’re going to paste it as a new path here. Now hit okay. And the path is saved.
By doing this, we can open up any old console, and we are gonna be able to run Flutter Doctor. Flutter Doctor is a tool which will tell you what you have or what you have not set up properly in order to Flutter to be able to run and build projects, which is a pretty cool feature of Flutter that it immediately tells you what you have wrong set up on your system.
So let’s go to CMB, and we are going to run Flutter Doctor. And we’re going to be left with an output saying that we have flutter channel stable version 1.2.1, and by the way, this course will work completely fine with any kind of Flutter version, because Flutter is now stable, so there will not be any breaking changes.
And then it says that we do have Android toolchain, which you will probably not have, because we have, if you are not already an Android developer, because we have not yet set up Android, so you will have a red cross here next to Android toolchain. You probably won’t have even Android Studio, unless you are an Android developer as I’ve already said. And you’re probably not going to have VS Code. But you should have this green check mark alongside Flutter Channel stable.
So now we know that the path is set up properly, because we can call Flutter Doctor from any kind of a place in our system. And let’s move on to setting up Android.
Transcript 2
Hey, everyone. This video’s going to show you how to install the Flutter SDK on your macOS device.
So the first thing you want to do is go to the Flutter website and navigate to the macOS install page. Here, you want to scroll down and click on the download link to download the zip. I’ve already downloaded it. When it does download, it’ll either be in a zip file or already unzipped. So if it is in a zip file, just unzip it. I’ve placed my Flutter folder over here in the documents. It doesn’t matter where you place it, you can place it wherever, but I find it just easier to put it in the documents.
Alright, the first thing you want to do is go to our Finder and navigate to our user drive here. What we want to do is figure out if we have the dot bash profile file, which contains all of our environmental variables. Now, to see that (it’s actually a hidden file), what we need to do is hold down shift, command, and full stop. This should then show all of the hidden folders and files. As you can see, we don’t have a .bash_profile file, so we’ll need to create it.
Alright, so we want to open up the Terminal, and we want to navigate to our home directory. To do that, we can just type cd space tilde and then a forward slash. This will change the directory to our home drive, and we can now start to create our bash profile. To do that, we can type touch and then .bash_profile, and this will create the profile inside of our home drive, as seen here.
Now with that done, we need to add our environmental variable for the Flutter SDK. To add these variables to the bash profile, we need to type nano ~/.bash_profile. Press enter and then it should open up in this kind of text editor here. What we want to type in is PATH=~/Documents /flutter/bin and then we want to do a :$PATH. Now to save it and exit, we can just go control x and then press enter. Now we should have our environmental variable added to the bash profile, and we’re ready to go.
All that’s left to do is first of all, actually run the bash profile so that the changes are saved. So for that, we can go source, and then just enter in the directory for the bash profile. Press enter and this will just run it behind the scenes and pretty much just assign those environmental variables for us to use. As you can see, if we open up our bash profile, we now have our path added to it.
Now, to get Flutter working, we just need to go back to the Terminal and type in Flutter Doctor, and this will just launch the set-up for the Flutter SDK. We have a welcome to Flutter message here and now the doctor summary (which is basically all of the stuff we have installed and don’t have installed) will be displayed to us now. So as you can see, we have this list of different items here. We have the Flutter, which is what we just installed. And that has a tick next to it.
The only other thing we need is the Android toolchain, which, if you’re not already an Android developer, you won’t have. But this will be explained in a future lesson. All we need to make sure is that we have Flutter installed, which, at the moment here, it is. So just make sure you have Flutter ticked and you should be good to go for the next lesson.
Transcript 3
Next on this page we have Android setup and this is, by the way, valid for both Windows and Mac because Android is cross-platform- and even the installation process is cross-platform.
So we wanna start up by downloading and installing Android Studio. So we are going to be taken to the developer.android.com/studio page and we wanna download Android Studio, the latest version which is currently 3.3.2. And by the way, we are not going to be using Android Studio as our development environment. But we need to have Android Studio fully setup so that we can utilize the Android Toolchain, because actually Flutter apps are not just running on Flutter itself. They’re running on Android or iOS or, in the future, they will even be able to run on the web with project Hummingbird. But as of speaking, they cannot run on the web, so let’s just focus on Android and iOS.
So let’s download Android Studio for Windows (and the same process that I already said applies to Mac). I also have a separate folder on local disk C for Android Studio versions, so let’s just download that file over there. It has almost one gigabyte, but the download is pretty fast here so that’s cool. In the meantime, we can return to the previous page which is the Flutter setup.
Okay, once the Android Studio setup is downloaded, we wanna open the folder where it is. Now download it and we wanna start it. By doing this, I will already have three Android Studio versions installed in my machine, but what am I not going to do for you guys. So we wanna just click on Next as always. Then we want to install both Android Studio and Android Virtual Device. Then you wanna select the location for the installation of Android Studio. I am going to choose the C folder, Android Studio. And under that, I wanna create a new folder which will be just flutter_course, because I really do not need a real Android Studio installation.
Oh, it did not save the folder name, so flutter_course here, Android Studio flutter_course. So let’s put that Android Studio installation there. Now just click on Next. We are going to create a shortcut, alright. And it’s going to be all nicely installed. So even though we are not gonna be using Android Studio as our development environment, we need it for Android SDK. We’re not gonna use it, because I feel that the VS Code, Visual Studio Code, is a much better development environment for Flutter, because it’s lightweight. It doesn’t take up like, it doesn’t stutter, and overall, the experience in VS Code is just much better.
But now, let’s click on Next and we wanna start Android Studio- this new installation. Otherwise, the Android Studio executable is right under the bin folder. And actually by installing Android Studio, you’ve also installed Android SDK. But just to make sure that SDK is configured properly, you wanna click on this configure button. Go to SDK Manager. And you’re going to be taken to Android SDK tab. And just make sure that you have at least one Android SDK setup here. So I have Android nine, Android P Preview, Android 8.0 Oreo. Just click on these check marks and then also SDK Tools. You wanna make sure that you have Android SDK Build Tools, Android Emulator, the latest version.
And actually, we can update these versions even now because I have some out of date versions. So Android Emulator, Android SDK Platform-Tools, Android SDK Tools, they’re really important. You wanna have them definitely along with the Build-Tools. And actually, we are going to fully setup Android Emulator later, just now make sure that you have this package downloaded here. And then you also want to install Intel x86 Emulator Accelerator so that the Emulators are actually much faster. And then you are probably good to go. You can just download Support Repository if you want to, and Google Play services, and hit Apply.
You are going to be prompted to allow the installation and accept licenses in case you have not yet accepted them. And it’s all going to be installed in your SDK path, which was set up while installing Android Studio. So actually, here, you do not need to set up your path manually as you have to with Flutter. Because Flutter setup was really just extracting a zip file. But here, Android Studio has a complete executable installer, so it takes care of everything for you. Now, you’re gonna be prompted to set up the minimum amount of RAM for the Intel HAXM Accelerators- so two gigabytes is fine if you have that preselected.
Once we have Android SDK successfully downloaded and setup, we can check if everything was successful by running the Flutter Doctor command. So let’s go to the command line and run Flutter Doctor once again. And now, even you should have Android Toolchain with a green check mark next to it, because now we actually have it installed unless you were previously an Android developer. You will also have a check mark next to Android Studio. And you will still not have VS Code because we are going to install it later on.
What we need to setup next is the Android Emulator.
Interested in continuing? Check out the full The Complete Mobile App Development Course with Flutter course, which is part of our Android Development Mini-Degree.
